Récemment, en expérimentant GTK et ses liaisons Ruby, j'ai décidé d'écrire un tutoriel présentant cette fonctionnalité. Dans cet article, nous allons créer une application ToDo simple (quelque chose comme ce que nous avons créé avec Ruby on Rails) en utilisant le gtk3 gem (alias les liaisons GTK+ Ruby).
Vous pouvez trouver le code du tutoriel sur GitHub.
Qu'est-ce que GTK+ ?
D'après le site Web de GTK+ :
GTK+, ou GIMP Toolkit, est une boîte à outils multiplateforme permettant de créer des interfaces utilisateur graphiques. Offrant un ensemble complet de widgets, GTK+ convient aux projets allant des petits outils ponctuels aux suites d'applications complètes.
Le site explique également pourquoi GTK+ a été créé :
GTK+ a été initialement développé et utilisé par GIMP, le programme de manipulation d'images GNU. Il s'appelle "The GIMP ToolKit" afin que les origines du projet soient mémorisées. Aujourd'hui, il est plus communément connu sous le nom de GTK+ et est utilisé par un grand nombre d'applications, y compris le bureau GNOME du projet GNU.
Prérequis
GTK+ :
Contenu associé
Assurez-vous que GTK+ est installé. J'ai développé l'application du didacticiel dans Ubuntu 16.04, sur laquelle GTK+ (version 3.18) est installé par défaut.
Vous pouvez vérifier votre version avec la commande suivante : dpkg -l libgtk-3-0 .
Rubis :
Vous devriez avoir Ruby installé sur votre système. J'utilise RVM pour gérer plusieurs versions de Ruby installées sur mon système. Si vous souhaitez également faire cela, vous pouvez trouver les instructions d'installation de RVM sur sa page d'accueil et les instructions d'installation des versions de Ruby (alias Rubies) sur la page de documentation associée.
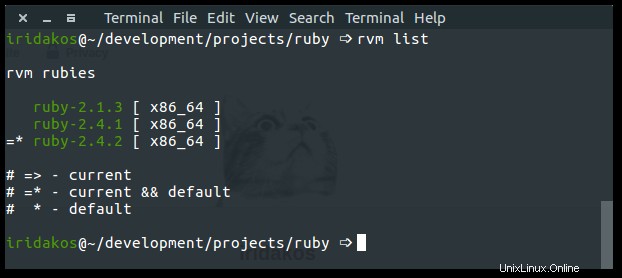
Ce tutoriel utilise Ruby 2.4.2. Vous pouvez vérifier votre version en utilisant ruby --version ou via RVM avec rvm list .
Clairière :
Selon le site Web de Glade, "Glade est un outil RAD permettant de développer rapidement et facilement des interfaces utilisateur pour la boîte à outils GTK+ et l'environnement de bureau GNOME."
Nous utiliserons Glade pour concevoir l'interface utilisateur de notre application. Si vous êtes sur Ubuntu, installez glade avec sudo apt install glade .
Gemme GTK3 :
Cette gemme fournit les liaisons Ruby pour la boîte à outils GTK+. En d'autres termes, cela nous permet de parler à l'API GTK+ en utilisant le langage Ruby.
Installez le gem avec gem install gtk3 .
Définir les spécifications de l'application
L'application que nous allons créer dans ce didacticiel :
- Disposer d'une interface utilisateur (c'est-à-dire une application de bureau)
- Autoriser les utilisateurs à définir diverses propriétés pour chaque élément (par exemple, la priorité)
- Autoriser les utilisateurs à créer et modifier des éléments ToDo
- Tous les éléments seront enregistrés sous forme de fichiers dans le répertoire personnel de l'utilisateur dans un dossier nommé
.gtk-todo-tutorial
- Tous les éléments seront enregistrés sous forme de fichiers dans le répertoire personnel de l'utilisateur dans un dossier nommé
- Autoriser les utilisateurs à archiver les éléments ToDo
- Les éléments archivés doivent être placés dans leur propre dossier appelé
archived
- Les éléments archivés doivent être placés dans leur propre dossier appelé
Structure de l'application
gtk-todo-tutorial # root directory

  |-- application

    |-- ui # everything related to the ui of the application

    |-- models # our models

    |-- lib # the directory to host any utilities we might need

  |-- resources # directory to host the resources of our application

  gtk-todo # the executable that will start our application
Construire l'application ToDo
Initialisation de l'application
Créez un répertoire pour enregistrer tous les fichiers dont l'application aura besoin. Comme vous pouvez le voir dans la structure ci-dessus, j'ai nommé le mien gtk-todo-tutorial .
Créez un fichier nommé gtk-todo (c'est vrai, pas d'extension) et ajoutez ce qui suit :
#!/usr/bin/env ruby
require 'gtk3'
app = Gtk::Application.new 'com.iridakos.gtk-todo', :flags_none
app.signal_connect :activate do |application|
window = Gtk::ApplicationWindow.new(application)
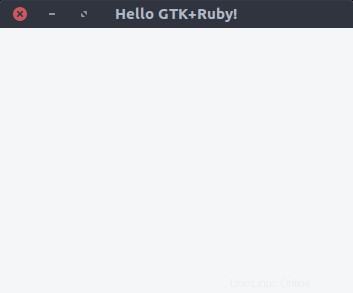
window.set_title 'Hello GTK+Ruby!'
window.present
end
puts app.run
Ce sera le script qui lancera l'application.
Notez le shebang (#! ) en première ligne. C'est ainsi que nous définissons quel interpréteur exécutera le script sous les systèmes d'exploitation Unix/Linux. De cette façon, nous n'avons pas à utiliser ruby gtk-todo; nous pouvons simplement utiliser le nom du script :gtk-todo .
Ne l'essayez pas encore, car nous n'avons pas changé le mode du fichier pour qu'il soit exécutable. Pour ce faire, tapez la commande suivante dans un terminal après avoir navigué jusqu'au répertoire racine de l'application :
chmod +x ./gtk-todo # make the script executable Depuis la console, exécutez :
./gtk-todo # execute the script
Remarques :
- L'objet d'application que nous avons défini ci-dessus (et tous les widgets GTK+ en général) émettent des signaux pour déclencher des événements. Une fois qu'une application commence à s'exécuter, par exemple, elle émet un signal pour déclencher le
activateun événement. Tout ce que nous avons à faire est de définir ce que nous voulons qu'il se passe lorsque ce signal est émis. Nous avons accompli cela en utilisant lesignal_connectméthode d'instance et en lui passant un bloc dont le code sera exécuté lors de l'événement donné. Nous le ferons souvent tout au long du didacticiel. - Lorsque nous avons initialisé le
Gtk::Applicationobjet, nous avons passé deux paramètres :com.iridakos.gtk-todo:Il s'agit de l'identifiant de notre application et, en général, il doit s'agir d'un identifiant de style DNS inversé. Vous pouvez en savoir plus sur son utilisation et les meilleures pratiques sur le wiki de GNOME.:flags_none:Ce drapeau définit le comportement de l'application. Nous avons utilisé le comportement par défaut. Découvrez tous les drapeaux et les types d'applications qu'ils définissent. Nous pouvons utiliser les drapeaux équivalents Ruby, tels que définis dansGio::ApplicationFlags.constants. Par exemple, au lieu d'utiliser:flags_none, nous pourrions utiliserGio::ApplicationFlags::FLAGS_NONE.
Supposons que l'objet application que nous avons créé précédemment (Gtk::Application ) avait beaucoup de choses à faire lorsque le activate signal a été émis ou que nous voulions nous connecter à plus de signaux. Nous finirions par créer un énorme gtk-todo fichier de script, ce qui le rend difficile à lire/maintenir. Il est temps de refactoriser.
Comme décrit dans la structure de l'application ci-dessus, nous allons créer un dossier nommé application et sous-dossiers ui , models , et lib .
- Dans l'
uidossier, nous placerons tous les fichiers liés à notre interface utilisateur. - Dans les
modelsdossier, nous placerons tous les fichiers liés à nos modèles. - Dans la
libdossier, nous placerons tous les fichiers qui n'appartiennent à aucune de ces catégories.
Nous allons définir une nouvelle sous-classe de Gtk::Application classe pour notre application. Nous allons créer un fichier nommé application.rb sous application/ui/todo avec le contenu suivant :
module ToDo

  class Application < Gtk::Application

    def initialize

      super 'com.iridakos.gtk-todo', Gio::ApplicationFlags::FLAGS_NONE


      signal_connect :activate do |application|

        window = Gtk::ApplicationWindow.new(application)

        window.set_title 'Hello GTK+Ruby!'

        window.present

      end

    end

  end

end
Nous allons changer le gtk-todo script en conséquence :
#!/usr/bin/env ruby


require 'gtk3'


app = ToDo::Application.new


puts app.run
Beaucoup plus propre, n'est-ce pas ? Ouais, mais ça ne marche pas. Nous obtenons quelque chose comme :
./gtk-todo:5:in `<main>': uninitialized constant ToDo (NameError)
Le problème est que nous n'avons requis aucun des fichiers Ruby placés dans l'application dossier. Nous devons modifier le fichier de script comme suit et l'exécuter à nouveau.
#!/usr/bin/env ruby


require 'gtk3'


# Require all ruby files in the application folder recursively

application_root_path = File.expand_path(__dir__)

Dir[File.join(application_root_path, '**', '*.rb')].each { |file| require file }


app = ToDo::Application.new


puts app.run
Maintenant ça devrait aller.
Ressources
Au début de ce tutoriel, nous avons dit que nous utiliserions Glade pour concevoir l'interface utilisateur de l'application. Glade produit xml fichiers avec les éléments et attributs appropriés qui reflètent ce que nous avons conçu via son interface utilisateur. Nous devons utiliser ces fichiers pour notre application afin d'obtenir l'interface utilisateur que nous avons conçue.
Ces fichiers sont des ressources pour l'application, et le GResource L'API fournit un moyen de les emballer tous ensemble dans un fichier binaire auquel il est ensuite possible d'accéder depuis l'intérieur de l'application avec des avantages, par opposition à la gestion manuelle des ressources déjà chargées, de leur emplacement sur le système de fichiers, etc. En savoir plus sur le GResource API.
Décrire les ressources
Tout d'abord, nous devons créer un fichier décrivant les ressources de l'application. Créez un fichier nommé gresources.xml et placez-le directement sous les resources dossier.
<?xml version="1.0" encoding="UTF-8"?>

<gresources>

  <gresource prefix="/com/iridakos/gtk-todo">

    <file preprocess="xml-stripblanks">ui/application_window.ui</file>

  </gresource>

</gresources>
Cette description indique essentiellement :"Nous avons une ressource qui se trouve sous le ui répertoire (relatif à ce xml file) avec le nom application_window.ui . Avant de charger cette ressource, veuillez supprimer les blancs." Bien sûr, cela ne fonctionnera pas encore, puisque nous n'avons pas créé la ressource via Glade. Ne vous inquiétez pas cependant, une chose à la fois.
Remarque :Les xml-stripblanks la directive utilisera le xmllint commande pour supprimer les blancs. Dans Ubuntu, vous devez installer le package libxml2-utils .
Construire le fichier binaire des ressources
Pour produire le fichier de ressources binaires, nous allons utiliser un autre utilitaire de la bibliothèque GLib appelé glib-compile-resources . Vérifiez si vous l'avez installé avec dpkg -l libglib2.0-bin . Vous devriez voir quelque chose comme ceci :
ii libglib2.0-bin 2.48.2-0ubuntu amd64 Programs for the GLib library
Sinon, installez le package (sudo apt install libglib2.0-bin dans Ubuntu).
Construisons le fichier. Nous ajouterons du code à notre script afin que les ressources soient construites à chaque fois que nous l'exécuterons. Changez le gtk-todo script comme suit :
#!/usr/bin/env ruby


require 'gtk3'

require 'fileutils'


# Require all ruby files in the application folder recursively

application_root_path = File.expand_path(__dir__)

Dir[File.join(application_root_path, '**', '*.rb')].each { |file| require file }


# Define the source & target files of the glib-compile-resources command

resource_xml = File.join(application_root_path, 'resources', 'gresources.xml')

resource_bin = File.join(application_root_path, 'gresource.bin')


# Build the binary

system("glib-compile-resources",

       "--target", resource_bin,

       "--sourcedir", File.dirname(resource_xml),

       resource_xml)


at_exit do

  # Before existing, please remove the binary we produced, thanks.

  FileUtils.rm_f(resource_bin)

end


app = ToDo::Application.new

puts app.run
Lorsque nous l'exécutons, voici ce qui se passe dans la console :nous le corrigerons plus tard :
/.../gtk-todo-tutorial/resources/gresources.xml: Failed to locate 'ui/application_window.ui' in any source directory. Voici ce que nous avons fait :
- Ajout d'un
requireinstruction pourfileutilsbibliothèque afin que nous puissions l'utiliser dans leat_exitappeler - Défini les fichiers source et cible de
glib-compile-resourcescommande - Exécuté les
glib-compile-resourcescommande - Définissez un crochet pour que le fichier binaire soit supprimé avant de quitter le script (c'est-à-dire avant la fermeture de l'application) afin qu'il soit à nouveau construit la prochaine fois
Charger le fichier binaire des ressources
Nous avons décrit les ressources et les avons regroupées dans un fichier binaire. Nous devons maintenant les charger et les enregistrer dans l'application pour pouvoir les utiliser. C'est aussi simple que d'ajouter les deux lignes suivantes avant le at_exit crochet :
resource = Gio::Resource.load(resource_bin)

Gio::Resources.register(resource)
C'est ça. Désormais, nous pouvons utiliser les ressources de n'importe où dans l'application. (Nous verrons comment plus tard.) Pour l'instant, le script échoue car il ne peut pas charger un binaire qui n'est pas produit. Être patient; nous arriverons bientôt à la partie intéressante. En fait maintenant.
Conception de la fenêtre principale de l'application
Présentation de Glade
Pour commencer, ouvrez Glade.

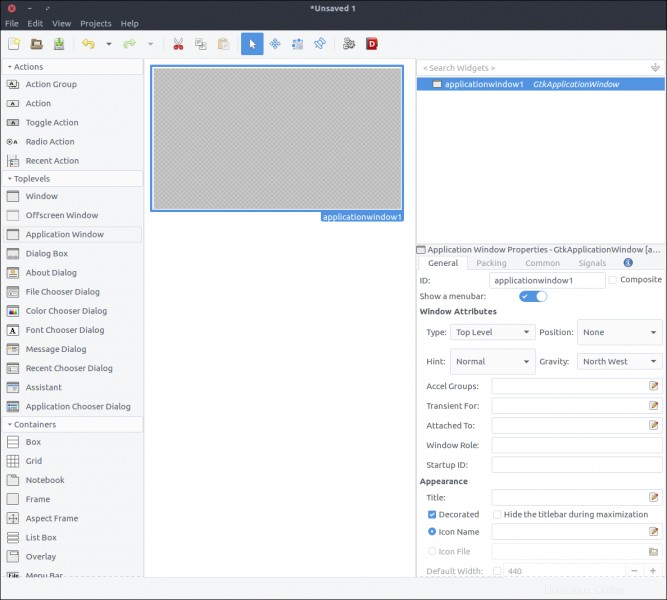
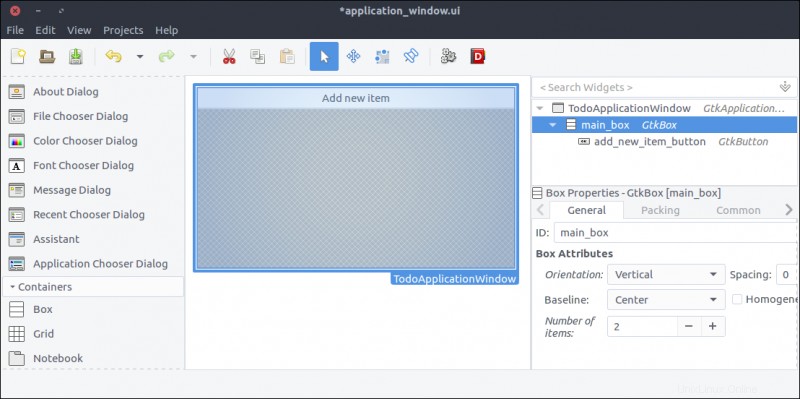
Voici ce que nous voyons :
- Sur la gauche, il y a une liste de widgets qui peuvent être glissés et déposés dans la section du milieu. (Vous ne pouvez pas ajouter une fenêtre de niveau supérieur à l'intérieur d'un widget d'étiquette.) J'appellerai cela la section Widget .
- La section du milieu contient nos widgets tels qu'ils apparaîtront (la plupart du temps) dans l'application. J'appellerai cela la section Design .
- Sur la droite se trouvent deux sous-sections :
- La section supérieure contient la hiérarchie des widgets tels qu'ils sont ajoutés à la ressource. J'appellerai cela la section Hiérarchie .
- La section inférieure contient toutes les propriétés qui peuvent être configurées via Glade pour un widget sélectionné ci-dessus. J'appellerai cela la section Propriétés .
Je décrirai les étapes de création de l'interface utilisateur de ce didacticiel à l'aide de Glade, mais si vous êtes intéressé par la création d'applications GTK+, vous devriez consulter les ressources et didacticiels officiels de l'outil.
Créer le design de la fenêtre de l'application
Créons la fenêtre d'application en faisant simplement glisser la Application Window widget de la section Widget à la section Design.
Gtk::Builder est un objet utilisé dans les applications GTK+ pour lire les descriptions textuelles d'une interface utilisateur (comme celle que nous allons construire via Glade) et construire les objets widgets décrits.
La première chose dans la section Propriétés est le ID , et il a une valeur par défaut applicationWindow1 . Si nous laissons cette propriété telle quelle, nous créerons plus tard un Gtk::Builder via notre code qui chargerait le fichier produit par Glade. Pour obtenir la fenêtre de l'application, nous devrions utiliser quelque chose comme :
application_window = builder.get_object('applicationWindow1')


application_window.signal_connect 'whatever' do |a,b|

...
La application_window l'objet serait de classe Gtk::ApplicationWindow; ainsi, tout ce que nous devions ajouter à son comportement (comme définir son titre) se produirait en dehors de la classe d'origine. De plus, comme indiqué dans l'extrait ci-dessus, le code pour se connecter au signal d'une fenêtre serait placé dans le fichier qui l'a instancié.
La bonne nouvelle est que GTK+ a introduit une fonctionnalité en 2013 qui permet la création de modèles de widgets composites, qui (entre autres avantages) nous permettent de définir la classe personnalisée pour le widget (qui dérive éventuellement d'un GTK::Widget classe en général). Ne vous inquiétez pas si vous êtes confus. Vous comprendrez ce qui se passe après avoir écrit du code et vu les résultats.
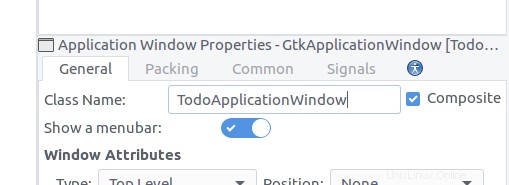
Pour définir notre design comme modèle, cochez le Composite case à cocher dans le widget de propriété. Notez que l'ID propriété changée en Class Name . Remplissez TodoApplicationWindow . C'est la classe que nous allons créer dans notre code pour représenter ce widget.
Enregistrez le fichier sous le nom application_window.ui dans un nouveau dossier nommé ui dans les resources . Voici ce que nous voyons si nous ouvrons le fichier depuis un éditeur :
<?xml version="1.0" encoding="UTF-8"?>

<!-- Generated with glade 3.18.3 -->

<interface>

  <requires lib="gtk+" version="3.12"/>

  <template class="TodoApplicationWindow" parent="GtkApplicationWindow">

    <property name="can_focus">False</property>

    <child>

      <placeholder/>

    </child>

  </template>

</interface>
Notre widget a une classe et un attribut parent. Suivant la convention d'attribut de la classe parent, notre classe doit être définie dans un module nommé Todo . Avant d'en arriver là, essayons de démarrer l'application en exécutant le script (./gtk-todo ).
Ouais! Ça commence !
Créer la classe de fenêtre d'application
Si nous vérifions le contenu du répertoire racine de l'application lors de l'exécution de l'application, nous pouvons voir le gresource.bin déposer là-bas. Même si l'application démarre correctement car la corbeille de ressources est présente et peut être enregistrée, nous ne l'utiliserons pas encore. Nous allons toujours lancer un Gtk::ApplicationWindow ordinaire dans notre application.rb dossier. Il est maintenant temps de créer notre classe de fenêtre d'application personnalisée.
Créez un fichier nommé application_window.rb dans application/ui/todo dossier et ajoutez le contenu suivant :
module Todo
class ApplicationWindow < Gtk::ApplicationWindow
# Register the class in the GLib world
type_register
class << self
def init
# Set the template from the resources binary
set_template resource: '/com/iridakos/gtk-todo/ui/application_window.ui'
end
end
def initialize(application)
super application: application
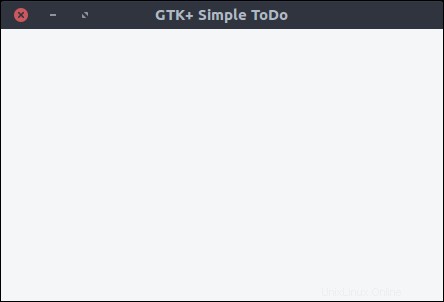
set_title 'GTK+ Simple ToDo'
end
end
end
Nous avons défini le init méthode en tant que méthode singleton sur la classe après l'ouverture de la eigenclass afin de lier le modèle de ce widget au fichier de ressources précédemment enregistré.
Avant cela, nous appelions le type_register méthode de classe, qui enregistre et met à disposition notre classe de widgets personnalisés à la GLib monde.
Enfin, chaque fois que nous créons une instance de cette fenêtre, nous définissons son titre sur GTK+ Simple ToDo .
Revenons maintenant à application.rb fichier et utilisez ce que nous venons d'implémenter :
module ToDo

  class Application < Gtk::Application

    def initialize

      super 'com.iridakos.gtk-todo', Gio::ApplicationFlags::FLAGS_NONE


      signal_connect :activate do |application|

        window = Todo::ApplicationWindow.new(application)

        window.present

      end

    end

  end

end
Exécutez le script.
Définir le modèle
Pour plus de simplicité, nous enregistrerons les éléments ToDo dans des fichiers au format JSON sous un dossier caché dédié dans le répertoire de base de notre utilisateur. Dans une application réelle, nous utiliserions une base de données, mais cela sort du cadre de ce didacticiel.
Notre Todo::Item modèle aura les propriétés suivantes :
- identifiant :L'identifiant de l'élément
- titre :Le titre
- remarques :Toutes les notes
- priorité :Sa priorité
- creation_datetime :La date et l'heure de création de l'élément
- nom du fichier :Le nom du fichier dans lequel un élément est enregistré
Nous allons créer un fichier nommé item.rb sous application/models répertoire avec le contenu suivant :
require 'securerandom'

require 'json'


module Todo

  class Item

    PROPERTIES = [:id, :title, :notes, :priority, :filename, :creation_datetime].freeze


    PRIORITIES = ['high', 'medium', 'normal', 'low'].freeze


    attr_accessor *PROPERTIES


    def initialize(options = {})

      if user_data_path = options[:user_data_path]

        # New item. When saved, it will be placed under the :user_data_path value

        @id = SecureRandom.uuid

        @creation_datetime = Time.now.to_s

        @filename = "#{user_data_path}/#{id}.json"

      elsif filename = options[:filename]

        # Load an existing item

        load_from_file filename

      else

        raise ArgumentError, 'Please specify the :user_data_path for new item or the :filename to load existing'

      end

    end


    # Loads an item from a file

    def load_from_file(filename)

      properties = JSON.parse(File.read(filename))


      # Assign the properties

      PROPERTIES.each do |property|

        self.send "#{property}=", properties[property.to_s]

      end

    rescue => e

      raise ArgumentError, "Failed to load existing item: #{e.message}"

    end


    # Resolves if an item is new

    def is_new?

      !File.exists? @filename

    end


    # Saves an item to its `filename` location

    def save!

      File.open(@filename, 'w') do |file|

        file.write self.to_json

      end

    end


    # Deletes an item

    def delete!

      raise 'Item is not saved!' if is_new?


      File.delete(@filename)

    end


    # Produces a json string for the item

    def to_json

      result = {}

      PROPERTIES.each do |prop|

        result[prop] = self.send prop

      end


      result.to_json

    end

  end

end
Ici, nous avons défini des méthodes pour :
- Initialiser un élément :
- Comme "nouveau" en définissant le
:user_data_pathdans lequel il sera sauvegardé plus tard - Comme "existant" en définissant le
:filenameêtre chargé à partir de. Le nom de fichier doit être un fichier JSON précédemment généré par un élément
- Comme "nouveau" en définissant le
- Charger un élément à partir d'un fichier
- Déterminer si un élément est nouveau ou non (c'est-à-dire enregistré au moins une fois dans le
:user_data_pathou pas) - Enregistrer un élément en écrivant sa chaîne JSON dans un fichier
- Supprimer un élément
- Produire la chaîne JSON d'un élément sous la forme d'un hachage de ses propriétés
Ajouter un nouvel élément
Créer le bouton
Ajoutons un bouton à notre fenêtre d'application pour ajouter un nouvel élément. Ouvrez le resources/ui/application_window.ui fichier dans Glade.
- Faites glisser un
Buttonde la section Widget à la section Design. - Dans la section Propriétés, définissez son ID valeur à
add_new_item_button. - Près du bas du Général dans la section Propriétés, il y a une zone de texte juste en dessous de l'Étiquette avec image facultative option. Modifiez sa valeur à partir de Button pour Ajouter un nouvel élément .
- Enregistrez le fichier et exécutez le script.

Ne vous inquiétez pas; nous améliorerons la conception plus tard. Voyons maintenant comment se connecter fonctionnalité aux clics de nos boutons événement.
Tout d'abord, nous devons mettre à jour notre classe de fenêtre d'application afin qu'elle apprenne à connaître son nouvel enfant, le bouton avec l'identifiant add_new_item_button . Ensuite, nous pouvons accéder à l'enfant pour modifier son comportement.
Changer le init méthode comme suit :
def init

  # Set the template from the resources binary

  set_template resource: '/com/iridakos/gtk-todo/ui/application_window.ui'


  bind_template_child 'add_new_item_button'

end
Assez simple, non? Le bind_template_child fait exactement ce qu'elle dit, et à partir de maintenant chaque instance de notre Todo::ApplicationWindow la classe aura un add_new_item_button méthode pour accéder au bouton associé. Alors, modifions le initialize méthode comme suit :
def initialize(application)

  super application: application


  set_title 'GTK+ Simple ToDo'


  add_new_item_button.signal_connect 'clicked' do |button, application|

    puts "OMG! I AM CLICKED"

  end

end
Comme vous pouvez le voir, nous allons accéder au bouton par le add_new_item_button méthode, et nous définissons ce que nous voulons qu'il se passe quand on clique dessus. Redémarrez l'application et essayez de cliquer sur le bouton. Dans la console, vous devriez voir le message OMG! I AM CLICKED lorsque vous cliquez sur le bouton.
Cependant, ce que nous voulons qu'il se passe lorsque nous cliquons sur ce bouton, c'est d'afficher une nouvelle fenêtre pour enregistrer un élément ToDo. Vous avez bien deviné :c'est l'heure de Glade.
Créer la nouvelle fenêtre d'élément
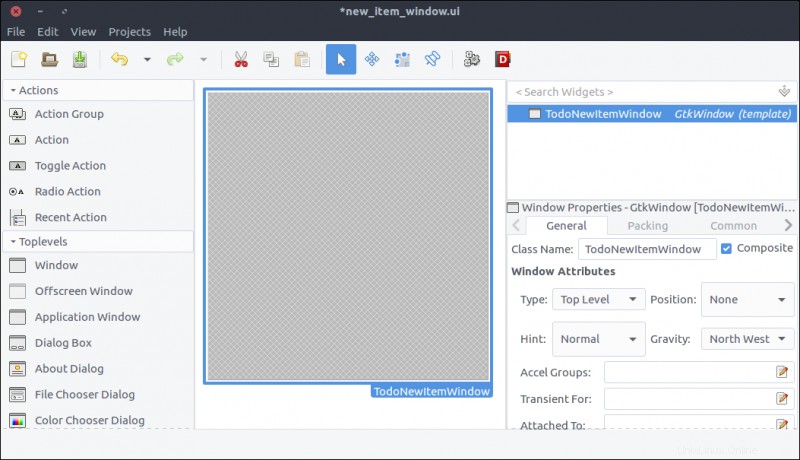
- Créez un nouveau projet dans Glade en appuyant sur l'icône la plus à gauche dans la barre supérieure ou en sélectionnant Fichier > Nouveau depuis le menu de l'application.
- Faites glisser une
Windowde la section Widget à la zone Design. - Vérifier son
Compositepropriété et nommez la classeTodoNewItemWindow.
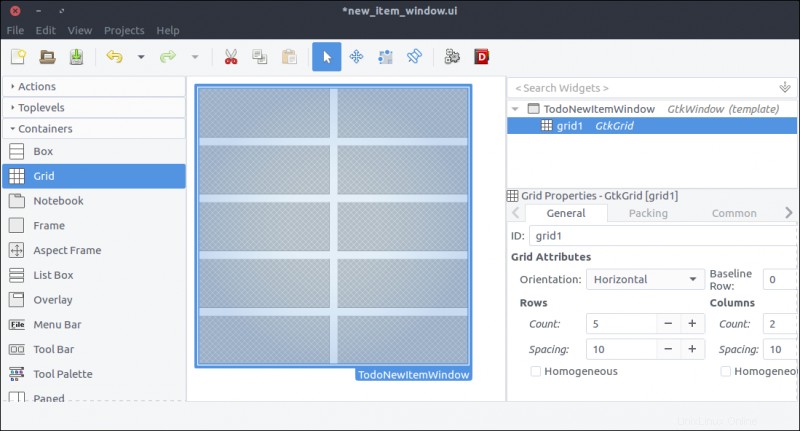
- Faites glisser une
Gridde la section Widget et placez-le dans la fenêtre que nous avons ajoutée précédemment. - Ensemble 5 lignes et 2 colonnes dans la fenêtre qui s'affiche.
- Dans le Général de la section Propriétés, définissez l'espacement des lignes et des colonnes sur 10 (pixels).
- Dans le Commun de la section Propriétés, définissez
Widget Spacing > Margins > Top, Bottom, Left, Righttous à 10 afin que le contenu ne soit pas collé aux bordures de la grille.
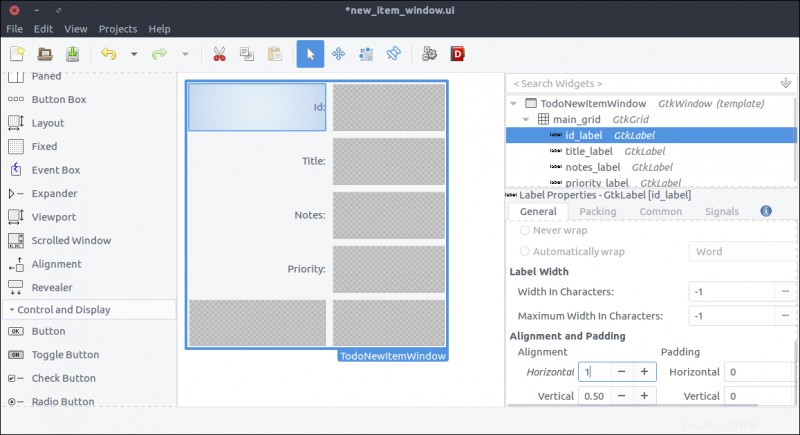
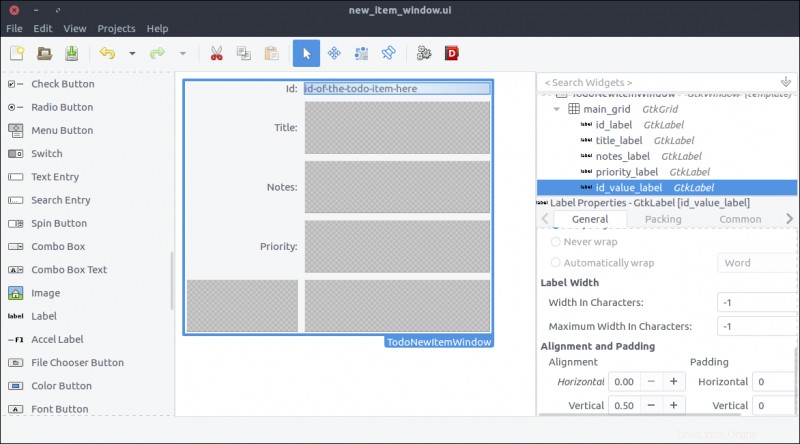
- Faites glisser quatre
Labelwidgets de la section Widget et placez-en un dans chaque ligne de la grille. - Modifier son
Labelpropriétés, de haut en bas, comme suit :Id:Title:Notes:Priority:
- Dans le Général de la section Propriétés, modifiez Alignement et remplissage> Alignement> Horizontal propriété de 0,50 à 1 pour chaque propriété afin d'aligner à droite le texte de l'étiquette.
- Cette étape est facultative mais recommandée. Nous ne lierons pas ces étiquettes dans notre fenêtre car nous n'avons pas besoin de modifier leur état ou leur comportement. Dans ce contexte, nous n'avons pas besoin de définir un ID descriptif pour eux comme nous l'avons fait pour le
add_new_item_buttonbouton dans la fenêtre de l'application. MAIS nous ajouterons plus d'éléments à notre conception, et la hiérarchie des widgets dans Glade sera difficile à lire s'ils disentlabel1,label2, etc. Définition d'identifiants descriptifs (commeid_label,title_label,notes_label,priority_label) nous facilitera la vie. J'ai même défini l'ID de la grille surmain_gridparce que je n'aime pas voir des nombres ou des noms de variables dans les identifiants.
- Faites glisser un
Labelde la section Widget à la deuxième colonne de la première ligne de la grille. L'ID sera automatiquement généré par notre modèle ; nous n'autoriserons pas la modification, donc une étiquette pour l'afficher est plus que suffisante. - Définir l'
IDpropriété àid_value_label. - Définir Alignement et remplissage > Alignement > Horizontal propriété à 0 pour que le texte s'aligne sur la gauche.
- Nous allons lier ce widget à notre classe Window afin de pouvoir modifier son texte chaque fois que nous chargeons la fenêtre. Par conséquent, il n'est pas nécessaire de définir une étiquette via Glade, mais cela rend la conception plus proche de ce à quoi elle ressemblera lorsqu'elle sera rendue avec des données réelles. Vous pouvez définir une étiquette sur ce qui vous convient le mieux. J'ai défini le mien sur
id-of-the-todo-item-here.
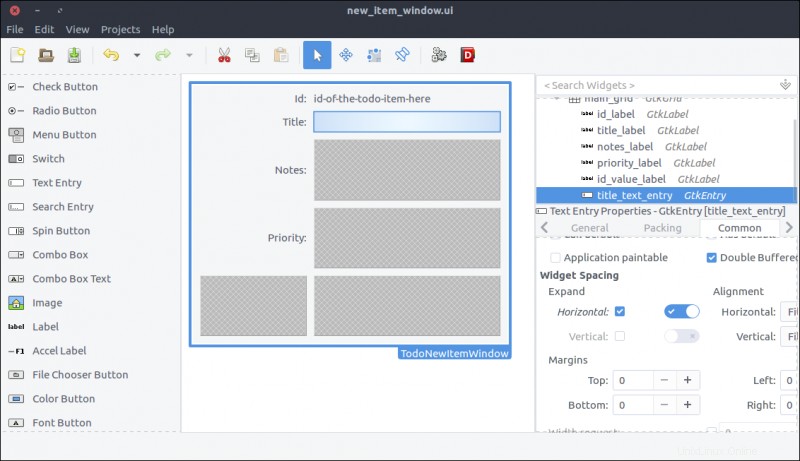
- Faites glisser une
Text Entryde la section Widget à la deuxième colonne de la deuxième ligne de la grille. - Définir sa propriété ID sur
title_text_entry. Comme vous l'avez peut-être remarqué, je préfère obtenir le type de widget dans l'ID pour rendre le code de la classe plus lisible. - Dans le Commun de la section Propriétés, cochez la case
Widget Spacing > Expand > Horizontalcase à cocher et activez l'interrupteur à côté. De cette façon, le widget s'agrandira horizontalement chaque fois que son parent (c'est-à-dire la grille) est redimensionné.
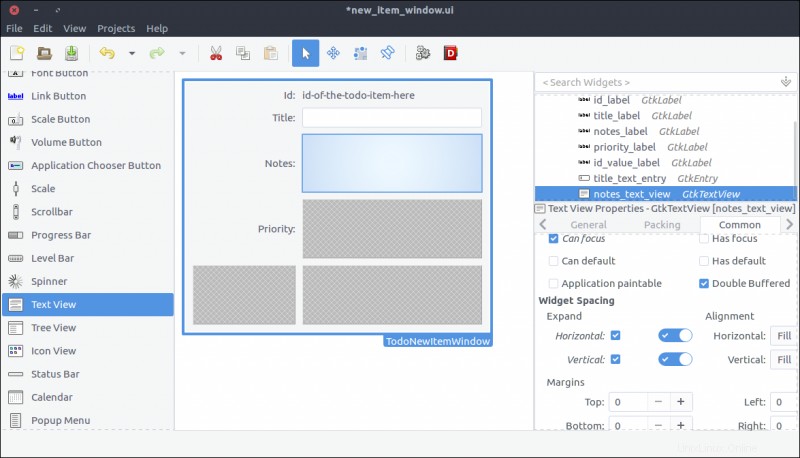
- Faites glisser une
Text Viewde la section Widget à la deuxième colonne de la troisième ligne de la grille. - Définir son
IDauxnotes. Non, je te teste juste. Définir sonIDpropriété ànotes_text_view. - Dans le Commun Dans l'onglet Propriétés de la section Propriétés, cochez
Widget Spacing > Expand > Horizontal, Verticalcases à cocher et activer les commutateurs à côté d'eux. De cette façon, le widget s'agrandira horizontalement et verticalement chaque fois que son parent (la grille) sera redimensionné.
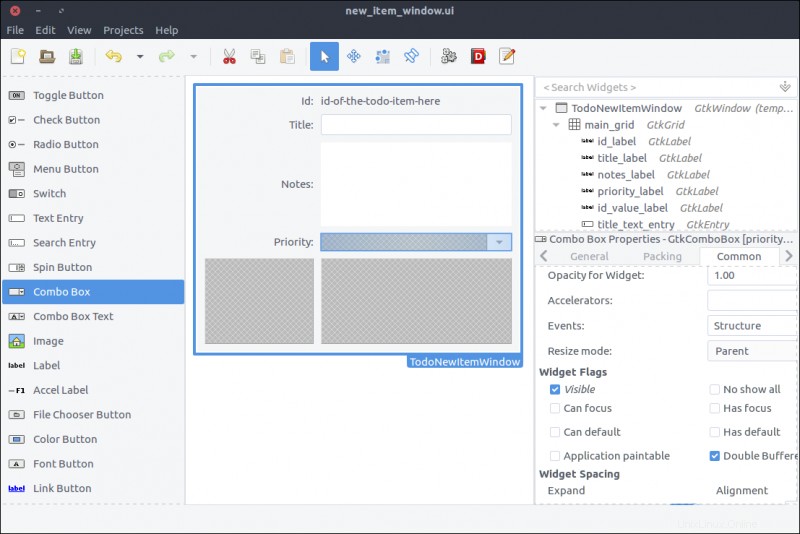
- Faites glisser une
Combo Boxde la section Widget à la deuxième colonne de la quatrième ligne de la grille. - Définir son
IDàpriority_combo_box. - Dans le Commun de la section Propriétés, cochez la case
Widget Spacing > Expand > Horizontalcase à cocher et activez l'interrupteur à sa droite. Cela permet au widget de s'étendre horizontalement chaque fois que son parent (la grille) est redimensionné. - Ce widget est un élément déroulant. We will populate its values that can be selected by the user when it shows up inside our window class.
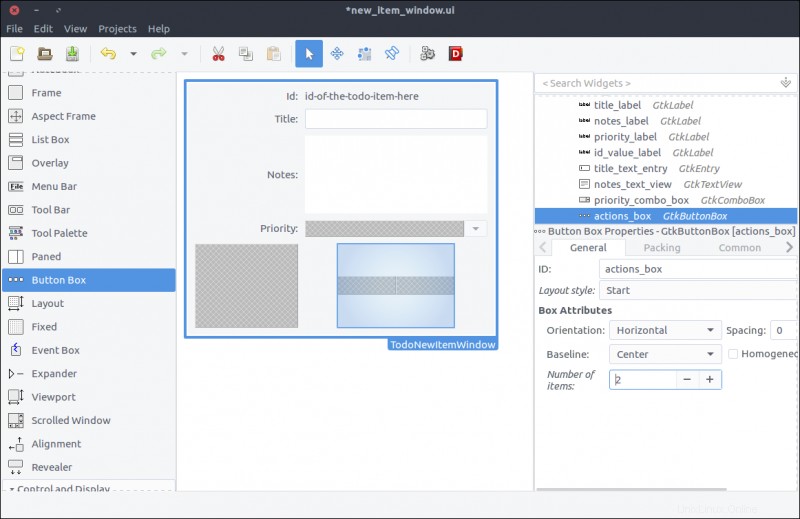
- Drag a
Button Boxfrom the Widget section to the second column of the last row of the grid. - In the pop-up window, select 2 items.
- In the General tab of the Properties section, set the Box Attributes> Orientation property to Horizontal .
- In the General tab of the Properties section, set the Box Attributes> Spacing property to 10 .
- In the Common tab of the Properties section, set the Widget Spacing> Alignment> Horizontal to Center .
- Again, our code won't alter this widget, but you can give it a descriptive
IDfor readability. I named mineactions_box.
- Drag two
Buttonwidgets and place one in each box of the button box widget we added in the previous step. - Set their
IDproperties tocancel_buttonandsave_button, respectively. - In the General tab of the Properties window, set their Button Content> Label with option image property to Cancel and Save , respectively.
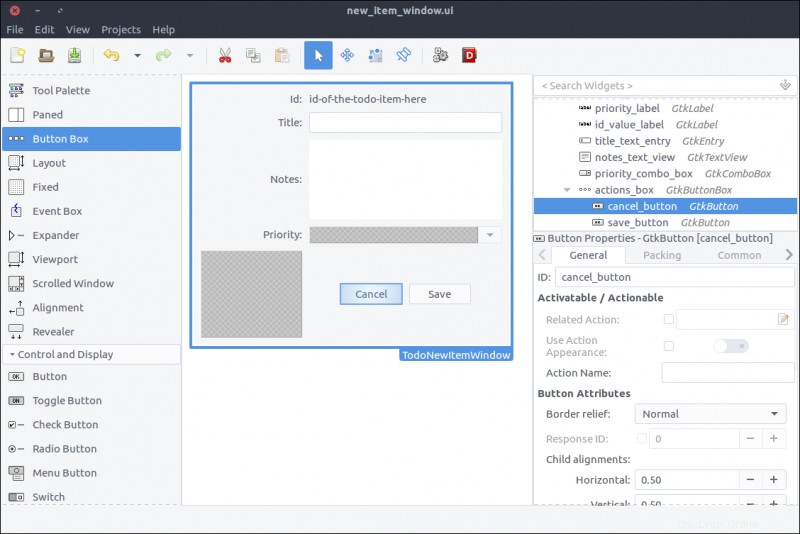
The window is ready. Save the file under resources/ui/new_item_window.ui .
It's time to port it into our application.
Implement the new item window class
Before implementing the new class, we must update our GResource description file (resources/gresources.xml ) to obtain the new resource:
<?xml version="1.0" encoding="UTF-8"?>

<gresources>

  <gresource prefix="/com/iridakos/gtk-todo">

    <file preprocess="xml-stripblanks">ui/application_window.ui</file>

    <file preprocess="xml-stripblanks">ui/new_item_window.ui</file>

  </gresource>

</gresources>
Now we can create the new window class. Create a file under application/ui/todo named new_item_window.rb and set its contents as follows:
module Todo

  class NewItemWindow < Gtk::Window

    # Register the class in the GLib world

    type_register


    class << self

      def init

        # Set the template from the resources binary

        set_template resource: '/com/iridakos/gtk-todo/ui/new_item_window.ui'

      end

    end


    def initialize(application)

      super application: application

    end

  end

end
There's nothing special here. We just changed the template resource to point to the correct file of our resources.
We have to change the add_new_item_button code that executes on the clicked signal to show the new item window. We'll go ahead and change that code in application_window.rb to this:
add_new_item_button.signal_connect 'clicked' do |button|

  new_item_window = NewItemWindow.new(application)

  new_item_window.present

end
Let's see what we have done. Start the application and click on the Add new item bouton. Tadaa!
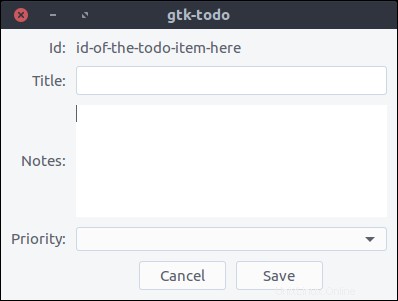
But nothing happens when we press the buttons. Let's fix that.
First, we'll bind the UI widgets in the Todo::NewItemWindow class.
Change the init method to this:
def init

  # Set the template from the resources binary

  set_template resource: '/com/iridakos/gtk-todo/ui/new_item_window.ui'


  # Bind the window's widgets

  bind_template_child 'id_value_label'

  bind_template_child 'title_text_entry'

  bind_template_child 'notes_text_view'

  bind_template_child 'priority_combo_box'

  bind_template_child 'cancel_button'

  bind_template_child 'save_button'

end
This window will be shown when either creating or editing a ToDo item, so the new_item_window naming is not very valid. We'll refactor that later.
For now, we will update the window's initialize method to require one extra parameter for the Todo::Item to be created or edited. We can then set a more meaningful window title and change the child widgets to reflect the current item.
We'll change the initialize method to this:
def initialize(application, item)

  super application: application

  set_title "ToDo item #{item.id} - #{item.is_new? ? 'Create' : 'Edit' } Mode"


  id_value_label.text = item.id

  title_text_entry.text = item.title if item.title

  notes_text_view.buffer.text = item.notes if item.notes


  # Configure the combo box

  model = Gtk::ListStore.new(String)

  Todo::Item::PRIORITIES.each do |priority|

    iterator = model.append

    iterator[0] = priority

  end


  priority_combo_box.model = model

  renderer = Gtk::CellRendererText.new

  priority_combo_box.pack_start(renderer, true)

  priority_combo_box.set_attributes(renderer, "text" => 0)


  priority_combo_box.set_active(Todo::Item::PRIORITIES.index(item.priority)) if item.priority

end
Then we'll add the constant PRIORITIES in the application/models/item.rb file just below the PROPERTIES constant:
PRIORITIES = ['high', 'medium', 'normal', 'low'].freeze What did we do here?
- We set the window's title to a string containing the current item's ID and the mode (depending on whether the item is being created or edited).
- We set the
id_value_labeltext to display the current item's ID. - We set the
title_text_entrytext to display the current item's title. - We set the
notes_text_viewtext to display the current item's notes. - We created a model for the
priority_combo_boxwhose entries are going to have only oneStringvaleur. At first sight, aGtk::ListStoremodel might look a little confusing. Here's how it works.- Suppose we want to display in a combo box a list of country codes and their respective country names.
- We would create a
Gtk::ListStoredefining that its entries would consist of two string values:one for the country code and one for the country name. Thus we would initialize the ListStore as:model = Gtk::ListStore.new(String, String) - To fill the model with data, we would do something like the following (make sure you don't miss the comments in the snippet):
[['gr', 'Greece'], ['jp','Japan'], ['nl', 'Netherlands']].each do |country_pair|

  entry = model.append

  # Each entry has two string positions since that's how we initialized the Gtk::ListStore

  # Store the country code in position 0

  entry[0] = country_pair[0]

  # Store the country name in position 1

  entry[1] = country_pair[1]

end - We also configured the combo box to render two text columns/cells (again, make sure you don't miss the comments in the snippet):
country_code_renderer = Gtk::CellRendererText.new

# Add the first renderer

combo.pack_start(country_code_renderer, true)

# Use the value in index 0 of each model entry a.k.a. the country code

combo.set_attributes(country_code_renderer, 'text' => 0)


country_name_renderer = Gtk::CellRendererText.new

# Add the second renderer

combo.pack_start(country_name_renderer, true)

# Use the value in index 1 of each model entry a.k.a. the country name

combo.set_attributes(country_name_renderer, 'text' => 1) - I hope that made it a little clearer.
- We added a simple text renderer in the combo box and instructed it to display the only value of each model's entry (a.k.a., position
0). Imagine that our model is something like[['high'],['medium'],['normal'],['low']]and0is the first element of each sub-array. I will stop with the model-combo-text-renderer explanations now…
Configure the user data path
Remember that when initializing a new Todo::Item (not an existing one), we had to define a :user_data_path in which it would be saved. We are going to resolve this path when the application starts and make it accessible from all the widgets.
All we have to do is check if the .gtk-todo-tutorial path exists inside the user's home ~ annuaire. If not, we will create it. Then we'll set this as an instance variable of the application. All widgets have access to the application instance. So, all widgets have access to this user path variable.
Change the application/application.rb file to this:
module ToDo

  class Application < Gtk::Application

    attr_reader :user_data_path


    def initialize

      super 'com.iridakos.gtk-todo', Gio::ApplicationFlags::FLAGS_NONE


      @user_data_path = File.expand_path('~/.gtk-todo-tutorial')

      unless File.directory?(@user_data_path)

        puts "First run. Creating user's application path: #{@user_data_path}"

        FileUtils.mkdir_p(@user_data_path)

      end


      signal_connect :activate do |application|

        window = Todo::ApplicationWindow.new(application)

        window.present

      end

    end

  end

end
One last thing we need to do before testing what we have done so far is to instantiate the Todo::NewItemWindow when the add_new_item_button is clicked complying with the changes we made. In other words, change the code in application_window.rb to this:
add_new_item_button.signal_connect 'clicked' do |button|

  new_item_window = NewItemWindow.new(application, Todo::Item.new(user_data_path: application.user_data_path))

  new_item_window.present

end
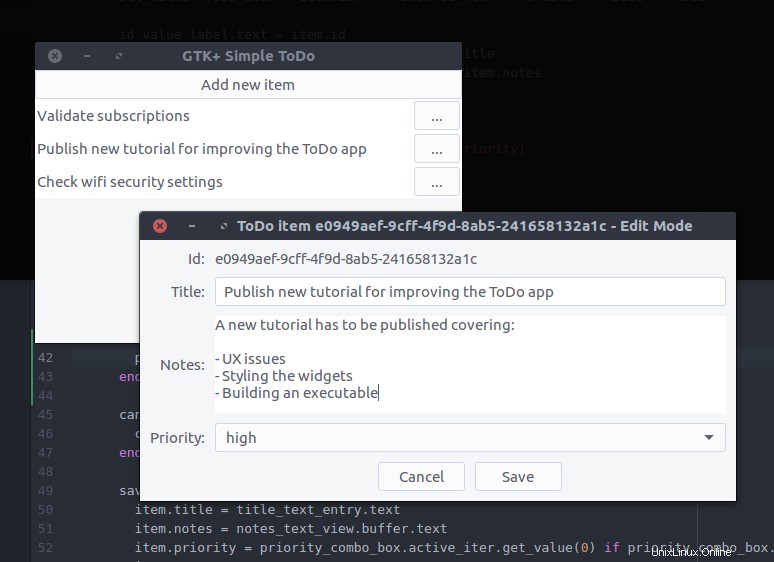
Start the application and click on the Add new item bouton. Tadaa! (Note the - Create mode part in the title).

Cancel item creation/update
To close the Todo::NewItemWindow window when a user clicks the cancel_button , we only have to add this to the window's initialize method:
cancel_button.signal_connect 'clicked' do |button|

  close

end
close is an instance method of the Gtk::Window class that closes the window.
Save the item
Saving an item involves two steps:
- Update the item's properties based on the widgets' values.
- Call the
save!method on theTodo::Iteminstance.
Again, our code will be placed in the initialize method of the Todo::NewItemWindow :
save_button.signal_connect 'clicked' do |button|

  item.title = title_text_entry.text

  item.notes = notes_text_view.buffer.text

  item.priority = priority_combo_box.active_iter.get_value(0) if priority_combo_box.active_iter

  item.save!

  close

end
Once again, the window closes after saving the item.
Let's try that out.
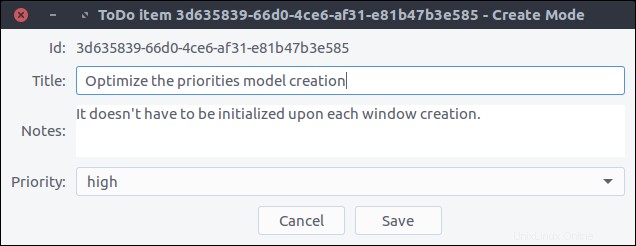
Now, by pressing Save and navigating to our ~/.gtk-todo-tutorial folder, we should see a file. Mine had the following contents:
{

        "id": "3d635839-66d0-4ce6-af31-e81b47b3e585",

        "title": "Optimize the priorities model creation",

        "notes": "It doesn't have to be initialized upon each window creation.",

        "priority": "high",

        "filename": "/home/iridakos/.gtk-todo-tutorial/3d635839-66d0-4ce6-af31-e81b47b3e585.json",

        "creation_datetime": "2018-01-25 18:09:51 +0200"

}
Don't forget to try out the Cancel button as well.
View ToDo items
The Todo::ApplicationWindow contains only one button. It's time to change that.
We want the window to have Add new item on the top and a list below with all of our ToDo items. We'll add a Gtk::ListBox to our design that can contain any number of rows.
Update the application window
- Open the
resources/ui/application_window.uifile in Glade. - Nothing happens if we drag a
List Boxwidget from the Widget section directly on the window. That is normal. First, we have to split the window into two parts:one for the button and one for the list box. Bear with me. - Right-click on the
new_item_windowin the Hierarchy section and select Add parent> Box . - In the pop-up window, set 2 for the number of items.
- The orientation of the box is already vertical, so we are fine.
- Now, drag a
List Boxand place it on the free area of the previously added box. - Set its
IDproperty totodo_items_list_box. - Set its
Selection modetoNonesince we won't provide that functionality.

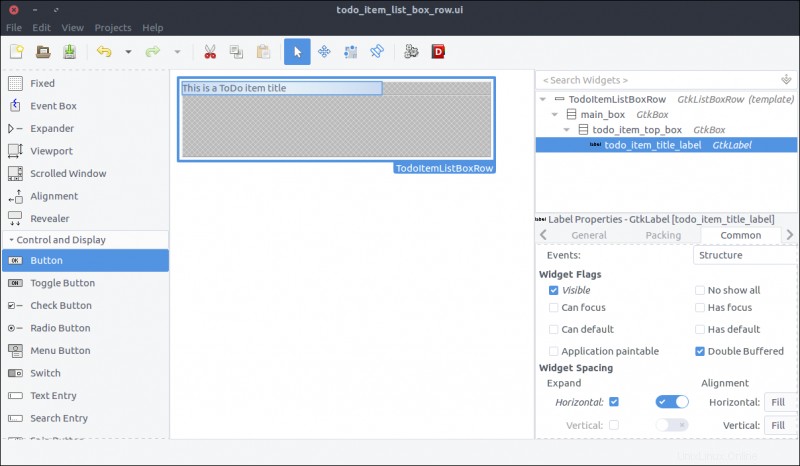
Design the ToDo item list box row
Each row of the list box we created in the previous step will be more complex than a row of text. Each will contain widgets that allow the user to expand an item's notes and to delete or edit the item.
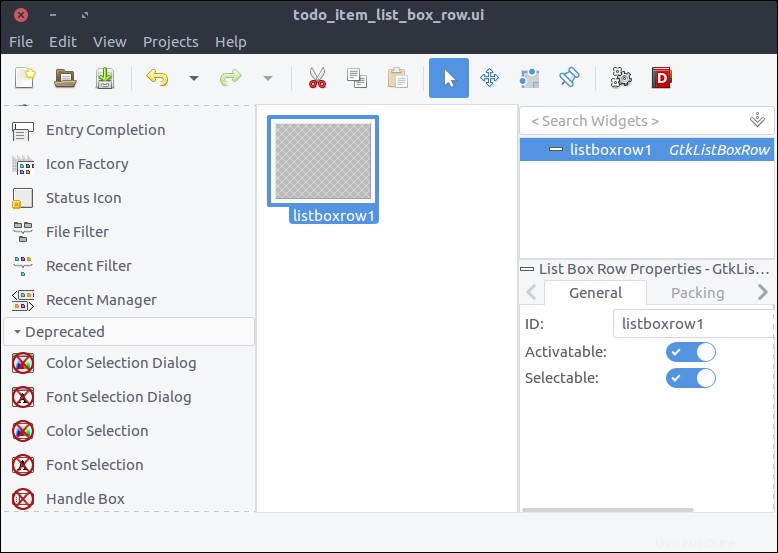
- Create a new project in Glade, as we did for the
new_item_window.ui. Save it underresources/ui/todo_item_list_box_row.ui. - Unfortunately (at least in my version of Glade), there is no List Box Row widget in the Widget section. So, we'll add one as the top-level widget of our project in a kinda hackish way.
- Drag a
List Boxfrom the Widget section to the Design area. - Inside the Hierarchy section, right-click on the
List Boxand selectAdd Row

- In the Hierarchy section, right-click on the newly added
List Box Rownested under theList Boxand selectRemove parent. There it is! TheList Box Rowis the top-level widget of the project now.
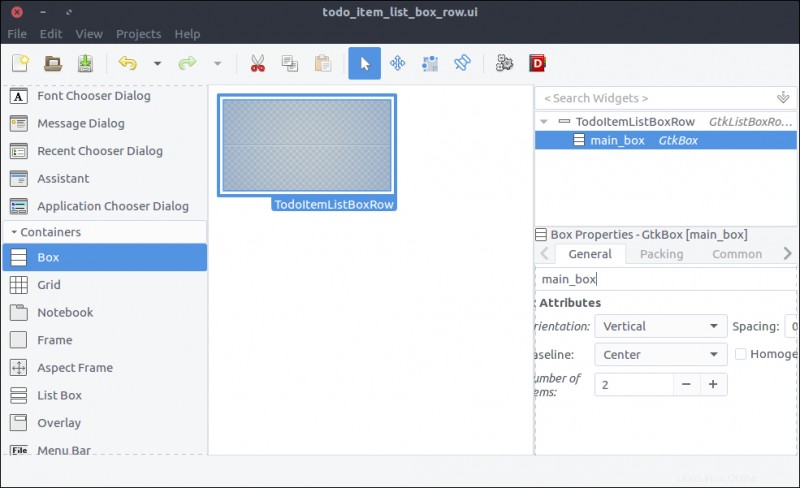
- Check the widget's
Compositeproperty and set its name toTodoItemListBoxRow. - Drag a
Boxfrom the Widget section to the Design area inside ourList Box Row. - Set 2 items in the pop-up window.
- Set its
IDproperty tomain_box.
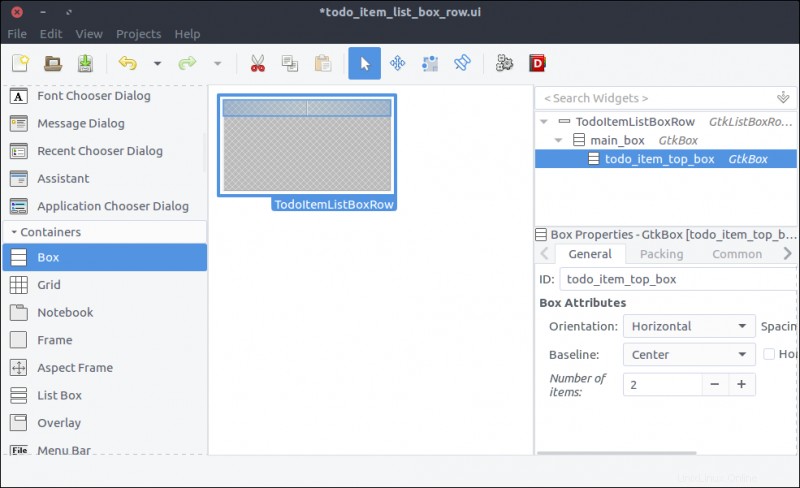
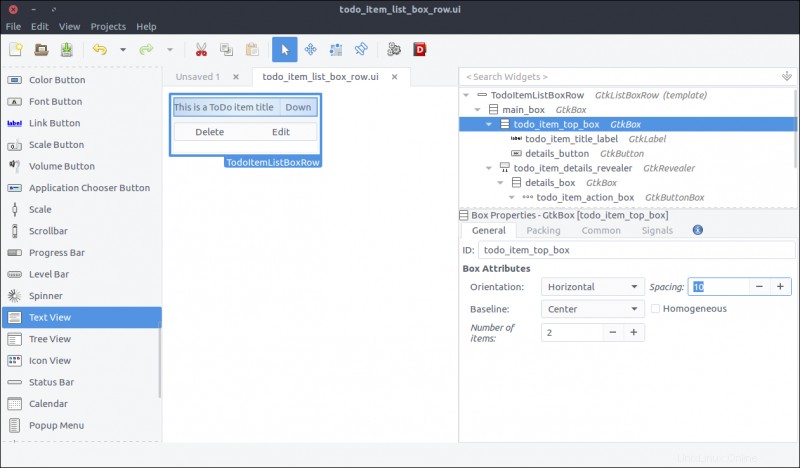
- Drag another
Boxfrom the Widget section to the first row of the previously added box. - Set 2 items in the pop-up window.
- Set its
IDproperty totodo_item_top_box. - Set its Orientation property to Horizontal .
- Set its
Spacing(General tab) property to 10 .
- Drag a
Labelfrom the Widget section to the first column of thetodo_item_top_box. - Set its
IDproperty totodo_item_title_label. - Set its Alignment and Padding> Alignment> Horizontal property to 0.00 .
- In the Common tab of the Properties section, check the Widget Spacing> Expand> Horizontal checkbox and turn on the switch next to it so the label will expand to the available space.
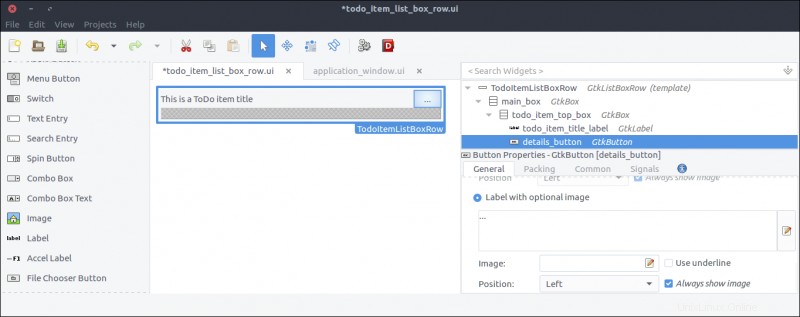
- Drag a
Buttonfrom the Widget section to the second column of thetodo_item_top_box. - Set its
IDproperty todetails_button. - Check the Button Content> Label with optional image radio and type
...(three dots).
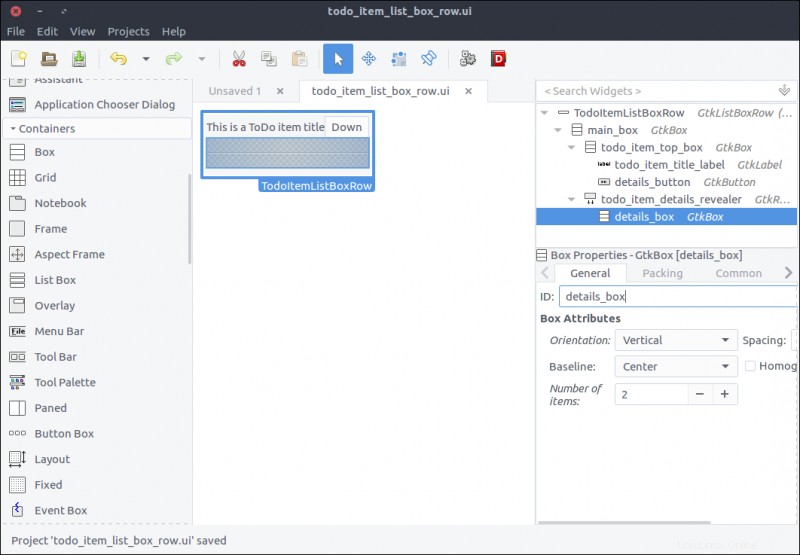
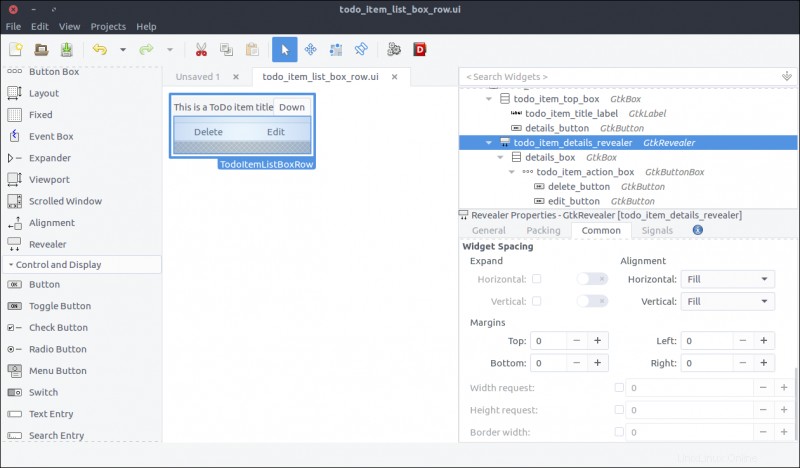
- Drag a
Revealerwidget from the Widget section to the second row of themain_box. - Turn off the
Reveal Childswitch in the General tab. - Set its
IDproperty totodo_item_details_revealer. - Set its
Transition typeproperty toSlide Down.
- Drag a
Boxfrom the Widget section to the reveal space. - Set its items to 2 in the pop-up window.
- Set its
IDproperty todetails_box. - In the Common tab, set its Widget Spacing> Margins> Top property to 10 .
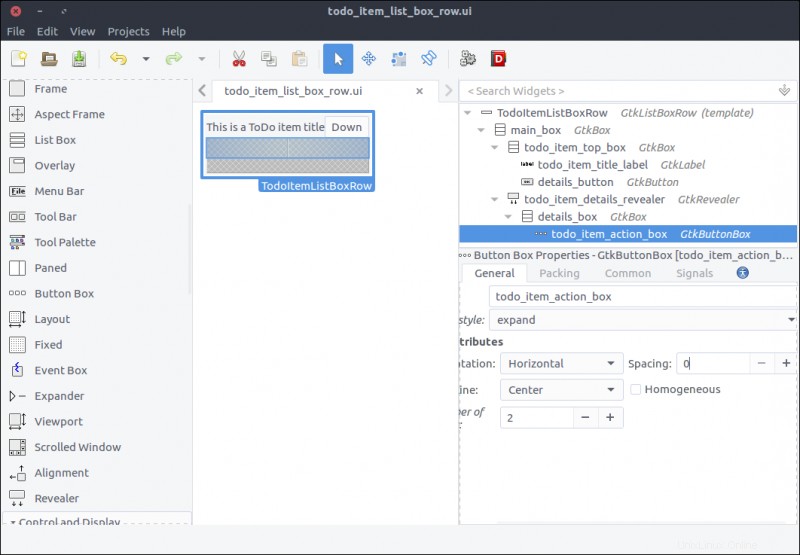
- Drag a
Button Boxfrom the Widget section to the first row of thedetails_box. - Set its
IDproperty totodo_item_action_box. - Set its
Layout styleproperty toexpand.
- Drag
Buttonwidgets to the first and second columns of thetodo_item_action_box. - Set their
IDproperties todelete_buttonandedit_button, respectively. - Set their Button Content> Label with optional image properties to Delete and Edit , respectively.
- Drag a
Viewportwidget from the Widget section to the second row of thedetails_box. - Set its
IDproperty totodo_action_notes_viewport. - Drag a
Text Viewwidget from the Widget section to thetodo_action_notes_viewportthat we just added. - Set its
IDtotodo_item_notes_text_view. - Uncheck its
Editableproperty in theGeneraltab of the Properties section.
Create the ToDo item list-box row class
Now we will create the class reflecting the UI of the list-box row we just created.
First we have to update our GResource description file to include the newly created design. Change the resources/gresources.xml file as follows:
<?xml version="1.0" encoding="UTF-8"?>

<gresources>

  <gresource prefix="/com/iridakos/gtk-todo">

    <file preprocess="xml-stripblanks">ui/application_window.ui</file>

    <file preprocess="xml-stripblanks">ui/new_item_window.ui</file>

    <file preprocess="xml-stripblanks">ui/todo_item_list_box_row.ui</file>

  </gresource>

</gresources>
Create a file named item_list_box_row.rb inside the application/ui folder and add the following:
module Todo

  class ItemListBoxRow < Gtk::ListBoxRow

    type_register


    class << self

      def init

        set_template resource: '/com/iridakos/gtk-todo/ui/todo_item_list_box_row.ui'

      end

    end


    def initialize(item)

      super()

    end

  end

end
We will not bind any children at the moment.
When starting the application, we have to search for files in the :user_data_path , and we must create a Todo::Item instance for each file. For each instance, we must also add a new Todo::ItemListBoxRow to the Todo::ApplicationWindow 's todo_items_list_box list box. One thing at a time.
First, let's bind the todo_items_list_box in the Todo::ApplicationWindow class. Change the init method as follows:
def init

  # Set the template from the resources binary

  set_template resource: '/com/iridakos/gtk-todo/ui/application_window.ui'


  bind_template_child 'add_new_item_button'

  bind_template_child 'todo_items_list_box'

end
Next, we'll add an instance method in the same class that will be responsible to load the ToDo list items in the related list box. Add this code in Todo::ApplicationWindow :
def load_todo_items

  todo_items_list_box.children.each { |child| todo_items_list_box.remove child }


  json_files = Dir[File.join(File.expand_path(application.user_data_path), '*.json')]

  items = json_files.map{ |filename| Todo::Item.new(filename: filename) }


  items.each do |item|

    todo_items_list_box.add Todo::ItemListBoxRow.new(item)

  end

end
Then we'll call this method at the end of the initialize method:
def initialize(application)

  super application: application


  set_title 'GTK+ Simple ToDo'


  add_new_item_button.signal_connect 'clicked' do |button|

    new_item_window = NewItemWindow.new(application, Todo::Item.new(user_data_path: application.user_data_path))

    new_item_window.present

  end


  load_todo_items

end
Remarque : We must first empty the list box of its current children rows then refill it. This way, we will call this method after saving a Todo::Item via the signal_connect of the save_button of the Todo::NewItemWindow , and the parent application window will be reloaded! Here's the updated code (in application/ui/new_item_window.rb ):
save_button.signal_connect 'clicked' do |button|

  item.title = title_text_entry.text

  item.notes = notes_text_view.buffer.text

  item.priority = priority_combo_box.active_iter.get_value(0) if priority_combo_box.active_iter

  item.save!


  close


  # Locate the application window

  application_window = application.windows.find { |w| w.is_a? Todo::ApplicationWindow }

  application_window.load_todo_items

end
Previously, we used this code:
json_files = Dir[File.join(File.expand_path(application.user_data_path), '*.json')] to find the names of all the files in the application-user data path with a JSON extension.
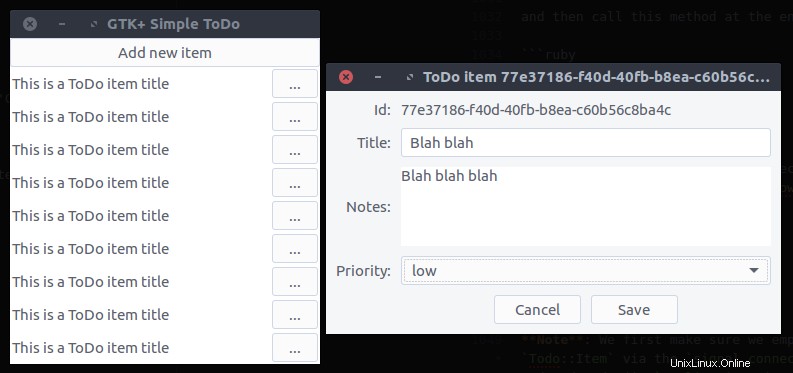
Let's see what we've created. Start the application and try adding a new ToDo item. After pressing the Save button, you should see the parent Todo::ApplicationWindow automatically updated with the new item!
What's left is to complete the functionality of the Todo::ItemListBoxRow .
First, we will bind the widgets. Change the init method of the Todo::ItemListBoxRow class as follows:
def init

  set_template resource: '/com/iridakos/gtk-todo/ui/todo_item_list_box_row.ui'


  bind_template_child 'details_button'

  bind_template_child 'todo_item_title_label'

  bind_template_child 'todo_item_details_revealer'

  bind_template_child 'todo_item_notes_text_view'

  bind_template_child 'delete_button'

  bind_template_child 'edit_button'

end
Then, we'll set up the widgets based on the item of each row.
def initialize(item)

  super()


  todo_item_title_label.text = item.title || ''


  todo_item_notes_text_view.buffer.text = item.notes


  details_button.signal_connect 'clicked' do

    todo_item_details_revealer.set_reveal_child !todo_item_details_revealer.reveal_child?

  end


  delete_button.signal_connect 'clicked' do

    item.delete!


    # Locate the application window

    application_window = application.windows.find { |w| w.is_a? Todo::ApplicationWindow }

    application_window.load_todo_items

  end


  edit_button.signal_connect 'clicked' do

    new_item_window = NewItemWindow.new(application, item)

    new_item_window.present

  end

end


def application

  parent = self.parent

  parent = parent.parent while !parent.is_a? Gtk::Window

  parent.application

end
- As you can see, when the
details_buttonis clicked, we instruct thetodo_item_details_revealerto swap the visibility of its contents. - After deleting an item, we find the application's
Todo::ApplicationWindowto call itsload_todo_items, as we did after saving an item. - When clicking to edit a button, we create a new instance of the
Todo::NewItemWindowpassing an item as the current item. Works like a charm! - Finally, to reach the application parent of a list-box row, we defined a simple instance method
applicationthat navigates through the widget's parents until it reaches a window from which it can obtain the application object.
Save and run the application. There it is!
This has been a really long tutorial and, even though there are so many items that we haven't covered, I think we better end it here.
Long post, cat photo.

Useful links
- This tutorial's code
- A set of bindings for the GNOME-2.x libraries to use from Ruby
- Gtk3 tutorial for Ruby based on the official C version
- GTK+ 3 Reference Manual
This was originally published on Lazarus Lazaridis's blog, iridakos.com, and is republished with permission.