Ce tutoriel est Copyright (c) 2008 par Falko Timme. Il est dérivé d'un tutoriel de Christoph Haas que vous pouvez trouver sur http://workaround.org. Vous êtes libre d'utiliser ce didacticiel sous la licence Creative Commons 2.5 ou toute version ultérieure.
Ce document décrit comment installer un serveur de messagerie basé sur Postfix qui est basé sur des utilisateurs et des domaines virtuels, c'est-à-dire des utilisateurs et des domaines qui se trouvent dans une base de données MySQL. Je montrerai également l'installation et la configuration de Courier (Courier-POP3, Courier-IMAP), afin que Courier puisse s'authentifier auprès de la même base de données MySQL que Postfix utilise.
Le serveur Postfix résultant est capable de SMTP-AUTH et TLS et quota (le quota n'est pas intégré à Postfix par défaut, je vais montrer comment patcher votre Postfix de manière appropriée). Les mots de passe sont stockés dans crypté formulaire dans la base de données (la plupart des documents que j'ai trouvés traitaient de mots de passe en texte brut, ce qui représente un risque pour la sécurité). En plus de cela, ce tutoriel couvre l'installation de Amavisd , SpamAssassin et ClamAV afin que les e-mails soient analysés à la recherche de spam et de virus. Je montrerai également comment installer SquirrelMail en tant qu'interface de messagerie Web afin que les utilisateurs puissent lire et envoyer des e-mails et modifier leurs mots de passe.
L'avantage d'une telle configuration "virtuelle" (utilisateurs et domaines virtuels dans une base de données MySQL) est qu'elle est bien plus performante qu'une configuration basée sur des utilisateurs système "réels". Avec cette configuration virtuelle, votre serveur de messagerie peut gérer des milliers de domaines et d'utilisateurs. De plus, il est plus facile à administrer car vous n'avez à vous occuper de la base de données MySQL que lorsque vous ajoutez de nouveaux utilisateurs/domaines ou modifiez ceux qui existent déjà. Plus de commandes postmap pour créer des fichiers db, plus de rechargement de Postfix, etc. Pour l'administration de la base de données MySQL, vous pouvez utiliser des outils basés sur le Web comme phpMyAdmin qui sera également installé dans ce guide. Le troisième avantage est que les utilisateurs ont une adresse e-mail comme nom d'utilisateur (au lieu d'un nom d'utilisateur + une adresse e-mail), ce qui est plus facile à comprendre et à retenir.
Ce guide est conçu comme un guide pratique ; il ne couvre pas les arrière-plans théoriques. Ils sont traités dans de nombreux autres documents sur le Web.
Ce document est fourni sans garantie d'aucune sorte ! Je tiens à dire que ce n'est pas la seule façon de mettre en place un tel système. Il existe de nombreuses façons d'atteindre cet objectif, mais c'est la voie que je prends. Je n'émets aucune garantie que cela fonctionnera pour vous !
1 Remarque préliminaire
Ce didacticiel est basé sur le serveur Ubuntu 8.10 (Intrepid Ibex), vous devez donc configurer une installation de base du serveur Ubuntu 8.10 avant de continuer avec ce didacticiel (par exemple, comme indiqué aux pages 1 à 3 de ce didacticiel :The Perfect Server - Ubuntu Intrepid Bouquetin (Ubuntu 8.10)). Le système doit avoir une adresse IP statique. J'utilise 192.168.0.100 comme adresse IP dans ce tutoriel et server1.example.com comme nom d'hôte.
Assurez-vous que vous êtes connecté en tant que root (tapez
sudo su
pour devenir root), car nous devons exécuter toutes les étapes de ce tutoriel en tant qu'utilisateur root.
Il est très important que vous fassiez de /bin/sh un lien symbolique vers /bin/bash...
ln -sf /bin/bash /bin/sh
... et que vous désactivez AppArmor :
/etc/init.d/apparmor stop
update-rc.d -f apparmor remove
apt-get remove apparmor apparmor-utils
2 Installer Postfix, Courier, Saslauthd, MySQL, phpMyAdmin
Pour installer Postfix, Courier, Saslauthd, MySQL et phpMyAdmin, nous exécutons simplement
apt-get install postfix postfix-mysql postfix-doc mysql-client mysql-server courier-authdaemon courier-authlib-mysql courier-pop courier-pop-ssl courier-imap courier-imap-ssl postfix-tls libsasl2-2 libsasl2-modules libsasl2-modules-sql sasl2-bin libpam-mysql openssl phpmyadmin apache2 libapache2-mod-php5 php5 php5-mysql libpam-smbpass
Quelques questions vous seront posées :
Nouveau mot de passe pour l'utilisateur "root" MySQL :<-- yourrootsqlpassword
Répéter le mot de passe pour l'utilisateur MySQL "root" :<-- yourrootsqlpassword
Créer des répertoires pour l'administration Web ? <-- Non
Type général de configuration de messagerie :<-- Site Internet
Nom de messagerie système :<-- serveur1.exemple.com
Certificat SSL requis <-- Ok
Serveur Web à reconfigurer automatiquement :<-- apache2
3 Appliquer le correctif de quota à Postfix
Nous devons récupérer les sources de Postfix, le patcher avec le patch de quota, créer de nouveaux packages .deb Postfix et installer ces packages .deb :
apt-get install build-essential dpkg-dev fakeroot debhelper libgdbm-dev libldap2-dev libpcre3-dev libssl-dev libsasl2-dev postgresql-server-dev-8.3 po-debconf dpatch libmysqlclient15-dev lsb-release libcdb-dev libdb-dev hardening-wrapper
cd /usr/src
apt-get suffixe source
(Assurez-vous d'utiliser la bonne version de Postfix dans les commandes suivantes. J'ai installé Postfix 2.5.5. Vous pouvez trouver votre version de Postfix en exécutant
postconf -d | grep mail_version
Le résultat devrait ressembler à ceci :
[email protected] :/usr/src# postconf -d | grep mail_version
mail_version =2.5.5
milter_macro_v =$mail_name $mail_version
[email protected] :/usr/src#
)
wget http://vda.sourceforge.net/VDA/postfix-2.5.5-vda-ng.patch.gz
gunzip postfix-2.5.5-vda-ng.patch.gz
cd postfix -2.5.5
correctif -p1 <../postfix-2.5.5-vda-ng.patch
dpkg-buildpackage
Vous pouvez voir un avertissement comme celui-ci à la fin de la commande dpkg-buildpackage :
dpkg-buildpackage: warning: Failed to sign .dsc and .changes file
Vous pouvez ignorer ce message.
Maintenant, nous remontons d'un répertoire, c'est là que les nouveaux packages .deb ont été créés :
cd ..
La commande
ls -l
vous montre les packages disponibles :
[email protected] :/usr/src# ls -l
total 5872
drwxr-xr-x 19 root root 4096 2008-11-04 16:19 postfix-2.5.5
- rw-r--r-- 1 source racine 230154 2008-11-04 16:16 postfix_2.5.5-1.diff.gz
-rw-r--r-- 1 source racine 1170 2008-11- 04 16:16 postfix_2.5.5-1.dsc
-rw-r--r-- 1 root src 3737 2008-11-04 16:21 postfix_2.5.5-1_i386.changes
-rw- r--r-- 1 source racine 1230234 2008-11-04 16:21 postfix_2.5.5-1_i386.deb
-rw-r--r-- 1 source racine 3157877 2008-09-03 17:04 postfix_2.5.5.orig.tar.gz
-rw-r--r-- 1 root src 58389 2008-09-06 05:02 postfix-2.5.5-vda-ng.patch
- rw-r--r-- 1 root src 41404 2008-11-04 16:21 postfix-cdb_2.5.5-1_i386.deb
-rw-r--r-- 1 root src 140970 2008-11- 04 16:21 postfix-dev_2.5.5-1_all.deb
-rw-r--r-- 1 root src 916504 2008-11-04 16:21 postfix-doc_2.5.5-1_all.deb
-rw-r--r-- 1 root src 48652 2008-11-04 16:21 postfix-ldap_2.5.5-1_i386.deb
-rw-r--r-- 1 root src 43332 2008- 11-04 16:21 postfix-mysql_2.5.5-1_ i386.deb
-rw-r--r-- 1 root src 43256 2008-11-04 16:21 postfix-pcre_2.5.5-1_i386.deb
-rw-r--r-- 1 root src 43412 2008-11-04 16:21 postfix-pgsql_2.5.5-1_i386.deb
[email protected] :/usr/src#
Choisissez les packages postfix et postfix-mysql et installez-les comme ceci :
dpkg -i postfix_2.5.5-1_i386.deb postfix-mysql_2.5.5-1_i386.deb
4 Créer la base de données MySQL pour Postfix/Courier
Nous créons maintenant une base de données appelée mail :
mysqladmin -u root -p create mail
Ensuite, nous passons au shell MySQL :
mysql -u root -p
Sur le shell MySQL, nous créons l'utilisateur mail_admin avec le mot de passe mail_admin_password (remplacez-le par votre propre mot de passe) qui a les privilèges SELECT, INSERT, UPDATE, DELETE sur la base de données de messagerie. Cet utilisateur sera utilisé par Postfix et Courier pour se connecter à la base mail :
GRANT SELECT, INSERT, UPDATE, DELETE ON mail.* TO 'mail_admin'@'localhost' IDENTIFIED BY 'mail_admin_password';
GRANT SELECT, INSERT, UPDATE, DELETE ON mail.* TO 'mail_admin'@'localhost. localdomain' IDENTIFIÉ PAR 'mail_admin_password' ;
PRIVILÈGES FLUSH ;
Toujours sur le shell MySQL, nous créons les tables nécessaires à Postfix et Courier :
USE mail;
CREATE TABLE domaines (
domaine varchar(50) NOT NULL,
CLÉ PRIMAIRE (domaine) )
TYPE=MyISAM;
CREATE TABLE redirections (
source varchar(80) NOT NULL,
destination TEXT NOT NULL,
PRIMARY KEY (source) )
TYPE=MyISAM;
CREATE TABLE users (
email varchar(80) NOT NULL,
mot de passe varchar(20) NOT NULL,
quota INT(10) DEFAULT '10485760',
PRIMARY KEY (email )
) TYPE=MonISAM ;
CREATE TABLE transport (
domaine varchar(128) NOT NULL par défaut '',
transport varchar(128) NOT NULL par défaut '',
CLÉ UNIQUE domaine (domaine)
) TYPE =MonISAM;
quit;
Comme vous l'avez peut-être remarqué, avec le renoncement; commande, nous avons quitté le shell MySQL et sommes de retour sur le shell Linux.
Les domaines table stockera chaque domaine virtuel pour lequel Postfix devrait recevoir des e-mails (par exemple, example.com ).
| domaine |
| exemple.com |
Les transferts table sert à créer un alias d'une adresse e-mail à une autre, par ex. transférer les e-mails pour [email protected] à [email protected] .
| source | destination |
| [email protected] | [email protected] |
Les utilisateurs La table stocke tous les utilisateurs virtuels (c'est-à-dire les adresses e-mail, car l'adresse e-mail et le nom d'utilisateur sont identiques) et les mots de passe (en chiffré formulaire !) et une valeur de quota pour chaque boîte aux lettres (dans cet exemple, la valeur par défaut est de 10485760 octets, ce qui signifie 10 Mo).
| mot de passe | quota | |
| [email protected] | No9.E4skNvGa. ("secret" sous forme cryptée) | 10485760 |
Le transport table est facultative, elle est destinée aux utilisateurs avancés. Il permet de transférer les e-mails d'utilisateurs uniques, de domaines entiers ou de tous les e-mails vers un autre serveur. Par exemple,
| domaine | transport |
| exemple.com | smtp :[1.2.3.4] |
transmettra tous les e-mails pour example.com via le protocole smtp au serveur avec l'adresse IP 1.2.3.4 (les crochets [] signifie "ne pas rechercher l'enregistrement DNS MX" (ce qui est logique pour les adresses IP...). Si vous utilisez un nom de domaine complet (FQDN) à la place, vous n'utiliserez pas les crochets.).
BTW, (je suppose que l'adresse IP de votre système de serveur de messagerie est 192.168.0.100), vous pouvez accéder à phpMyAdmin via http://192.168.0.100/phpmyadmin/ dans un navigateur et vous connecter en tant que mail_admin. Ensuite, vous pouvez consulter la base de données. Plus tard, vous pourrez utiliser phpMyAdmin pour administrer votre serveur de messagerie.
5 Configurer Postfix
Maintenant, nous devons dire à Postfix où il peut trouver toutes les informations dans la base de données. Par conséquent, nous devons créer six fichiers texte. Vous remarquerez que je dis à Postfix de se connecter à MySQL sur l'adresse IP 127.0.0.1 au lieu de localhost. C'est parce que Postfix s'exécute dans une prison chroot et n'a pas accès au socket MySQL auquel il essaierait de se connecter si je disais à Postfix d'utiliser localhost. Si j'utilise 127.0.0.1, Postfix utilise le réseau TCP pour se connecter à MySQL, ce qui ne pose aucun problème, même dans une prison chroot (l'alternative serait de déplacer le socket MySQL dans la prison chroot, ce qui cause d'autres problèmes).
Assurez-vous que /etc/mysql/my.cnf contient la ligne suivante :
vi /etc/mysql/my.cnf
[...] bind-address = 127.0.0.1 [...] |
Si vous deviez modifier /etc/mysql/my.cnf, veuillez redémarrer MySQL maintenant :
/etc/init.d/mysql restart
Exécuter
netstat -tap | grep mysql
pour vous assurer que MySQL écoute sur 127.0.0.1 (localhost.localdomain) :
[email protected] :/usr/src# netstat -tap | grep mysql
tcp 0 0 localhost.localdo:mysql * : ÉCOUTEZ 7224/mysqld
[email protected] :/usr/src#
Créons maintenant nos six fichiers texte.
vi /etc/postfix/mysql-virtual_domains.cf
user = mail_admin password = mail_admin_password dbname = mail query = SELECT domain AS virtual FROM domains WHERE domain='%s' hosts = 127.0.0.1 |
vi /etc/postfix/mysql-virtual_forwardings.cf
user = mail_admin password = mail_admin_password dbname = mail query = SELECT destination FROM forwardings WHERE source='%s' hosts = 127.0.0.1 |
vi /etc/postfix/mysql-virtual_mailboxes.cf
user = mail_admin password = mail_admin_password dbname = mail query = SELECT CONCAT(SUBSTRING_INDEX(email,'@',-1),'/',SUBSTRING_INDEX(email,'@',1),'/') FROM users WHERE email='%s' hosts = 127.0.0.1 |
vi /etc/postfix/mysql-virtual_email2email.cf
user = mail_admin password = mail_admin_password dbname = mail query = SELECT email FROM users WHERE email='%s' hosts = 127.0.0.1 |
vi /etc/postfix/mysql-virtual_transports.cf
user = mail_admin password = mail_admin_password dbname = mail query = SELECT transport FROM transport WHERE domain='%s' hosts = 127.0.0.1 |
vi /etc/postfix/mysql-virtual_mailbox_limit_maps.cf
user = mail_admin password = mail_admin_password dbname = mail query = SELECT quota FROM users WHERE email='%s' hosts = 127.0.0.1 |
Modifiez ensuite les permissions et le groupe de ces fichiers :
chmod o=/etc/postfix/mysql-virtual_*.cf
chgrp postfix /etc/postfix/mysql-virtual_*.cf
Nous créons maintenant un utilisateur et un groupe appelé vmail avec le répertoire personnel /home/vmail. C'est là que toutes les boîtes aux lettres seront stockées.
groupadd -g 5000 vmail
useradd -g vmail -u 5000 vmail -d /home/vmail -m
Ensuite, nous effectuons une configuration de Postfix. Assurez-vous de remplacer server1.example.com par un FQDN valide, sinon votre Postfix risque de ne pas fonctionner correctement !
postconf -e 'myhostname =server1.example.com'
postconf -e 'mydestination =server1.example.com, localhost, localhost.localdomain'
postconf -e 'mynetworks =127.0.0.0/8'
postconf -e 'virtual_alias_domains ='
postconf -e 'virtual_alias_maps =proxy:mysql:/etc/postfix/mysql-virtual_forwardings.cf, mysql:/etc/postfix/mysql-virtual_email2email.cf'
postconf -e 'virtual_mailbox_domains =proxy:mysql:/etc/postfix/mysql-virtual_domains.cf'
postconf -e 'virtual_mailbox_maps =proxy:mysql:/etc/postfix/mysql-virtual_mailboxes.cf'
postconf -e 'virtual_mailbox_base =/home/vmail'
postconf -e 'virtual_uid_maps =static:5000'
postconf -e 'virtual_gid_maps =static:5000'
postconf -e ' smtpd_sasl_auth_enable =yes'
postconf -e 'broken_sasl_auth_clients =yes'
postconf -e 'smtpd_sasl_authenticated_header =yes'
postconf -e 'smtpd_recipient_restrictions =permit_mynetworks, post permit_sasl_authenticated, rejet_unauth />destination'
-e 'smtpd_use_tls =yes'
postconf -e 'smtpd_tls_cert_file =/etc/postfix/smtpd.cert'
postconf -e 'smtpd_tls_key_file =/etc/postfix/smtpd.key'
postconf -e 'transport_maps =proxy:mysql:/etc/postfix/mysql-virtual_transports.cf'
postconf -e 'virtual_create_maildirsize =yes'
postconf -e 'virtual_maildir_extended =yes'
postconf - e 'virtual_mailbox_limit_maps =proxy:mysql:/etc/postfix/mysql-virtual_mailbox_limit_maps.cf'
postconf -e 'virtual_mailbox_limit_override =yes'
postconf -e 'virtual_maildir_limit_message ="L'utilisateur que vous essayez de joindre est dépassement de quota."'
postconf -e 'virtual_overquota_bounce =yes'
postconf -e 'proxy_read_maps =$local_recipient_maps $mydestination $virtual_alias_maps $virtual_alias_domains $virtual_mailbox_maps $virtual_mailbox_domains $relay_recipient_maps $relay_domains $canonical_maps $sender_canonical_maps relocated_maps $transport_maps $mynetworks $virtual_mailbox_limit_maps'
Ensuite, nous créons le certificat SSL nécessaire pour TLS :
cd /etc/postfix
openssl req -new -outform PEM -out smtpd.cert -newkey rsa:2048 -nodes -keyout smtpd.key -keyform PEM -days 365 -x509
Nom du pays (code à 2 lettres) [AU] :<-- Saisissez le nom de votre pays (par exemple, "DE").
Nom de l'État ou de la province (nom complet) [Some-State] :<-- Saisissez votre état ou Nom de la province.
Nom de la localité (par exemple, ville) [] :<-- Entrez votre ville.
Nom de l'organisation (par exemple, société) [Internet Widgits Pty Ltd] :<-- Entrez le nom de votre organisation (par exemple, le nom de votre entreprise).
Nom de l'unité organisationnelle (par exemple, section) [] :<-- Saisissez le nom de votre unité organisationnelle (par exemple, "Service informatique").
Nom commun (par exemple, VOTRE nom) [] :<-- Saisissez le nom de domaine complet du système (par exemple, "serveur1.exemple.com").
Adresse e-mail [] :<-- Saisissez votre adresse e-mail.
Modifiez ensuite les permissions du smtpd.key :
chmod o= /etc/postfix/smtpd.key
6 Configurer Saslauthd
Première exécution
mkdir -p /var/spool/postfix/var/run/saslauthd
Modifiez ensuite /etc/default/saslauthd. Définissez START sur yes et modifiez la ligne OPTIONS="-c -m /var/run/saslauthd" en OPTIONS="-c -m /var/spool/postfix/var/run/saslauthd -r":
vi /etc/default/saslauthd
# # Settings for saslauthd daemon # Please read /usr/share/doc/sasl2-bin/README.Debian for details. # # Should saslauthd run automatically on startup? (default: no) START=yes # Description of this saslauthd instance. Recommended. # (suggestion: SASL Authentication Daemon) DESC="SASL Authentication Daemon" # Short name of this saslauthd instance. Strongly recommended. # (suggestion: saslauthd) NAME="saslauthd" # Which authentication mechanisms should saslauthd use? (default: pam) # # Available options in this Debian package: # getpwent -- use the getpwent() library function # kerberos5 -- use Kerberos 5 # pam -- use PAM # rimap -- use a remote IMAP server # shadow -- use the local shadow password file # sasldb -- use the local sasldb database file # ldap -- use LDAP (configuration is in /etc/saslauthd.conf) # # Only one option may be used at a time. See the saslauthd man page # for more information. # # Example: MECHANISMS="pam" MECHANISMS="pam" # Additional options for this mechanism. (default: none) # See the saslauthd man page for information about mech-specific options. MECH_OPTIONS="" # How many saslauthd processes should we run? (default: 5) # A value of 0 will fork a new process for each connection. THREADS=5 # Other options (default: -c -m /var/run/saslauthd) # Note: You MUST specify the -m option or saslauthd won't run! # # WARNING: DO NOT SPECIFY THE -d OPTION. # The -d option will cause saslauthd to run in the foreground instead of as # a daemon. This will PREVENT YOUR SYSTEM FROM BOOTING PROPERLY. If you wish # to run saslauthd in debug mode, please run it by hand to be safe. # # See /usr/share/doc/sasl2-bin/README.Debian for Debian-specific information. # See the saslauthd man page and the output of 'saslauthd -h' for general # information about these options. # # Example for postfix users: "-c -m /var/spool/postfix/var/run/saslauthd" #OPTIONS="-c -m /var/run/saslauthd" OPTIONS="-c -m /var/spool/postfix/var/run/saslauthd -r" |
Créez ensuite le fichier /etc/pam.d/smtp. Il ne doit contenir que les deux lignes suivantes (assurez-vous de remplir correctement les détails de votre base de données) :
vi /etc/pam.d/smtp
auth required pam_mysql.so user=mail_admin passwd=mail_admin_password host=127.0.0.1 db=mail table=users usercolumn=email passwdcolumn=password crypt=1 account sufficient pam_mysql.so user=mail_admin passwd=mail_admin_password host=127.0.0.1 db=mail table=users usercolumn=email passwdcolumn=password crypt=1 |
Créez ensuite le fichier /etc/postfix/sasl/smtpd.conf. Cela devrait ressembler à ceci :
vi /etc/postfix/sasl/smtpd.conf
pwcheck_method: saslauthd mech_list: plain login allow_plaintext: true auxprop_plugin: mysql sql_hostnames: 127.0.0.1 sql_user: mail_admin sql_passwd: mail_admin_password sql_database: mail sql_select: select password from users where email = '%u' |
Ajoutez ensuite l'utilisateur postfix au groupe sasl (cela garantit que Postfix a l'autorisation d'accéder à saslauthd) :
adduser postfix sasl
Redémarrez ensuite Postfix et Saslauthd :
/etc/init.d/postfix restart
/etc/init.d/saslauthd restart
7 Configurer Courrier
Nous devons maintenant dire à Courier qu'il doit s'authentifier auprès de notre base de données MySQL. Tout d'abord, éditez /etc/courier/authdaemonrc et changez la valeur de authmodulelist pour qu'elle se lise :
vi /etc/courier/authdaemonrc
[...] authmodulelist="authmysql" [...] |
Faites ensuite une sauvegarde de /etc/courier/authmysqlrc et videz l'ancien fichier :
cp /etc/courier/authmysqlrc /etc/courier/authmysqlrc_orig
cat /dev/null> /etc/courier/authmysqlrc
Ouvrez ensuite /etc/courier/authmysqlrc et insérez-y les lignes suivantes :
vi /etc/courier/authmysqlrc
MYSQL_SERVER localhost MYSQL_USERNAME mail_admin MYSQL_PASSWORD mail_admin_password MYSQL_PORT 0 MYSQL_DATABASE mail MYSQL_USER_TABLE users MYSQL_CRYPT_PWFIELD password #MYSQL_CLEAR_PWFIELD password MYSQL_UID_FIELD 5000 MYSQL_GID_FIELD 5000 MYSQL_LOGIN_FIELD email MYSQL_HOME_FIELD "/home/vmail" MYSQL_MAILDIR_FIELD CONCAT(SUBSTRING_INDEX(email,'@',-1),'/',SUBSTRING_INDEX(email,'@',1),'/') #MYSQL_NAME_FIELD MYSQL_QUOTA_FIELD quota |
Redémarrez ensuite Courier :
/etc/init.d/courier-authdaemon restart
/etc/init.d/courier-imap restart
/etc/init.d/courier-imap-ssl restart
/etc/ init.d/courier-pop restart
/etc/init.d/courier-pop-ssl restart
En courant
telnet localhost pop3
vous pouvez voir si votre serveur POP3 fonctionne correctement. Il devrait rendre +OK Bonjour. (Tapez quit pour revenir au shell Linux.)
[email protected] :/etc/postfix# telnet localhost pop3
Essai 127.0.0.1...
Connecté à localhost.localdomain.
Le caractère d'échappement est '^]'.
+OK Bonjour.
quitter
+OK Meilleure chance la prochaine fois.
Connexion fermée par un hôte étranger.
[email protected] :/etc/postfix#
8 Modifier /etc/aliases
Maintenant, nous devrions ouvrir /etc/aliases. Assurez-vous que postmaster pointe vers root et root vers votre propre nom d'utilisateur ou votre adresse e-mail, par ex. comme ceci :
vi /etc/aliases
[...] postmaster: root root: [email protected] [...] |
ou comme ceci (si l'administrateur est votre propre nom d'utilisateur) :
[...] postmaster: root root: administrator [...] |
Chaque fois que vous modifiez /etc/aliases, vous devez exécuter
newaliases
ensuite et relancez Postfix :
/etc/init.d/postfix restart
9 Installer amavisd-new, SpamAssassin et ClamAV
Pour installer amavisd-new, spamassassin et clamav, exécutez la commande suivante :
apt-get install amavisd-new spamassassin clamav clamav-daemon zoo unzip bzip2 libnet-ph-perl libnet-snpp-perl libnet-telnet-perl nomarch lzop pax
Étant donné que cette commande installe à nouveau AppArmor en tant que dépendance, nous devons la désactiver à nouveau :
/etc/init.d/apparmor stop
update-rc.d -f apparmor remove
apt-get remove apparmor apparmor-utils
Ensuite, nous devons configurer amavisd-new. La configuration est divisée en plusieurs fichiers qui résident dans le répertoire /etc/amavis/conf.d. Jetez un œil à chacun d'eux pour vous familiariser avec la configuration. La plupart des paramètres sont corrects, cependant nous devons modifier trois fichiers :
Il faut d'abord activer ClamAV et SpamAssassin dans /etc/amavis/conf.d/15-content_filter_mode en décommentant les lignes @bypass_virus_checks_maps et @bypass_spam_checks_maps :
vi /etc/amavis/conf.d/15-content_filter_mode
Le fichier devrait ressembler à ceci :
use strict; # You can modify this file to re-enable SPAM checking through spamassassin # and to re-enable antivirus checking. # # Default antivirus checking mode # Uncomment the two lines below to enable it back # @bypass_virus_checks_maps = ( \%bypass_virus_checks, \@bypass_virus_checks_acl, \$bypass_virus_checks_re); # # Default SPAM checking mode # Uncomment the two lines below to enable it back # @bypass_spam_checks_maps = ( \%bypass_spam_checks, \@bypass_spam_checks_acl, \$bypass_spam_checks_re); 1; # ensure a defined return |
Ensuite, vous devriez jeter un œil aux paramètres de spam et aux actions pour les spams/virus-mails dans /etc/amavis/conf.d/20-debian_defaults. Il n'est pas nécessaire de modifier quoi que ce soit si les paramètres par défaut vous conviennent. Le fichier contient de nombreuses explications, il n'est donc pas nécessaire d'expliquer les paramètres ici :
vi /etc/amavis/conf.d/20-debian_defaults
[...] $QUARANTINEDIR = "$MYHOME/virusmails"; $quarantine_subdir_levels = 1; # enable quarantine dir hashing $log_recip_templ = undef; # disable by-recipient level-0 log entries $DO_SYSLOG = 1; # log via syslogd (preferred) $syslog_ident = 'amavis'; # syslog ident tag, prepended to all messages $syslog_facility = 'mail'; $syslog_priority = 'debug'; # switch to info to drop debug output, etc $enable_db = 1; # enable use of BerkeleyDB/libdb (SNMP and nanny) $enable_global_cache = 1; # enable use of libdb-based cache if $enable_db=1 $inet_socket_port = 10024; # default listening socket $sa_spam_subject_tag = '***SPAM*** '; $sa_tag_level_deflt = 2.0; # add spam info headers if at, or above that level $sa_tag2_level_deflt = 6.31; # add 'spam detected' headers at that level $sa_kill_level_deflt = 6.31; # triggers spam evasive actions $sa_dsn_cutoff_level = 10; # spam level beyond which a DSN is not sent [...] $final_virus_destiny = D_DISCARD; # (data not lost, see virus quarantine) $final_banned_destiny = D_BOUNCE; # D_REJECT when front-end MTA $final_spam_destiny = D_BOUNCE; $final_bad_header_destiny = D_PASS; # False-positive prone (for spam) [...] |
Enfin, éditez /etc/amavis/conf.d/50-user et ajoutez la ligne $pax='pax'; au milieu :
vi /etc/amavis/conf.d/50-user
use strict; # # Place your configuration directives here. They will override those in # earlier files. # # See /usr/share/doc/amavisd-new/ for documentation and examples of # the directives you can use in this file # $pax='pax'; #------------ Do not modify anything below this line ------------- 1; # ensure a defined return |
Ensuite, exécutez ces commandes pour ajouter l'utilisateur clamav au groupe amavis et pour redémarrer amavisd-new et ClamAV :
adduser clamav amavis
/etc/init.d/amavis restart
/etc/init.d/clamav-daemon restart
/etc/init.d/clamav-freshclam restart
Nous devons maintenant configurer Postfix pour diriger les e-mails entrants via amavisd-new :
postconf -e 'content_filter =amavis:[127.0.0.1]:10024'
postconf -e 'receive_override_options =no_address_mappings'
Ajoutez ensuite les lignes suivantes à /etc/postfix/master.cf :
vi /etc/postfix/master.cf
[...]
amavis unix - - - - 2 smtp
        -o smtp_data_done_timeout=1200
        -o smtp_send_xforward_command=yes

127.0.0.1:10025 inet n - - - - smtpd
        -o content_filter=
        -o local_recipient_maps=
        -o relay_recipient_maps=
        -o smtpd_restriction_classes=
        -o smtpd_client_restrictions=
        -o smtpd_helo_restrictions=
        -o smtpd_sender_restrictions=
        -o smtpd_recipient_restrictions=permit_mynetworks,reject
        -o mynetworks=127.0.0.0/8
        -o strict_rfc821_envelopes=yes
        -o receive_override_options=no_unknown_recipient_checks,no_header_body_checks
-o smtpd_bind_address=127.0.0.1 |
Redémarrez ensuite Postfix :
/etc/init.d/postfix restart
Maintenant lancez
netstat -tap
et vous devriez voir Postfix (master) en écoute sur les ports 25 (smtp) et 10025, et amavisd-new sur le port 10024 :
[email protected] :/etc/postfix# netstat -tap
Connexions Internet actives (serveurs et établies)
Proto Recv-Q Send-Q Adresse locale Adresse étrangère État PID/Nom du programme
tcp 0 0 localhost.localdo:10024 *:* Écoutez 22356 / Amavisd (Mast
TCP 0 0 localhost.localdo:10025 *:* Écoutez 23581 / Master
TCP 0 0 localhost.localdo:mysql *:* Écoutez 7224 / mysqld
TCP 0 0 *:www *:* Écoutez 6237 / apache2
TCP 0 0 *:SSH *:* Écoutez 3648 / sshd
TCP 0 0 *:SMTP *:* Écoutez 23581 / Master
TCP 0 148 Server1.example.com:SSh LocalHost:3220 établi 3698/0
TCP6 0 0 [::]:imaps [::]:* Écoutez 19408 / COURERTCPD
tcp 6 0 0 [::]:Pop3s [::]:* Écoutez 19476 / COURERTCPD
TCP6 0 0 [::]:POP3 [::]:* Écoutez 19439 / COURERTCPD
TCP6 0 0 [ ::]:imap2 [::]:* Écoutez 19371 / COURERTCPD
TCP6 0 0 [::]:ssh [::]:* Écoutez 3648 / sshd
[e-mail protégé]:/ etc / suffixe#
10 Installer Razor, Pyzor et DCC et configurer SpamAssassin
Razor, Pyzor et DCC sont des filtres anti-spam qui utilisent un réseau de filtrage collaboratif. Pour installer Razor et Pyzor, exécutez
apt-get install razor pyzor
DCC n'est pas disponible dans les référentiels Ubuntu 8.10, nous l'installons donc comme suit :
cd /tmp
wget http://launchpadlibrarian.net/11564361/dcc-server_1.3.42-5_i386.deb
wget http://launchpadlibrarian.net/11564359/dcc-common_1.3.42-5_i386. deb
dpkg -i dcc-common_1.3.42-5_i386.deb
dpkg -i dcc-server_1.3.42-5_i386.deb
Maintenant, nous devons dire à SpamAssassin d'utiliser ces trois programmes. Modifiez /etc/spamassassin/local.cf et ajoutez-y les lignes suivantes :
vi /etc/spamassassin/local.cf
[...] #dcc use_dcc 1 dcc_path /usr/bin/dccproc #pyzor use_pyzor 1 pyzor_path /usr/bin/pyzor #razor use_razor2 1 razor_config /etc/razor/razor-agent.conf #bayes use_bayes 1 use_bayes_rules 1 bayes_auto_learn 1 |
Ensuite, il faut activer le plugin DCC dans SpamAssassin. Ouvrez /etc/spamassassin/v310.pre et décommentez le loadplugin Mail::SpamAssassin::Plugin::DCC line:
vi /etc/spamassassin/v310.pre
[...] # DCC - perform DCC message checks. # # DCC is disabled here because it is not open source. See the DCC # license for more details. # loadplugin Mail::SpamAssassin::Plugin::DCC [...] |
You can check your SpamAssassin configuration by executing:
spamassassin --lint
It shouldn't show any errors.
Restart amavisd-new afterwards:
/etc/init.d/amavis restart
Now we update our SpamAssassin rulesets as follows:
sa-update --no-gpg
We create a cron job so that the rulesets will be updated regularly. Exécuter
crontab -e
to open the cron job editor. Create the following cron job:
23 4 */2 * * /usr/bin/sa-update --no-gpg &> /dev/null |
This will update the rulesets every second day at 4.23h.
11 Quota Exceedance Notifications
If you want to get notifications about all the email accounts that are over quota, then do this:
cd /usr/local/sbin/
wget http://puuhis.net/vhcs/quota.txt
mv quota.txt quota_notify
chmod 755 quota_notify
Open /usr/local/sbin/quota_notify and edit the variables at the top. Further down in the file (towards the end) there are two lines where you should add a % sign:
vi /usr/local/sbin/quota_notify
[...]
my $POSTFIX_CF = "/etc/postfix/main.cf";
my $MAILPROG = "/usr/sbin/sendmail -t";
my $WARNPERCENT = 80;
my @POSTMASTERS = ('[email protected]');
my $CONAME = 'My Company';
my $COADDR = '[email protected]';
my $SUADDR = '[email protected]';
my $MAIL_REPORT = 1;
my $MAIL_WARNING = 1;
[...]
           print "Subject: WARNING: Your mailbox is $lusers{$luser}% full.\n";
[...]
           print "Your mailbox: $luser is $lusers{$luser}% full.\n\n";
[...] |
Exécuter
crontab -e
to create a cron job for that script:
0 0 * * * /usr/local/sbin/quota_notify &> /dev/null |
12 Test Postfix
To see if Postfix is ready for SMTP-AUTH and TLS, run
telnet localhost 25
After you have established the connection to your Postfix mail server type
ehlo localhost
If you see the lines
250-STARTTLS
et
250-AUTH LOGIN PLAIN
everything is fine:
[email protected]:/usr/local/sbin# telnet localhost 25
Trying 127.0.0.1...
Connected to localhost.localdomain.
Escape character is '^]'.
220 server1.example.com ESMTP Postfix (Ubuntu)
ehlo localhost
250-server1.example.com
250-PIPELINING
250-SIZE 10240000
250-VRFY
250-ETRN
250-STARTTLS
250-AUTH LOGIN PLAIN
250-AUTH=LOGIN PLAIN
250-ENHANCEDSTATUSCODES
250-8BITMIME
250 DSN
quit
221 2.0.0 Bye
Connection closed by foreign host.
[email protected]:/usr/local/sbin#
Type
quit
to return to the system shell.
13 Populate The Database And Test
To populate the database you can use the MySQL shell:
mysql -u root -p
USE mail;
At least you have to create entries in the tables domains and users :
INSERT INTO `domains` (`domain`) VALUES ('example.com');
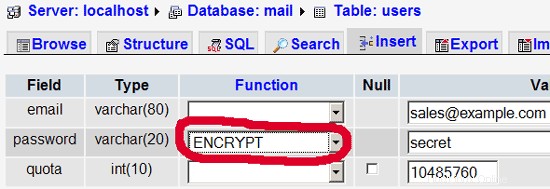
INSERT INTO `users` (`email`, `password`, `quota`) VALUES ('[email protected]', ENCRYPT('secret'), 10485760);
(Please take care that you use the ENCRYPT syntax in the second INSERT statement in order to encrypt the password!)
If you want to make entries in the other two tables, that would look like this:
INSERT INTO `forwardings` (`source`, `destination`) VALUES ('[email protected]', '[email protected]');
INSERT INTO `transport` (`domain`, `transport`) VALUES ('example.com', 'smtp:mail.example.com');
To leave the MySQL shell, type
quit;
For most people it is easier if they have a graphical front-end to MySQL; therefore you can also use phpMyAdmin (in this example under http://192.168.0.100/phpmyadmin/ or http://server1.example.com/phpmyadmin/) to administrate the mail base de données. Again, when you create a user, go sure that you use the ENCRYPT function to encrypt the password:
I do not think I have to explain the domains and users table further.
The forwardings table can have entries like the following:
| source | destination | |
| [email protected] | [email protected] | Redirects emails for [email protected] to [email protected] |
| @example.com | [email protected] | Creates a Catch-All account for [email protected] All emails to example.com will arrive at [email protected], except those that exist in the users table (i.e., if [email protected] exists in the users table, mails to [email protected] will still arrive at [email protected]). |
| @example.com | @anotherdomain.tld | This redirects all emails to example.com to the same user at anotherdomain.tld. E.g., emails to [email protected] will be forwarded to [email protected] |
| [email protected] | [email protected], [email protected] | Forward emails for [email protected] to two or more email addresses. All listed email addresses under destination receive a copy of the email. |
The transport table can have entries like these:
| domain | transport | |
| example.com | : | Delivers emails for example.com locally. This is as if this record would not exist in this table at all. |
| example.com | smtp:mail.anotherdomain.tld | Delivers all emails for example.com via smtp to the server mail.anotherdomain.com. |
| example.com | smtp:mail.anotherdomain.tld:2025 | Delivers all emails for example.com via smtp to the server mail.anotherdomain.com, but on port 2025, not 25 which is the default port for smtp. |
| example.com |
smtp:[1.2.3.4] | The square brackets prevent Postfix from doing lookups of the MX DNS record for the address in square brackets. Makes sense for IP addresses. |
| .example.com | smtp:mail.anotherdomain.tld | Mail for any subdomain of example.com is delivered to mail.anotherdomain.tld. |
| * | smtp:mail.anotherdomain.tld | All emails are delivered to mail.anotherdomain.tld. |
| [email protected] | smtp:mail.anotherdomain.tld | Emails for [email protected] are delivered to mail.anotherdomain.tld. |
See
man transport
pour plus de détails.
Please keep in mind that the order of entries in the transport table is important! The entries will be followed from the top to the bottom.
Important: Postfix uses a caching mechanism for the transports, therefore it might take a while until you changes in the transport table take effect. If you want them to take effect immediately, run
postfix reload
after you have made your changes in the transport table.
14 Send A Welcome Email For Creating Maildir
When you create a new email account and try to fetch emails from it (with POP3/IMAP) you will probably get error messages saying that the Maildir doesn't exist. The Maildir is created automatically when the first email arrives for the new account. Therefore it's a good idea to send a welcome email to a new account.
First, we install the mailx package:
apt-get install mailx
To send a welcome email to [email protected], we do this:
mailx [email protected]
You will be prompted for the subject. Type in the subject (e.g. Welcome), then press ENTER, and in the next line type your message. When the message is finished, press ENTER again so that you are in a new line, then press CTRL+D; if you don't want to cc the mail, press ENTER again:
[email protected]:/usr/local/sbin# mailx [email protected]
Subject:Welcome <-- ENTER
Welcome! Have fun with your new mail account. <-- ENTER
<-- CTRL+D
Cc:<-- ENTER
[email protected]:/usr/local/sbin#
15 Installing SquirrelMail
SquirrelMail is a webmail interface that will let your users send and receive emails in a browser. This chapter shows how to install it and adjust it to our setup so that users can even change their email account password from the SquirrelMail interface.
To install SquirrelMail, we run:
apt-get install squirrelmail php-pear
Next we copy the Apache configuration that comes with the SquirrelMail package to the /etc/apache2/conf.d directory and restart Apache:
cp /etc/squirrelmail/apache.conf /etc/apache2/conf.d/squirrelmail.conf
/etc/init.d/apache2 restart
SquirrelMail comes with some pre-installed plugins, unfortunately none of them is capable of letting us change our email password in our MySQL database. But there's the Change SQL Password plugin which we can install manually:
The plugin depends on the Pear-DB package so we install it:
pear install DB
Then we install the Change SQL Password plugin itself:
cd /usr/share/squirrelmail/plugins
wget http://www.squirrelmail.org/countdl.php?fileurl=http%3A%2F%2Fwww.squirrelmail.org%2Fplugins%2Fchange_sqlpass-3.3-1.2.tar.gz
tar xvfz change_sqlpass-3.3-1.2.tar.gz
cd change_sqlpass
cp config.php.sample config.php
Now we must edit config.php and adjust it to our setup. Please adjust the $csp_dsn, $lookup_password_query, $password_update_queries, $password_encryption, $csp_salt_static, and $csp_delimiter variables as follows and comment out $csp_salt_query:
vi config.php
[...]
$csp_dsn = 'mysql://mail_admin:[email protected]/mail';
[...]
$lookup_password_query = 'SELECT count(*) FROM users WHERE email = "%1" AND password = %4';
[...]
$password_update_queries = array('UPDATE users SET password = %4 WHERE email = "%1"');
[...]
$password_encryption = 'MYSQLENCRYPT';
[...]
$csp_salt_static = 'LEFT(password, 2)';
[...]
//$csp_salt_query = 'SELECT salt FROM users WHERE username = "%1"';
[...]
$csp_delimiter = '@';
[...] |
The complete file looks as follows:
<?php

/**
  * SquirrelMail Change SQL Password Plugin
  * Copyright (C) 2001-2002 Tyler Akins
  *               2002 Thijs Kinkhorst <[email protected]>
  *               2002-2005 Paul Lesneiwski <[email protected]>
  * This program is licensed under GPL. See COPYING for details
  *
  * @package plugins
  * @subpackage Change SQL Password
  *
  */


   // Global Variables, don't touch these unless you want to break the plugin
   //
   global $csp_dsn, $password_update_queries, $lookup_password_query,
          $force_change_password_check_query, $password_encryption,
          $csp_salt_query, $csp_salt_static, $csp_secure_port,
          $csp_non_standard_http_port, $csp_delimiter, $csp_debug,
          $min_password_length, $max_password_length, $include_digit_in_password,
          $include_uppercase_letter_in_password, $include_lowercase_letter_in_password,
          $include_nonalphanumeric_in_password;


   // csp_dsn
   //
   // Theoretically, any SQL database supported by Pear should be supported
   // here.  The DSN (data source name) must contain the information needed
   // to connect to your database backend. A MySQL example is included below.
   // For more details about DSN syntax and list of supported database types,
   // please see:
   //   http://pear.php.net/manual/en/package.database.db.intro-dsn.php
   //
   //$csp_dsn = 'mysql://user:[email protected]/email_users';
   $csp_dsn = 'mysql://mail_admin:[email protected]/mail';


   // lookup_password_query
   //
   // This plugin will always verify the user's old password
   // against their login password, but an extra check can also
   // be done against the database for more security if you
   // desire.  If you do not need the extra password check,
   // make sure this setting is empty.
   //
   // This is a query that returns a positive value if a user
   // and password pair are found in the database.
   //
   // This query should return one value (one row, one column), the
   // value being ideally a one or a zero, simply indicating that
   // the user/password pair does in fact exist in the database.
   //
   //   %1 in this query will be replaced with the full username
   //      (including domain), such as "[email protected]"
   //   %2 in this query will be replaced with the username (without
   //      any domain portion), such as "jose"
   //   %3 in this query will be replaced with the domain name,
   //      such as "example.com"
   //   %4 in this query will be replaced with the current (old)
   //      password in whatever encryption format is needed per other
   //      plugin configuration settings (Note that the syntax of
   //      the password will be provided depending on your encryption
   //      choices, so you NEVER need to provide quotes around this
   //      value in the query here.)
   //   %5 in this query will be replaced with the current (old)
   //      password in unencrypted plain text.  If you do not use any
   //      password encryption, %4 and %5 will be the same values,
   //      except %4 will have double quotes around it and %5 will not.
   //
   //$lookup_password_query = '';
   // TERRIBLE SECURITY: $lookup_password_query = 'SELECT count(*) FROM users WHERE username = "%1" AND plain_password = "%5"';
   //$lookup_password_query = 'SELECT count(*) FROM users WHERE username = "%1" AND crypt_password = %4';
   $lookup_password_query = 'SELECT count(*) FROM users WHERE email = "%1" AND password = %4';


   // password_update_queries
   //
   // An array of SQL queries that will all be executed
   // whenever a password change attempt is made.
   //
   // Any number of queries may be included here.
   // The queries will be executed in the order given here.
   //
   //   %1 in all queries will be replaced with the full username
   //      (including domain), such as "[email protected]"
   //   %2 in all queries will be replaced with the username (without
   //      any domain portion), such as "jose"
   //   %3 in all queries will be replaced with the domain name,
   //      such as "example.com"
   //   %4 in all queries will be replaced with the new password
   //      in whatever encryption format is needed per other
   //      plugin configuration settings (Note that the syntax of
   //      the password will be provided depending on your
   //      encryption choices, so you NEVER need to provide quotes
   //      around this value in the queries here.)
   //   %5 in all queries will be replaced with the new password
   //      in unencrypted plain text - BEWARE!  If you do not use
   //      any password encryption, %4 and %5 will be the same
   //      values, except %4 will have double quotes around it
   //      and %5 will not.
   //
//   $password_update_queries = array(
//            'UPDATE users SET crypt_password = %4 WHERE username = "%1"',
//            'UPDATE user_flags SET force_change_pwd = 0 WHERE username = "%1"',
//            'UPDATE users SET crypt_password = %4, force_change_pwd = 0 WHERE username = "%1"',
//                                   );
   $password_update_queries = array('UPDATE users SET password = %4 WHERE email = "%1"');


   // force_change_password_check_query
   //
   // A query that checks for a flag that indicates if a user
   // should be forced to change their password.  This query
   // should return one value (one row, one column) which is
   // zero if the user does NOT need to change their password,
   // or one if the user should be forced to change it now.
   //
   // This setting should be an empty string if you do not wish
   // to enable this functionality.
   //
   //   %1 in this query will be replaced with the full username
   //      (including domain), such as "[email protected]"
   //   %2 in this query will be replaced with the username (without
   //      any domain portion), such as "jose"
   //   %3 in this query will be replaced with the domain name,
   //      such as "example.com"
   //
   //$force_change_password_check_query = 'SELECT IF(force_change_pwd = "yes", 1, 0) FROM users WHERE username = "%1"';
   //$force_change_password_check_query = 'SELECT force_change_pwd FROM users WHERE username = "%1"';
   $force_change_password_check_query = '';


   // password_encryption
   //
   // What encryption method do you use to store passwords
   // in your database?  Please use one of the following,
   // exactly as you see it:
   //
   //   NONE          Passwords are stored as plain text only
   //   MYSQLPWD      Passwords are stored using the MySQL password() function
   //   MYSQLENCRYPT  Passwords are stored using the MySQL encrypt() function
   //   PHPCRYPT      Passwords are stored using the PHP crypt() function
   //   MD5CRYPT      Passwords are stored using encrypted MD5 algorithm
   //   MD5           Passwords are stored as MD5 hash
   //
   //$password_encryption = 'MYSQLPWD';
   $password_encryption = 'MYSQLENCRYPT';


   // csp_salt_query
   // csp_salt_static
   //
   // Encryption types that need a salt need to know where to get
   // that salt.  If you have a constant, known salt value, you
   // should define it in $csp_salt_static.  Otherwise, leave that
   // value empty and define a value for the $csp_salt_query.
   //
   // Leave both values empty if you do not need (or use) salts
   // to encrypt your passwords.
   //
   // The query should return one value (one row, one column) which
   // is the salt value for the current user's password.  This
   // query is ignored if $csp_salt_static is anything but empty.
   //
   //   %1 in this query will be replaced with the full username
   //      (including domain), such as "[email protected]"
   //   %2 in this query will be replaced with the username (without
   //      any domain portion), such as "jose"
   //   %3 in this query will be replaced with the domain name,
   //      such as "example.com"
   //
   //$csp_salt_static = 'LEFT(crypt_password, 2)';
   //$csp_salt_static = '"a4"';  // use this format with MYSQLENCRYPT
   //$csp_salt_static = '$2$blowsomefish$';  // use this format with PHPCRYPT
   //$csp_salt_static = '';
   $csp_salt_static = 'LEFT(password, 2)';

   //$csp_salt_query = 'SELECT SUBSTRING_INDEX(crypt_password, '$', 1) FROM users WHERE username = "%1"';
   //$csp_salt_query = 'SELECT SUBSTRING(crypt_password, (LENGTH(SUBSTRING_INDEX(crypt_password, '$', 2)) + 2)) FROM users WHERE username = "%1"';
   //$csp_salt_query = 'SELECT salt FROM users WHERE username = "%1"';
   //$csp_salt_query = '';


   // csp_secure_port
   //
   // You may ensure that SSL encryption is used during password
   // change by setting this to the port that your HTTPS is served
   // on (443 is typical).  Set to zero if you do not wish to force
   // an HTTPS connection when users are changing their passwords.
   //
   // You may override this value for certain domains, users, or
   // service levels through the Virtual Host Login (vlogin) plugin
   // by setting a value(s) for $vlogin_csp_secure_port in the vlogin
   // configuration.
   //
   $csp_secure_port = 0;
   //$csp_secure_port = 443;


   // csp_non_standard_http_port
   //
   // If you serve standard HTTP web requests on a non-standard
   // port (anything other than port 80), you should specify that
   // port number here.  Set to zero otherwise.
   //
   // You may override this value for certain domains, users, or
   // service levels through the Virtual Host Login (vlogin) plugin
   // by setting a value(s) for $vlogin_csp_non_standard_http_port
   // in the vlogin configuration.
   //
   //$csp_non_standard_http_port = 8080;
   $csp_non_standard_http_port = 0;


   // min_password_length
   // max_password_length
   // include_digit_in_password
   // include_uppercase_letter_in_password
   // include_lowercase_letter_in_password
   // include_nonalphanumeric_in_password
   //
   // You can set the minimum and maximum password lengths that
   // you accept or leave those settings as zero to indicate that
   // no limit should be applied.
   //
   // Turn on any of the other settings here to check that the
   // new password contains at least one digit, upper case letter,
   // lower case letter and/or one non-alphanumeric character.
   //
   $min_password_length = 6;
   $max_password_length = 0;
   $include_digit_in_password = 0;
   $include_uppercase_letter_in_password = 0;
   $include_lowercase_letter_in_password = 0;
   $include_nonalphanumeric_in_password = 0;


   // csp_delimiter
   //
   // if your system has usernames with something other than
   // an "@" sign separating the user and domain portion,
   // specify that character here
   //
   //$csp_delimiter = '|';
   $csp_delimiter = '@';


   // debug mode
   //
   $csp_debug = 0;


?> |
The Change SQL Password plugin also depends on the Compatibility plugin which we install as follows:
cd /usr/share/squirrelmail/plugins
wget http://www.squirrelmail.org/countdl.php?fileurl=http%3A%2F%2Fwww.squirrelmail.org%2Fplugins%2Fcompatibility-2.0.11-1.0.tar.gz
tar xvfz compatibility-2.0.11-1.0.tar.gz
Now we must go into the SquirrelMail configuration and tell SquirrelMail that we use Courier as our POP3 and IMAP server and enable the Change SQL Password and the Compatibility plugins:
/usr/sbin/squirrelmail-configure
You'll see the following menu. Navigate through it as indicated:
SquirrelMail Configuration : Read: config.php (1.4.0)
---------------------------------------------------------
Main Menu --
1. Organization Preferences
2. Server Settings
3. Folder Defaults
4. General Options
5. Themes
6. Address Books
7. Message of the Day (MOTD)
8. Plugins
9. Database
10. Languages
D. Set pre-defined settings for specific IMAP servers
C Turn color on
S Save data
Q Quit
Command >> <-- D
SquirrelMail Configuration : Read: config.php
---------------------------------------------------------
While we have been building SquirrelMail, we have discovered some
preferences that work better with some servers that don't work so
well with others. If you select your IMAP server, this option will
set some pre-defined settings for that server.
Please note that you will still need to go through and make sure
everything is correct. This does not change everything. There are
only a few settings that this will change.
Please select your IMAP server:
bincimap = Binc IMAP server
courier = Courier IMAP server
cyrus = Cyrus IMAP server
dovecot = Dovecot Secure IMAP server
exchange = Microsoft Exchange IMAP server
hmailserver = hMailServer
macosx = Mac OS X Mailserver
mercury32 = Mercury/32
uw = University of Washington's IMAP server
quit = Do not change anything
Command >> <-- courier
imap_server_type = courier
default_folder_prefix = INBOX.
trash_folder = Trash
sent_folder = Sent
draft_folder = Drafts
show_prefix_option = false
default_sub_of_inbox = false
show_contain_subfolders_option = false
optional_delimiter = .
delete_folder = true
Press any key to continue... <-- press some key
SquirrelMail Configuration : Read: config.php (1.4.0)
---------------------------------------------------------
Main Menu --
1. Organization Preferences
2. Server Settings
3. Folder Defaults
4. General Options
5. Themes
6. Address Books
7. Message of the Day (MOTD)
8. Plugins
9. Database
10. Languages
D. Set pre-defined settings for specific IMAP servers
C Turn color on
S Save data
Q Quit
Command >> <-- 8
SquirrelMail Configuration : Read: config.php (1.4.0)
---------------------------------------------------------
Plugins
Installed Plugins
Available Plugins:
1. abook_take
2. administrator
3. bug_report
4. calendar
5. change_sqlpass
6. compatibility
7. delete_move_next
8. demo
9. filters
10. fortune
11. info
12. listcommands
13. mail_fetch
14. message_details
15. newmail
16. sent_subfolders
17. spamcop
18. squirrelspell
19. test
20. translate
R Return to Main Menu
C Turn color on
S Save data
Q Quit
Command >> <-- 6 (or whatever number the compatibility plugin has - it's needed by the change_sqlpass plugin)
SquirrelMail Configuration : Read: config.php (1.4.0)
---------------------------------------------------------
Plugins
Installed Plugins
1. compatibility
Available Plugins:
2. abook_take
3. administrator
4. bug_report
5. calendar
6. change_sqlpass
7. delete_move_next
8. demo
9. filters
10. fortune
11. info
12. listcommands
13. mail_fetch
14. message_details
15. newmail
16. sent_subfolders
17. spamcop
18. squirrelspell
19. test
20. translate
R Return to Main Menu
C Turn color on
S Save data
Q Quit
Command >> <-- 6 (the number of the change_sqlpass plugin)
SquirrelMail Configuration : Read: config.php (1.4.0)
---------------------------------------------------------
Plugins
Installed Plugins
1. compatibility
2. change_sqlpass
Available Plugins:
3. abook_take
4. administrator
5. bug_report
6. calendar
7. delete_move_next
8. demo
9. filters
10. fortune
11. info
12. listcommands
13. mail_fetch
14. message_details
15. newmail
16. sent_subfolders
17. spamcop
18. squirrelspell
19. test
20. translate
R Return to Main Menu
C Turn color on
S Save data
Q Quit
Command >> <-- S
SquirrelMail Configuration : Read: config.php (1.4.0)
---------------------------------------------------------
Plugins
Installed Plugins
1. compatibility
2. change_sqlpass
Available Plugins:
3. abook_take
4. administrator
5. bug_report
6. calendar
7. delete_move_next
8. demo
9. filters
10. fortune
11. info
12. listcommands
13. mail_fetch
14. message_details
15. newmail
16. sent_subfolders
17. spamcop
18. squirrelspell
19. test
20. translate
R Return to Main Menu
C Turn color on
S Save data
Q Quit
Command >> S
Data saved in config.php
Press enter to continue... <-- press some key
SquirrelMail Configuration : Read: config.php (1.4.0)
---------------------------------------------------------
Plugins
Installed Plugins
1. compatibility
2. change_sqlpass
Available Plugins:
3. abook_take
4. administrator
5. bug_report
6. calendar
7. delete_move_next
8. demo
9. filters
10. fortune
11. info
12. listcommands
13. mail_fetch
14. message_details
15. newmail
16. sent_subfolders
17. spamcop
18. squirrelspell
19. test
20. translate
R Return to Main Menu
C Turn color on
S Save data
Q Quit
Command >> <-- Q
Now you can type in http://server1.example.com/squirrelmail or http://192.168.0.100/squirrelmail in your browser to access SquirrelMail.
Log in with your email address (e.g. [email protected]) and your password:
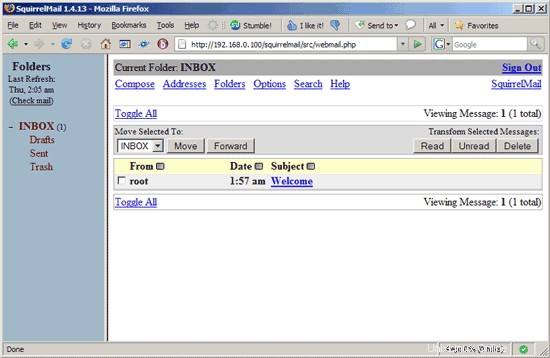
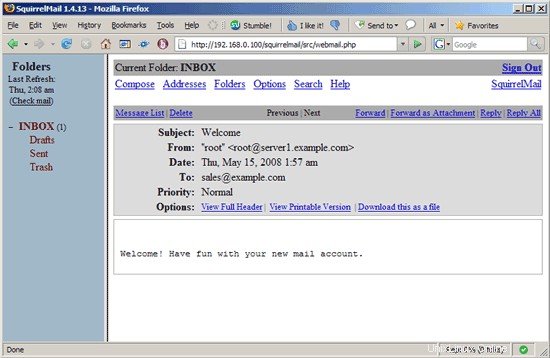
You should find the welcome email in your inbox:
To change your password, go to Options and then select Change Password:

Type in your current password and then your new password twice:

SquirrelMail will tell you if the password has been changed successfully:

16 References
- Tutorial:ISP-style Email Service with Debian-Sarge and Postfix 2.1:http://workaround.org/articles/ispmail-sarge/
- Postfix + Quota:http://vhcs.net/new/modules/newbb/viewtopic.php?topic_id=3496&forum=17
- Mail Passwords Encrypted using saslauthd:http://www.syscp.de/docs/public/contrib/cryptedmailpws
17 Links
- Postfix MTA:http://www.postfix.org/
- Postfix Quota Patch:http://web.onda.com.br/nadal/
- phpMyAdmin :http://www.phpmyadmin.net/
- SquirrelMail:http://www.squirrelmail.org/
- Ubuntu :http://www.ubuntu.com/