Le serveur parfait - Fedora 15 x86_64 [ISPConfig 3]
Ce tutoriel montre comment préparer un serveur Fedora 15 (x86_64) pour l'installation d'ISPConfig 3, et comment installer ISPConfig 3. ISPConfig 3 est un panneau de contrôle d'hébergement Web qui vous permet de configurer les services suivants via un navigateur Web :Serveur Web Apache , serveur de messagerie Postfix, MySQL, serveur de noms BIND, PureFTPd, SpamAssassin, ClamAV et bien d'autres.
Veuillez noter que cette configuration ne fonctionne pas pour ISPConfig 2 ! Il n'est valable que pour ISPConfig 3 !
Je n'émets aucune garantie que cela fonctionnera pour vous !
Manuel ISPConfig 3
Afin d'apprendre à utiliser ISPConfig 3, je vous recommande fortement de télécharger le manuel ISPConfig 3.
Sur environ 300 pages, il couvre le concept derrière ISPConfig (administrateur, revendeurs, clients), explique comment installer et mettre à jour ISPConfig 3, inclut une référence pour tous les formulaires et champs de formulaire dans ISPConfig ainsi que des exemples d'entrées valides, et fournit des tutoriels pour les tâches les plus courantes dans ISPConfig 3. Il explique également comment rendre votre serveur plus sécurisé et est accompagné d'une section de dépannage à la fin.
Application de surveillance ISPConfig pour Android
Avec l'application ISPConfig Monitor, vous pouvez vérifier l'état de votre serveur et savoir si tous les services fonctionnent comme prévu. Vous pouvez vérifier les ports TCP et UDP et envoyer un ping à vos serveurs. En plus de cela, vous pouvez utiliser cette application pour demander des détails aux serveurs sur lesquels ISPConfig est installé (veuillez noter que la version minimale installée d'ISPConfig 3 avec prise en charge de l'application ISPConfig Monitor est 3.0.3.3 ! ); ces détails incluent tout ce que vous savez du module Monitor dans le panneau de configuration ISPConfig (par exemple, les services, les journaux de messagerie et système, la file d'attente de messagerie, les informations sur le processeur et la mémoire, l'utilisation du disque, les quotas, les détails du système d'exploitation, le journal RKHunter, etc.), et bien sûr , comme ISPConfig est compatible avec plusieurs serveurs, vous pouvez vérifier tous les serveurs contrôlés à partir de votre serveur maître ISPConfig.
Pour obtenir des instructions de téléchargement et d'utilisation, veuillez visiter http://www.ispconfig.org/ispconfig-3/ispconfig-monitor-app-for-android/.
1 Exigences
Pour installer un tel système, vous aurez besoin des éléments suivants :
- Téléchargez l'image ISO du DVD Fedora 15 à partir d'un miroir près de chez vous (la liste des miroirs peut être trouvée ici :http://mirrors.fedoraproject.org/publiclist/Fedora/15/), par ex. http://ftp.tu-chemnitz.de/pub/linux/fedora/linux/releases/15/Fedora/x86_64/iso/Fedora-15-x86_64-DVD.iso
- une connexion Internet...
2 Remarque préliminaire
Dans ce tutoriel, j'utilise le nom d'hôte server1.example.com avec l'adresse IP 192.168.0.100 et la passerelle 192.168.0.1. Ces paramètres peuvent différer pour vous, vous devez donc les remplacer le cas échéant.
Assurez-vous que le système que vous souhaitez mettre à niveau dispose de plus de 600 Mo de RAM. Sinon, le système risque de se bloquer lorsqu'il essaie de démarrer avec le message suivant :
Trying to unpack rootfs image as initramfs...
3 Installer le système de base
Démarrez à partir de votre DVD Fedora 15. Sélectionnez Installer un nouveau système ou mettre à niveau un système existant :

Le test du support d'installation peut prendre beaucoup de temps, nous sautons donc ce test ici :

Choisissez ensuite votre langue :
Sélectionnez votre disposition de clavier :
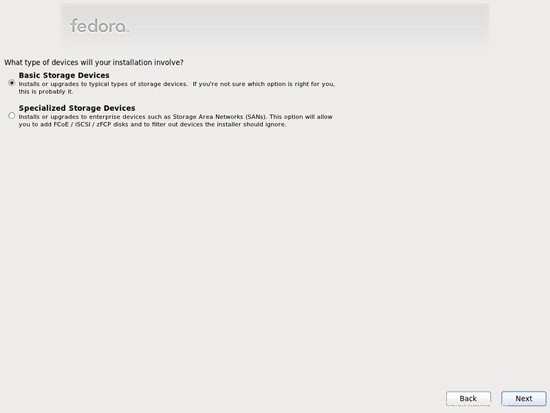
Je suppose que vous utilisez un disque dur connecté localement, vous devez donc sélectionner Périphériques de stockage de base ici :
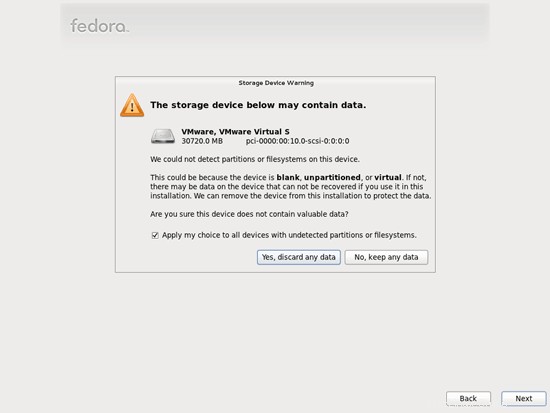
Comme nous voulons une nouvelle installation de Fedora, cliquez ensuite sur le bouton Oui, supprimer toutes les données :
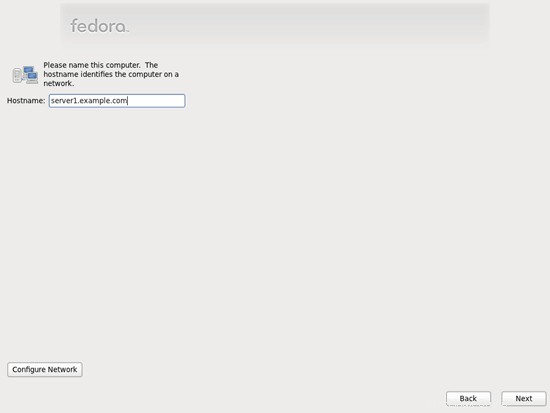
Renseignez le nom d'hôte du serveur :
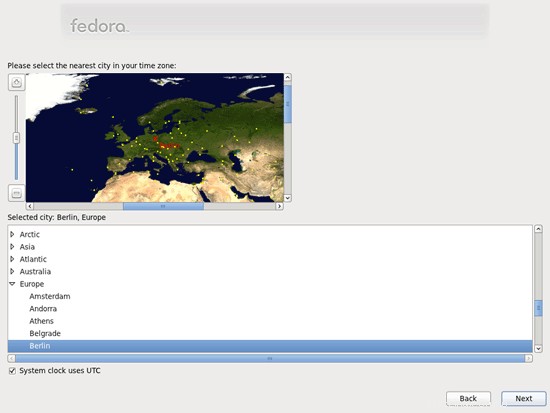
Choisissez votre fuseau horaire :
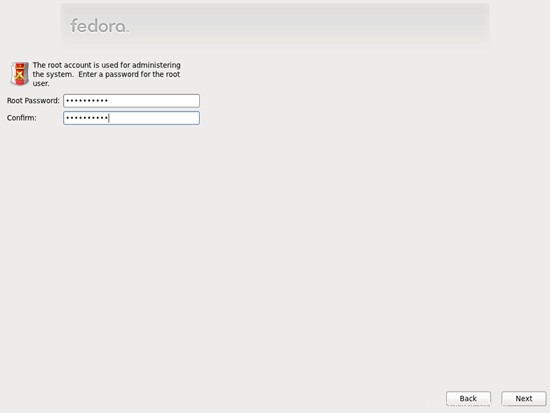
Donnez un mot de passe à root :
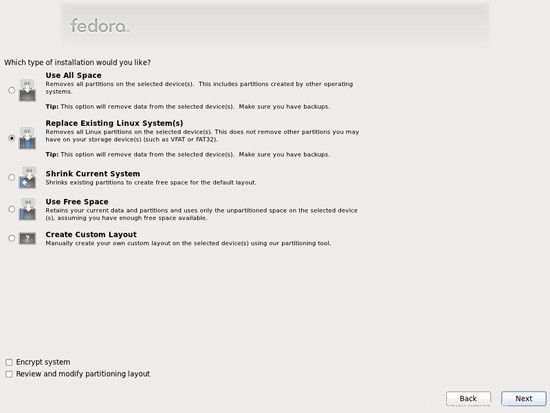
Ensuite, nous procédons au partitionnement. Sélectionnez Remplacer le(s) système(s) Linux existant(s). Cela vous donnera une petite partition /boot et une grande partition / ce qui nous convient :
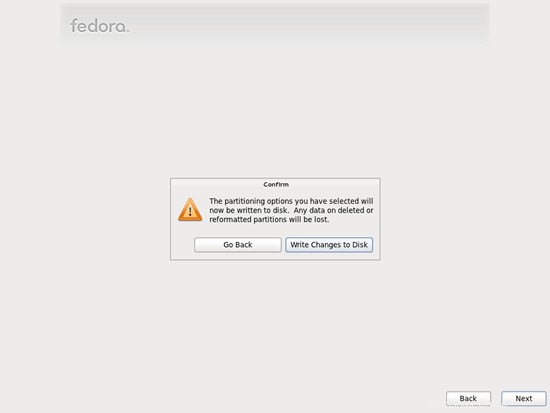
Sélectionnez Écrire les modifications sur le disque :
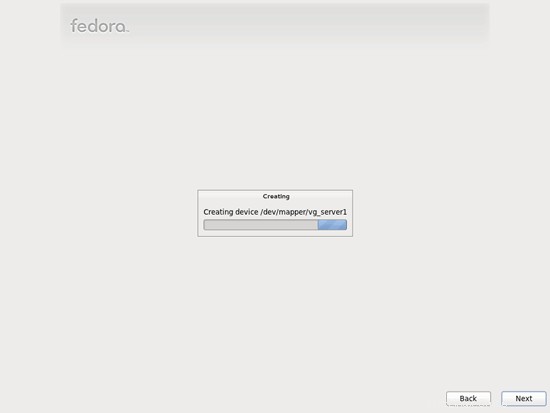
Le disque dur est en cours de formatage :
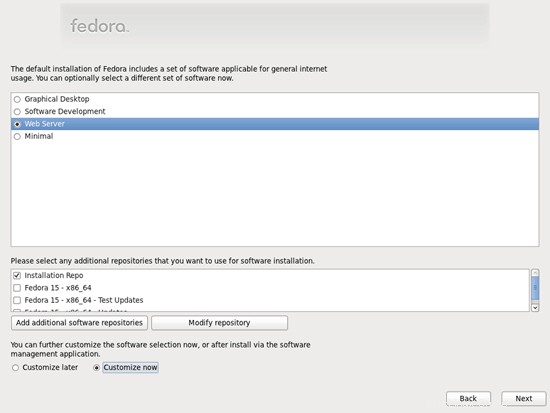
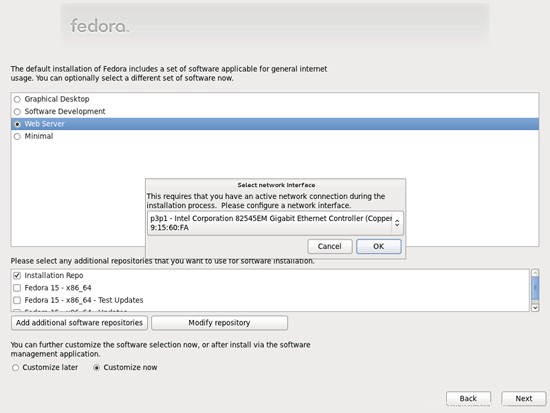
Maintenant, nous sélectionnons le logiciel que nous voulons installer. Décochez Graphical Desktop et cochez Web Server à la place. Ensuite, cochez Personnaliser maintenant. Ensuite, sélectionnez les référentiels supplémentaires Fedora 15 - x86_64 et Fedora 15 - x86_64 - Updates (si vous êtes sur un système i686, les noms sont probablement Fedora 15 - i686 et Fedora 15 - i686 - Updates) :
Comme les deux derniers référentiels ont besoin d'une connexion Internet, une nouvelle fenêtre apparaît dans laquelle vous devez configurer votre carte réseau. Sélectionnez votre carte réseau et cliquez sur OK :
Le serveur parfait - Fedora 15 x86_64 [ISPConfig 3] - Page 2
4 Changer le nom de votre carte réseau en ethx
Nous devons maintenant configurer Fedora pour qu'il n'utilise plus les noms de périphériques BIOS pour notre interface réseau. Au lieu de p3p1, nous avons besoin de notre bon vieux eth0 (car sinon le pare-feu d'ISPConfig deviendra fou et bloquera tout car il attend eth0 au lieu de p3p1). Ouvrez /etc/grub.conf...
vi /etc/grub.conf
... et ajoutez biosdevname=0 à la ligne du noyau :
# grub.conf generated by anaconda
#
# Note that you do not have to rerun grub after making changes to this file
# NOTICE:  You have a /boot partition.  This means that
#          all kernel and initrd paths are relative to /boot/, eg.
#          root (hd0,0)
#          kernel /vmlinuz-version ro root=/dev/mapper/vg_server1-lv_root
#          initrd /initrd-[generic-]version.img
#boot=/dev/sda
default=0
timeout=0
splashimage=(hd0,0)/grub/splash.xpm.gz
hiddenmenu
title Fedora (2.6.38.6-27.fc15.x86_64)
        root (hd0,0)
        kernel /vmlinuz-2.6.38.6-27.fc15.x86_64 ro root=/dev/mapper/vg_server1-lv_root rd_LVM_LV=vg_server1/lv_root rd_LVM_LV=vg_server1/lv_swap rd_NO_LUKS rd_NO_MD rd_NO_DM LANG=en_US.UTF-8 SYSFONT=latarcyrheb-sun16 KEYTABLE=de rhgb quiet biosdevname=0
initrd /initramfs-2.6.38.6-27.fc15.x86_64.img |
Redémarrez ensuite le système :
reboot
Après le redémarrage, votre carte réseau doit s'appeler eth0. Exécuter...
ifconfig
... pour vérifier :
[example@unixlinux.online ~]# ifconfig
eth0 Link encap:Ethernet HWaddr 00:0C:29:15:60:FA
inet addr:192.168.0.100 Bcast:192.168.0.255 Mask:255.255. 255.0
inet6 addr : fe80::20c:29ff:fe15:60fa/64 Scope : Link
UP BROADCAST RUNNING MULTICAST MTU : 1 500 Métrique : 1
Paquets RX :48 erreurs perdues : 0 erreurs 0 dépassement :0 trame :0
Paquets TX :58 erreurs :0 abandonnés :0 dépassement :0 porteuse :0
collisions :0 txqueuelen :1 000
RX octets :5 226 (5,1 Kio) TX octets : 9 682 (9,4 Kio)
lo Link encap:Local Loopback
inet addr:127.0.0.1 Mask:255.0.0.0
inet6 addr : ::1/128 Portée :Hôte
UP LOOPBACK RUNNING MTU : 16436 Métrique : 1
Paquets RX :2 erreurs :0 abandonnés :0 dépassement :0 frame :0
Paquets TX :2 erreurs :0 abandonnés :0 dépassement :0 porteuse :0
collisions :0 txqueuelen :0
Octets RX :100 (100,0 b) Octets TX :100 (100,0 b)
[exemple@unixlinux.online ~]#
5 Ajuster /etc/hosts
Ensuite, nous éditons /etc/hosts. Faites en sorte qu'il ressemble à ceci :
vi /etc/hosts
127.0.0.1 localhost localhost.localdomain localhost4 localhost4.localdomain4 192.168.0.100 server1.example.com server1 ::1 localhost localhost.localdomain localhost6 localhost6.localdomain6 |
Il est important d'ajouter une ligne pour server1.example.com et de supprimer server1.example.com et server1 de la ligne 127.0.0.1.
6 Configurer le pare-feu
(Vous pouvez ignorer ce chapitre si vous avez déjà désactivé le pare-feu à la fin de l'installation de base du système.)
Je souhaite installer ISPConfig à la fin de ce tutoriel qui est livré avec son propre pare-feu. C'est pourquoi je désactive maintenant le pare-feu Fedora par défaut. Bien sûr, vous êtes libre de le laisser allumé et de le configurer selon vos besoins (mais vous ne devriez pas utiliser d'autre pare-feu plus tard car il interférera très probablement avec le pare-feu Fedora).
Exécuter
system-config-firewall
et désactiver le pare-feu.
Pour vérifier que le pare-feu a bien été désactivé, vous pouvez lancer
iptables -L
ensuite. Le résultat devrait ressembler à ceci :
[example@unixlinux.online ~]# iptables -L
Chain INPUT (policy ACCEPT)
target prot opt source destination
Chain FORWARD (policy ACCEPT)
target prot opt source destination
Chaîne OUTPUT (policy ACCEPT)
target prot opt source destination
[example@unixlinux.online ~]#
7 Désactiver SELinux
SELinux est une extension de sécurité de Fedora qui devrait fournir une sécurité étendue. À mon avis, vous n'en avez pas besoin pour configurer un système sécurisé, et cela cause généralement plus de problèmes que d'avantages (pensez-y après avoir effectué une semaine de dépannage car un service ne fonctionnait pas comme prévu, puis vous découvrir que tout allait bien, seul SELinux causait le problème). Par conséquent, je le désactive (c'est indispensable si vous souhaitez installer ISPConfig plus tard).
Modifiez /etc/selinux/config et définissez SELINUX=disabled :
vi /etc/selinux/config
# This file controls the state of SELinux on the system. # SELINUX= can take one of these three values: # enforcing - SELinux security policy is enforced. # permissive - SELinux prints warnings instead of enforcing. # disabled - No SELinux policy is loaded. SELINUX=disabled # SELINUXTYPE= can take one of these two values: # targeted - Targeted processes are protected, # mls - Multi Level Security protection. SELINUXTYPE=targeted |
Ensuite, nous devons redémarrer le système :
reboot
8 Installer des logiciels
Nous importons d'abord les clés GPG pour les packages logiciels :
rpm --import /etc/pki/rpm-gpg/RPM-GPG-KEY*
Ensuite, nous mettons à jour nos packages existants sur le système :
yum update
Maintenant, nous installons certains packages logiciels qui seront nécessaires plus tard :
yum groupinstall 'Development Tools'
yum groupinstall 'Development Libraries'
9 quota journalisé
(Si vous avez choisi un schéma de partitionnement différent du mien, vous devez ajuster ce chapitre afin que le quota s'applique aux partitions où vous en avez besoin.)
Pour installer le quota, nous exécutons cette commande :
yum install quota
Modifiez /etc/fstab et ajoutez ,usrjquota=aquota.user,grpjquota=aquota.group,jqfmt=vfsv0 à la partition / (/dev/mapper/vg_server1-lv_root) :
vi /etc/fstab
# # /etc/fstab # Created by anaconda on Wed May 25 15:57:24 2011 # # Accessible filesystems, by reference, are maintained under '/dev/disk' # See man pages fstab(5), findfs(8), mount(8) and/or blkid(8) for more info # /dev/mapper/vg_server1-lv_root / ext4 defaults,usrjquota=aquota.user,grpjquota=aquota.group,jqfmt=vfsv0 1 1 UUID=366ba6a7-7e68-4ec9-9743-4b02dd105180 /boot ext4 defaults 1 2 /dev/mapper/vg_server1-lv_swap swap swap defaults 0 0 tmpfs /dev/shm tmpfs defaults 0 0 devpts /dev/pts devpts gid=5,mode=620 0 0 sysfs /sys sysfs defaults 0 0 proc /proc proc defaults 0 0 |
Puis lancez
mount -o remount /
quotacheck -avugm
quotaon -avug
pour activer le quota.
10 Installer Apache, MySQL, phpMyAdmin
Tout cela peut être installé avec une seule commande :
yum install ntp httpd mysql-server php php-mysql php-mbstring php-mcrypt phpMyAdmin
Le serveur parfait - Fedora 15 x86_64 [ISPConfig 3] - Page 4
11 Installer Courier-IMAP, Courier-Authlib et Maildrop
Malheureusement, il n'y a pas de packages RPM pour Courier-IMAP, Courier-Authlib et Maildrop, nous devons donc les créer nous-mêmes.
Supprimez d'abord Dovecot (Fedora 15 est livré avec Dovecot 2.x ; malheureusement, ISPConfig 3 prend en charge Dovecot 1.2.x, mais pas 2.x) :
yum remove dovecot dovecot-mysql
Ensuite, installez les prérequis dont nous avons besoin pour créer des packages Courier rpm :
yum install rpm-build gcc mysql-devel openssl-devel cyrus-sasl-devel pkgconfig zlib-devel pcre-devel openldap-devel postgresql-devel expect libtool-ltdl-devel openldap-servers libtool gdbm-devel pam-devel gamin-devel libidn-devel
Les packages RPM ne doivent pas être compilés en tant que root; courier-imap refusera même de compiler s'il détecte que la compilation est exécutée en tant qu'utilisateur root. Par conséquent, nous créons maintenant un compte d'utilisateur normal (falko dans cet exemple) et lui donnons un mot de passe :
useradd -m -s /bin/bash falko
passwd falko
Nous aurons besoin de la commande sudo plus tard pour que l'utilisateur falko puisse compiler et installer les packages rpm. Mais d'abord, nous devons autoriser falko à exécuter toutes les commandes en utilisant sudo :
Exécuter
visudo
Dans le fichier qui s'ouvre, il y a une racine de ligne ALL=(ALL) ALL. Ajoutez une ligne similaire pour falko juste en dessous de cette ligne :
[...] ## Allow root to run any commands anywhere root ALL=(ALL) ALL falko ALL=(ALL) ALL [...] |
Nous sommes maintenant prêts à construire notre package rpm. Devenez d'abord l'utilisateur falko :
su falko
Ensuite, nous créons notre environnement de construction :
mkdir $HOME/rpm
mkdir $HOME/rpm/SOURCES
mkdir $HOME/rpm/SPECS
mkdir $HOME/rpm/BUILD
mkdir $HOME/rpm/BUILDROOT
mkdir $HOME/rpm/SRPMS
mkdir $HOME/rpm/RPMS
mkdir $HOME/rpm/RPMS/i386
mkdir $HOME/rpm/RPMS/x86_64
echo "%_topdir $HOME/rpm" >> $HOME/.rpmmacros
Maintenant, nous créons un répertoire de téléchargements et téléchargeons les fichiers source depuis http://www.courier-mta.org/download.php :
mkdir $HOME/téléchargements
cd $HOME/téléchargements
wget https://sourceforge.net/projects/courier/files/authlib/0.63.0/courier-authlib-0.63.0.tar.bz2/download
wget https://sourceforge.net/projects/courier /files/imap/4.8.1/courier-imap-4.8.1.tar.bz2/download
wget https://sourceforge.net/projects/courier/files/maildrop/2.5.4/maildrop-2.5 .4.tar.bz2/download
(Vous vous demandez peut-être pourquoi je ne télécharge pas la dernière version de courier-imap - 4.9.3 au moment d'écrire ces lignes - mais j'en utilise une plus ancienne - 4.8.1. C'est parce que 4.9.3 n'a pas pu être construit sur mon système , alors que 4.8.1 fonctionne très bien.)
Maintenant (toujours dans $HOME/downloads) nous pouvons construire courier-authlib :
sudo rpmbuild -ta courier-authlib-0.63.0.tar.bz2
Après le processus de construction, les packages rpm se trouvent dans /root/rpmbuild/RPMS/x86_64 (/root/rpmbuild/RPMS/i686 si vous êtes sur un système i686). La commande
sudo ls -l /root/rpmbuild/RPMS/x86_64
vous montre les packages RPM disponibles :
[example@unixlinux.online downloads]$ sudo ls -l /root/rpmbuild/RPMS/x86_64
total 520
-rw-r--r-- 1 root root 123448 May 25 18:06 courier -authlib-0.63.0-1.fc15.x86_64.rpm
-rw-r--r-- 1 root root 265144 25 mai 18:06 courier-authlib-debuginfo-0.63.0-1.fc15. x86_64.rpm
-rw-r--r-- 1 racine racine 34876 25 mai 18:06 courier-authlib-devel-0.63.0-1.fc15.x86_64.rpm
-rw-r --r-- 1 root root 17448 25 mai 18:06 courier-authlib-ldap-0.63.0-1.fc15.x86_64.rpm
-rw-r--r-- 1 root root 13808 25 mai 18:06 courier-authlib-mysql-0.63.0-1.fc15.x86_64.rpm
-rw-r--r-- 1 root root 13020 25 mai 18:06 courier-authlib-pgsql-0.63. 0-1.fc15.x86_64.rpm
-rw-r--r-- 1 root root 8276 25 mai 18:06 courier-authlib-pipe-0.63.0-1.fc15.x86_64.rpm
-rw-r--r-- 1 root root 34108 25 mai 18:06 courier-authlib-userdb-0.63.0-1.fc15.x86_64.rpm
[example@unixlinux.online downloads]$
Sélectionnez ceux que vous souhaitez installer et installez-les comme ceci :
sudo rpm -ivh /root/rpmbuild/RPMS/x86_64/courier-authlib-0.63.0-1.fc15.x86_64.rpm /root/rpmbuild/RPMS/x86_64/courier-authlib-mysql-0.63.0-1.fc15.x86_64.rpm /root/rpmbuild/RPMS/x86_64/courier-authlib-devel-0.63.0-1.fc15.x86_64.rpm
Revenons maintenant à notre répertoire de téléchargement :
cd $HOME/downloads
Exécutez les commandes suivantes pour créer les répertoires requis/modifier les autorisations de répertoire (car sinon le processus de génération de Courier-Imap échouera) :
sudo mkdir /var/cache/ccache/tmp
sudo chmod o+rwx /var/cache/ccache/
sudo chmod 777 /var/cache/ccache/tmp
Maintenant, lancez à nouveau rpmbuild, cette fois sans sudo, sinon la compilation échouera car elle a été exécutée en tant que root :
rpmbuild -ta courier-imap-4.8.1.tar.bz2
Après le processus de construction, les packages rpm peuvent être trouvés dans $HOME/rpm/RPMS/x86_64 ($HOME/rpm/RPMS/i686 si vous êtes sur un système i686) :
cd $HOME/rpm/RPMS/x86_64
La commande
ls -l
vous montre les packages RPM disponibles :
[example@unixlinux.online x86_64]$ ls -l
total 1708
-rw-rw-r-- 1 falko falko 596432 25 mai 18:33 courier-imap-4.8.1-2.15.x86_64 .rpm
-rw-rw-r-- 1 falko falko 1149328 25 mai 18:33 courier-imap-debuginfo-4.8.1-2.15.x86_64.rpm
[example@unixlinux.online x86_64] $
Vous pouvez installer courier-imap comme ceci :
sudo rpm -ivh courier-imap-4.8.1-2.15.x86_64.rpm
Revenons maintenant à notre répertoire de téléchargement :
cd $HOME/downloads
et exécutez à nouveau rpmbuild, cette fois pour créer un package maildrop :
sudo rpmbuild -ta maildrop-2.5.4.tar.bz2
Après le processus de construction, les packages rpm se trouvent dans /root/rpmbuild/RPMS/x86_64 (/root/rpmbuild/RPMS/i686 si vous êtes sur un système i686). La commande
sudo ls -l /root/rpmbuild/RPMS/x86_64
vous montre les packages RPM disponibles :
[example@unixlinux.online downloads]$ sudo ls -l /root/rpmbuild/RPMS/x86_64
total 1628
-rw-r--r-- 1 root root 123448 May 25 18:06 courier -authlib-0.63.0-1.fc15.x86_64.rpm
-rw-r--r-- 1 root root 265144 25 mai 18:06 courier-authlib-debuginfo-0.63.0-1.fc15. x86_64.rpm
-rw-r--r-- 1 racine racine 34876 25 mai 18:06 courier-authlib-devel-0.63.0-1.fc15.x86_64.rpm
-rw-r --r-- 1 root root 17448 25 mai 18:06 courier-authlib-ldap-0.63.0-1.fc15.x86_64.rpm
-rw-r--r-- 1 root root 13808 25 mai 18:06 courier-authlib-mysql-0.63.0-1.fc15.x86_64.rpm
-rw-r--r-- 1 root root 13020 25 mai 18:06 courier-authlib-pgsql-0.63. 0-1.fc15.x86_64.rpm
-rw-r--r-- 1 root root 8276 25 mai 18:06 courier-authlib-pipe-0.63.0-1.fc15.x86_64.rpm
-rw-r--r-- 1 root root 34108 25 mai 18:06 courier-authlib-userdb-0.63.0-1.fc15.x86_64.rpm
-rw-r--r-- 1 root root 278520 25 mai 18:50 maildrop-2.5.4-1.15.x86_64.rpm
-rw-r--r-- 1 root root 685672 25 mai 18:50 maildrop-debuginfo-2.5.4 -1.15.x86_64.rpm
-rw-r--r-- 1 racine racine 99924 25 mai 18:50 maildrop-devel-2.5.4-1.15.x86_64.rpm
-rw-r- -r-- 1 root root 63968 25 mai 18:50 maildrop-man-2.5.4-1.15.x86_64.rpm
[example@unixlinux.online downloads]$
Vous pouvez maintenant installer maildrop comme ceci :
sudo rpm -ivh /root/rpmbuild/RPMS/x86_64/maildrop-2.5.4-1.15.x86_64.rpm
Après avoir compilé et installé tous les packages nécessaires, vous pouvez redevenir root en tapant
exit
12 Installer Postfix
Postfix peut être installé comme suit :
yum install postfix
Ensuite, désactivez Sendmail et démarrez Postfix et MySQL :
chkconfig --levels 235 mysqld on
/etc/init.d/mysqld start
chkconfig sendmail off
chkconfig --levels 235 postfix on
/etc/init.d/sendmail stop
/etc/init.d/postfix start
13 Installer Getmail
Getmail peut être installé comme suit :
yum install getmail
14 Définir les mots de passe MySQL et configurer phpMyAdmin
Définissez des mots de passe pour le compte racine MySQL :
mysql_secure_installation
[example@unixlinux.online ~]# mysql_secure_installation
REMARQUE : L'EXÉCUTION DE TOUTES LES PARTIES DE CE SCRIPT EST RECOMMANDÉE POUR TOUS MySQL
SERVEURS EN PRODUCTION UTILISER! VEUILLEZ LIRE ATTENTIVEMENT CHAQUE ÉTAPE !
Pour vous connecter à MySQL pour le sécuriser, nous aurons besoin du mot de passe
actuel pour l'utilisateur root. Si vous venez d'installer MySQL et
vous n'avez pas défini le mot de passe root encore, le mot de passe sera vide,
vous devez donc juste appuyer sur entrée ici.
Entrez mot de passe actuel pour root (entrez pour aucun) : <-- ENTER
OK, mot de passe utilisé avec succès, continuons ...
La définition du mot de passe root assure que personne ne peut se connecter à MySQL
utilisateur root sans l'autorisation appropriée.
Définir le mot de passe root ? [O/n] <-- ENTRER
Nouveau mot de passe : <-- votremotdepasseqlracine
Saisir à nouveau le nouveau mot de passe : <-- votremotdepasseqlracine
Mot de passe mis à jour avec succès !
Rechargement des tableaux de privilèges. .
... Succès !
Par défaut, une installation de MySQL a un utilisateur anonyme, permettant à n'importe qui
de se connecter à MySQL sans avoir d'avoir un compte d'utilisateur créé pour
eux. Ceci est un conçu uniquement pour les tests, et pour rendre l'installation
un peu plus fluide. Vous devriez les supprimer avant de passer dans un
environnement de production.
Supprimer les utilisateurs anonymes ? [O/n] <-- ENTER
... Succès !
Normalement, root ne doit être autorisé à se connecter depuis 'localhost'. Cela
assure que quelqu'un ne ne peut pas deviner le mot de passe root depuis le réseau.
Interdire la connexion root à distance ? [O/n] <-- ENTER
... Succès !
Par défaut, MySQL est fourni avec une base de données nommée "test" à laquelle n'importe qui peut
accéder. Cela est également conçu uniquement pour les tests et devrait être supprimé
avant de passer dans un environnement de production .
Supprimer la base de données de test et y accéder ? [O/n] <-- ENTER
- Suppression de la base de données de test...
... Réussite !
- Suppression des privilèges sur la base de données de test...
... Réussite !
Recharger les tableaux de privilèges garantira que tout les changements apportés jusqu'à présent
prendront effet immédiatement.
Recharger les tableaux de privilèges maintenant ? [O/n] <-- ENTER
... Réussi !
Nettoyage ...
Tout fait ! Si vous avez complété toutes les étapes ci-dessus, votre installation de MySQL
devrait maintenant être sécurisée.
Merci d'utiliser MySQL !
[exemple @unixlinux.online ~]#
Maintenant, nous configurons phpMyAdmin. Nous modifions la configuration d'Apache afin que phpMyAdmin autorise les connexions non seulement à partir de l'hôte local (en commentant la strophe
vi /etc/httpd/conf.d/phpMyAdmin.conf
# phpMyAdmin - Web based MySQL browser written in php
#
# Allows only localhost by default
#
# But allowing phpMyAdmin to anyone other than localhost should be considered
# dangerous unless properly secured by SSL

Alias /phpMyAdmin /usr/share/phpMyAdmin
Alias /phpmyadmin /usr/share/phpMyAdmin

#<Directory /usr/share/phpMyAdmin/>
#   Order Deny,Allow
#   Deny from All
#   Allow from 127.0.0.1
#   Allow from ::1
#</Directory>

<Directory /usr/share/phpMyAdmin/setup/>
   Order Deny,Allow
   Deny from All
   Allow from 127.0.0.1
   Allow from ::1
</Directory>

# These directories do not require access over HTTP - taken from the original
# phpMyAdmin upstream tarball
#
<Directory /usr/share/phpMyAdmin/libraries/>
    Order Deny,Allow
    Deny from All
    Allow from None
</Directory>

<Directory /usr/share/phpMyAdmin/setup/lib/>
    Order Deny,Allow
    Deny from All
    Allow from None
</Directory>

# This configuration prevents mod_security at phpMyAdmin directories from
# filtering SQL etc.  This may break your mod_security implementation.
#
#<IfModule mod_security.c>
#    <Directory /usr/share/phpMyAdmin/>
#        SecRuleInheritance Off
#    </Directory>
#</IfModule> |
Ensuite, nous créons les liens de démarrage du système pour Apache et le démarrons :
chkconfig --levels 235 httpd sur
/etc/init.d/httpd start
Vous pouvez maintenant diriger votre navigateur vers http://server1.example.com/phpmyadmin/ ou http://192.168.0.100/phpmyadmin/ et vous connecter avec le nom d'utilisateur root et votre nouveau mot de passe root MySQL.
Le serveur parfait - Fedora 15 x86_64 [ISPConfig 3] - Page 5
15 Installer Amavisd-new, SpamAssassin et ClamAV
Pour installer amavisd-new, spamassassin et clamav, exécutez la commande suivante :
yum install amavisd-new spamassassin clamav clamav-data clamav-server clamav-update unzip bzip2 perl-DBD-mysql
Lorsque nous avons installé ClamAV, une tâche cron a été installée qui tente de mettre à jour la base de données virale ClamAV toutes les trois heures. Mais cela ne fonctionne que si nous l'activons dans /etc/sysconfig/freshclam et /etc/freshclam.conf :
vi /etc/sysconfig/freshclam
Commentez la ligne FRESHCLAM_DELAY à la fin :
## When changing the periodicity of freshclam runs in the crontab, ## this value must be adjusted also. Its value is the timespan between ## two subsequent freshclam runs in minutes. E.g. for the default ## ## | 0 */3 * * * ... ## ## crontab line, the value is 180 (minutes). # FRESHCLAM_MOD= ## A predefined value for the delay in seconds. By default, the value is ## calculated by the 'hostid' program. This predefined value guarantees ## constant timespans of 3 hours between two subsequent freshclam runs. ## ## This option accepts two special values: ## 'disabled-warn' ... disables the automatic freshclam update and ## gives out a warning ## 'disabled' ... disables the automatic freshclam silently # FRESHCLAM_DELAY= ### !!!!! REMOVE ME !!!!!! ### REMOVE ME: By default, the freshclam update is disabled to avoid ### REMOVE ME: network access without prior activation #FRESHCLAM_DELAY=disabled-warn # REMOVE ME |
vi /etc/freshclam.conf
Commentez la ligne Exemple :
[...] # Comment or remove the line below. #Example [...] |
Ensuite, nous commençons freshclam, amavisd et clamd...
sa-update
chkconfig --levels 235 amavisd on
chkconfig --levels 235 clamd.amavisd on
/usr/bin/freshclam
/etc/init.d/amavisd start
/etc/init.d/clamd.amavisd start
Procédez comme suit :
rm -f /var/spool/amavisd/clamd.sock
mkdir /var/run/clamav.amavisd /var/run/clamd.amavisd /var/run/amavisd
chown amavis /var/run /clamav.amavisd
chown amavis /var/run/clamd.amavisd
chown amavis /var/run/amavisd
ln -sf /var/spool/amavisd/clamd.sock /var/ run/clamav.amavisd/clamd.sock
ln -sf /var/spool/amavisd/clamd.sock /var/run/clamd.amavisd/clamd.sock
/etc/init.d/clamd .amavisd redémarrer
Fedora 15 a un répertoire /run pour stocker les données d'exécution. /run est maintenant un tmpfs, et /var/run et /var/lock sont maintenant montés en liaison sur /run et /run/lock depuis tmpfs, et donc vidés au redémarrage (voir https://docs.fedoraproject.org/en -US/Fedora/15/html/Release_Notes/sect-Release_Notes-Changes_for_SysAdmin.html pour plus de détails).
Cela signifie qu'après un redémarrage, les répertoires /var/run/clamav.amavisd, /var/run/clamd.amavisd et /var/run/amavisd que nous venons de créer n'existeront plus, et donc clamd et amavisd échouer à démarrer. Par conséquent, nous créons maintenant le fichier /etc/tmpfiles.d/amavisd.conf qui créera ces répertoires au démarrage du système (voir http://0pointer.de/public/systemd-man/tmpfiles.d.html pour plus de détails) :
vi /etc/tmpfiles.d/amavisd.conf
D /var/run/clamav.amavisd 0755 amavis root - D /var/run/clamd.amavisd 0755 amavis root - D /var/run/amavisd 0755 amavis root - |
16 Installation de mod_php, mod_fcgi/PHP5 et suPHP
ISPConfig 3 vous permet d'utiliser mod_php, mod_fcgi/PHP5, cgi/PHP5 et suPHP site par site.
Nous pouvons installer Apache2 avec mod_php5, mod_fcgid et PHP5 comme suit :
yum install php php-devel php-gd php-imap php-ldap php-mysql php-odbc php-pear php-xml php-xmlrpc php-mbstring php-mcrypt php-mssql php-snmp php-soap php-tidy curl curl-devel perl-libwww-perl ImageMagick libxml2 libxml2-devel mod_fcgid php-cli httpd-devel
Ensuite, nous ouvrons /etc/php.ini...
vi /etc/php.ini
... et modifiez le rapport d'erreur (afin que les avis ne soient plus affichés) et décommentez cgi.fix_pathinfo=1 :
[...] ;error_reporting = E_ALL & ~E_DEPRECATED error_reporting = E_ALL & ~E_NOTICE [...] ; cgi.fix_pathinfo provides *real* PATH_INFO/PATH_TRANSLATED support for CGI. PHP's ; previous behaviour was to set PATH_TRANSLATED to SCRIPT_FILENAME, and to not grok ; what PATH_INFO is. For more information on PATH_INFO, see the cgi specs. Setting ; this to 1 will cause PHP CGI to fix its paths to conform to the spec. A setting ; of zero causes PHP to behave as before. Default is 1. You should fix your scripts ; to use SCRIPT_FILENAME rather than PATH_TRANSLATED. ; http://www.php.net/manual/en/ini.core.php#ini.cgi.fix-pathinfo cgi.fix_pathinfo=1 [...] |
Ensuite, nous installons suPHP :
cd /tmp
wget http://www.suphp.org/download/suphp-0.7.1.tar.gz
tar xvfz suphp-0.7.1.tar.gz
cd suphp-0.7.1/
./configure --prefix=/usr --sysconfdir=/etc --with-apr=/usr/bin/apr-1-config --with-apxs=/usr/sbin/apxs --with-apache-user=apache --with-setid-mode=owner --with-php=/usr/bin/php-cgi --with-logfile=/var/log/httpd/suphp_log --enable-SUPHP_USE_USERGROUP=yes
make
make install
Then we add the suPHP module to our Apache configuration...
vi /etc/httpd/conf.d/suphp.conf
LoadModule suphp_module modules/mod_suphp.so |
... and create the file /etc/suphp.conf as follows:
vi /etc/suphp.conf
[global] ;Path to logfile logfile=/var/log/httpd/suphp.log ;Loglevel loglevel=info ;User Apache is running as webserver_user=apache ;Path all scripts have to be in docroot=/ ;Path to chroot() to before executing script ;chroot=/mychroot ; Security options allow_file_group_writeable=true allow_file_others_writeable=false allow_directory_group_writeable=true allow_directory_others_writeable=false ;Check wheter script is within DOCUMENT_ROOT check_vhost_docroot=true ;Send minor error messages to browser errors_to_browser=false ;PATH environment variable env_path=/bin:/usr/bin ;Umask to set, specify in octal notation umask=0077 ; Minimum UID min_uid=100 ; Minimum GID min_gid=100 [handlers] ;Handler for php-scripts x-httpd-suphp="php:/usr/bin/php-cgi" ;Handler for CGI-scripts x-suphp-cgi="execute:!self" |
Finally we restart Apache:
/etc/init.d/httpd restart
16.1 Ruby
Starting with version 3.0.3, ISPConfig 3 has built-in support for Ruby. Instead of using CGI/FastCGI, ISPConfig depends on mod_ruby being available in the server's Apache.
For Fedora 15, there's no mod_ruby package available, so we must compile it ourselves. First we install some prerequisites:
yum install ruby ruby-devel
Next we download and install mod_ruby as follows:
cd /tmp
wget http://modruby.net/archive/mod_ruby-1.3.0.tar.gz
tar zxvf mod_ruby-1.3.0.tar.gz
cd mod_ruby-1.3.0/
./configure.rb --with-apr-includes=/usr/include/apr-1
make
make install
Finally we must add the mod_ruby module to the Apache configuration, so we create the file /etc/httpd/conf.d/ruby.conf...
vi /etc/httpd/conf.d/ruby.conf
LoadModule ruby_module modules/mod_ruby.so RubyAddPath /1.8 |
... et redémarrez Apache :
/etc/init.d/httpd restart
(If you leave out the RubyAddPath /1.8 directive, you will see errors like the following ones in Apache's error log when you call Ruby files:
[Thu May 26 02:05:05 2011] [error] mod_ruby:ruby:0:in `require':no such file to load -- apache/ruby-run (LoadError)
[Thu May 26 02:05:05 2011] [error] mod_ruby:failed to require apache/ruby-run
[Thu May 26 02:05:05 2011] [error] mod_ruby:error in ruby
)
16.2 WebDAV
WebDAV should already be enabled, but to check this, open /etc/httpd/conf/httpd.conf and make sure that the following three modules are active:
vi /etc/httpd/conf/httpd.conf
[...] LoadModule auth_digest_module modules/mod_auth_digest.so [...] LoadModule dav_module modules/mod_dav.so [...] LoadModule dav_fs_module modules/mod_dav_fs.so [...] |
If you have to modify /etc/httpd/conf/httpd.conf, don't forget to restart Apache afterwards:
/etc/init.d/httpd restart
17 Install PureFTPd
PureFTPd can be installed with the following command:
yum install pure-ftpd
Then create the system startup links and start PureFTPd:
chkconfig --levels 235 pure-ftpd on
/etc/init.d/pure-ftpd start
Now we configure PureFTPd to allow FTP and TLS sessions. FTP is a very insecure protocol because all passwords and all data are transferred in clear text. By using TLS, the whole communication can be encrypted, thus making FTP much more secure.
OpenSSL is needed by TLS; to install OpenSSL, we simply run:
yum install openssl
Open /etc/pure-ftpd/pure-ftpd.conf...
vi /etc/pure-ftpd/pure-ftpd.conf
If you want to allow FTP and TLS sessions, set TLS to 1:
[...] # This option can accept three values : # 0 : disable SSL/TLS encryption layer (default). # 1 : accept both traditional and encrypted sessions. # 2 : refuse connections that don't use SSL/TLS security mechanisms, # including anonymous sessions. # Do _not_ uncomment this blindly. Be sure that : # 1) Your server has been compiled with SSL/TLS support (--with-tls), # 2) A valid certificate is in place, # 3) Only compatible clients will log in. TLS 1 [...] |
In order to use TLS, we must create an SSL certificate. I create it in /etc/ssl/private/, therefore I create that directory first:
mkdir -p /etc/ssl/private/
Afterwards, we can generate the SSL certificate as follows:
openssl req -x509 -nodes -days 7300 -newkey rsa:2048 -keyout /etc/ssl/private/pure-ftpd.pem -out /etc/ssl/private/pure-ftpd.pem
Country Name (2 letter code) [XX]:<-- Enter your Country Name (e.g., "DE").
State or Province Name (full name) []:<-- Enter your State or Province Name.
Locality Name (eg, city) [Default City]:<-- Enter your City.
Organization Name (eg, company) [Default Company Ltd]:<-- Enter your Organization Name (e.g., the name of your company).
Organizational Unit Name (eg, section) []:<-- Enter your Organizational Unit Name (e.g. "IT Department").
Common Name (eg, your name or your server's hostname) []:<-- Enter the Fully Qualified Domain Name of the system (e.g. "server1.example.com").
Email Address []:<-- Enter your Email Address.
Change the permissions of the SSL certificate:
chmod 600 /etc/ssl/private/pure-ftpd.pem
Finally restart PureFTPd:
/etc/init.d/pure-ftpd restart
That's it. You can now try to connect using your FTP client; however, you should configure your FTP client to use TLS.
18 Install BIND
We can install BIND as follows:
yum install bind bind-utils
Next open /etc/sysconfig/named...
vi /etc/sysconfig/named
... and comment out the ROOTDIR=/var/named/chroot line:
# BIND named process options # ~~~~~~~~~~~~~~~~~~~~~~~~~~ # Currently, you can use the following options: # # ROOTDIR="/var/named/chroot" -- will run named in a chroot environment. # you must set up the chroot environment # (install the bind-chroot package) before # doing this. # NOTE: # Those directories are automatically mounted to chroot if they are # empty in the ROOTDIR directory. It will simplify maintenance of your # chroot environment. # - /var/named # - /etc/pki/dnssec-keys # - /etc/named # - /usr/lib64/bind or /usr/lib/bind (architecture dependent) # # Those files are mounted as well if target file doesn't exist in # chroot. # - /etc/named.conf # - /etc/rndc.conf # - /etc/rndc.key # - /etc/named.rfc1912.zones # - /etc/named.dnssec.keys # - /etc/named.iscdlv.key # # Don't forget to add "$AddUnixListenSocket /var/named/chroot/dev/log" # line to your /etc/rsyslog.conf file. Otherwise your logging becomes # broken when rsyslogd daemon is restarted (due update, for example). # # OPTIONS="whatever" -- These additional options will be passed to named # at startup. Don't add -t here, use ROOTDIR instead. # # KEYTAB_FILE="/dir/file" -- Specify named service keytab file (for GSS-TSIG) # # DISABLE_ZONE_CHECKING -- By default, initscript calls named-checkzone # utility for every zone to ensure all zones are # valid before named starts. If you set this option # to 'yes' then initscript doesn't perform those # checks. #ROOTDIR=/var/named/chroot |
Then we create the startup links:
chkconfig --levels 235 named on
We don't start BIND now because it must be configured first - this will be done automatically by the ISPConfig 3 installer later on.
19 Install Vlogger, Webalizer, And AWStats
Vlogger, webalizer, and AWStats can be installed as follows:
yum install webalizer awstats perl-DateTime-Format-HTTP perl-DateTime-Format-Builder
cd /tmp
wget http://n0rp.chemlab.org/vlogger/vlogger-1.3.tar.gz
tar xvfz vlogger-1.3.tar.gz
mv vlogger-1.3/vlogger /usr/sbin/
rm -rf vlogger*
20 Install Jailkit
Jailkit is needed only if you want to chroot SSH users. It can be installed as follows (important:Jailkit must be installed before ISPConfig - it cannot be installed afterwards!):
cd /tmp
wget http://olivier.sessink.nl/jailkit/jailkit-2.14.tar.gz
tar xvfz jailkit-2.14.tar.gz
cd jailkit-2.14
./configure
make
make install
cd ..
rm -rf jailkit-2.14*
21 Install fail2ban
This is optional but recommended, because the ISPConfig monitor tries to show the log:
yum install fail2ban
chkconfig --levels 235 fail2ban on
/etc/init.d/fail2ban start
22 Install rkhunter
rkhunter can be installed as follows:
yum install rkhunter
The Perfect Server - Fedora 15 x86_64 [ISPConfig 3] - Page 6
23 Install SquirrelMail
To install the SquirrelMail webmail client, run...
yum install squirrelmail
... and restart Apache:
/etc/init.d/httpd restart
Then configure SquirrelMail:
/usr/share/squirrelmail/config/conf.pl
We must tell SquirrelMail that we are using Courier-IMAP/-POP3:
SquirrelMail Configuration : Read: config.php (1.4.0)
---------------------------------------------------------
Main Menu --
1. Organization Preferences
2. Server Settings
3. Folder Defaults
4. General Options
5. Themes
6. Address Books
7. Message of the Day (MOTD)
8. Plugins
9. Database
10. Languages
D. Set pre-defined settings for specific IMAP servers
C Turn color off
S Save data
Q Quit
Command >> <-- D
SquirrelMail Configuration : Read: config.php
---------------------------------------------------------
While we have been building SquirrelMail, we have discovered some
preferences that work better with some servers that don't work so
well with others. If you select your IMAP server, this option will
set some pre-defined settings for that server.
Please note that you will still need to go through and make sure
everything is correct. This does not change everything. There are
only a few settings that this will change.
Please select your IMAP server:
bincimap = Binc IMAP server
courier = Courier IMAP server
cyrus = Cyrus IMAP server
dovecot = Dovecot Secure IMAP server
exchange = Microsoft Exchange IMAP server
hmailserver = hMailServer
macosx = Mac OS X Mailserver
mercury32 = Mercury/32
uw = University of Washington's IMAP server
gmail = IMAP access to Google mail (Gmail) accounts
quit = Do not change anything
Command >> <-- courier
SquirrelMail Configuration : Read: config.php
---------------------------------------------------------
While we have been building SquirrelMail, we have discovered some
preferences that work better with some servers that don't work so
well with others. If you select your IMAP server, this option will
set some pre-defined settings for that server.
Please note that you will still need to go through and make sure
everything is correct. This does not change everything. There are
only a few settings that this will change.
Please select your IMAP server:
bincimap = Binc IMAP server
courier = Courier IMAP server
cyrus = Cyrus IMAP server
dovecot = Dovecot Secure IMAP server
exchange = Microsoft Exchange IMAP server
hmailserver = hMailServer
macosx = Mac OS X Mailserver
mercury32 = Mercury/32
uw = University of Washington's IMAP server
gmail = IMAP access to Google mail (Gmail) accounts
quit = Do not change anything
Command >> courier
imap_server_type = courier
default_folder_prefix = INBOX.
trash_folder = Trash
sent_folder = Sent
draft_folder = Drafts
show_prefix_option = false
default_sub_of_inbox = false
show_contain_subfolders_option = false
optional_delimiter = .
delete_folder = true
Press any key to continue... <-- press ENTER
SquirrelMail Configuration : Read: config.php (1.4.0)
---------------------------------------------------------
Main Menu --
1. Organization Preferences
2. Server Settings
3. Folder Defaults
4. General Options
5. Themes
6. Address Books
7. Message of the Day (MOTD)
8. Plugins
9. Database
10. Languages
D. Set pre-defined settings for specific IMAP servers
C Turn color off
S Save data
Q Quit
Command >> <--S
SquirrelMail Configuration : Read: config.php (1.4.0)
---------------------------------------------------------
Main Menu --
1. Organization Preferences
2. Server Settings
3. Folder Defaults
4. General Options
5. Themes
6. Address Books
7. Message of the Day (MOTD)
8. Plugins
9. Database
10. Languages
D. Set pre-defined settings for specific IMAP servers
C Turn color off
S Save data
Q Quit
Command >> <--Q
One last thing we need to do is modify the file /etc/squirrelmail/config_local.php and comment out the $default_folder_prefix variable - if you don't do this, you will see the following error message in SquirrelMail after you've logged in:Query:CREATE "Sent" Reason Given:Invalid mailbox name.
vi /etc/squirrelmail/config_local.php
<?php /** * Local config overrides. * * You can override the config.php settings here. * Don't do it unless you know what you're doing. * Use standard PHP syntax, see config.php for examples. * * @copyright © 2002-2006 The SquirrelMail Project Team * @license http://opensource.org/licenses/gpl-license.php GNU Public License * @version $Id$ * @package squirrelmail * @subpackage config */ //$default_folder_prefix = ''; ?> |
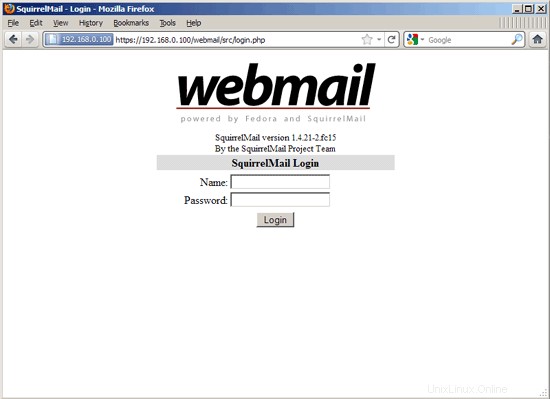
Now you can type in http://server1.example.com/webmail or http://192.168.0.100/webmail in your browser to access SquirrelMail.
24 Install ISPConfig 3
To install ISPConfig 3 from the latest released version, do this:
cd /tmp
wget http://www.ispconfig.org/downloads/ISPConfig-3-stable.tar.gz
tar xfz ISPConfig-3-stable.tar.gz
cd ispconfig3_install /installer/
The next step is to run
php -q install.php
This will start the ISPConfig 3 installer:
[example@unixlinux.online install]# php -q install.php
--------------------------------------------------------------------------------
_____ ___________ _____ __ _ ____
|_ _/ ___| ___ \ / __ \ / _(_) /__ \
| | \ `--.| |_/ / | / \/ ___ _ __ | |_ _ __ _ _/ /
| | `--. \ __/ | | / _ \| '_ \| _| |/ _` | |_ |
_| |_/\__/ / | | \__/\ (_) | | | | | | | (_| | ___\ \
\___/\____/\_| \____/\___/|_| |_|_| |_|\__, | \____/
__/ |
|___/
--------------------------------------------------------------------------------
>> Initial configuration
Operating System: Redhat or compatible, unknown version.
Following will be a few questions for primary configuration so be careful.
Default values are in [brackets] and can be accepted with
Tap in "quit" (without the quotes) to stop the installer.
Select language (en,de) [en]: <-- ENTER
Installation mode (standard,expert) [standard]: <-- ENTER
Full qualified hostname (FQDN) of the server, eg server1.domain.tld [server1.example.com]: <-- ENTER
MySQL server hostname [localhost]: <-- ENTER
MySQL root username [root]: <-- ENTER
MySQL root password []: <-- yourrootsqlpassword
MySQL database to create [dbispconfig]: <-- ENTER
MySQL charset [utf8]: <-- ENTER
Generating a 2048 bit RSA private key
......+++
...............+++
writing new private key to 'smtpd.key'
-----
You are about to be asked to enter information that will be incorporated
into your certificate request.
What you are about to enter is what is called a Distinguished Name or a DN.
There are quite a few fields but you can leave some blank
For some fields there will be a default value,
If you enter '.', the field will be left blank.
-----
Country Name (2 letter code) [XX]: <-- ENTER
State or Province Name (full name) []: <-- ENTER
Locality Name (eg, city) [Default City]: <-- ENTER
Organization Name (eg, company) [Default Company Ltd]: <-- ENTER
Organizational Unit Name (eg, section) []: <-- ENTER
Common Name (eg, your name or your server's hostname) []: <-- E NTER
Email Address []: <-- ENTER
Configuring Jailkit
Configuring SASL
Configuring PAM
Configuring Courier
Configuring Spamassassin
Configuring Amavisd
Configuring Getmail
Configuring Pureftpd
Configuring BIND
Configuring Apache
Configuring Vlogger
Configuring Apps vhost
Configuring Firewall
Installing ISPConfig
ISPConfig Port [8080]: <-- ENTER
Configuring DBServer
Installing ISPConfig crontab
no crontab for root
no crontab for getmail
Restarting services ...
Restarting mysqld (via systemctl): [ OK ]
Restarting postfix (via systemctl): [ OK ]
Restarting saslauthd (via systemctl): [ OK ]
Restarting amavisd (via systemctl): [ OK ]
Restarting clamd.amavisd (via systemctl): [ OK ]
Stopping Courier authentication services: authdaemond
Starting Courier authentication services: authdaemond
Stopping Courier-IMAP server: imap imap-ssl pop3 pop3-ssl
Starting Courier-IMAP server: imap generating-SSL-certificate... imap-ssl pop3 generating-SSL-certificate... pop3-ssl
Stopping Courier-IMAP server: imap imap-ssl pop3 pop3-ssl
Starting Courier-IMAP server: imap imap-ssl pop3 pop3-ssl
Stopping Courier-IMAP server: imap imap-ssl pop3 pop3-ssl
Starting Courier-IMAP server: imap imap-ssl pop3 pop3-ssl
Stopping Courier-IMAP server: imap imap-ssl pop3 pop3-ssl
Starting Courier-IMAP server: imap imap-ssl pop3 pop3-ssl
Restarting httpd (via systemctl): [ OK ]
Restarting pure-ftpd (via systemctl): [ OK ]
Installation completed.
[example@unixlinux.online install]#
Le programme d'installation configure automatiquement tous les services sous-jacents, aucune configuration manuelle n'est donc nécessaire.
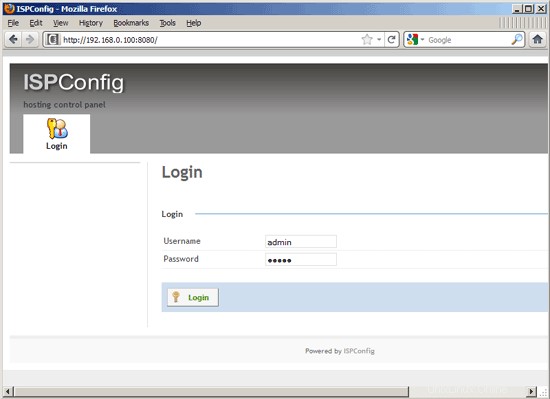
Afterwards you can access ISPConfig 3 under http://server1.example.com:8080/ or http://192.168.0.100:8080/. Connectez-vous avec le nom d'utilisateur admin et le mot de passe admin (vous devez changer le mot de passe par défaut après votre première connexion) :
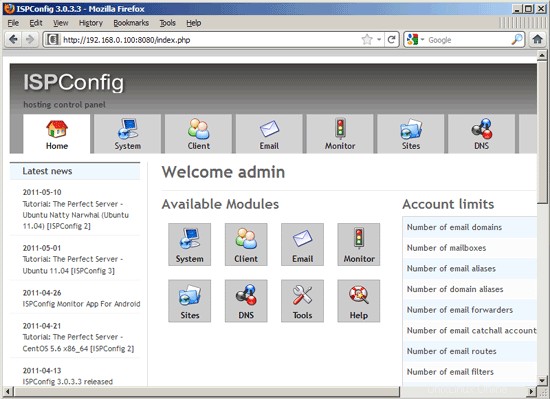
The system is now ready to be used.
24.1 ISPConfig 3 Manual
In order to learn how to use ISPConfig 3, I strongly recommend to download the ISPConfig 3 Manual.
On about 300 pages, it covers the concept behind ISPConfig (admin, resellers, clients), explains how to install and update ISPConfig 3, includes a reference for all forms and form fields in ISPConfig together with examples of valid inputs, and provides tutorials for the most common tasks in ISPConfig 3. It also lines out how to make your server more secure and comes with a troubleshooting section at the end.
24.2 ISPConfig Monitor App For Android
With the ISPConfig Monitor App, you can check your server status and find out if all services are running as expected. You can check TCP and UDP ports and ping your servers. In addition to that you can use this app to request details from servers that have ISPConfig installed (please note that the minimum installed ISPConfig 3 version with support for the ISPConfig Monitor App is 3.0.3.3! ); these details include everything you know from the Monitor module in the ISPConfig Control Panel (e.g. services, mail and system logs, mail queue, CPU and memory info, disk usage, quota, OS details, RKHunter log, etc.), and of course, as ISPConfig is multiserver-capable, you can check all servers that are controlled from your ISPConfig master server.
For download and usage instructions, please visit http://www.ispconfig.org/ispconfig-3/ispconfig-monitor-app-for-android/.
25 Links
- Fedora:http://fedoraproject.org/
- Network Device Naming:http://fedoraproject.org/wiki/Features/ConsistentNetworkDeviceNaming
- /run directory:https://docs.fedoraproject.org/en-US/Fedora/15/html/Release_Notes/sect-Release_Notes-Changes_for_SysAdmin.html
- tmpfiles.d:http://0pointer.de/public/systemd-man/tmpfiles.d.html
- ISPConfig:http://www.ispconfig.org/