Le serveur parfait - OpenSUSE 12.1 x86_64 avec Nginx [ISPConfig 3]
Ce tutoriel montre comment préparer un OpenSUSE 12.1 64bit (x86_64) serveur avec nginx pour l'installation d'ISPConfig 3, et comment installer ISPConfig 3. Depuis la version 3.0.4, ISPConfig est livré avec un support complet pour le serveur web nginx en plus d'Apache, et ce tutoriel couvre la configuration d'un serveur qui utilise nginx au lieu d'Apache. ISPConfig 3 est un panneau de contrôle d'hébergement Web qui vous permet de configurer les services suivants via un navigateur Web :serveur Web nginx et Apache, serveur de messagerie Postfix, MySQL, Dovecot POP3/IMAP, serveur de noms BIND ou MyDNS, PureFTPd, SpamAssassin, ClamAV, et bien d'autres Suite.
Si vous souhaitez utiliser nginx au lieu d'Apache avec ISPConfig, veuillez noter que votre version de nginx doit être au moins 0.8.21 et que vous devez également installer PHP-FPM. Pour le support CGI/Perl, vous devez utiliser fcgiwrap. Tout est couvert par ce tutoriel.
J'utiliserai le logiciel suivant :
- Serveur Web :nginx avec PHP 5
- Serveur de base de données :MySQL
- Serveur de messagerie :Postfix avec des utilisateurs virtuels
- Serveur DNS :BIND
- Serveur FTP :pureftpd
- POP3/IMAP :Pigeonnier
- Webalizer et AWStats pour les statistiques de sites Web
Au final, vous devriez avoir un système qui fonctionne de manière fiable et qui est facilement gérable avec le panneau de contrôle ISPConfig 3. Le guide suivant concerne la version 64 bits d'OpenSUSE.
Je veux d'abord dire que ce n'est pas la seule façon de mettre en place un tel système. Il existe de nombreuses façons d'atteindre cet objectif, mais c'est la voie que je prends. Je n'émets aucune garantie que cela fonctionnera pour vous !
Avis :Ce guide est pour ISPConfig 3.0.4 ou plus récent. Il n'est pas adapté à ISPConfig 2.x !
Manuel ISPConfig 3
Afin d'apprendre à utiliser ISPConfig 3, je vous recommande fortement de télécharger le manuel ISPConfig 3.
Sur environ 300 pages, il couvre le concept derrière ISPConfig (administrateur, revendeurs, clients), explique comment installer et mettre à jour ISPConfig 3, inclut une référence pour tous les formulaires et champs de formulaire dans ISPConfig ainsi que des exemples d'entrées valides, et fournit des tutoriels pour les tâches les plus courantes dans ISPConfig 3. Il explique également comment rendre votre serveur plus sécurisé et est accompagné d'une section de dépannage à la fin.
Application de surveillance ISPConfig pour Android
Avec l'application ISPConfig Monitor, vous pouvez vérifier l'état de votre serveur et savoir si tous les services fonctionnent comme prévu. Vous pouvez vérifier les ports TCP et UDP et envoyer un ping à vos serveurs. En plus de cela, vous pouvez utiliser cette application pour demander des détails aux serveurs sur lesquels ISPConfig est installé (veuillez noter que la version minimale installée d'ISPConfig 3 avec prise en charge de l'application ISPConfig Monitor est 3.0.3.3 ! ); ces détails incluent tout ce que vous savez du module Monitor dans le panneau de configuration ISPConfig (par exemple, les services, les journaux de messagerie et système, la file d'attente de messagerie, les informations sur le processeur et la mémoire, l'utilisation du disque, les quotas, les détails du système d'exploitation, le journal RKHunter, etc.), et bien sûr , comme ISPConfig est compatible avec plusieurs serveurs, vous pouvez vérifier tous les serveurs contrôlés à partir de votre serveur maître ISPConfig.
Pour obtenir des instructions de téléchargement et d'utilisation, veuillez visiter http://www.ispconfig.org/ispconfig-3/ispconfig-monitor-app-for-android/.
1 Exigences
Pour installer un tel système, vous aurez besoin des éléments suivants :
- Le DVD OpenSUSE 12.1 . Vous pouvez le télécharger ici :http://download.opensuse.org/distribution/12.1/iso/openSUSE-12.1-DVD-x86_64.iso
- Une connexion Internet rapide...
2 Remarque préliminaire
Dans ce tutoriel, j'utilise le nom d'hôte server1.example.com avec l'adresse IP 192.168.0.100 et la passerelle 192.168.0.1. Ces paramètres peuvent différer pour vous, vous devez donc les remplacer le cas échéant.
3 Le système de base
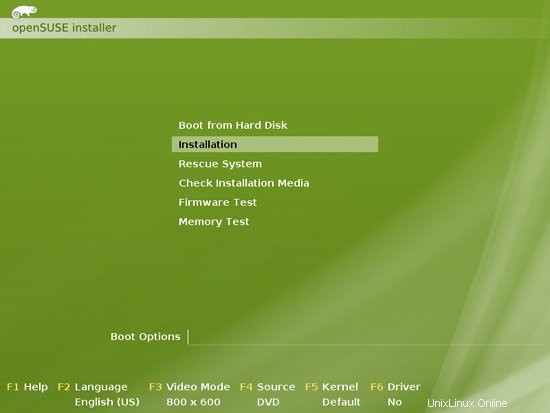
Démarrez à partir de votre DVD OpenSUSE 12.1 et sélectionnez Installation :
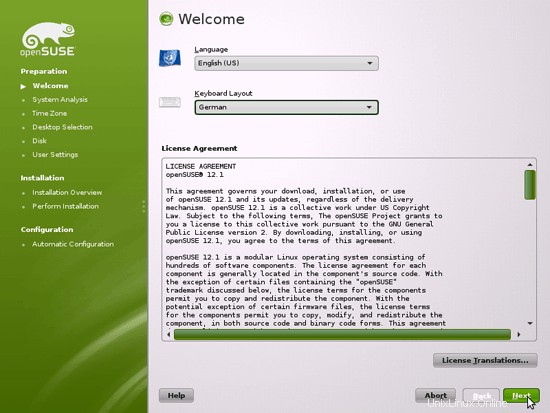
Sélectionnez votre langue, la disposition du clavier et acceptez les termes de la licence :
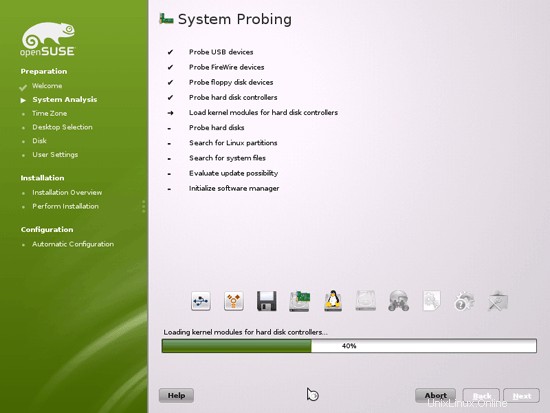
Le programme d'installation analyse votre matériel et crée le cache du référentiel de logiciels :
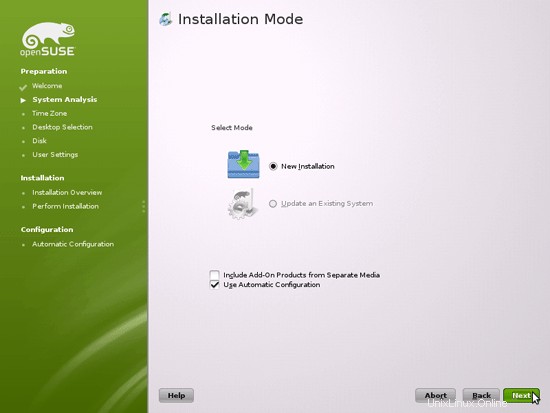
Sélectionnez Nouvelle installation :
Sélectionnez la région et le fuseau horaire :

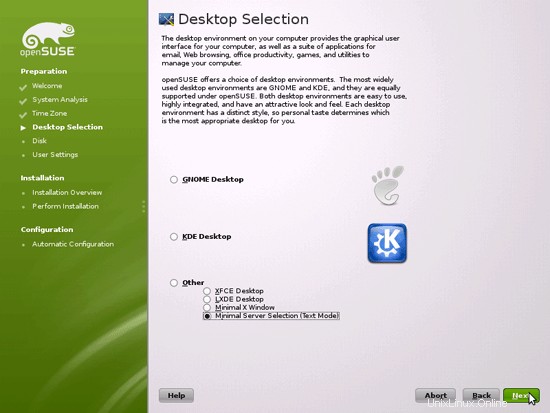
Nous sélectionnons Autre> Sélection minimale du serveur (mode texte) ici car nous voulons installer un serveur sans bureau X-Window. Le système X-Window n'est pas nécessaire pour faire fonctionner le serveur et ralentirait le système. Nous effectuerons toutes les tâches d'administration sur le shell ou via une connexion SSH, par ex. via PuTTY depuis un poste de travail distant.
Le serveur parfait - OpenSUSE 12.1 x86_64 avec Nginx [ISPConfig 3] - Page 2
4 Configurer les paramètres réseau
Nous utilisons Yast, l'outil de gestion du système OpenSuSE pour reconfigurer les paramètres de la carte réseau. Après le premier démarrage, le système est configuré pour obtenir l'adresse IP avec DHCP. Pour un serveur, nous le basculerons vers une adresse IP statique.
Exécuter
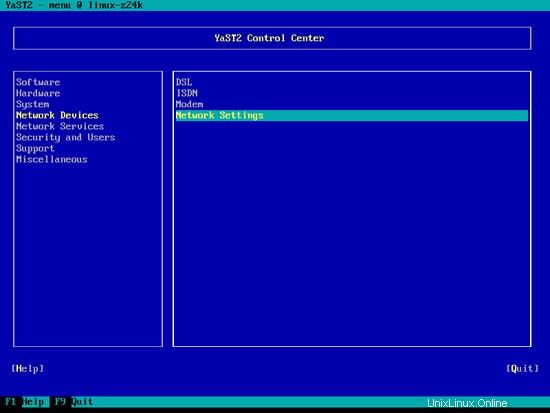
yast2
Sélectionnez Périphériques réseau> Paramètres réseau :
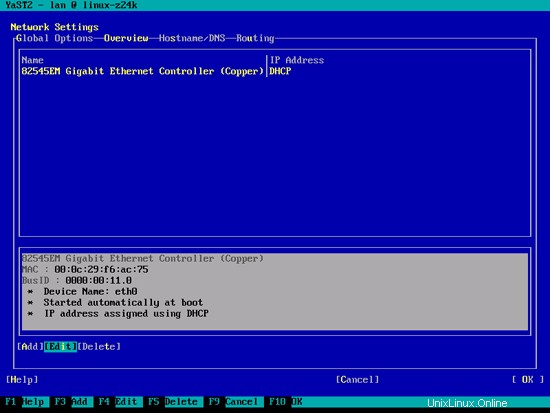
Sélectionnez votre carte réseau puis Modifier :
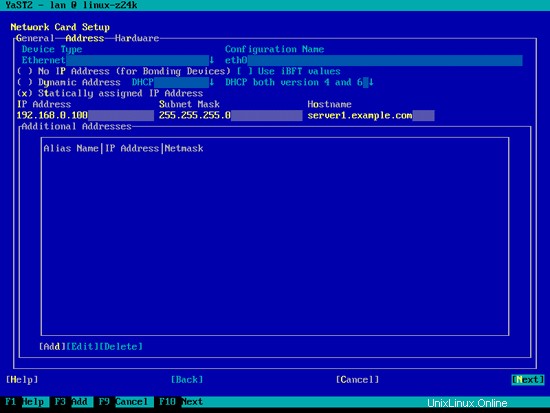
Sélectionnez Adresse IP attribuée statiquement et entrez l'adresse IP, le masque de sous-réseau et le nom d'hôte et enregistrez les modifications en sélectionnant Suivant :
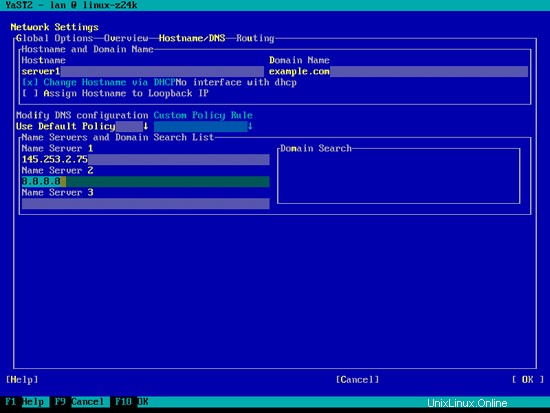
Sélectionnez maintenant Nom d'hôte/DNS et entrez le nom d'hôte (par exemple, serveur1.exemple.com) et les serveurs de noms (par exemple, 145.253.2.75 et 8.8.8.8) :
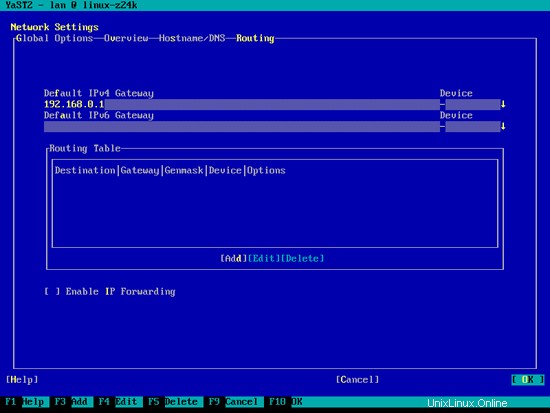
Sélectionnez maintenant Routage et entrez la passerelle par défaut et appuyez sur OK :
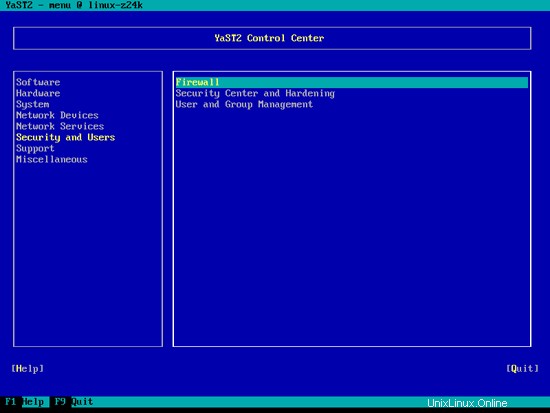
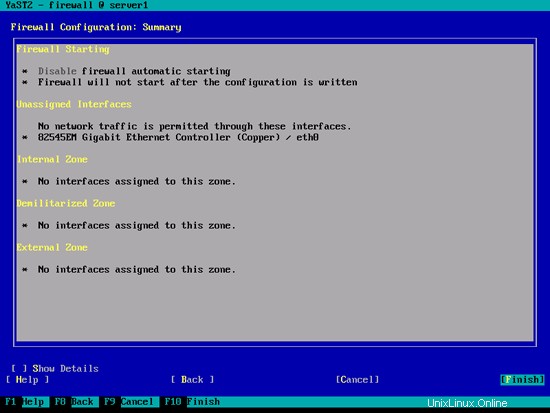
Pour configurer le pare-feu (au cas où vous ne l'auriez pas configuré lors de l'installation de base), sélectionnez Sécurité et utilisateurs> Pare-feu dans Yast :
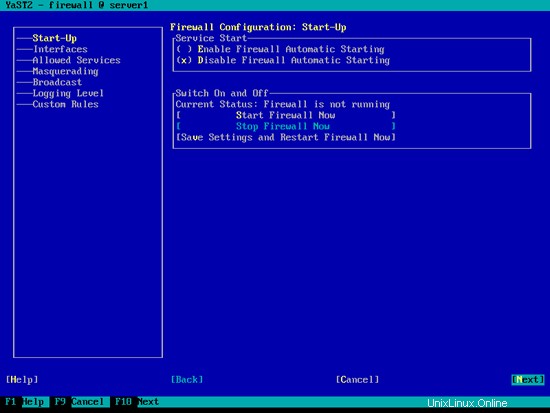
Je souhaite installer ISPConfig à la fin de ce tutoriel qui est livré avec son propre pare-feu. C'est pourquoi je désactive maintenant le pare-feu OpenSUSE par défaut. Bien sûr, vous êtes libre de le laisser allumé et de le configurer selon vos besoins (mais vous ne devriez pas utiliser d'autre pare-feu plus tard car il interférera très probablement avec le pare-feu OpenSUSE).
Sélectionnez Désactiver le démarrage automatique du pare-feu et Arrêter le pare-feu maintenant, puis appuyez sur Suivant :
Appuyez sur Terminer et quittez Yast :
Ensuite, vous devriez vérifier avec
ifconfig
si votre configuration réseau est correcte. Si ce n'est pas le cas (par exemple, si eth0 est manquant), redémarrez le système...
redémarrer
... et vérifiez à nouveau votre configuration réseau par la suite - elle devrait maintenant être correcte.
5 Installer les mises à jour
Nous installons maintenant les dernières mises à jour à partir des référentiels openSUSE. Exécuter
mise à jour de zypper
Et puis redémarrez le serveur car vous avez probablement également installé des mises à jour du noyau :
redémarrer
6 Installer des packages de base
Exécuter
yast2 -i findutils readline glibc-devel findutils-locate gcc flex lynx compat-readline4 db-devel wget gcc-c++ subversion make vim telnet cron iptables iputils man man-pages nano pico sudo perl-TimeDate
7 Quota journalisé
Pour installer le quota, exécutez
yast2 -i quota
Modifiez /etc/fstab pour qu'il ressemble à ceci (j'ai ajouté ,usrjquota=aquota.user,grpjquota=aquota.group,jqfmt=vfsv0 aux points de montage / et /srv) :
vi /etc/fstab
/dev/sda1 swap swap defaults 0 0/dev/sda2 / ext4 acl,user_xattr,usrjquota=aquota.user,grpjquota=aquota.group, jqfmt=vfsv0 1 1/dev/sda3 /srv ext4 acl,user_xattr,usrjquota=aquota.user,grpjquota=aquota.group,jqfmt=vfsv0 1 2proc /proc proc par défaut 0 0sysfs /sys sysfs noauto 0 0debugfs /sys/kernel/ debug debugfs noauto 0 0devpts /dev/pts devpts mode=0620,gid=5 0 0 |
Exécutez ensuite :
mount -o remonter /
mount -o remonter /srv
quotacheck -avugm
quotaon -avug
Ne vous inquiétez pas si vous voyez ces messages d'erreur - ils sont normaux lorsque vous exécutez quotacheck pour la première fois :
server1:~ # quotacheck -avugm
quotacheck :Scanning /dev/sda2 [/] done
quotacheck :Impossible de stat l'ancien fichier de quota utilisateur :aucun fichier ou répertoire de ce type
quotacheck :Impossible de stat l'ancien groupe fichier de quota :aucun fichier ou répertoire de ce type
quotacheck :impossible de déclarer l'ancien fichier de quota d'utilisateur :aucun fichier ou répertoire de ce type
quotacheck :impossible de déclarer l'ancien fichier de quota de groupe :aucun fichier ou répertoire de ce type
quotacheck :3872 répertoires et 32991 fichiers vérifiés
quotacheck :Ancien fichier introuvable.
quotacheck :Ancien fichier introuvable.
quotacheck :Analyse de /dev/sda3 [/srv] effectuée
quotacheck :Impossible de déclarer l'ancien fichier de quota d'utilisateur :aucun fichier ou répertoire de ce type />quotacheck :Impossible de déclarer l'ancien fichier de quota de groupe :aucun fichier ou répertoire de ce type
quotacheck :6 répertoires et 0 fichier vérifiés
quotacheck :Ancien fichier introuvable.
quotacheck :Ancien fichier introuvable.
ser ver1 :~ #
Le serveur parfait - OpenSUSE 12.1 x86_64 avec Nginx [ISPConfig 3] - Page 4
8 Installer Postfix, Dovecot, MySQL
Exécuter
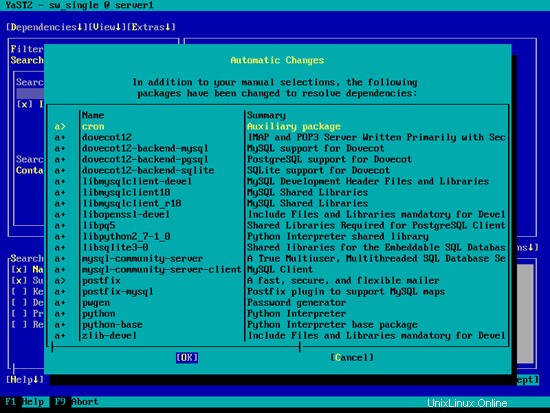
yast2 -i postfix postfix-mysql mysql mysql-community-server mysql-client libmysqlclient-devel dovecot12 dovecot12-backend-mysql pwgen cron python
Si vous obtenez l'erreur patterns-openSUSE-minimal_base-conflicts-12.1-25.21.1.x86_64 conflict with python fourni par python-2.7.2-7.1.3.x86_64, sélectionnez l'option désinstallation de patterns-openSUSE-minimal_base-conflicts- 12.1-25.21.1.x86_64 et appuyez sur OK -- Réessayez :
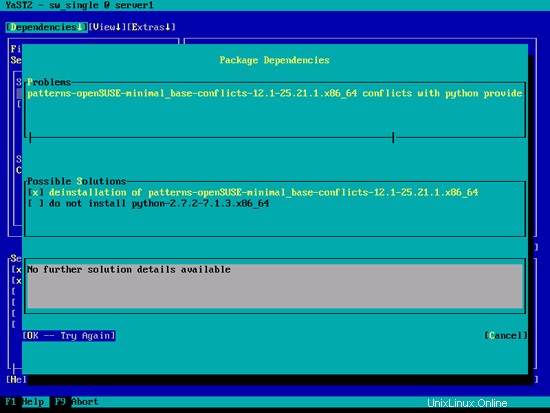
Appuyez sur Accepter sur l'écran suivant...
... et enfin OK :
Ouvrez /etc/postfix/master.cf...
vi /etc/postfix/master.cf
... et décommentez la ligne suivante :
[...]tlsmgr unix - - n 1000 ? 1 tlsmgr[...] |
Créez le lien symbolique suivant :
ln -s /usr/lib64/dovecot/modules /usr/lib/dovecot
Démarrez MySQL, Postfix et Dovecot et activez le démarrage des services au démarrage.
systemctl enable mysql.service
systemctl start mysql.service
systemctl activer postfix.service
systemctl démarrer postfix.service
systemctl activer dovecot.service
systemctl démarrer dovecot.service
Maintenant, j'installe le package getmail :
yast2 -i getmail
Pour sécuriser l'installation de MySQL, exécutez :
mysql_secure_installation
Plusieurs questions vont maintenant vous être posées :
server1:~ # mysql_secure_installation
REMARQUE : L'EXÉCUTION DE TOUTES LES PARTIES DE CE SCRIPT EST RECOMMANDÉE POUR TOUS MySQL
SERVEURS EN UTILISATION DE PRODUCTION ! VEUILLEZ LIRE ATTENTIVEMENT CHAQUE ÉTAPE !
Pour vous connecter à MySQL pour le sécuriser, nous aurons besoin du mot de passe
actuel pour l'utilisateur root. Si vous venez d'installer MySQL et
vous n'avez pas défini le mot de passe root encore, le mot de passe sera vide,
vous devez donc juste appuyer sur entrée ici.
Entrez mot de passe actuel pour root (entre pour aucun) :<-- ENTER
OK, mot de passe utilisé avec succès, continuer ...
La définition du mot de passe root assure que personne ne peut se connecter à MySQL
utilisateur root sans l'autorisation appropriée.
Définir le mot de passe root ? [O/n] <-- O
Nouveau mot de passe : <-- votremotdepasseqlracine
Saisissez à nouveau le nouveau mot de passe : <-- votremotdepasseqlracine
Mot de passe mis à jour avec succès !
Rechargement des tables de privilèges. .
... Succès !
Par défaut, une installation de MySQL a un utilisateur anonyme, permettant à n'importe qui
de se connecter à MySQL sans avoir d'avoir un compte d'utilisateur créé pour
eux. Ceci est un conçu uniquement pour les tests, et pour rendre l'installation
un peu plus fluide. Vous devriez les supprimer avant de passer dans un
environnement de production.
Supprimer les utilisateurs anonymes ? [O/n] <-- O
... Succès !
Normalement, root ne doit être autorisé à se connecter depuis 'localhost'. Cela
assure que quelqu'un ne ne peut pas deviner le mot de passe root depuis le réseau.
Interdire la connexion root à distance ? [O/n] <-- O
... Succès !
Par défaut, MySQL est fourni avec une base de données nommée "test" à laquelle n'importe qui peut
accéder. Cela est également conçu uniquement pour les tests et devrait être supprimé
avant de passer dans un environnement de production .
Supprimer la base de données de test et y accéder ? [O/n] <-- O
- Suppression de la base de données de test...
... Réussite !
- Suppression des privilèges sur la base de données de test...
... Réussite !
Recharger les tableaux de privilèges garantira que tout les changements apportés jusqu'à présent
prendront effet immédiatement.
Recharger les tableaux de privilèges maintenant ? [O/n] <-- O
... Réussite !
Nettoyage ...
Tout fait ! Si vous avez complété toutes les étapes ci-dessus, votre installation MySQL
devrait maintenant être sécurisée.
Merci d'utiliser MySQL !
serveur1 :~ #
Votre configuration MySQL devrait maintenant être sécurisée.
9 Amavisd-new, Spamassassin et Clamav
Installez les antivirus Amavisd-new, Spamassassin et Clamav. Exécuter
yast2 -i amavisd-new clamav clamav-db zoo unzip unrar bzip2 unarj perl-DBD-mysql
Ouvrez /etc/amavisd.conf...
vi /etc/amavisd.conf
... et ajoutez la ligne $myhostname avec votre nom d'hôte correct sous la ligne $mydomain :
[...]$mydomain ='example.com' ; # une valeur par défaut pratique pour les autres paramètres$myhostname ="server1.$mydomain";[...] |
Créez ensuite un lien symbolique de /var/run/clamav/clamd vers /var/lib/clamav/clamd-socket :
mkdir -p /var/run/clamav
ln -s /var/lib/clamav/clamd-socket /var/run/clamav/clamd
OpenSUSE 12.1 a un répertoire /run pour stocker les données d'exécution. /run est maintenant un tmpfs, et /var/run est maintenant monté en liaison avec /run à partir de tmpfs, et donc vidé au redémarrage.
Cela signifie qu'après un redémarrage, le répertoire /var/run/clamav que nous venons de créer n'existera plus, et donc clamd ne pourra pas démarrer. Par conséquent, nous créons maintenant le fichier /etc/tmpfiles.d/clamav.conf qui créera ce répertoire au démarrage du système (voir http://0pointer.de/public/systemd-man/tmpfiles.d.html pour plus de détails) :
vi /etc/tmpfiles.d/clamav.conf
D /var/run/clamav 0755 racine racine - |
Avant de démarrer amavisd et clamd, nous devons éditer le script d'initialisation /etc/init.d/amavis - je n'ai pas pu démarrer, arrêter et redémarrer amavisd de manière fiable avec le script d'initialisation par défaut :
vi /etc/init.d/amavis
Commentez les lignes suivantes dans la section de démarrage et d'arrêt :
[...] start) # ZMI 20100428 check for stale pid file #if test -f $AMAVIS_PID; then # checkproc -p $AMAVIS_PID amavisd # if test $? -ge 1; then # # le fichier pid est obsolète, supprimez-le # echo -n "(fichier obsolète amavisd pid $AMAVIS_PID trouvé, suppression. Amavisd a-t-il planté ?)" # rm -f $AMAVIS_PID # fi #fi echo -n "Démarrage de l'analyseur de virus (amavisd-new):" $AMAVISD_BIN start #if ! checkproc amavisd; then # rc_failed 7 #fi rc_status -v #if [ "$AMAVIS_SENDMAIL_MILTER" =="yes" ]; then # rc_reset # echo -n "Démarrage d'amavis-milter :" # startproc -u vscan $AMAVIS_MILTER_BIN -p $AMAVIS_MILTER_SOCK> /dev/null 2>&1 # rc_status -v #fi;; stop) echo -n "Arrêt de l'analyseur de virus (amavisd-new) :" #if checkproc amavisd; then # rc_reset $AMAVISD_BIN stop #else # rc_reset #fi rc_status -v #if [ "$AMAVIS_SENDMAIL_MILTER" =="yes" ]; then # rc_reset # echo -n "Arrêter amavis-milter :" # killproc -TERM $AMAVIS_MILTER_BIN # rc_status -v #fi;;[...] |
Parce que nous avons changé le script d'initialisation, nous devons exécuter
systemctl --system daemon-reload
à présent.
Pour activer les services, exécutez :
systemctl enable amavis.service
systemctl enable clamd.service
systemctl start amavis.service
systemctl start clamd.service
10 Installer Nginx, PHP5 (PHP-FPM) et Fcgiwrap
Nginx est disponible sous forme de package pour OpenSUSE que nous pouvons installer comme suit :
yast2 -i nginx-1.0
Si Apache2 est déjà installé sur le système, arrêtez-le maintenant...
systemctl stop apache2.service
... et supprimer les liens de démarrage du système d'Apache :
systemctl désactiver apache2.service
Ensuite, nous créons les liens de démarrage du système pour nginx et le démarrons :
systemctl activer nginx.service
systemctl démarrer nginx.service
(Si Apache2 et nginx sont installés, le programme d'installation d'ISPConfig 3 vous demandera lequel vous souhaitez utiliser - répondez nginx dans ce cas. Si un seul de ces deux éléments est installé, ISPConfig effectuera automatiquement la configuration nécessaire.)
Nous pouvons faire fonctionner PHP5 dans nginx via PHP-FPM (PHP-FPM (FastCGI Process Manager) est une implémentation alternative de PHP FastCGI avec quelques fonctionnalités supplémentaires utiles pour les sites de toute taille, en particulier les sites les plus fréquentés) que nous installons comme suit :
yast2 -i php5-fpm
Avant de démarrer PHP-FPM, renommez /etc/php5/fpm/php-fpm.conf.default en /etc/php5/fpm/php-fpm.conf :
mv /etc/php5/fpm/php-fpm.conf.default /etc/php5/fpm/php-fpm.conf
Modifiez les permissions du répertoire de session de PHP :
chmod 1733 /var/lib/php5
Ouvrez ensuite /etc/php5/fpm/php-fpm.conf...
vi /etc/php5/fpm/php-fpm.conf
... et changez error_log en /var/log/php-fpm.log et décommentez pm.min_spare_servers et pm.max_spare_servers :
[...]error_log =/var/log/php-fpm.log[...]pm.min_spare_servers =5[... ]pm.max_spare_servers =35[...] |
Créez ensuite les liens de démarrage du système pour php-fpm et démarrez-le :
systemctl activer php-fpm.service
systemctl démarrer php-fpm.service
PHP-FPM est un processus démon qui exécute un serveur FastCGI sur le port 9000, comme vous pouvez le voir dans la sortie de
netstat -tapn
server1 :~ # netstat -tapn
Connexions Internet actives (serveurs et établies)
Proto Recv-Q Send-Q Adresse locale Adresse étrangère État PID/Nom du programme
tcp 0 0.127 : 0.127 :3310 0.0.0.0:* Écoutez 10357 / Clamd
TCP 0 0 0.0.0.0:143 0.0.0.0:* Écoutez 9869 / Dovecot
TCP 0 0 0.0.0.0:80 0.0.0.0:* Écoutez 10521 / nginx
TCP 0 0 0.0.0.0:22 0.0.0.0:* Écoutez 1275 / sshd
TCP 0 0 127.0.0.1:25 0.0.0.0:* Écoutez 9816 / Master
TCP 0 0 127.0.0.1:9000 0.0.0.0:* Écoutez 10695 / php-fpm.conf)
TCP 0 0 127.0.0.1:10024 0.0.0.0:* Écoutez 10337 / Amavisd (Mast
TCP 0 0 0.0.0.0:3306 0.0.0.0 :* ÉCOUTER 9694/mysqld
tcp 0 0 192.168.0.100:22 192.168.0.199:4630 établi 1332/0
TCP 0 0 :::22 :::* Écoutez 1275 / sshd
TCP 0 0 ::1:25 :::* ÉCOUTEZ 9816/maître
serveur1 :~ #
Pour obtenir le support MySQL en PHP, nous pouvons installer le package php5-mysql. C'est une bonne idée d'installer d'autres modules PHP5 car vous pourriez en avoir besoin pour vos applications :
yast2 -i php5-mysql php5-bcmath php5-bz2 php5-calendar php5-ctype php5-curl php5-dom php5-ftp php5-gd php5-gettext php5-gmp php5-iconv php5-imap php5-ldap php5- mbstring php5-mcrypt php5-odbc php5-openssl php5-pcntl php5-pgsql php5-posix php5-shmop php5-snmp php5-soap php5-sockets php5-sqlite php5-sysvsem php5-tokenizer php5-wddx php5-xmlrpc php5-xsl php5 -zlib php5-exif php5-pear php5-sysvmsg php5-sysvshm
Redémarrez maintenant PHP-FPM :
systemctl redémarre php-fpm.service
Pour obtenir le support CGI dans nginx, nous installons Fcgiwrap.
Fcgiwrap est un wrapper CGI qui devrait également fonctionner pour les scripts CGI complexes et peut être utilisé pour les environnements d'hébergement partagé car il permet à chaque vhost d'utiliser son propre répertoire cgi-bin.
Comme il n'y a pas de package fcgiwrap pour OpenSUSE, nous devons le construire nous-mêmes. Nous installons d'abord quelques prérequis :
yast2 -i git patch automake glibc-devel gcc flex compat-readline4 db-devel wget gcc-c++ make vim libtool FastCGI-devel
Créez les liens symboliques suivants :
ln -s /usr/include/fastcgi/fastcgi.h /usr/local/include/
ln -s /usr/include/fastcgi/fcgi_config.h /usr/local/include/
ln - s /usr/include/fastcgi/fcgi_stdio.h /usr/local/include/
ln -s /usr/include/fastcgi/fcgiapp.h /usr/local/include/
ln -s / usr/include/fastcgi/fcgimisc.h /usr/local/include/
ln -s /usr/include/fastcgi/fcgio.h /usr/local/include/
ln -s /usr/ inclure/fastcgi/fcgios.h /usr/local/include/
Nous pouvons maintenant construire fcgiwrap comme suit :
cd /usr/local/src/
git clone git://github.com/gnosek/fcgiwrap.git
cd fcgiwrap
autoreconf -i
./configure
faire
faire installer
Ceci installe fcgiwrap dans /usr/local/sbin/fcgiwrap.
Ensuite, nous installons le paquet spawn-fcgi qui nous permet d'exécuter fcgiwrap en tant que démon :
yast2 -i spawn-fcgi
Nous pouvons maintenant démarrer fcgiwrap comme suit :
spawn-fcgi -u wwwrun -g www -s /var/run/fcgiwrap.socket -S -M 0770 -F 1 -P /var/run/spawn-fcgi.pid -- /usr/local/sbin /fcgiwrap
Vous devriez maintenant trouver le socket fcgiwrap dans /var/run/fcgiwrap.socket, appartenant à l'utilisateur wwwrun et au groupe www. Il faut maintenant ajouter l'utilisateur nginx au groupe www:
usermod -A www nginx
Recharger ensuite nginx :
systemctl recharge nginx.service
Si vous ne voulez pas démarrer fcgiwrap manuellement à chaque démarrage de votre système, ouvrez /etc/init.d/boot.local...
vi /etc/init.d/boot.local
... et ajoutez la commande spawn-fcgi à la fin du fichier - cela lancera automatiquement fcgiwrap à la fin du processus de démarrage :
[...]/usr/bin/spawn-fcgi -u wwwrun -g www -s /var/run/fcgiwrap.socket -S -M 0770 -F 1 -P /var/run/spawn-fcgi.pid -- /usr/local/sbin/fcgiwrap |
C'est ça! Désormais, lorsque vous créez un vhost nginx, ISPConfig s'occupe de la configuration correcte du vhost.
10.1 Installer phpMyAdmin
Ensuite, nous installons phpMyAdmin :
yast2 -i phpMyAdmin
Comme cela installe Apache en tant que dépendance, supprimez les liens de démarrage du système d'Apache :
systemctl désactiver apache2.service
phpMyAdmin est maintenant situé dans le répertoire /srv/www/htdocs/phpMyAdmin, mais nous le voulons dans le répertoire /usr/share/phpmyadmin/, nous créons donc un lien symbolique :
ln -s /srv/www/htdocs/phpMyAdmin /usr/share/phpmyadmin
Après avoir installé ISPConfig 3, vous pouvez accéder à phpMyAdmin comme suit :
Le vhost des applications ISPConfig sur le port 8081 pour nginx est livré avec une configuration phpMyAdmin, vous pouvez donc utiliser http://server1.example.com:8081/phpmyadmin ou http://server1.example.com:8081/phpMyAdmin pour accéder à phpMyAdmin.
Si vous souhaitez utiliser un alias /phpmyadmin ou /phpMyAdmin que vous pouvez utiliser depuis vos sites Web, c'est un peu plus compliqué que pour Apache car nginx n'a pas d'alias globaux (c'est-à-dire des alias qui peuvent être définis pour tous les vhosts). Vous devez donc définir ces alias pour chacun vhost à partir duquel vous souhaitez accéder à phpMyAdmin.
Pour ce faire, collez ce qui suit dans le champ Directives nginx de l'onglet Options du site Web dans ISPConfig :
emplacement /phpmyadmin { root /usr/share/; index index.php index.html index.htm; emplacement ~ ^/phpmyadmin/(.+\.php)$ { try_files $uri =404; racine /usr/partage/ ; fastcgi_pass 127.0.0.1:9000; fastcgi_index index.php ; fastcgi_param SCRIPT_FILENAME $document_root$fastcgi_script_name ; inclure /etc/nginx/fastcgi_params ; fastcgi_buffer_size 128k; fastcgi_buffers 256 4k; fastcgi_busy_buffers_size 256k ; fastcgi_temp_file_write_size 256k ; fastcgi_intercept_errors activé ; } emplacement ~* ^/phpmyadmin/(.+\.(jpg|jpeg|gif|css|png|js|ico|html|xml|txt))$ { root /usr/share/; } } emplacement /phpMyAdmin { réécrire ^/* /phpmyadmin dernier ; } |
Si vous utilisez https au lieu de http pour votre vhost, vous devez ajouter la ligne fastcgi_param HTTPS on; à votre configuration phpMyAdmin comme ceci :
emplacement /phpmyadmin { root /usr/share/; index index.php index.html index.htm; emplacement ~ ^/phpmyadmin/(.+\.php)$ { try_files $uri =404; racine /usr/partage/ ; fastcgi_pass 127.0.0.1:9000; fastcgi_param HTTPS activé ; # <-- ajoutez cette ligne fastcgi_index index.php; fastcgi_param SCRIPT_FILENAME $document_root$fastcgi_script_name ; inclure /etc/nginx/fastcgi_params ; fastcgi_buffer_size 128k; fastcgi_buffers 256 4k; fastcgi_busy_buffers_size 256k ; fastcgi_temp_file_write_size 256k ; fastcgi_intercept_errors activé ; } emplacement ~* ^/phpmyadmin/(.+\.(jpg|jpeg|gif|css|png|js|ico|html|xml|txt))$ { root /usr/share/; } } emplacement /phpMyAdmin { réécrire ^/* /phpmyadmin dernier ; } |
Si vous utilisez à la fois http et https pour votre vhost, vous devez ajouter la section suivante à la section http {} dans /etc/nginx/nginx.conf (avant toute ligne d'inclusion) qui détermine si le visiteur utilise http ou https et définit la variable $fastcgi_https (que nous utiliserons dans notre configuration phpMyAdmin) en conséquence :
vi /etc/nginx/nginx.conf
[...]http {[...] ## Détecter quand HTTPS est utilisé map $scheme $fastcgi_https { default off; https activé ; }[...]}[...] |
N'oubliez pas de recharger nginx après :
systemctl recharge nginx.service
Ensuite, allez à nouveau dans le champ Directives nginx, et au lieu de fastcgi_param HTTPS on ; vous ajoutez la ligne fastcgi_param HTTPS $fastcgi_https ; afin que vous puissiez utiliser phpMyAdmin pour les requêtes http et https :
emplacement /phpmyadmin { root /usr/share/; index index.php index.html index.htm; emplacement ~ ^/phpmyadmin/(.+\.php)$ { try_files $uri =404; racine /usr/partage/ ; fastcgi_pass 127.0.0.1:9000; fastcgi_param HTTPS $fastcgi_https ; # <-- ajoutez cette ligne fastcgi_index index.php; fastcgi_param SCRIPT_FILENAME $document_root$fastcgi_script_name ; inclure /etc/nginx/fastcgi_params ; fastcgi_buffer_size 128k; fastcgi_buffers 256 4k; fastcgi_busy_buffers_size 256k ; fastcgi_temp_file_write_size 256k ; fastcgi_intercept_errors activé ; } emplacement ~* ^/phpmyadmin/(.+\.(jpg|jpeg|gif|css|png|js|ico|html|xml|txt))$ { root /usr/share/; } } emplacement /phpMyAdmin { réécrire ^/* /phpmyadmin dernier ; } |
Le serveur parfait - OpenSUSE 12.1 x86_64 avec Nginx [ISPConfig 3] - Page 5
11 Facteur
Depuis la version 3.0.4, ISPConfig permet également de gérer (créer/modifier/supprimer) des listes de diffusion Mailman. Si vous souhaitez utiliser cette fonctionnalité, installez Mailman comme suit :
yast2 -i facteur
Avant de pouvoir démarrer Mailman, une première liste de diffusion appelée mailman doit être créée :
/usr/lib/mailman/bin/newlist mailman
server1 :~ # /usr/lib/mailman/bin/newlist mailman
Entrez l'adresse e-mail de la personne qui gère la liste :<-- adresse e-mail d'administration , par ex. example@unixlinux.online
Mot de passe initial du mailman :<-- mot de passe admin pour la liste de mailman
Appuyez sur Entrée pour notifier le propriétaire du mailman... <-- ENTER
serveur1 :~ #
Créez les liens de démarrage du système pour Mailman...
systemctl activer mailman.service
... et démarrez-le :
systemctl start mailman.service
Prochain redémarrage de Postfix :
systemctl redémarre postfix.service
Nous devons maintenant créer ce lien symbolique pour que Mailman fonctionne avec ISPConfig :
cd /usr/lib/mailman/cgi-bin/
ln -s ./ mailman
Si vous souhaitez utiliser Mailman à partir de vos sites Web créés via ISPConfig, c'est un peu plus compliqué que pour Apache car nginx n'a pas d'alias globaux (c'est-à-dire des alias qui peuvent être définis pour tous les vhosts). Vous devez donc définir ces alias pour chacun vhost à partir duquel vous souhaitez accéder à Mailman.
Pour ce faire, collez ce qui suit dans le champ Directives nginx de l'onglet Options du site Web dans ISPConfig :
emplacement /mailman { root /usr/lib/mailman/cgi-bin/; fastcgi_split_path_info (^/mailman/[^/]*)(.*)$ ; inclure /etc/nginx/fastcgi_params ; fastcgi_param SCRIPT_FILENAME $document_root$fastcgi_script_name ; fastcgi_param PATH_INFO $fastcgi_path_info ; fastcgi_param PATH_TRANSLATED $document_root$fastcgi_path_info; fastcgi_intercept_errors on; fastcgi_pass unix:/var/run/fcgiwrap.socket; } location /mailmanicons { alias /usr/lib/mailman/icons; } location /pipermail { alias /var/lib/mailman/archives/public; autoindex on; } |
This defines the alias /mailman/ for your vhost, which means you can access the Mailman admin interface for a list at http://
Under http://
12 Install PureFTPd
Install the pure-ftpd FTP daemon. Run:
yast2 -i pure-ftpd
systemctl enable pure-ftpd.service
systemctl start pure-ftpd.service
Now we configure PureFTPd to allow FTP and TLS sessions. FTP is a very insecure protocol because all passwords and all data are transferred in clear text. By using TLS, the whole communication can be encrypted, thus making FTP much more secure.
OpenSSL is needed by TLS; to install OpenSSL, we simply run:
yast2 -i openssl
Open /etc/pure-ftpd/pure-ftpd.conf...
vi /etc/pure-ftpd/pure-ftpd.conf
If you want to allow FTP and TLS sessions, set TLS to 1:
[...]# This option can accept three values :# 0 :disable SSL/TLS encryption layer (default).# 1 :accept both traditional and encrypted sessions.# 2 :refuse connections that don't use SSL/TLS security mechanisms,# including anonymous sessions.# Do _not_ uncomment this blindly. Be sure that :# 1) Your server has been compiled with SSL/TLS support (--with-tls),# 2) A valid certificate is in place,# 3) Only compatible clients will log in.TLS 1[...] |
If you want to accept TLS sessions only (no FTP), set TLS to 2:
[...]# This option can accept three values :# 0 :disable SSL/TLS encryption layer (default).# 1 :accept both traditional and encrypted sessions.# 2 :refuse connections that don't use SSL/TLS security mechanisms,# including anonymous sessions.# Do _not_ uncomment this blindly. Be sure that :# 1) Your server has been compiled with SSL/TLS support (--with-tls),# 2) A valid certificate is in place,# 3) Only compatible clients will log in.TLS 2[...] |
To not allow TLS at all (only FTP), set TLS to 0:
[...]# This option can accept three values :# 0 :disable SSL/TLS encryption layer (default).# 1 :accept both traditional and encrypted sessions.# 2 :refuse connections that don't use SSL/TLS security mechanisms,# including anonymous sessions.# Do _not_ uncomment this blindly. Be sure that :# 1) Your server has been compiled with SSL/TLS support (--with-tls),# 2) A valid certificate is in place,# 3) Only compatible clients will log in.TLS 0[...] |
In order to use TLS, we must create an SSL certificate. I create it in /etc/ssl/private/, therefore I create that directory first:
mkdir -p /etc/ssl/private/
Afterwards, we can generate the SSL certificate as follows:
openssl req -x509 -nodes -days 7300 -newkey rsa:2048 -keyout /etc/ssl/private/pure-ftpd.pem -out /etc/ssl/private/pure-ftpd.pem
Country Name (2 letter code) [AU]:<-- Enter your Country Name (e.g., "DE").
State or Province Name (full name) [Some-State]:<-- Enter your State or Province Name.
Locality Name (eg, city) []:<-- Enter your City.
Organization Name (eg, company) [Internet Widgits Pty Ltd]:<-- Enter your Organization Name (e.g., the name of your company).
Organizational Unit Name (eg, section) []:<-- Enter your Organizational Unit Name (e.g. "IT Department").
Common Name (eg, YOUR name) []:<-- Enter the Fully Qualified Domain Name of the system (e.g. "server1.example.com").
Email Address []:<-- Enter your Email Address.
Change the permissions of the SSL certificate:
chmod 600 /etc/ssl/private/pure-ftpd.pem
Finally restart PureFTPd:
systemctl restart pure-ftpd.service
C'est ça. You can now try to connect using your FTP client; however, you should configure your FTP client to use TLS - see the next chapter how to do this with FileZilla.
13 Install BIND
The BIND nameserver can be installed as follows:
yast2 -i bind
Create the BIND system startup links and start it:
systemctl enable named.service
systemctl start named.service
14 Install Webalizer And AWStats
Since ISPConfig 3 lets you choose if you want to use Webalizer or AWStats to create your web site statistics, we install both:
yast2 -i webalizer perl-DateManip
zypper install http://download.opensuse.org/repositories/network:/utilities/openSUSE_12.1/noarch/awstats-7.0-14.1.noarch.rpm
15 Install fail2ban
fail2ban can be installed as follows:
yast2 -i fail2ban
16 Install Jailkit
Jailkit can be installed like this:
zypper install http://download.opensuse.org/repositories/security/openSUSE_12.1/x86_64/jailkit-2.13-1.1.x86_64.rpm
17 Synchronize The System Clock
If you want to have the system clock synchronized with an NTP server do the following:
yast2 -i xntp
Then add system startup links for ntp and start ntp:
systemctl enable ntp.service
systemctl start ntp.service
18 Install rkhunter
rkhunter can be installed as follows:
yast2 -i rkhunter
The Perfect Server - OpenSUSE 12.1 x86_64 With Nginx [ISPConfig 3] - Page 6
19 Install SquirrelMail
To install the SquirrelMail webmail client, run:
zypper installhttp://download.opensuse.org/repositories/server:/php:/applications/openSUSE_12.1/noarch/squirrelmail-1.4.22-1.1.noarch.rpm
Then configure SquirrelMail:
/srv/www/htdocs/squirrelmail/config/conf.pl
We must tell SquirrelMail that we are using Dovecot:
SquirrelMail Configuration : Read: config.php (1.4.0)
---------------------------------------------------------
Main Menu --
1. Organization Preferences
2. Server Settings
3. Folder Defaults
4. General Options
5. User Interface
6. Address Books
7. Message of the Day (MOTD)
8. Plugins
9. Database
10. Language settings
11. Tweaks
D. Set pre-defined settings for specific IMAP servers
C Turn color on
S Save data
Q Quit
Command >> <-- D
SquirrelMail Configuration : Read: config.php
---------------------------------------------------------
While we have been building SquirrelMail, we have discovered some
preferences that work better with some servers that don't work so
well with others. If you select your IMAP server, this option will
set some pre-defined settings for that server.
Please note that you will still need to go through and make sure
everything is correct. This does not change everything. There are
only a few settings that this will change.
Please select your IMAP server:
bincimap = Binc IMAP server
courier = Courier IMAP server
cyrus = Cyrus IMAP server
dovecot = Dovecot Secure IMAP server
exchange = Microsoft Exchange IMAP server
hmailserver = hMailServer
macosx = Mac OS X Mailserver
mercury32 = Mercury/32
uw = University of Washington's IMAP server
gmail = IMAP access to Google mail (Gmail) accounts
quit = Do not change anything
Command >> <-- dovecot
SquirrelMail Configuration : Read: config.php
---------------------------------------------------------
While we have been building SquirrelMail, we have discovered some
preferences that work better with some servers that don't work so
well with others. If you select your IMAP server, this option will
set some pre-defined settings for that server.
Please note that you will still need to go through and make sure
everything is correct. This does not change everything. There are
only a few settings that this will change.
Please select your IMAP server:
bincimap = Binc IMAP server
courier = Courier IMAP server
cyrus = Cyrus IMAP server
dovecot = Dovecot Secure IMAP server
exchange = Microsoft Exchange IMAP server
hmailserver = hMailServer
macosx = Mac OS X Mailserver
mercury32 = Mercury/32
uw = University of Washington's IMAP server
gmail = IMAP access to Google mail (Gmail) accounts
quit = Do not change anything
Command >> dovecot
imap_server_type = dovecot
default_folder_prefix =
trash_folder = Trash
sent_folder = Sent
draft_folder = Drafts
show_prefix_option = false
default_sub_of_inbox = false
show_contain_subfolders_option = false
optional_delimiter = detect
delete_folder = false
force_username_lowercase = true
Press enter to continue... <-- ENTER
SquirrelMail Configuration : Read: config.php (1.4.0)
---------------------------------------------------------
Main Menu --
1. Organization Preferences
2. Server Settings
3. Folder Defaults
4. General Options
5. User Interface
6. Address Books
7. Message of the Day (MOTD)
8. Plugins
9. Database
10. Language settings
11. Tweaks
D. Set pre-defined settings for specific IMAP servers
C Turn color on
S Save data
Q Quit
Command >> <-- S
SquirrelMail Configuration : Read: config.php (1.4.0)
---------------------------------------------------------
Main Menu --
1. Organization Preferences
2. Server Settings
3. Folder Defaults
4. General Options
5. User Interface
6. Address Books
7. Message of the Day (MOTD)
8. Plugins
9. Database
10. Language settings
11. Tweaks
D. Set pre-defined settings for specific IMAP servers
C Turn color on
S Save data
Q Quit
Command >> S
Data saved in config.php
Done activating plugins; registration data saved in plugin_hooks.php
Press enter to continue... <-- ENTER
SquirrelMail Configuration : Read: config.php (1.4.0)
---------------------------------------------------------
Main Menu --
1. Organization Preferences
2. Server Settings
3. Folder Defaults
4. General Options
5. User Interface
6. Address Books
7. Message of the Day (MOTD)
8. Plugins
9. Database
10. Language settings
11. Tweaks
D. Set pre-defined settings for specific IMAP servers
C Turn color on
S Save data
Q Quit
Command >> <-- Q
SquirrelMail is located in the /srv/www/htdocs/squirrelmail directory, but we need it in the /usr/share/squirrelmail/ directory. Therefore we create a symlink:
ln -s /srv/www/htdocs/squirrelmail /usr/share/squirrelmail
In addition to that, we change the owner of the /srv/www/htdocs/squirrelmail/data/ directory to nobody:
chown nobody /srv/www/htdocs/squirrelmail/data/
After you have installed ISPConfig 3, you can access SquirrelMail as follows:
The ISPConfig apps vhost on port 8081 for nginx comes with a SquirrelMail configuration, so you can use http://server1.example.com:8081/squirrelmail or http://server1.example.com:8081/webmail to access SquirrelMail.
If you want to use a /webmail or /squirrelmail alias that you can use from your web sites, this is a bit more complicated than for Apache because nginx does not have global aliases (i.e., aliases that can be defined for all vhosts). Therefore you have to define these aliases for each vhost from which you want to access SquirrelMail.
To do this, paste the following into the nginx Directives field on the Options tab of the web site in ISPConfig:
location /squirrelmail { root /usr/share/; index index.php index.html index.htm; location ~ ^/squirrelmail/(.+\.php)$ { try_files $uri =404; root /usr/share/; fastcgi_pass 127.0.0.1:9000; fastcgi_index index.php; fastcgi_param SCRIPT_FILENAME $document_root$fastcgi_script_name; include /etc/nginx/fastcgi_params; fastcgi_buffer_size 128k; fastcgi_buffers 256 4k; fastcgi_busy_buffers_size 256k; fastcgi_temp_file_write_size 256k; fastcgi_intercept_errors on; } location ~* ^/squirrelmail/(.+\.(jpg|jpeg|gif|css|png|js|ico|html|xml|txt))$ { root /usr/share/; } } location /webmail { rewrite ^/* /squirrelmail last; } |
If you use https instead of http for your vhost, you should add the line fastcgi_param HTTPS on; to your SquirrelMail configuration like this:
location /squirrelmail { root /usr/share/; index index.php index.html index.htm; location ~ ^/squirrelmail/(.+\.php)$ { try_files $uri =404; root /usr/share/; fastcgi_pass 127.0.0.1:9000; fastcgi_param HTTPS on; # <-- add this line fastcgi_index index.php; fastcgi_param SCRIPT_FILENAME $document_root$fastcgi_script_name; include /etc/nginx/fastcgi_params; fastcgi_buffer_size 128k; fastcgi_buffers 256 4k; fastcgi_busy_buffers_size 256k; fastcgi_temp_file_write_size 256k; fastcgi_intercept_errors on; } location ~* ^/squirrelmail/(.+\.(jpg|jpeg|gif|css|png|js|ico|html|xml|txt))$ { root /usr/share/; } } location /webmail { rewrite ^/* /squirrelmail last; } |
If you use both http and https for your vhost, you need to add the following section to the http {} section in /etc/nginx/nginx.conf (before any include lines) which determines if the visitor uses http or https and sets the $fastcgi_https variable (which we will use in our SquirrelMail configuration) accordingly:
vi /etc/nginx/nginx.conf
[...]http {[...] ## Detect when HTTPS is used map $scheme $fastcgi_https { default off; https on; }[...]}[...] |
Don't forget to reload nginx afterwards:
systemctl reload nginx.service
Then go to the nginx Directives field again, and instead of fastcgi_param HTTPS on; you add the line fastcgi_param HTTPS $fastcgi_https; so that you can use SquirrelMail for both http and https requests:
location /squirrelmail { root /usr/share/; index index.php index.html index.htm; location ~ ^/squirrelmail/(.+\.php)$ { try_files $uri =404; root /usr/share/; fastcgi_pass 127.0.0.1:9000; fastcgi_param HTTPS $fastcgi_https; # <-- add this line fastcgi_index index.php; fastcgi_param SCRIPT_FILENAME $document_root$fastcgi_script_name; include /etc/nginx/fastcgi_params; fastcgi_buffer_size 128k; fastcgi_buffers 256 4k; fastcgi_busy_buffers_size 256k; fastcgi_temp_file_write_size 256k; fastcgi_intercept_errors on; } location ~* ^/squirrelmail/(.+\.(jpg|jpeg|gif|css|png|js|ico|html|xml|txt))$ { root /usr/share/; } } location /webmail { rewrite ^/* /squirrelmail last; } |
20 ISPConfig 3
Before we install ISPConfig 3, make sure that the /var/vmail/ directory exists:
mkdir /var/vmail/
Before you start the ISPConfig installation, make sure that Apache is stopped (if it is installed - it is possible that some of your installed packages have installed Apache as a dependency without you knowing). If Apache2 is already installed on the system, stop it now...
systemctl stop apache2.service
... and remove Apache's system startup links:
systemctl disable apache2.service
Make sure that nginx is running:
systemctl restart nginx.service
(If you have both Apache and nginx installed, the installer asks you which one you want to use:Apache and nginx detected. Select server to use for ISPConfig:(apache,nginx) [apache]:
Type nginx. If only Apache or nginx are installed, this is automatically detected by the installer, and no question is asked.)
Download the current ISPConfig 3 version and install it. The ISPConfig installer will configure all services like Postfix, Dovecot, etc. for you. A manual setup as required for ISPConfig 2 is not necessary anymore.
You now also have the possibility to let the installer create an SSL vhost for the ISPConfig control panel, so that ISPConfig can be accessed using https:// instead of http://. To achieve this, just press ENTER when you see this question:Do you want a secure (SSL) connection to the ISPConfig web interface (y,n) [y]:.
cd /tmp
wget http://www.ispconfig.org/downloads/ISPConfig-3-stable.tar.gz
tar xfz ISPConfig-3-stable.tar.gz
cd ispconfig3_install/install/
Now start the installation process by executing:
php -q install.php
server1:/tmp/ispconfig3_install/install # php -q install.php
--------------------------------------------------------------------------------
_____ ___________ _____ __ _ ____
|_ _/ ___| ___ \ / __ \ / _(_) /__ \
| | \ `--.| |_/ / | / \/ ___ _ __ | |_ _ __ _ _/ /
| | `--. \ __/ | | / _ \| '_ \| _| |/ _` | |_ |
_| |_/\__/ / | | \__/\ (_) | | | | | | | (_| | ___\ \
\___/\____/\_| \____/\___/|_| |_|_| |_|\__, | \____/
__/ |
|___/
--------------------------------------------------------------------------------
>> Initial configuration
Operating System: openSUSE or compatible, unknown version.
Following will be a few questions for primary configuration so be careful.
Default values are in [brackets] and can be accepted with
Tap in "quit" (without the quotes) to stop the installer.
Select language (en,de) [en]: <-- ENTER
Installation mode (standard,expert) [standard]: <-- ENTER
Full qualified hostname (FQDN) of the server, eg server1.domain.tld [server1.example.com]: <-- ENTER
MySQL server hostname [localhost]: <-- ENTER
MySQL root username [root]: <-- ENTER
MySQL root password []: <-- yourrootsqlpassword
MySQL database to create [dbispconfig]: <-- ENTER
MySQL charset [utf8]: <-- ENTER
Apache and nginx detected. Select server to use for ISPConfig: (apache,nginx) [apache]: <-- nginx
Generating a 2048 bit RSA private key
...................................................................................+++
...+++
writing new private key to 'smtpd.key'
-----
You are about to be asked to enter information that will be incorporated
into your certificate request.
What you are about to enter is what is called a Distinguished Name or a DN.
There are quite a few fields but you can leave some blank
For some fields there will be a default value,
If you enter '.', the field will be left blank.
-----
Country Name (2 letter code) [AU]: <-- ENTER
State or Province Name (full name) [Some-State]: <-- ENTER
Locality Name (eg, city) []: <-- ENTER
Organization Name (eg, company) [Internet Widgits Pty Ltd]: <-- ENTER
Organizational Unit Name (eg, section) []: <-- ENTER
Common Name (eg, YOUR name) []: <-- ENTER
Emai l Address []: <-- ENTER
Configuring Jailkit
Configuring Dovecot
chmod: cannot access `/etc/dovecot/dovecot-sql.conf~': No such file or directory
Configuring Spamassassin
Configuring Amavisd
Configuring Getmail
Configuring Pureftpd
Configuring BIND
Configuring nginx
Configuring Vlogger
Configuring Apps vhost
Configuring Bastille Firewall
Configuring Fail2ban
Installing ISPConfig
ISPConfig Port [8080]: <-- ENTER
Do you want a secure (SSL) connection to the ISPConfig web interface (y,n) [y]:<-- ENTER
Generating RSA private key, 4096 bit long modulus
.++
...............++
e is 65537 (0x10001)
You are about to be asked to enter information that will be incorporated
into your certificate request.
What you are about to enter is what is called a Distinguished Name or a DN.
There are quite a few fields but you can leave some blank
For some fields there will be a default value,
If you enter '.', the field will be left blank.
-----
Country Name (2 letter code) [AU]: <-- ENTER
State or Province Name (full name) [Some-State]: <-- ENTER
Locality Name (eg, city) []: <-- ENTER
Organization Name (eg, company) [Internet Widgits Pty Ltd]: <-- ENTER
Organizational Unit Name (eg, section) []: <-- ENTER
Common Name (eg, YOUR name) []: <-- ENTER
Email Address []: <-- ENTER
Please enter the following 'extra' attributes
to be sent with your certificate request
A challenge password []: <-- ENTER
An optional company name []: <-- ENTER
writing RSA key
Configuring DBServer
Installing ISPConfig crontab
no crontab for root
no crontab for getmail
Restarting services ...
redirecting to systemctl
redirecting to systemctl
redirecting to systemctl
redirecting to systemctl
redirecting to systemctl
redirecting to systemctl
redirectin g to systemctl
redirecting to systemctl
redirecting to systemctl
Installation completed.
server1:/tmp/ispconfig3_install/install #
Clean up the /tmp directory:
cd /tmp
rm -rf /tmp/ispconfig3_install
rm -f /tmp/ISPConfig-3-stable.tar.gz
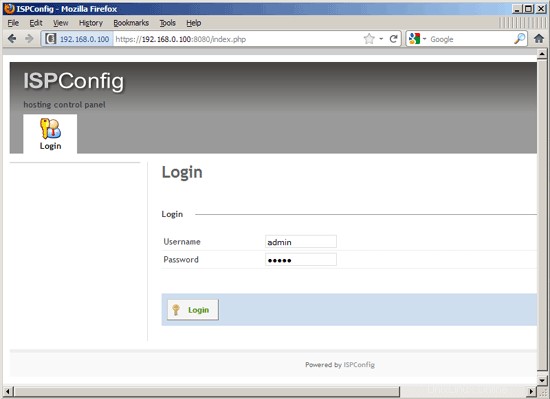
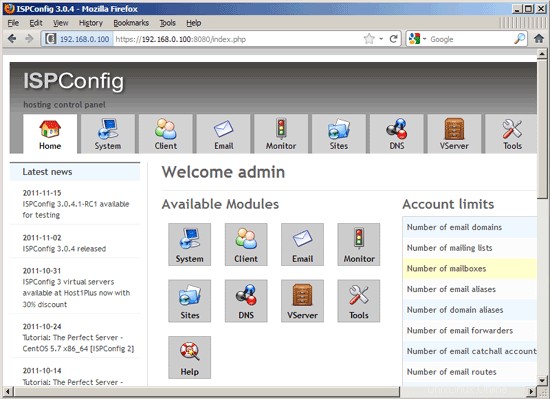
Afterwards you can access ISPConfig 3 under http(s)://server1.example.com:8080/ or http(s)://192.168.0.100:8080/ (http or https depends on what you chose during installation). Log in with the username admin and the password admin (you should change the default password after your first login):
If you want to use IPv6 addresses with your nginx vhosts, please do the following before you create IPv6 vhosts in ISPConfig:
Open /etc/sysctl.conf...
vi /etc/sysctl.conf
... and add the line net.ipv6.bindv6only =1:
[...]net.ipv6.bindv6only =1 |
Run...
sysctl -p
... afterwards for the change to take effect.
20.1 ISPConfig 3 Manual
In order to learn how to use ISPConfig 3, I strongly recommend to download the ISPConfig 3 Manual.
On about 300 pages, it covers the concept behind ISPConfig (admin, resellers, clients), explains how to install and update ISPConfig 3, includes a reference for all forms and form fields in ISPConfig together with examples of valid inputs, and provides tutorials for the most common tasks in ISPConfig 3. It also lines out how to make your server more secure and comes with a troubleshooting section at the end.
20.2 ISPConfig Monitor App For Android
With the ISPConfig Monitor App, you can check your server status and find out if all services are running as expected. You can check TCP and UDP ports and ping your servers. In addition to that you can use this app to request details from servers that have ISPConfig installed (please note that the minimum installed ISPConfig 3 version with support for the ISPConfig Monitor App is 3.0.3.3! ); these details include everything you know from the Monitor module in the ISPConfig Control Panel (e.g. services, mail and system logs, mail queue, CPU and memory info, disk usage, quota, OS details, RKHunter log, etc.), and of course, as ISPConfig is multiserver-capable, you can check all servers that are controlled from your ISPConfig master server.
For download and usage instructions, please visit http://www.ispconfig.org/ispconfig-3/ispconfig-monitor-app-for-android/.
21 Links
- OpenSUSE:http://www.opensuse.org/
- ISPConfig:http://www.ispconfig.org/
About The Author

Falko Timme is the owner of  Timme Hosting (ultra-fast nginx web hosting). He is the lead maintainer of HowtoForge (since 2005) and one of the core developers of ISPConfig (since 2000). He has also contributed to the O'Reilly book "Linux System Administration".