FreeIPA est un système de gestion d'identité open source pour les environnements Linux/Unix qui fournit une gestion et une authentification centralisées des comptes, comme Microsoft Active Directory ou LDAP .
FreeIPA est une combinaison de 389 Directory Server, MIT Kerberos, Apache HTTP Server , NTP, DNS , Dogtag (système de certificats) et SSSD, ce qui en fait une solution de sécurité intégrée unique pour gérer l'identité, la politique et effectuer une piste d'audit.
Identité : (ordinateur, utilisateur, machines virtuelles, groupes, identifiants d'authentification )
Politique : (paramètres de configuration, informations de contrôle d'accès )
Piste d'audit : (événements, journaux, analyse )
FreeIPA est livré avec une interface utilisateur Web et des outils de ligne de commande pour effectuer des tâches administratives.
Ici, nous allons installer le FreeIPA sur CentOS 7 / RHEL 7 serveur, puis configurez le client FreeIPA sur les machines clientes (CentOS / Ubuntu / Debian ) pour permettre aux utilisateurs de se connecter avec leurs identifiants.
Prérequis
Dans un premier temps, vous devez définir l'adresse IP statique sur le système.
LIRE :Comment définir une adresse IP statique sur CentOS 7 / RHEL 7
Si vous installez FreeIPA avec un DNS intégré, assurez-vous que DNS1=127.0.0.1 se trouve dans le fichier de configuration Ethernet.
Assurez-vous que /etc/resolv.conf a la valeur ci-dessous.
nameserver 127.0.0.1
Deuxièmement, définissez le nom d'hôte (FQDN).
hostnamectl set-hostname ipa.itzgeek.local
Troisièmement, ajoutez une entrée d'hôte sur le serveur pour résoudre le nom d'hôte du système.
echo "192.168.1.10 ipa.itzgeek.local ipa" >> /etc/hosts
Quatrièmement, configurez un enregistrement pour le nom d'hôte de votre serveur dans le serveur DNS (facultatif).
Vous pouvez utiliser le serveur DNS BIND ou le DNS ISC Bind intégré pour résoudre les noms d'hôte.
LIRE :Comment configurer le serveur DNS sur CentOS 7 / RHEL 7
Remarque : Ici, nous utiliserons DNS ISC Bind intégré pour notre configuration FreeIPA.
De plus, dans RHEL 7, abonnez le système aux canaux facultatifs et supplémentaires.
subscription-manager repos --enable rhel-7-server-optional-rpms
Installer FreeIPA
Les packages FreeIPA peuvent être trouvés sur le référentiel de base du système d'exploitation. Vous pouvez donc utiliser la commande YUM sur CentOS 7/ RHEL 7 pour installer le serveur FreeIPA .
L'installation du package bind-dyndb-ldap permettra à FreeIPA de gérer le DNS intégré.
yum install -y ipa-server ipa-server-dns bind-dyndb-ldap
Démarrez la liaison (DNS) service et activez-le pour le démarrage automatique au démarrage du système. Ceci pour le moment et vous pouvez désactiver le service après l'installation de FreeIPA.
systemctl start named
systemctl enable named
Maintenant, installez le serveur FreeIPA en utilisant la commande suivante.
ipa-server-install
Répondez à toutes les questions posées par le programme d'installation lors de la configuration.
The log file for this installation can be found in /var/log/ipaserver-install.log
==============================================================================
This program will set up the IPA Server.

This includes:
  * Configure a stand-alone CA (dogtag) for certificate management
  * Configure the Network Time Daemon (ntpd)
  * Create and configure an instance of Directory Server
  * Create and configure a Kerberos Key Distribution Center (KDC)
  * Configure Apache (httpd)
  * Configure DNS (bind)
  * Configure the KDC to enable PKINIT

To accept the default shown in brackets, press the Enter key.

WARNING: conflicting time&date synchronization service 'chronyd' will be disabled
in favor of ntpd

Do you want to configure integrated DNS (BIND)? [no]: yes << To use integrated DNS with FreeIPA

Enter the fully qualified domain name of the computer
on which you're setting up server software. Using the form
.
Example: master.example.com.


Server host name [ipa.itzgeek.local]: ipa.itzgeek.local << Enter the Hostname

Warning: skipping DNS resolution of host ipa.itzgeek.local
The domain name has been determined based on the host name.

Please confirm the domain name [itzgeek.local]: itzgeek.local << Enter the domain name

The kerberos protocol requires a Realm name to be defined.
This is typically the domain name converted to uppercase.

Please provide a realm name [ITZGEEK.LOCAL]: ITZGEEK.LOCAL << Type the REALM
Certain directory server operations require an administrative user.
This user is referred to as the Directory Manager and has full access
to the Directory for system management tasks and will be added to the
instance of directory server created for IPA.
The password must be at least 8 characters long.

Directory Manager password: xxxx << Enter Directory manager password
Password (confirm): xxxx << Re-Enter Ditectory manager password

The IPA server requires an administrative user, named 'admin'.
This user is a regular system account used for IPA server administration.

IPA admin password: xxxx << Enter IPA admin password - Used for Web UI and other administrative tasks
Password (confirm): xxxx << Re-Enter IPA admin password

Checking DNS domain itzgeek.local., please wait ...
Do you want to configure DNS forwarders? [yes]: yes <<  Type yes to configure DNS forwarder Zone
Following DNS servers are configured in /etc/resolv.conf: 127.0.0.1, 192.168.1.1
Do you want to configure these servers as DNS forwarders? [yes]: yes << Type yes to use the existing name server from resolv.conf file
All DNS servers from /etc/resolv.conf were added. You can enter additional addresses now:
Enter an IP address for a DNS forwarder, or press Enter to skip: 8.8.8.8 << Add aditional name servers
DNS forwarder 8.8.8.8 added. You may add another.
Enter an IP address for a DNS forwarder, or press Enter to skip: Press Enter << Press Enter to complete adding name servers
Checking DNS forwarders, please wait ...
Do you want to search for missing reverse zones? [yes]: yes << Type yes to search for reverse zone
Do you want to create reverse zone for IP 192.168.1.10 [yes]: yes << Type yes to create PTR for IPA server
Please specify the reverse zone name [1.168.192.in-addr.arpa.]:  Press enter << to use the reverse zone name
Using reverse zone(s) 1.168.192.in-addr.arpa.

The IPA Master Server will be configured with:
Hostname:       ipa.itzgeek.local
IP address(es): 192.168.1.10
Domain name:    itzgeek.local
Realm name:     ITZGEEK.LOCAL

BIND DNS server will be configured to serve IPA domain with:
Forwarders:       127.0.0.1, 192.168.1.1, 8.8.8.8
Forward policy:   only
Reverse zone(s):  1.168.192.in-addr.arpa.

Continue to configure the system with these values? [no]: yes << Type yes to confirm the inputs

The following operations may take some minutes to complete.
Please wait until the prompt is returned.

Configuring NTP daemon (ntpd)
  [1/4]: stopping ntpd
  [2/4]: writing configuration
  [3/4]: configuring ntpd to start on boot
  [4/4]: starting ntpd
Done configuring NTP daemon (ntpd).
Configuring directory server (dirsrv). Estimated time: 30 seconds
  [1/45]: creating directory server instance
  [2/45]: enabling ldapi
  [3/45]: configure autobind for root
  [4/45]: stopping directory server
  [5/45]: updating configuration in dse.ldif
  [6/45]: starting directory server
  [7/45]: adding default schema
  [8/45]: enabling memberof plugin
  [9/45]: enabling winsync plugin
  [10/45]: configuring replication version plugin
  [11/45]: enabling IPA enrollment plugin
  [12/45]: configuring uniqueness plugin
  [13/45]: configuring uuid plugin
  [14/45]: configuring modrdn plugin
  [15/45]: configuring DNS plugin
  [16/45]: enabling entryUSN plugin
  [17/45]: configuring lockout plugin
  [18/45]: configuring topology plugin
  [19/45]: creating indices
  [20/45]: enabling referential integrity plugin
  [21/45]: configuring certmap.conf
  [22/45]: configure new location for managed entries
  [23/45]: configure dirsrv ccache
  [24/45]: enabling SASL mapping fallback
  [25/45]: restarting directory server
  [26/45]: adding sasl mappings to the directory
  [27/45]: adding default layout
  [28/45]: adding delegation layout
  [29/45]: creating container for managed entries
  [30/45]: configuring user private groups
  [31/45]: configuring netgroups from hostgroups
  [32/45]: creating default Sudo bind user
  [33/45]: creating default Auto Member layout
  [34/45]: adding range check plugin
  [35/45]: creating default HBAC rule allow_all
  [36/45]: adding entries for topology management
  [37/45]: initializing group membership
  [38/45]: adding master entry
  [39/45]: initializing domain level
  [40/45]: configuring Posix uid/gid generation
  [41/45]: adding replication acis
  [42/45]: activating sidgen plugin
  [43/45]: activating extdom plugin
  [44/45]: tuning directory server
  [45/45]: configuring directory to start on boot
Done configuring directory server (dirsrv).
Configuring Kerberos KDC (krb5kdc)
  [1/10]: adding kerberos container to the directory
  [2/10]: configuring KDC
  [3/10]: initialize kerberos container
  [4/10]: adding default ACIs
  [5/10]: creating a keytab for the directory
  [6/10]: creating a keytab for the machine
  [7/10]: adding the password extension to the directory
  [8/10]: creating anonymous principal
  [9/10]: starting the KDC
  [10/10]: configuring KDC to start on boot
Done configuring Kerberos KDC (krb5kdc).
Configuring kadmin
  [1/2]: starting kadmin
  [2/2]: configuring kadmin to start on boot
Done configuring kadmin.
Configuring certificate server (pki-tomcatd). Estimated time: 3 minutes
  [1/29]: configuring certificate server instance
  [2/29]: exporting Dogtag certificate store pin
  [3/29]: stopping certificate server instance to update CS.cfg
  [4/29]: backing up CS.cfg
  [5/29]: disabling nonces
  [6/29]: set up CRL publishing
  [7/29]: enable PKIX certificate path discovery and validation
  [8/29]: starting certificate server instance
  [9/29]: configure certmonger for renewals
  [10/29]: requesting RA certificate from CA
  [11/29]: setting up signing cert profile
  [12/29]: setting audit signing renewal to 2 years
  [13/29]: restarting certificate server
  [14/29]: publishing the CA certificate
  [15/29]: adding RA agent as a trusted user
  [16/29]: authorizing RA to modify profiles
  [17/29]: authorizing RA to manage lightweight CAs
  [18/29]: Ensure lightweight CAs container exists
  [19/29]: configure certificate renewals
  [20/29]: configure Server-Cert certificate renewal
  [21/29]: Configure HTTP to proxy connections
  [22/29]: restarting certificate server
  [23/29]: updating IPA configuration
  [24/29]: enabling CA instance
  [25/29]: migrating certificate profiles to LDAP
  [26/29]: importing IPA certificate profiles
  [27/29]: adding default CA ACL
  [28/29]: adding 'ipa' CA entry
  [29/29]: configuring certmonger renewal for lightweight CAs
Done configuring certificate server (pki-tomcatd).
Configuring directory server (dirsrv)
  [1/3]: configuring TLS for DS instance
  [2/3]: adding CA certificate entry
  [3/3]: restarting directory server
Done configuring directory server (dirsrv).
Configuring ipa-otpd
  [1/2]: starting ipa-otpd
  [2/2]: configuring ipa-otpd to start on boot
Done configuring ipa-otpd.
Configuring ipa-custodia
  [1/5]: Generating ipa-custodia config file
  [2/5]: Making sure custodia container exists
  [3/5]: Generating ipa-custodia keys
  [4/5]: starting ipa-custodia
  [5/5]: configuring ipa-custodia to start on boot
Done configuring ipa-custodia.
Configuring the web interface (httpd)
  [1/22]: stopping httpd
  [2/22]: setting mod_nss port to 443
  [3/22]: setting mod_nss cipher suite
  [4/22]: setting mod_nss protocol list to TLSv1.0 - TLSv1.2
  [5/22]: setting mod_nss password file
  [6/22]: enabling mod_nss renegotiate
  [7/22]: disabling mod_nss OCSP
  [8/22]: adding URL rewriting rules
  [9/22]: configuring httpd
  [10/22]: setting up httpd keytab
  [11/22]: configuring Gssproxy
  [12/22]: setting up ssl
  [13/22]: configure certmonger for renewals
  [14/22]: importing CA certificates from LDAP
  [15/22]: publish CA cert
  [16/22]: clean up any existing httpd ccaches
  [17/22]: configuring SELinux for httpd
  [18/22]: create KDC proxy config
  [19/22]: enable KDC proxy
  [20/22]: starting httpd
  [21/22]: configuring httpd to start on boot
  [22/22]: enabling oddjobd
Done configuring the web interface (httpd).
Configuring Kerberos KDC (krb5kdc)
  [1/1]: installing X509 Certificate for PKINIT
Done configuring Kerberos KDC (krb5kdc).
Applying LDAP updates
Upgrading IPA:. Estimated time: 1 minute 30 seconds
  [1/9]: stopping directory server
  [2/9]: saving configuration
  [3/9]: disabling listeners
  [4/9]: enabling DS global lock
  [5/9]: starting directory server
  [6/9]: upgrading server
  [7/9]: stopping directory server
  [8/9]: restoring configuration
  [9/9]: starting directory server
Done.
Restarting the KDC
Configuring DNS (named)
  [1/12]: generating rndc key file
  [2/12]: adding DNS container
  [3/12]: setting up our zone
  [4/12]: setting up reverse zone
  [5/12]: setting up our own record
  [6/12]: setting up records for other masters
  [7/12]: adding NS record to the zones
  [8/12]: setting up kerberos principal
  [9/12]: setting up named.conf
  [10/12]: setting up server configuration
  [11/12]: configuring named to start on boot
  [12/12]: changing resolv.conf to point to ourselves
Done configuring DNS (named).
Restarting the web server to pick up resolv.conf changes
Configuring DNS key synchronization service (ipa-dnskeysyncd)
  [1/7]: checking status
  [2/7]: setting up bind-dyndb-ldap working directory
  [3/7]: setting up kerberos principal
  [4/7]: setting up SoftHSM
  [5/7]: adding DNSSEC containers
  [6/7]: creating replica keys
  [7/7]: configuring ipa-dnskeysyncd to start on boot
Done configuring DNS key synchronization service (ipa-dnskeysyncd).
Restarting ipa-dnskeysyncd
Restarting named
Updating DNS system records
Configuring client side components
Using existing certificate '/etc/ipa/ca.crt'.
Client hostname: ipa.itzgeek.local
Realm: ITZGEEK.LOCAL
DNS Domain: itzgeek.local
IPA Server: ipa.itzgeek.local
BaseDN: dc=itzgeek,dc=local

Skipping synchronizing time with NTP server.
New SSSD config will be created
Configured sudoers in /etc/nsswitch.conf
Configured /etc/sssd/sssd.conf
trying https://ipa.itzgeek.local/ipa/json
[try 1]: Forwarding 'schema' to json server 'https://ipa.itzgeek.local/ipa/json'
trying https://ipa.itzgeek.local/ipa/session/json
[try 1]: Forwarding 'ping' to json server 'https://ipa.itzgeek.local/ipa/session/json'
[try 1]: Forwarding 'ca_is_enabled' to json server 'https://ipa.itzgeek.local/ipa/session/json'
Systemwide CA database updated.
Adding SSH public key from /etc/ssh/ssh_host_rsa_key.pub
Adding SSH public key from /etc/ssh/ssh_host_ecdsa_key.pub
Adding SSH public key from /etc/ssh/ssh_host_ed25519_key.pub
[try 1]: Forwarding 'host_mod' to json server 'https://ipa.itzgeek.local/ipa/session/json'
SSSD enabled
Configured /etc/openldap/ldap.conf
Configured /etc/ssh/ssh_config
Configured /etc/ssh/sshd_config
Configuring itzgeek.local as NIS domain.
Client configuration complete.
The ipa-client-install command was successful

==============================================================================
Setup complete

Next steps:
        1. You must make sure these network ports are open:
                TCP Ports:
                  * 80, 443: HTTP/HTTPS
                  * 389, 636: LDAP/LDAPS
                  * 88, 464: kerberos
                  * 53: bind
                UDP Ports:
                  * 88, 464: kerberos
                  * 53: bind
                  * 123: ntp

        2. You can now obtain a kerberos ticket using the command: 'kinit admin'
           This ticket will allow you to use the IPA tools (e.g., ipa user-add)
           and the web user interface.

Be sure to back up the CA certificates stored in /root/cacert.p12
These files are required to create replicas. The password for these
files is the Directory Manager password
Pare-feu
En post-installation, configurez le pare-feu pour autoriser les ports requis.
for SER in ntp http https ldap ldaps kerberos kpasswd; do firewall-cmd --permanent --add-service=$SER; done
firewall-cmd --permanent --add-port=53/udp
firewall-cmd --permanent --add-port=53/tcp
firewall-cmd --reload
Vérifier le serveur FreeIPA
Après l'installation de FreeIPA, authentifiez-vous auprès du domaine Kerberos pour vous assurer que l'administrateur est correctement configuré.
kinit admin
Si FreeIPA fonctionne correctement, la commande ci-dessus vous demandera le mot de passe administrateur IPA. Entrez le mot de passe administrateur IPA que vous avez défini lors du processus d'installation, puis appuyez sur Entrée.
Après avoir saisi le mot de passe, vous devriez recevoir une invite du shell.
Ensuite, vérifiez la fonctionnalité du serveur FreeIPA en recherchant l'utilisateur IPA.
ipa user-find admin
Sortie :
--------------
1 user matched
--------------
  User login: admin
  Last name: Administrator
  Home directory: /home/admin
  Login shell: /bin/bash
  Principal alias: admin@ITZGEEK.LOCAL
  UID: 382200000
  GID: 382200000
  Account disabled: False
----------------------------
Number of entries returned 1
----------------------------
Accéder à l'interface Web de FreeIPA
Ouvrez votre navigateur préféré et visitez l'URL suivante.
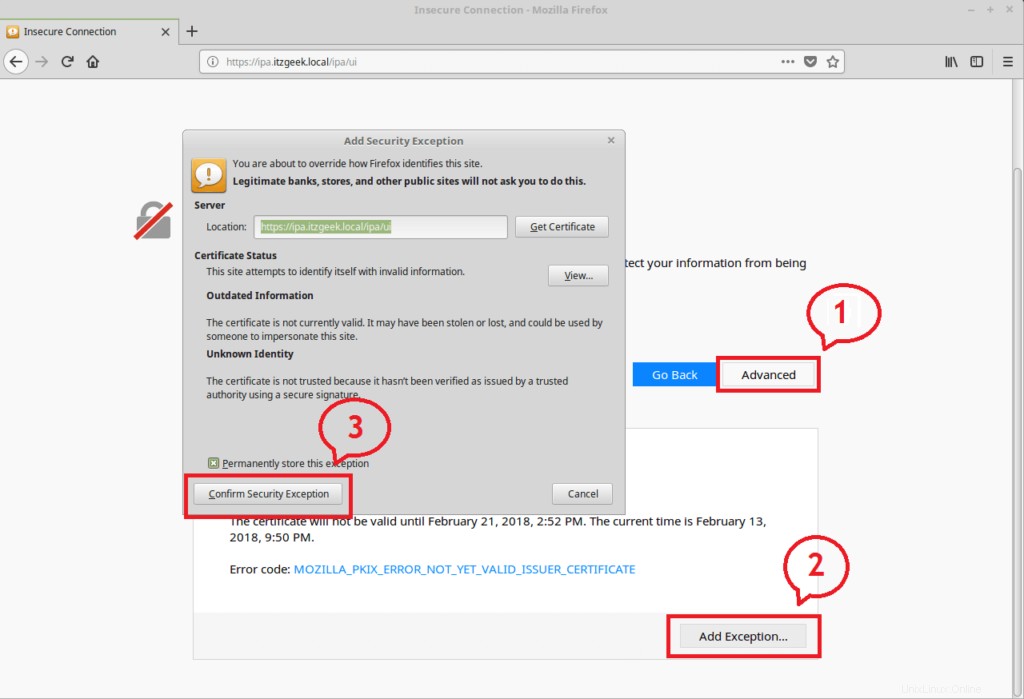
https://ipa.itzgeek.localOU
https://votre.free.ipaVous pouvez obtenir une exception SSL lorsque vous accédez à l'interface Web FreeIPA en raison du certificat auto-signé. Alors, ajoutez une exception permanente dans le navigateur pour accéder à l'interface Web FreeIPA.
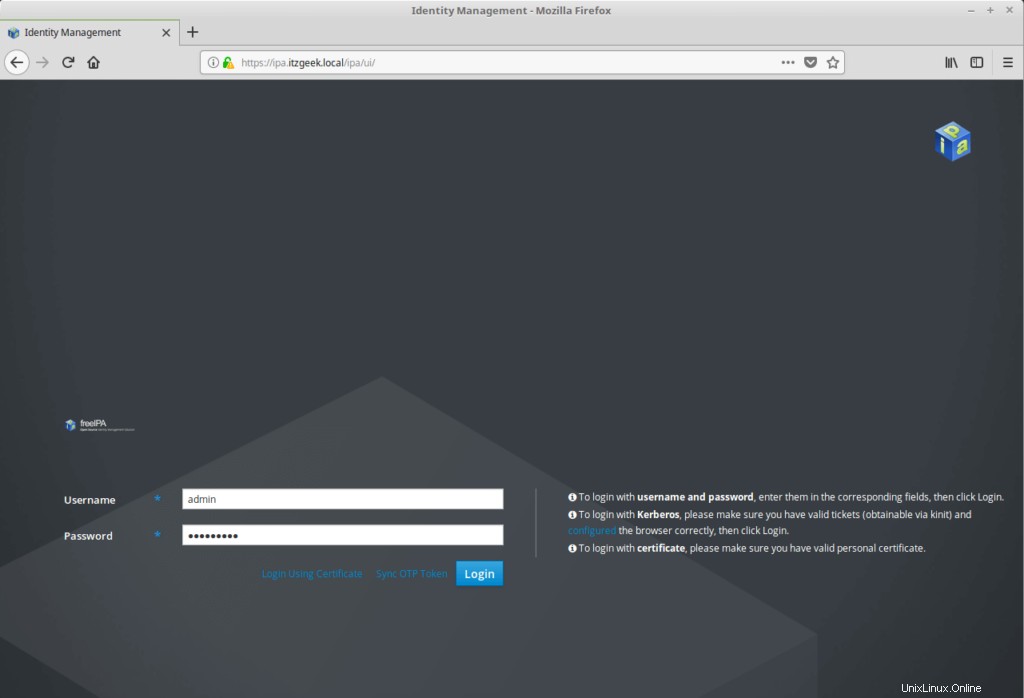
Connectez-vous avec,
Nom d'utilisateur : administrateur
Mot de passe : mot de passe de l'administrateur IPA que vous avez défini précédemment.
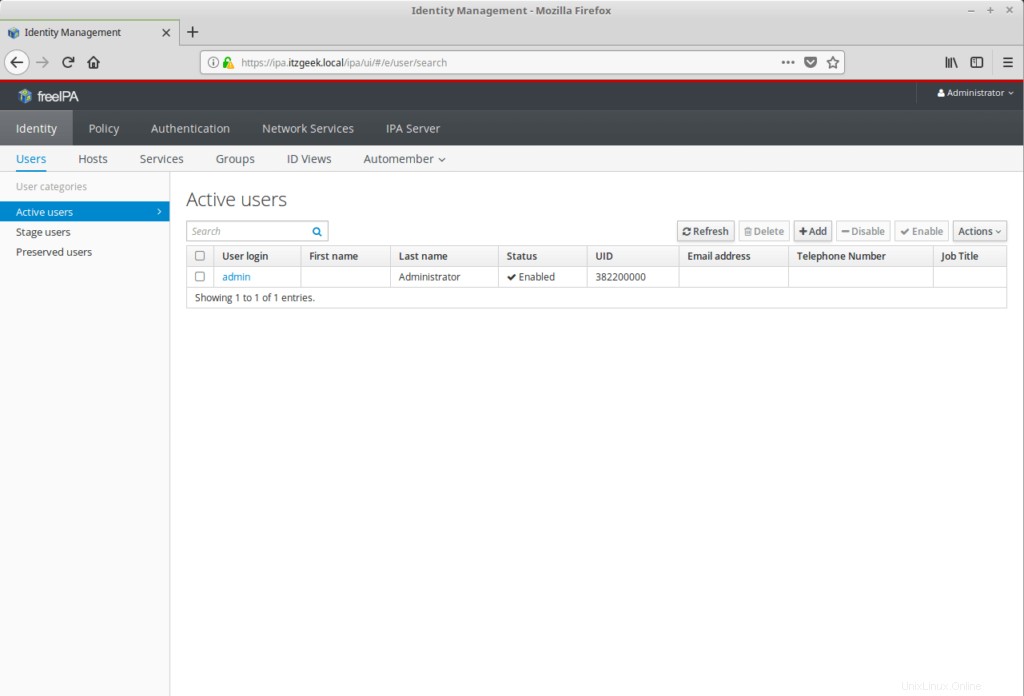
Publiez la connexion réussie ; vous obtiendrez la page principale de l'IPA, qui ressemble à ceci :
Configurer FreeIPA
Définissez le shell par défaut pour tous les nouveaux utilisateurs sur /bin/bash en allant sur Serveur IPA>> Configuration . Vous pouvez également définir le groupe d'utilisateurs par défaut et la base du répertoire personnel pour les nouveaux utilisateurs.
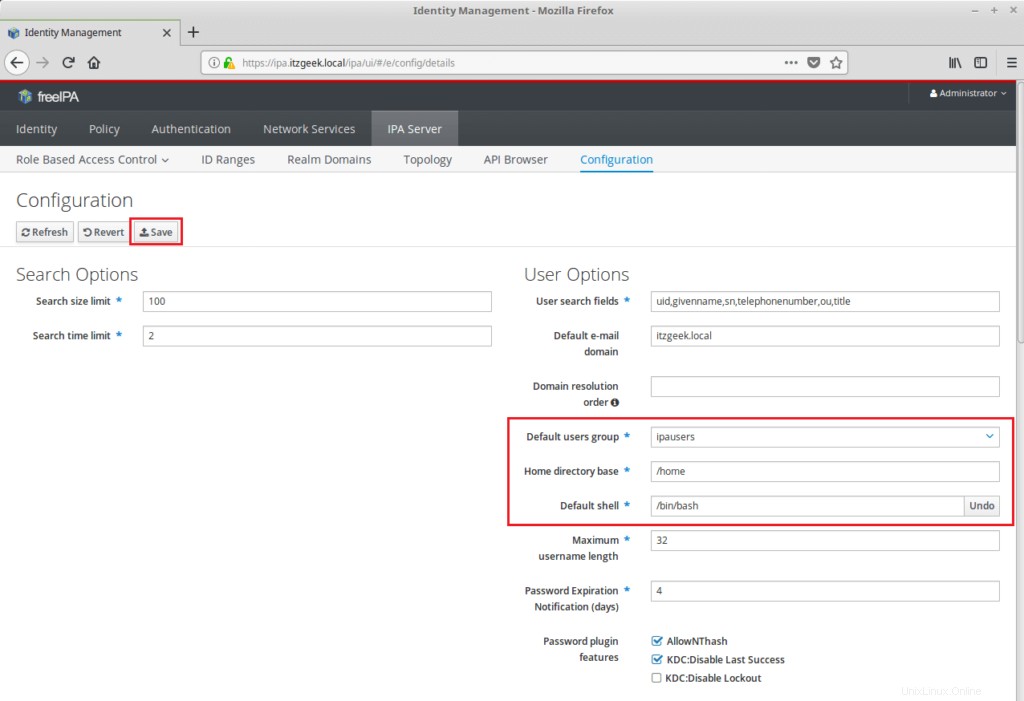
Cliquez sur enregistrer pour mettre à jour la modification.
C'est tout. Dans notre prochain article, nous configurerons les clients FreeIPA pour une authentification centralisée.