Dans ce tutoriel, je vais vous guider sur la configuration et l'installation d'Oracle Weblogic sur le système d'exploitation CentOS 7. Oracle Weblogic est un outil middleware largement utilisé par les grandes entreprises pour servir les applications qui utilisent Java EE comme langage de programmation. Avec son interface utilisateur cool, ses fonctionnalités éprouvées telles que le module de cohérence (à des fins de mise en cache), le clustering de bases de données (pour gérer plusieurs connexions de base de données), Oracle Weblogic présente des avantages assez impressionnants par rapport à d'autres outils similaires tels que Apache Tomcat, JBoss et WebSphere. Comme indiqué par Oracle lui-même, WebLogic fournit un ensemble complet de services pour ces modules et gère automatiquement de nombreux détails du comportement de l'application, sans nécessiter de programmation. Vous trouverez ci-dessous un exemple d'emplacement d'Oracle Weblogic dans une conception de haut niveau :

1. Remarque préliminaire
Pour ce tutoriel, j'utiliserai CentOS 7.4 en version 64 bits. Veuillez noter que même si la configuration est effectuée sous CentOS 7, les étapes et les modifications sont principalement les mêmes lors de l'utilisation de la version RedHat ou Oracle Linux. La raison pour laquelle j'ai mentionné cela est que la plupart des installations de production pour Oracle Weblogic utiliseront Oracle Linux lui-même comme système d'exploitation.
À la fin de ce didacticiel, nous aurons réussi à faire apparaître 2 nœuds de serveur qui agiront en tant que serveurs gérés Weblogic créés par un serveur d'administration Weblogic. En dehors de cela, nous utiliserons le tableau de bord du serveur d'administration pour combiner les deux serveurs gérés dans un groupe de clusters.
2. Phase d'installation
L'objectif d'Oracle Weblogic étant de servir du code d'application hautes performances dans le langage de programmation JAVA, il est bien évident que l'installation du serveur middleware lui-même nécessiterait l'intégration de l'environnement d'exécution Java. Par conséquent, pour le prérequis d'installation, nous devrons installer JAVA package dans notre serveur d'administration et les deux nœuds gérés. Les étapes sont comme ci-dessous :
 [[email protected]_mgr opt]# wget --no-cookies --no-check-certificate --header "Cookie: gpw_e24=http%3A%2F%2Fwww.oracle.com%2F; oraclelicense=accept-securebackup-cookie" "http://download.oracle.com/otn-pub/java/jdk/8u131-b11/d54c1d3a095b4ff2b6607d096fa80163/jdk-8u131-linux-x64.rpm"
--2018-06-09 12:57:05-- http://download.oracle.com/otn-pub/java/jdk/8u131-b11/d54c1d3a095b4ff2b6607d096fa80163/jdk-8u131-linux-x64.rpm
Resolving download.oracle.com (download.oracle.com)... 23.49.16.62
Connecting to download.oracle.com (download.oracle.com)|23.49.16.62|:80... connected.
HTTP request sent, awaiting response... 302 Moved Temporarily
Location: https://edelivery.oracle.com/otn-pub/java/jdk/8u131-b11/d54c1d3a095b4ff2b6607d096fa80163/jdk-8u131-linux-x64.rpm [following]
--2018-06-09 12:57:10-- https://edelivery.oracle.com/otn-pub/java/jdk/8u131-b11/d54c1d3a095b4ff2b6607d096fa80163/jdk-8u131-linux-x64.rpm
Resolving edelivery.oracle.com (edelivery.oracle.com)... 104.103.48.174, 2600:1417:58:181::2d3e, 2600:1417:58:188::2d3e
Connecting to edelivery.oracle.com (edelivery.oracle.com)|104.103.48.174|:443... connected.
HTTP request sent, awaiting response... 302 Moved Temporarily
Location: http://download.oracle.com/otn-pub/java/jdk/8u131-b11/d54c1d3a095b4ff2b6607d096fa80163/jdk-8u131-linux-x64.rpm?AuthParam=1528549151_b1fd01d854bc0423600a83c36240028e [following]
--2018-06-09 12:57:11-- http://download.oracle.com/otn-pub/java/jdk/8u131-b11/d54c1d3a095b4ff2b6607d096fa80163/jdk-8u131-linux-x64.rpm?AuthParam=1528549151_b1fd01d854bc0423600a83c36240028e
Connecting to download.oracle.com (download.oracle.com)|23.49.16.62|:80... connected.
HTTP request sent, awaiting response... 200 OK
Length: 169983496 (162M) [application/x-redhat-package-manager]
Saving to: ‘jdk-8u131-linux-x64.rpm’

100%[==============================================================================>] 169,983,496 2.56MB/s in 64s

2018-06-09 12:58:15 (2.54 MB/s) - ‘jdk-8u131-linux-x64.rpm’ saved [169983496/169983496]

[[email protected]_mgr opt]# yum localinstall -y jdk-8u131-linux-x64.rpm
Une fois cela fait, nous continuons à modifier le chemin de l'environnement pour créer la variable JAVA_HOME à l'intérieur de chaque nœud de serveur. Voici les étapes :
 [[email protected]_mgr opt]# vi /root/.bash_profile
export JAVA_HOME=/usr/java/jdk1.8.0_131
PATH=$JAVA_HOME/bin:$PATH:$HOME/bin
export PATH
 [[email protected]_mgr opt]# source /root/.bash_profile
[[email protected]_mgr opt]# java -version
java version "1.8.0_131"
Java(TM) SE Runtime Environment (build 1.8.0_131-b11)
Java HotSpot(TM) 64-Bit Server VM (build 25.131-b11, mixed mode)
Pour l'installation de la base de données Oracle, l'installation doit être effectuée à l'aide d'un utilisateur non root. Cela s'applique également à l'installation d'Oracle Weblogic. En ce qui concerne cette politique, pour continuer, créons un utilisateur supplémentaire pour être propriétaire d'Oracle Weblogic. Voici les étapes :
[[email protected]_mgr opt]# useradd -s /bin/bash shahril
 [[email protected]_mgr opt]# passwd shahril
Changing password for user shahril.
New password:
BAD PASSWORD: The password fails the dictionary check - it is too simplistic/systematic
Retype new password:
passwd: all authentication tokens updated successfully.

[[email protected]_mgr opt]# su - shahril
[[email protected]_mgr ~]$ pwd
/home/shahril
Avant de continuer, configurons les variables d'environnement pour l'utilisateur propriétaire de weblogic pour les variables requises. Vous trouverez ci-dessous les variables de bonnes pratiques à affecter :
- ORACLE_BASE ::Emplacement du répertoire d'installation Oracle par défaut
- ORACLE_HOME ::Emplacement du répertoire de la base de données Oracle par défaut / facultatif si le client Oracle est présent
- MW_HOME ::Emplacement du répertoire d'installation du middleware par défaut
- WLS_HOME ::Emplacement par défaut du répertoire du serveur géré Oracle Weblogic
- WL_HOME ::Emplacement par défaut du répertoire du serveur d'administration Oracle Weblogic
- DOMAIN_BASE ::Domaine global Oracle Weblogic par défaut
- DOMAIN_HOME ::Domaine spécifique à Oracle Weblogic par défaut
 [shahr[email protected]_mgr wls]$ vi /home/shahril/.bash_profile

export ORACLE_BASE=/home/shahril/wls/oracle
export ORACLE_HOME=$ORACLE_BASE/product/fmw12
export MW_HOME=$ORACLE_HOME
export WLS_HOME=$MW_HOME/wlserver
export WL_HOME=$WLS_HOME
export DOMAIN_BASE=$ORACLE_BASE/config/domains
export DOMAIN_HOME=$DOMAIN_BASE/TEST

export JAVA_HOME=/usr/java/jdk1.8.0_131
PATH=$JAVA_HOME/bin:$PATH:$HOME/bin
export PATH

[[email protected]_mgr wls]$ source /home/shahril/.bash_profile
[[email protected]_mgr wls]$ mkdir -p $ORACLE_BASE
[[email protected]_mgr wls]$ mkdir -p $DOMAIN_BASE
[[email protected]_mgr wls]$ mkdir -p $ORACLE_HOME
[[email protected]_mgr wls]$ mkdir -p $ORACLE_BASE/config/applications
[[email protected]_mgr wls]$ mkdir -p /home/shahril/wls/oraInventory
Une fois cela fait, créons un fichier appelé oraInst.loc et wls.rsp . Pour le nom de fichier oraInst.loc :ce fichier est nécessaire pour définir un emplacement d'inventaire lors de l'installation d'Oracle Weblogic. Pour le nom de fichier wls.rsp, il est facultatif car il agit comme un fichier de réponse qui sera utilisé lors de l'installation. Pourtant, au fur et à mesure que nous ferons l'installation à partir de l'interface de ligne de commande (CLI), le wls.rsp serait obligatoire pour nous. Maintenant, procédons aux étapes ci-dessous :
 [[email protected]_mgr wls]$ pwd
/home/shahril/wls
[[email protected]_mgr wls]$ vi oraInst.loc

inventory_loc=/home/shahril/wls/oraInventory
inst_group=shahril

[[email protected]_mgr wls]$ vi wls.rsp

[ENGINE]
Response File Version=1.0.0.0.0
[GENERIC]
ORACLE_HOME=/home/shahril/wls/oracle/product/fmw12
INSTALL_TYPE=WebLogic Server
DECLINE_SECURITY_UPDATES=true
SECURITY_UPDATES_VIA_MYORACLESUPPORT=false
Comme tout est en place, procédons au téléchargement du programme d'installation d'Oracle Weblogic. Vous pouvez accéder à l'URL du site Web ici et choisir votre version préférée d'Oracle Weblogic.
Dans notre cas, nous allons procéder au téléchargement de la version 12.1.3 d'Oracle Weblogic, car il s'agit de loin de la version la plus à jour et la plus stable (sur la base de mon expérience actuelle). Voici les étapes :
 [[email protected]_mgr ~]$ cd $ORACLE_BASE
[[email protected]_mgr oracle]$ wget http://download.oracle.com/otn/nt/middleware/12c/wls/1213/fmw_12.1.3.0.0_wls.jar?AuthParam=1530174357_1de6ededa212d8bc86524a0fb78ac0df
--2018-06-28 16:24:15-- http://download.oracle.com/otn/nt/middleware/12c/wls/1213/fmw_12.1.3.0.0_wls.jar?AuthParam=1530174357_1de6ededa212d8bc86524a0fb78ac0df
Resolving download.oracle.com (download.oracle.com)... 23.74.208.198
Connecting to download.oracle.com (download.oracle.com)|23.74.208.198|:80... connected.
HTTP request sent, awaiting response... 200 OK
Length: 923179081 (880M) [application/x-jar]
Saving to: ‘fmw_12.1.3.0.0_wls.jar?AuthParam=1530174357_1de6ededa212d8bc86524a0fb78ac0df’

100%[=================================================================>] 923,179,081 1.05MB/s in 16m 4s

2018-06-28 16:40:24 (935 KB/s) - ‘fmw_12.1.3.0.0_wls.jar?AuthParam=1530174357_1de6ededa212d8bc86524a0fb78ac0df’ saved [923179081/923179081]

[[email protected]_mgr oracle]$ mv fmw_12.1.3.0.0_wls.jar?AuthParam=1530174357_1de6ededa212d8bc86524a0fb78ac0df fmw_12.1.3.0.0_wls.jar
Procédez ensuite à l'installation. Les étapes sont indiquées ci-dessous :
 [[email protected]_mgr wls]$ java -jar /home/shahril/wls/oracle/fmw_12.1.3.0.0_wls.jar -silent -responseFile /home/shahril/wls/wls.rsp -invPtrLoc /home/shahril/wls/oraInst.loc
Launcher log file is /tmp/OraInstall2018-06-10_12-44-24PM/launcher2018-06-10_12-44-24PM.log.
Extracting files.......
Starting Oracle Universal Installer

Checking if CPU speed is above 300 MHz. Actual 3199.968 MHz Passed
Checking swap space: must be greater than 512 MB. Actual 7815164 MB Passed
Checking if this platform requires a 64-bit JVM. Actual 64 Passed (64-bit not required)
Checking temp space: must be greater than 300 MB. Actual 393285 MB Passed


Preparing to launch the Oracle Universal Installer from /tmp/OraInstall2018-06-10_12-44-24PM
Java HotSpot(TM) 64-Bit Server VM warning: ignoring option MaxPermSize=512m; support was removed in 8.0
Log: /tmp/OraInstall2018-06-10_12-44-24PM/install2018-06-10_12-44-24PM.log
Copyright (c) 1996, 2014, Oracle and/or its affiliates. All rights reserved.
Reading response file..
Starting check : CertifiedVersions
/bin/cat: /proc/sys/net/core/wmem_default: No such file or directory
Starting check : CheckJDKVersion
Expected result: 1.7.0_15
Actual Result: 1.8.0_131
Check complete. The overall result of this check is: Passed
CheckJDKVersion Check: Success.
Validations are enabled for this session.
Verifying data......
Copying Files...
You can find the log of this install session at:
/tmp/OraInstall2018-06-10_12-44-24PM/install2018-06-10_12-44-24PM.log
-----------20%----------40%----------60%----------80%--------100%

The installation of Oracle Fusion Middleware 12c WebLogic Server and Coherence 12.1.3.0.0 completed successfully.
Logs successfully copied to /home/shahril/wls/oraInventory/logs.
Excellent! Nous avons maintenant installé avec succès Oracle Weblogic sur notre serveur CentOS 7. Ensuite, nous allons passer à la phase de configuration.
3. Phase de configuration
Maintenant nous sommes dans la partie configuration, il va y avoir 2 niveaux de configuration à faire qui sont :
- Configuration Weblogic
- Configuration du domaine
Pour un serveur d'administration Weblogic, nous devons faire en sorte que la configuration de la commande principale de weblogic soit sous la configuration weblogic. Mais pour chaque serveur géré Weblogic qui agira comme nœud d'instance, il suffit de configurer Weblogic Configuration uniquement car lors de l'initialisation du domaine, l'administrateur peut décider quel nœud d'instance sera utilisé pour quel domaine de projet. Vous trouverez ci-dessous un exemple simple du fonctionnement du domaine weblogic :

Pour chaque serveur géré par weblogic, vous pouvez créer autant de nœuds d'instance que nécessaire, cela dépend de l'allocation des ressources de votre serveur, car chaque nœud d'instance pointera vers son domaine de projet dédié. Pour indiquer quel domaine vers quel nœud d'instance peut facilement être fait par le tableau de bord du serveur d'administration.
Conformément au brief, configurons maintenant la configuration pour weblogic et la configuration de domaine pour la partie serveur d'administration. Juste pour simplifier le processus du didacticiel, nous ne créerons qu'un seul domaine appelé TEST. Voici les étapes :-
 [[email protected]_mgr wls]$ cd $WL_HOME
[[email protected]_mgr wlserver]$ cd common/bin/
[[email protected]_mgr bin]$ ./commEnv.sh
[[email protected]_mgr bin]$ ./wlst.sh
Java HotSpot(TM) 64-Bit Server VM warning: ignoring option MaxPermSize=256m; support was removed in 8.0
Initializing WebLogic Scripting Tool (WLST) ...
Jython scans all the jar files it can find at first startup. Depending on the system, this process may take a few minutes to complete, and WLST may not return a prompt right away.

Welcome to WebLogic Server Administration Scripting Shell

Type help() for help on available commands

wls:/offline> readTemplate('/home/shahril/wls/oracle/product/fmw12/wlserver/common/templates/wls/wls.jar')
wls:/offline/base_domain>cd('Servers/AdminServer')
wls:/offline/base_domain/Server/AdminServer>set('ListenAddress','172.17.0.6')
wls:/offline/base_domain/Server/AdminServer>set('ListenPort',7001) ## Port that will be assign to each domain

wls:/offline/base_domain/Server/AdminServer>create('AdminServer','SSL')
Proxy for AdminServer: Name=AdminServer, Type=SSL

wls:/offline/base_domain/Server/AdminServer>cd('SSL/AdminServer')
wls:/offline/base_domain/Server/AdminServer/SSL/AdminServer>set('Enabled','True')
wls:/offline/base_domain/Server/AdminServer/SSL/AdminServer>set('ListenPort',7002)

wls:/offline/base_domain/Server/AdminServer/SSL/AdminServer>cd('/')
wls:/offline/base_domain>cd('Security/base_domain/User/weblogic')
wls:/offline/base_domain/Security/base_domain/User/weblogic>cmo.setPassword('Test1234')
wls:/offline/base_domain/Security/base_domain/User/weblogic>setOption('OverwriteDomain','true')
wls:/offline/base_domain/Security/base_domain/User/weblogic>writeDomain('/home/shahril/wls/oracle/config/domains/TEST')

wls:/offline/TEST/Security/TEST/User/weblogic>closeTemplate()
wls:/offline>exit()

Exiting WebLogic Scripting Tool.
Super, maintenant que nous avons fait la configuration pour les deux, démarrons maintenant les services weblogic et TEST sur le serveur d'administration. Voici les étapes :
 [[email protected]_mgr bin]$ cd $DOMAIN_HOME
[[email protected]_mgr TEST]$ cd bin/
[[email protected]_mgr bin]$ pwd
/home/shahril/wls/oracle/config/domains/TEST/bin

[[email protected]_mgr bin]$ ./startWebLogic.sh &
[1] 19303
[[email protected]_mgr bin]$ .
.
JAVA Memory arguments: -Xms256m -Xmx512m -XX:CompileThreshold=8000 -XX:PermSize=128m -XX:MaxPermSize=256m
.
CLASSPATH=/usr/java/jdk1.8.0_131/lib/tools.jar:/home/shahril/wls/oracle/product/fmw12/wlserver/server/lib/weblogic_sp.jar:/home/shahril/wls/oracle/product/fmw12/wlserver/server/lib/weblogic.jar:/home/shahril/wls/oracle/product/fmw12/oracle_common/modules/net.sf.antcontrib_1.1.0.0_1-0b3/lib/ant-contrib.jar:/home/shahril/wls/oracle/product/fmw12/wlserver/modules/features/oracle.wls.common.nodemanager_2.0.0.0.jar:/home/shahril/wls/oracle/product/fmw12/oracle_common/modules/com.oracle.cie.config-wls-online_8.1.0.0.jar:/home/shahril/wls/oracle/product/fmw12/wlserver/common/derby/lib/derbyclient.jar:/home/shahril/wls/oracle/product/fmw12/wlserver/common/derby/lib/derby.jar:/home/shahril/wls/oracle/product/fmw12/wlserver/server/lib/xqrl.jar .
PATH=/home/shahril/wls/oracle/product/fmw12/wlserver/server/bin:/home/shahril/wls/oracle/product/fmw12/oracle_common/modules/org.apache.ant_1.9.2/bin:/usr/java/jdk1.8.0_131/jre/bin:/usr/java/jdk1.8.0_131/bin:/usr/java/jdk1.8.0_131/bin:/usr/java/jdk1.8.0_131/bin:/usr/java/jdk1.8.0_131/bin:/usr/local/bin:/bin:/usr/bin:/usr/local/sbin:/usr/sbin:/home/shahril/bin:/home/shahril/bin:/home/shahril/bin .
***************************************************
* To start WebLogic Server, use a username and *
* password assigned to an admin-level user. For *
* server administration, use the WebLogic Server *
* console at http://hostname:port/console *
***************************************************
starting weblogic with Java version:
java version "1.8.0_131"
Java(TM) SE Runtime Environment (build 1.8.0_131-b11)
Java HotSpot(TM) 64-Bit Server VM (build 25.131-b11, mixed mode)
Starting WLS with line:
/usr/java/jdk1.8.0_131/bin/java -server -Xms256m -Xmx512m -XX:CompileThreshold=8000 -XX:PermSize=128m -XX:MaxPermSize=256m -Dweblogic.Name=AdminServer -Djava.security.policy=/home/shahril/wls/oracle/product/fmw12/wlserver/server/lib/weblogic.policy -Xverify:none -Djava.endorsed.dirs=/usr/java/jdk1.8.0_131/jre/lib/endorsed:/home/shahril/wls/oracle/product/fmw12/oracle_common/modules/endorsed -da -Dwls.home=/home/shahril/wls/oracle/product/fmw12/wlserver/server -Dweblogic.home=/home/shahril/wls/oracle/product/fmw12/wlserver/server -Dweblogic.utils.cmm.lowertier.ServiceDisabled=true weblogic.Server
Java HotSpot(TM) 64-Bit Server VM warning: ignoring option PermSize=128m; support was removed in 8.0
Java HotSpot(TM) 64-Bit Server VM warning: ignoring option MaxPermSize=256m; support was removed in 8.0
Jun 10, 2018 1:11:46 PM UTC Info Security BEA-090905 Disabling the CryptoJ JCE Provider self-integrity check for better startup performance. To enable this check, specify -Dweblogic.security.allowCryptoJDefaultJCEVerification=true.
Jun 10, 2018 1:11:46 PM UTC Info Security BEA-090906 Changing the default Random Number Generator in RSA CryptoJ from ECDRBG128 to FIPS186PRNG. To disable this change, specify -Dweblogic.security.allowCryptoJDefaultPRNG=true.
Jun 10, 2018 1:11:47 PM UTC Info WebLogicServer BEA-000377 Starting WebLogic Server with Java HotSpot(TM) 64-Bit Server VM Version 25.131-b11 from Oracle Corporation.
Jun 10, 2018 1:11:47 PM UTC Info Management BEA-141107 Version: WebLogic Server 12.1.3.0.0 Wed May 21 18:53:34 PDT 2014 1604337
Jun 10, 2018 1:11:48 PM UTC Notice WebLogicServer BEA-000365 Server state changed to STARTING.
Jun 10, 2018 1:11:48 PM UTC Info WorkManager BEA-002900 Initializing self-tuning thread pool.
Jun 10, 2018 1:11:48 PM UTC Info WorkManager BEA-002942 CMM memory level becomes 0. Setting standby thread pool size to 256.
Jun 10, 2018 1:11:48 PM UTC Notice Log Management BEA-170019 The server log file /home/shahril/wls/oracle/config/domains/TEST/servers/AdminServer/logs/AdminServer.log is opened. All server side log events will be written to this file.
Jun 10, 2018 1:11:50 PM UTC Notice Security BEA-090082 Security initializing using security realm myrealm.
Jun 10, 2018 1:11:51 PM UTC Notice WebLogicServer BEA-000365 Server state changed to STANDBY.
Jun 10, 2018 1:11:51 PM UTC Notice WebLogicServer BEA-000365 Server state changed to STARTING.
Jun 10, 2018 1:11:51 PM weblogic.wsee.WseeCoreMessages logWseeServiceStarting

INFO: The Wsee Service is starting

Jun 10, 2018 1:11:51 PM UTC Notice Log Management BEA-170027 The server has successfully established a connection with the Domain level Diagnostic Service.
Jun 10, 2018 1:11:51 PM UTC Notice WebLogicServer BEA-000365 Server state changed to ADMIN.
Jun 10, 2018 1:11:51 PM UTC Notice WebLogicServer BEA-000365 Server state changed to RESUMING.
Jun 10, 2018 1:11:51 PM UTC Notice Security BEA-090171 Loading the identity certificate and private key stored under the alias DemoIdentity from the jks keystore file /home/shahril/wls/oracle/config/domains/TEST/security/DemoIdentity.jks.
Jun 10, 2018 1:11:51 PM UTC Notice Security BEA-090169 Loading trusted certificates from the jks keystore file /home/shahril/wls/oracle/product/fmw12/wlserver/server/lib/DemoTrust.jks.
Jun 10, 2018 1:11:51 PM UTC Notice Security BEA-090169 Loading trusted certificates from the jks keystore file /usr/java/jdk1.8.0_131/jre/lib/security/cacerts.
Jun 10, 2018 1:11:51 PM UTC Notice Server BEA-002613 Channel "DefaultSecure" is now listening on 172.17.0.6:7002 for protocols iiops, t3s, ldaps, https.
Jun 10, 2018 1:11:51 PM UTC Notice Server BEA-002613 Channel "Default" is now listening on 172.17.0.6:7001 for protocols iiop, t3, ldap, snmp, http.
Jun 10, 2018 1:11:51 PM UTC Notice WebLogicServer BEA-000331 Started the WebLogic Server Administration Server "AdminServer" for domain "TEST" running in development mode.
Jun 10, 2018 1:11:51 PM UTC Notice WebLogicServer BEA-000360 The server started in RUNNING mode.
Jun 10, 2018 1:11:52 PM UTC Notice WebLogicServer BEA-000365 Server state changed to RUNNING.

[[email protected]_mgr bin]$ netstat -apn|grep -i :70
(Not all processes could be identified, non-owned process info
will not be shown, you would have to be root to see it all.)
tcp 0 0 172.17.0.6:7001 0.0.0.0:* LISTEN 19360/java
tcp 0 0 172.17.0.6:7002 0.0.0.0:* LISTEN 19360/java
Excellent! Nous avons maintenant fait la configuration complète sur la partie serveur d'administration. Maintenant que les parties compliquées ont été faites, vous pouvez vous détendre, prendre une tasse de café, puis faire une copie de la configuration Weblogic UNIQUEMENT et la coller sur chaque nœud de serveur géré. Voici les étapes :-
 [[email protected]_mgr bin]$ $WL_HOME/common/bin/pack.sh -domain=$DOMAIN_HOME -template=$WL_HOME/common/templates/domains/TEST_template.jar -template_name=TEST -managed=true
Java HotSpot(TM) 64-Bit Server VM warning: ignoring option MaxPermSize=256m; support was removed in 8.0
<< read domain from "/home/shahril/wls/oracle/config/domains/TEST"
>> succeed: read domain from "/home/shahril/wls/oracle/config/domains/TEST"
<< set config option Managed to "true"
>> succeed: set config option Managed to "true"
<< write template to "/home/shahril/wls/oracle/product/fmw12/wlserver/common/templates/domains/TEST_template.jar"
..........................................................................................
>> succeed: write template to "/home/shahril/wls/oracle/product/fmw12/wlserver/common/templates/domains/TEST_template.jar"
<< close template
>> succeed: close template

[[email protected]_mgr ~]$ ls -lh $WL_HOME/common/templates/domains/TEST_template.jar
-rw-r----- 1 shahril shahril 51K Jun 10 14:11 /home/shahril/wls/oracle/product/fmw12/wlserver/common/templates/domains/TEST_template.jar
Ci-dessus, nous avons fait une copie de la configuration de weblogic dans un fichier jar. Nous n'apporterons que ce fichier jar à chaque serveur géré weblogic et le configurerons à partir de là.
 [[email protected]_mgr ~]$ scp -r /home/shahril/wls/oracle/product/fmw12/wlserver/common/templates/domains/TEST_template.jar 172.17.0.7:/home/shahril/wls/
[email protected]'s password:
TEST_template.jar 100% 50KB 58.2MB/s 00:00
Allez maintenant sur le serveur géré et extrayez le fichier jar copié. Aucune configuration n'est nécessaire car elle apportera le domaine connexe que nous avons créé. Voici les étapes :
 [[email protected]_node1 ~]$ cd $WL_HOME
[[email protected]_node1 wlserver]$ pwd
/home/shahril/wls/oracle/product/fmw12/wlserver
[[email protected]_node1 wlserver]$ $WL_HOME/common/bin/unpack.sh -template=/home/shahril/wls/TEST_template.jar -domain=$DOMAIN_HOME
Java HotSpot(TM) 64-Bit Server VM warning: ignoring option MaxPermSize=256m; support was removed in 8.0
<< read template from "/home/shahril/wls/TEST_template.jar"
>> succeed: read template from "/home/shahril/wls/TEST_template.jar"
<< set config option DomainName to "TEST"
>> succeed: set config option DomainName to "TEST"
<< write Domain to "/home/shahril/wls/oracle/config/domains/TEST"
....................................................................................................
>> succeed: write Domain to "/home/shahril/wls/oracle/config/domains/TEST"
<< close template
>> succeed: close template
Excellent! Nous avons extrait avec succès la configuration weblogic copiée. Prochaine étape, démarrons le service Weblogic dans le serveur géré. Voici les étapes :
 [[email protected]_node1 wlserver]$ cd $DOMAIN_HOME
[[email protected]_node1 TEST]$ cd bin/
[[email protected]_node1 bin]$ ./stopManagedWebLogic.sh Node_Server01 t3://172.17.0.6:7001 weblogic Test1234
Stopping Weblogic Server...
Java HotSpot(TM) 64-Bit Server VM warning: ignoring option PermSize=128m; support was removed in 8.0
Java HotSpot(TM) 64-Bit Server VM warning: ignoring option MaxPermSize=256m; support was removed in 8.0
Initializing WebLogic Scripting Tool (WLST) ...
Jython scans all the jar files it can find at first startup. Depending on the system, this process may take a few minutes to complete, and WLST may not return a prompt right away.

Welcome to WebLogic Server Administration Scripting Shell

Type help() for help on available commands

Connecting to t3://172.17.0.6:7001 with userid weblogic ...
Successfully connected to Admin Server "AdminServer" that belongs to domain "TEST".

Warning: An insecure protocol was used to connect to the
server. To ensure on-the-wire security, the SSL port or
Admin port should be used instead.

Shutting down the server Node_Server01 with force=false while connected to AdminServer ...
No stack trace available.
Problem invoking WLST - Traceback (innermost last):
File "/home/shahril/wls/oracle/config/domains/TEST/shutdown-Node_Server01.py", line 4, in ?
File "", line 1199, in shutdown
File "", line 552, in raiseWLSTException
WLSTException: Error occurred while performing shutdown : No Server with name "Node_Server01" configured in the domain

Done
Stopping Derby Server...


[[email protected]_node1 bin]$ ./startManagedWebLogic.sh Node_Server01 t3://172.17.0.6:7001 &
[1] 5378
[[email protected]_node1 bin]$ .
.
JAVA Memory arguments: -Xms256m -Xmx512m -XX:CompileThreshold=8000 -XX:PermSize=128m -XX:MaxPermSize=256m
.
CLASSPATH=/usr/java/jdk1.8.0_131/lib/tools.jar:/home/shahril/wls/oracle/product/fmw12/wlserver/server/lib/weblogic_sp.jar:/home/shahril/wls/oracle/product/fmw12/wlserver/server/lib/weblogic.jar:/home/shahril/wls/oracle/product/fmw12/oracle_common/modules/net.sf.antcontrib_1.1.0.0_1-0b3/lib/ant-contrib.jar:/home/shahril/wls/oracle/product/fmw12/wlserver/modules/features/oracle.wls.common.nodemanager_2.0.0.0.jar:/home/shahril/wls/oracle/product/fmw12/wlserver/common/derby/lib/derbyclient.jar:/home/shahril/wls/oracle/product/fmw12/wlserver/common/derby/lib/derby.jar:/home/shahril/wls/oracle/product/fmw12/wlserver/server/lib/xqrl.jar
.
PATH=/home/shahril/wls/oracle/product/fmw12/wlserver/server/bin:/home/shahril/wls/oracle/product/fmw12/oracle_common/modules/org.apache.ant_1.9.2/bin:/usr/java/jdk1.8.0_131/jre/bin:/usr/java/jdk1.8.0_131/bin:/usr/java/jdk1.8.0_131/bin:/usr/local/bin:/bin:/usr/bin:/usr/local/sbin:/usr/sbin:/home/shahril/bin
.
***************************************************
* To start WebLogic Server, use a username and *
* password assigned to an admin-level user. For *
* server administration, use the WebLogic Server *
* console at http://hostname:port/console *
***************************************************
starting weblogic with Java version:
java version "1.8.0_131"
Java(TM) SE Runtime Environment (build 1.8.0_131-b11)
Java HotSpot(TM) 64-Bit Server VM (build 25.131-b11, mixed mode)
Starting WLS with line:
/usr/java/jdk1.8.0_131/bin/java -server -Xms256m -Xmx512m -XX:CompileThreshold=8000 -XX:PermSize=128m -XX:MaxPermSize=256m -Dweblogic.Name=Node_Server01 -Djava.security.policy=/home/shahril/wls/oracle/product/fmw12/wlserver/server/lib/weblogic.policy -Dweblogic.security.SSL.trustedCAKeyStore=/home/shahril/wls/oracle/product/fmw12/wlserver/server/lib/cacerts -Xverify:none -Djava.endorsed.dirs=/usr/java/jdk1.8.0_131/jre/lib/endorsed:/home/shahril/wls/oracle/product/fmw12/oracle_common/modules/endorsed -da -Dwls.home=/home/shahril/wls/oracle/product/fmw12/wlserver/server -Dweblogic.home=/home/shahril/wls/oracle/product/fmw12/wlserver/server -Dweblogic.management.server=t3://172.17.0.6:7001 -Dweblogic.utils.cmm.lowertier.ServiceDisabled=true weblogic.Server
Java HotSpot(TM) 64-Bit Server VM warning: ignoring option PermSize=128m; support was removed in 8.0
Java HotSpot(TM) 64-Bit Server VM warning: ignoring option MaxPermSize=256m; support was removed in 8.0
Jun 10, 2018 3:29:41 PM UTC Info Security BEA-090905 Disabling the CryptoJ JCE Provider self-integrity check for better startup performance. To enable this check, specify -Dweblogic.security.allowCryptoJDefaultJCEVerification=true.
Jun 10, 2018 3:29:41 PM UTC Info Security BEA-090906 Changing the default Random Number Generator in RSA CryptoJ from ECDRBG128 to FIPS186PRNG. To disable this change, specify -Dweblogic.security.allowCryptoJDefaultPRNG=true.
Jun 10, 2018 3:29:42 PM UTC Info WebLogicServer BEA-000377 Starting WebLogic Server with Java HotSpot(TM) 64-Bit Server VM Version 25.131-b11 from Oracle Corporation.
Jun 10, 2018 3:29:42 PM UTC Info Management BEA-141107 Version: WebLogic Server 12.1.3.0.0 Wed May 21 18:53:34 PDT 2014 1604337
Jun 10, 2018 3:29:43 PM UTC Notice WebLogicServer BEA-000365 Server state changed to STARTING.
Jun 10, 2018 3:29:43 PM UTC Info WorkManager BEA-002900 Initializing self-tuning thread pool.
Jun 10, 2018 3:29:43 PM UTC Info WorkManager BEA-002942 CMM memory level becomes 0. Setting standby thread pool size to 256.
Jun 10, 2018 3:29:43 PM UTC Notice Log Management BEA-170019 The server log file /home/shahril/wls/oracle/config/domains/TEST/servers/Node_Server01/logs/Node_Server01.log is opened. All server side log events will be written to this file.
Jun 10, 2018 3:29:45 PM UTC Notice Security BEA-090082 Security initializing using security realm myrealm.
Jun 10, 2018 3:29:46 PM UTC Notice WebLogicServer BEA-000365 Server state changed to STANDBY.
Jun 10, 2018 3:29:46 PM UTC Notice WebLogicServer BEA-000365 Server state changed to STARTING.
Jun 10, 2018 3:29:46 PM weblogic.wsee.WseeCoreMessages logWseeServiceStarting
INFO: The Wsee Service is starting

Jun 10, 2018 3:29:48 PM UTC Notice Log Management BEA-170027 The server has successfully established a connection with the Domain level Diagnostic Service.
Jun 10, 2018 3:29:48 PM UTC Notice Cluster BEA-000197 Listening for announcements from cluster using unicast cluster messaging
Jun 10, 2018 3:29:48 PM UTC Notice WebLogicServer BEA-000365 Server state changed to ADMIN.
Jun 10, 2018 3:29:48 PM UTC Notice WebLogicServer BEA-000365 Server state changed to RESUMING.
Jun 10, 2018 3:29:48 PM UTC Notice Cluster BEA-000162 Starting "async" replication service with remote cluster address "null"
Jun 10, 2018 3:29:48 PM UTC Notice Server BEA-002613 Channel "Default" is now listening on 172.17.0.7:8001 for protocols iiop, t3, CLUSTER-BROADCAST, ldap, snmp, http.
Jun 10, 2018 3:29:48 PM UTC Notice WebLogicServer BEA-000332 Started the WebLogic Server Managed Server "Node_Server01" for domain "TEST" running in development mode.
Jun 10, 2018 3:29:48 PM UTC Notice WebLogicServer BEA-000360 The server started in RUNNING mode.
Jun 10, 2018 3:29:48 PM UTC Notice WebLogicServer BEA-000365 Server state changed to RUNNING.
Génial! Now we have successfully configured the weblogic services on the managed servers. You can do the process to other managed server and later we will define the cluster grouping from administration server dashboard.
4. Testing Phase
To ensure that our Weblogic architecture works as expected, we'll just apply a simple test configuration on our servers. For this test, we will open the Weblogic admin server dashboard and from the dashboard console itself we will add our 2 managed servers into the environment and define them as a cluster.
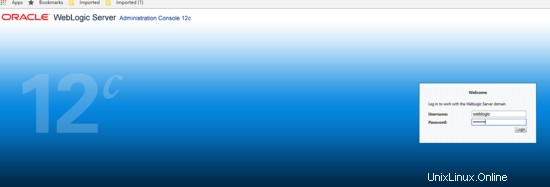
Now, let's open up our admin dashboard via http://172.17.0.6:7001/console . As mentioned before, for this test, we are've just creating only 1 DOMAIN which is TEST therefore the default port 7001 are dedicated for this domain. For multiple domains, the configuration can be seperated by its own dedicated port. Once you have launched the URL in the browser, you should see the console like below, enter the username and password that we've defined during configuration above. For this test, it's weblogic/Test1234 :-
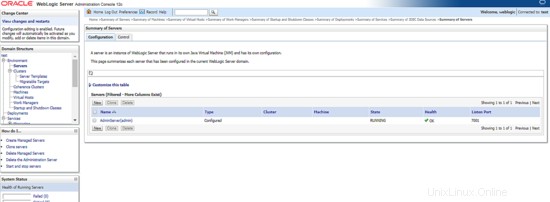
Once you have login successfully, you will see a complete dashboard like shown below:

To proceed with our test, from the dashboard click on Environment -> Servers tab . You will see the results as shown like below which automatically the Weblogic Admin server already included inside TEST domain.
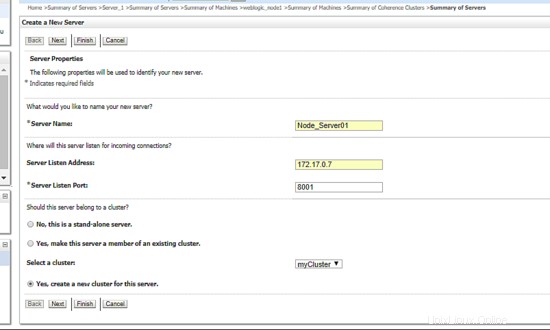
Next, click on the button  , it will forward you to page below. Fill in the Weblogic Managed Server information like it's IP addresses and the weblogic port as per shown then click next.
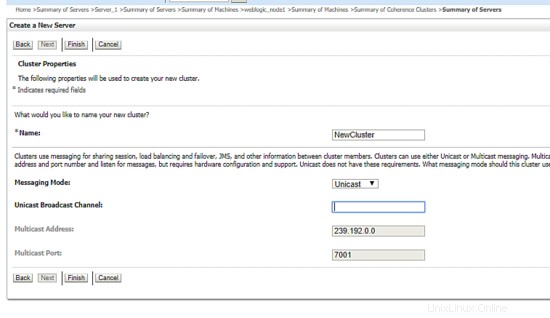
After that, define the new cluster name you want to the click next. Remain others as per default like example below:
Great, now you've include an instance node inside your newly created weblogic cluster. Below are the example snapshot:
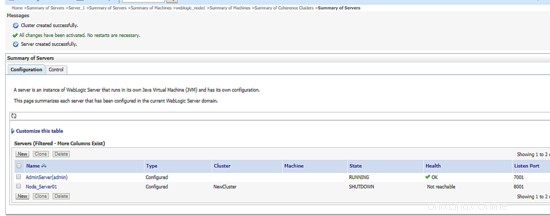
Now, let's bring up the instance node. For this case, we'll go back to CLI shell and start up the weblogic managed server like command we use before like below:
 [[email protected]_node1 wlserver]$ cd $DOMAIN_HOME
[[email protected]_node1 TEST]$ cd bin/
[[email protected]_node1 bin]$ ./startManagedWebLogic.sh Node_Server01 t3://172.17.0.6:7001 &
Once done, go back to admin URL and refresh the dashboard. You will see that now the instance node you've established are up and running. Below is the example screenshot:
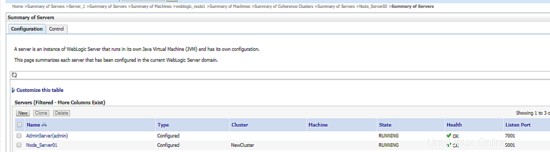
Next, use the same process to add another Weblogic Managed Server into the defined cluster. As the final result, you will see all instance nodes you've added are up and running and in load balancing mode. Below is the example result:
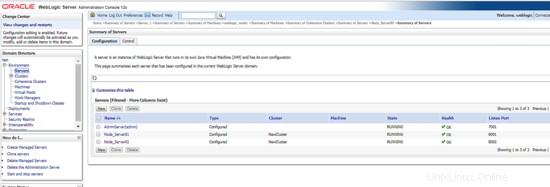
Toutes nos félicitations! Now you've successfully created a new weblogic cluster architecture.