Cette page explique comment utiliser Webmin pour configurer le serveur Web Apache . Il couvre les hôtes virtuels, le contrôle d'accès IP, les restrictions de mot de passe et bien plus encore.
Introduction à Apache
Apache est le serveur HTTP le plus populaire d'Internet, en raison de son coût nul, de sa large disponibilité et de son large éventail de fonctionnalités. Toutes les distributions Linux l'incluent en tant que package standard, et il peut être installé ou compilé pour toutes les autres variantes Unix prises en charge par Webmin. Cependant, il a un très grand nombre de directives d'option définies dans un fichier de configuration texte, et peut donc être difficile à configurer pour un administrateur inexpérimenté.
Au fil des années depuis son introduction, de nombreuses versions d'Apache ont été publiées. En commençant par 1.0 et en passant aux séries 1.3 et 2.2 actuelles, chaque version a inclus plus de fonctionnalités et d'options. La fonctionnalité de base du service Web et la disposition du fichier de configuration sont restées essentiellement les mêmes, même si l'implémentation interne a considérablement changé.
Apache a une conception modulaire, dans laquelle chaque module est responsable d'une partie de son ensemble de fonctionnalités global. Il existe plusieurs modules standard qui sont inclus avec presque toutes les installations d'Apache, et bien d'autres qui sont facultatifs ou doivent être téléchargés séparément. Les modules peuvent être compilés dans l'exécutable du serveur Web ou chargés dynamiquement à partir de bibliothèques partagées au moment de l'exécution. Cette architecture modulaire peut être utilisée pour économiser de la mémoire en évitant d'avoir à charger des modules qui ne fournissent aucune fonctionnalité utile pour un système particulier.
Apache prend sa configuration à partir de plusieurs fichiers texte, chacun contenant une série de directives, généralement une par ligne. Chaque directive a un nom et une ou plusieurs valeurs, et définit une option telle que le chemin d'accès à un fichier journal ou le type MIME pour certains fichiers. Les directives reconnues par Apache dépendent des modules utilisés. La plupart des modules ajoutent la prise en charge de plusieurs directives pour configurer les fonctions qu'ils fournissent.
Souvent, vous souhaiterez héberger plusieurs sites Web sur un seul serveur. Apache peut être configuré pour utiliser une configuration différente selon le site Web qui a été demandé par un navigateur. Chacun de ces sites est appelé un hôte virtuel et est défini dans le fichier de configuration avec une section spéciale
De même, les sections
Une autre méthode pour créer des directives qui ne s'appliquent qu'à un seul répertoire consiste à les placer dans un fichier de configuration spécial nommé .htaccess qui réside dans le répertoire lui-même. Souvent, ces fichiers seront créés par des utilisateurs réguliers, afin qu'ils puissent configurer leurs propres sites Web sans avoir besoin d'un accès complet au fichier de configuration principal. Ceci est très utile sur un système qui héberge plusieurs sites appartenant chacun à un utilisateur Unix différent, plutôt que sur un système avec un seul site Web configuré par le propriétaire du serveur.
Le module Serveur Web Apache
C'est l'un des modules Webmin les plus complexes et les plus puissants, car il vous permet de configurer presque toutes les fonctionnalités d'Apache. Il peut déterminer la version d'Apache installée sur votre système et les modules qu'il utilise, et ajuste son interface utilisateur en conséquence afin que vous ne puissiez modifier que les directives que le serveur Web comprend. Cependant, l'interface est généralement la même pour toutes les versions d'Apache.
Parce qu'il y a tellement de directives et que le module tente de permettre la configuration de chacune d'elles, il regroupe les directives dans des catégories telles que Processus et limites, Mise en réseau et adresses et Programmes CGI. Ces catégories sont représentées par des icônes qui apparaîtront lorsque vous ouvrirez un serveur virtuel, un répertoire ou un fichier d'options dans le module. Dans tous les cas, vous pouvez afficher et modifier les paramètres de chaque catégorie en cliquant sur son icône.
Apache a un grand nombre de modules standards, et un nombre encore plus grand de modules séparés qui ont été développés par d'autres personnes. Webmin ne prend pas en charge l'édition de directives dans la plupart de ces directives non standard, telles que mod_perl et mod_php. Cependant, il ignorera en toute sécurité toute directive de fichier de configuration qu'il ne comprend pas, de sorte que les paramètres des modules non pris en charge que vous définissez manuellement ne seront pas endommagés.
Lorsque vous ouvrez le module Apache, la page à onglets ci-dessous s'affiche :
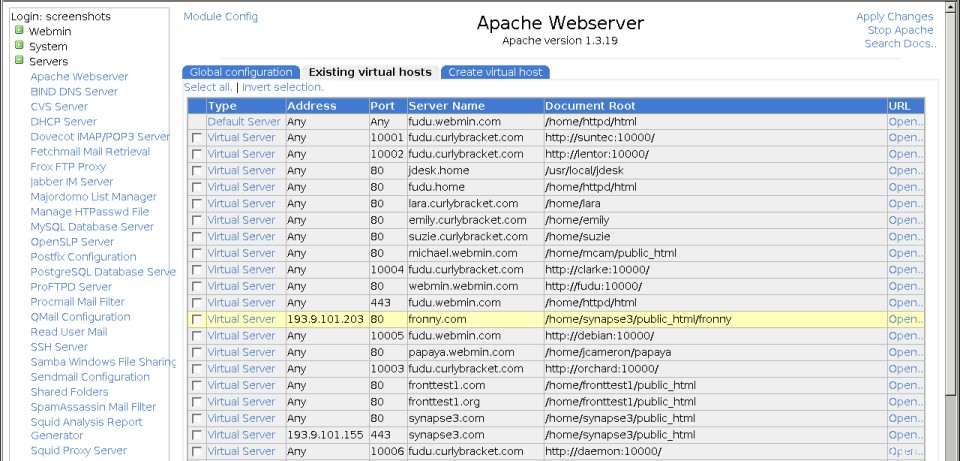 La page principale du module Apache Webserver
 Dans le premier onglet se trouvent des icônes pour les différentes catégories d'options globales, ainsi que quelques fonctionnalités supplémentaires. Dans le second se trouve une liste de tous les serveurs virtuels actuels, et dans le troisième se trouve un formulaire pour ajouter un nouvel hôte virtuel. Si vous avez un très grand nombre de serveurs virtuels sur votre système (plus de 100 par défaut) un formulaire de recherche de serveurs s'affichera à la place. Le premier serveur sera toujours le serveur par défaut spécial , qui contient des directives qui s'appliquent à tous les autres serveurs virtuels et gère les requêtes que les autres serveurs ne gèrent pas.
Naturellement, le module Apache ne fonctionnera pas si Apache n'est pas installé sur votre système. Si tel est le cas, la page principale affichera un message d'erreur à la place du formulaire de configuration du module ou de la liste des serveurs virtuels. Toutes les distributions Linux incluent un ou plusieurs packages sur leur CD-ROM ou leur site Web. Installez-les à partir de là à l'aide du module Packages logiciels avant de continuer.
Étant donné que le module suppose que les fichiers exécutables et de configuration d'Apache se trouveront aux emplacements utilisés par le package de votre distribution, il signalera la même erreur concernant le logiciel non installé si vous l'avez compilé et installé manuellement. Si tel est le cas, cliquez sur Configuration du module liez et ajustez les chemins vers les emplacements corrects pour votre système.
Sur les versions d'Unix qui n'incluent pas Apache par défaut, Webmin suppose qu'il sera installé à partir de la distribution source standard de www.apache.org. Si vous avez installé le serveur Web à partir d'un package optionnel mis à disposition pour votre système d'exploitation, la page principale se plaindra qu'il n'est pas installé et vous devrez ajuster la configuration du module.
L'interface utilisateur du module est assez complexe et comporte un grand nombre de pages, de formulaires et de sous-pages en raison de la complexité et de la puissance des fichiers de configuration d'Apache. Cependant, certains éléments de l'interface sont répétés sur de nombreuses pages tout au long du module, tels que :
- Icônes de catégorie Lorsque vous cliquez sur l'icône d'un serveur virtuel, d'un répertoire ou d'un fichier d'options, un tableau d'icônes portant des noms tels que Types MIME et Programmes CGI s'affiche en haut de la page. Sous chacune de ces icônes se trouvent des champs et des tableaux pour configurer les options liées à l'étiquette de l'icône sous laquelle elles se trouvent. Cette mise en page couramment utilisée décompose le grand nombre d'options Apache modifiables en catégories, car il y a beaucoup trop de champs à afficher sur une seule page. Les icônes exactes qui s'affichent et les champs situés en dessous diffèrent selon la partie de la configuration du serveur Web que vous modifiez et la version d'Apache installée. Cependant, leur mise en page de base est toujours la même.
- Champs des tableaux Sur de nombreux formulaires, certains champs utilisent des tableaux pour saisir plusieurs valeurs telles que les types MIME et leurs extensions de fichier associées. Il n'y a pas de limite au nombre de lignes que chaque table peut avoir, mais Webmin n'affichera qu'une seule ligne vide dans chaque table à la fois. Cela réduit la taille des formulaires contenant de nombreux tableaux, mais signifie que vous ne pouvez ajouter qu'une seule nouvelle ligne à un tableau à la fois. Pour en ajouter plusieurs, vous devrez enregistrer le formulaire puis le saisir à nouveau, ce qui entraînera l'affichage d'une nouvelle ligne vide sous celle que vous venez de remplir.
Les sections ci-dessous expliquent plus en détail les icônes sur lesquelles cliquer et les tableaux à remplir lors d'opérations telles que l'activation des scripts CGI et la définition des types MIME.
Démarrer et arrêter Apache
Avant que les navigateurs puissent se connecter au serveur Web Apache sur votre système, son processus serveur doit être démarré. Vous pouvez vérifier s'il est en cours d'exécution en regardant en haut de l'une des pages du module. Si les liens libellés Appliquer les modifications et Arrêter Apache apparaît, alors il est actuellement actif. Cependant, si seul le lien *Démarrer Apache* leur apparaît, il n'est pas encore en cours d'exécution.
Pour le démarrer, cliquez sur Démarrer Apache lien. Si tout se passe bien, la page sur laquelle vous vous trouvez actuellement sera réaffichée et les liens en haut devraient changer pour indiquer qu'elle est en cours d'exécution. Sinon, un message d'erreur apparaîtra expliquant ce qui s'est passé - la cause la plus probable sera une erreur dans le fichier de configuration.
Pour arrêter le serveur Web une fois qu'il est en cours d'exécution, cliquez sur Arrêter Apache lien sur n'importe quelle page du module. Dans le cas peu probable où Webmin ne parviendrait pas à arrêter le serveur, une page de message d'erreur s'affichera. S'il est arrêté avec succès, la même page s'affichera à nouveau avec les liens en haut modifiés pour indiquer qu'il n'est plus en cours d'exécution.
Lorsqu'Apache est actif, chaque page aura un Appliquer les modifications lien en haut qui peut être utilisé pour signaler au serveur web de recharger sa configuration actuelle. Après avoir effectué des modifications dans ce module (sauf celles dans les fichiers .htaccess), ce lien doit être cliqué pour les rendre actifs. Contrairement aux autres modules Webmin qui ont un bouton Appliquer sur la page principale, celui-ci l'a sur chaque page afin que vous n'ayez pas à revenir à l'index chaque fois que vous apportez une modification.
Modifier des pages sur votre serveur Web
Cette section explique comment rechercher et modifier les fichiers de votre système qui s'affichent lorsqu'un client se connecte à votre serveur Web Apache. Si vous savez déjà comment procéder, n'hésitez pas à l'ignorer et à passer à la section suivante.
Lorsqu'Apache est installé pour la première fois à partir d'un package ou de la source, sa configuration initiale ne comporte généralement aucun serveur virtuel configuré. Au lieu de cela, seul le serveur par défaut existera, servant des pages à tout client qui se connecte sur le port 80. Vous pouvez afficher les pages par défaut en exécutant un navigateur Web et en accédant à l'URL http://_yourhostname_/, ou http://_localhost_/ si vous exécutez le navigateur sur le même système que Webmin. La page qui apparaît sera probablement celle fournie avec Apache ou votre distribution Linux.
Le répertoire racine du document à partir duquel Apache sert les fichiers sera affiché sur la page principale du module à côté du serveur par défaut icône. Sur Redhat Linux par exemple, ce répertoire est /home/httpd/html par défaut. Les fichiers de ce répertoire peuvent être modifiés en se connectant en tant que root ou en utilisant le module File Manager de Webmin. Toute modification que vous apporterez sera immédiatement répercutée sur le site Web.
Si votre système ne doit héberger qu'un seul site Web statique, il n'est peut-être pas nécessaire de configurer d'autres aspects d'Apache. Vous pouvez simplement télécharger ou copier des fichiers HTML, image et autres dans le répertoire et ses sous-répertoires pour créer le site que vous souhaitez. Le fichier le plus important est index.html, qui est servi par Apache chaque fois qu'un navigateur ne demande pas une page spécifique. Parce que la plupart des gens iront d'abord sur http://_votreserveur_/, la page index.html sera la première qu'ils verront.
Pour faciliter l'édition, vous souhaiterez peut-être changer la propriété du répertoire racine du document et de tous ses fichiers en un utilisateur non root. Cependant, vous devez vous assurer qu'ils sont toujours lisibles par l'utilisateur sous lequel le processus du serveur Apache s'exécute, qui est généralement nommé httpd. Le moyen le plus simple de le faire est de rendre tous les fichiers et répertoires lisibles et exécutables par le monde entier.
Création d'un nouvel hôte virtuel
Si vous souhaitez héberger plusieurs sites Web sur votre système, vous devrez créer un hôte virtuel Apache pour chacun d'eux. Avant de pouvoir ajouter un site, son adresse doit d'abord être enregistrée dans le DNS, soit sur un serveur DNS de votre système, soit sur un autre hébergeur. Si les fichiers du site doivent appartenir à un utilisateur Unix différent de celui qui possède le répertoire racine du document, alors il doit également être créé en premier.
L'ensemble du processus d'ajout d'un serveur virtuel, y compris les étapes ci-dessus, est :
- Choisissez un nom d'hôte qui sera utilisé dans l'URL du nouveau site Web, par exemple www.example.com .
- Décidez si votre nouveau site sera basé sur l'adresse IP ou sur le nom. Un site basé sur le nom fonctionnera bien avec tous sauf pour les anciens navigateurs, et est donc de loin le meilleur choix de nos jours. Un site basé sur IP fonctionnera avec n'importe quel navigateur, mais nécessite que sa propre adresse IP distincte soit ajoutée à votre système. Étant donné que les adresses IP sont souvent rares, cela n'a de sens que si vous devez également configurer un serveur FTP ou POP3 virtuel pour le domaine.
- Si votre site doit être basé sur IP, utilisez le module de configuration réseau (traité dans Configuration réseau) pour ajouter une nouvelle adresse IP virtuelle à l'interface réseau externe de votre système. Assurez-vous qu'il sera activé au démarrage et qu'il est actif maintenant. Si votre système n'a qu'une seule adresse IP Internet statique attribuée par votre FAI, les adresses IP virtuelles supplémentaires que vous y ajoutez ne fonctionneront pas. Dans ce cas, vous devrez plutôt utiliser un serveur virtuel basé sur le nom ou demander à votre FAI de vous attribuer plusieurs adresses.
- Si example.com domaine existe déjà sur un serveur DNS, ajoutez un enregistrement pour www.example.com avec l'adresse IP externe de votre système (pour un site nominatif) ou l'adresse choisie à l'étape précédente (pour un site IP). Si le domaine n'existe pas encore, vous devrez l'ajouter à un serveur DNS et l'enregistrer auprès d'un registraire DNS comme Network Solutions. Dans tous les cas, la page BIND DNS Server explique en détail comment ajouter des enregistrements et des domaines.
- Si le site va utiliser le port HTTP standard 80 (ce qui est presque toujours ce que vous voulez), alors vous pouvez passer à l'étape 8. Sinon, sur la page principale du module Apache Webserver, cliquez sur Réseau et Adresses icône pour faire apparaître le formulaire illustré dans la première capture d'écran ci-dessous.
- Dans la ligne vide dans Écouter les adresses et les ports tableau, sélectionnez Tous sous l'adresse colonne et désélectionnez Par défaut sous le port colonne. Entrez ensuite le numéro de port TCP de votre site Web dans le champ à côté, puis cliquez sur Enregistrer bouton en bas de la page.
- Sur la page principale du module, faites défiler jusqu'au formulaire *Créer un nouveau serveur virtuel* sous la liste des hôtes virtuels existants.
- Si vous configurez un serveur virtuel basé sur IP, dans l'Adresse Dans ce champ, vous devez saisir l'adresse IP virtuelle qui a été ajoutée à l'étape 3. Si vous configurez un serveur virtuel basé sur le nom, saisissez plutôt l'adresse IP externe de votre système dans le champ. Si votre serveur Apache a été configuré pour accepter les connexions basées sur le nom sur n'importe quelle adresse IP, vous pouvez sélectionner l'option Tous option pour ce champ à la place. Voir l'explication ci-dessous pour plus de détails. Si votre nouveau serveur virtuel va utiliser un port autre que 80 et sera le seul serveur sur ce port, vous pouvez sélectionner Tous option ainsi afin qu'il gère toutes les demandes qui arrivent sur le port.
- Si vous configurez un serveur virtuel basé sur IP, désélectionnez l'option Ajouter un nom d'adresse de serveur virtuel case à cocher. Pour les serveurs basés sur le nom, il doit être laissé activé.
- Si le nouvel hôte virtuel va utiliser un port non standard, sélectionnez la dernière option pour le Port champ et entrez le numéro dans le champ à côté.
- Dans la racine du document , entrez le chemin complet du répertoire qui contiendra les fichiers de ce site Web. Par exemple, cela pourrait être /home/example/www .
- Dans le Nom du serveur champ, entrez les noms d'hôte que les clients utiliseront pour se référer à ce site Web, tels que www.example.com . Vous pouvez saisir plusieurs noms, tels que web.example.com et example.com s'il s'agit d'un serveur basé sur le nom qui doit être accessible à plusieurs URL différentes.
- À moins que vous n'ayez un fichier séparé sur votre système contenant tous les hôtes virtuels, laissez l'option Ajouter un serveur virtuel au fichier champ défini sur Fichier httpd.conf standard . Sinon, vous pouvez choisir Fichier sélectionné et entrez le chemin dans le champ à côté. Assurez-vous que le fichier choisi est bien utilisé par Apache (comme par une directive Include dans httpd.conf) ou le serveur virtuel sera inutile et n'apparaîtra pas dans Webmin. Si vous utilisez toujours le même fichier séparé pour stocker les hôtes virtuels, le Fichier auquel ajouter les serveurs virtuels champ expliqué dans le module Configurer le module Apache Webserver section ci-dessous peut être utile. S'il est défini, une autre option est ajoutée au champ *Ajouter un serveur virtuel au fichier* pour l'ajouter au fichier défini par cette option de configuration de module.
- Pour que Webmin copie toutes les directives d'un autre serveur virtuel vers celui que vous créez, sélectionnez-le dans Copier les directives de menu. Cela peut être utile si tous vos hôtes virtuels ont une configuration similaire.
- Lorsque vous avez terminé de remplir le formulaire, cliquez sur Créer bouton. Le nouveau serveur virtuel sera ajouté au fichier de configuration Apache et à la liste des serveurs sur la page principale.
- Cliquez sur l'icône du nouveau serveur virtuel, ce qui vous amènera à sa page d'options, illustrée dans la deuxième capture d'écran ci-dessous.
- Faites défiler jusqu'au formulaire sous Options par répertoire , et entrez le répertoire racine du document que vous avez choisi à l'étape 11 dans le Chemin domaine. Assurez-vous que le Type est défini sur Répertoire , et l'Regexp ? champ à Correspondance exacte .
- Cliquez sur Créer pour ajouter une nouvelle section au fichier de configuration du répertoire. Cela est nécessaire pour que vous puissiez accorder aux clients le droit de parcourir les fichiers qu'il contient, ce que la configuration par défaut du répertoire Apache refuse.
- Cliquez sur la nouvelle icône du répertoire qui a été ajouté à la page des options du serveur virtuel. Cela vous amènera à la page des options de répertoire, illustrée dans la troisième capture d'écran ci-dessous.
- Cliquez sur Options de document et sur le formulaire qui s'affiche, modifiez les Options du répertoire champ à *Sélectionné ci-dessous*. Sous le Définir pour le répertoire colonne, modifiez l'entrée pour Générer des index de répertoire à Oui . Cliquez ensuite sur Enregistrer bouton en bas de la page.
- Pour rendre toutes vos modifications actives, cliquez sur Appliquer les modifications bouton en haut de n'importe quelle page.
- Vous ou l'utilisateur propriétaire du serveur virtuel pouvez maintenant commencer à ajouter des fichiers au répertoire racine du document. Vous pouvez le tester en ouvrant l'URL (telle que http://_www.example.com_/) dans votre navigateur Web pour vous assurer que tout fonctionne correctement.
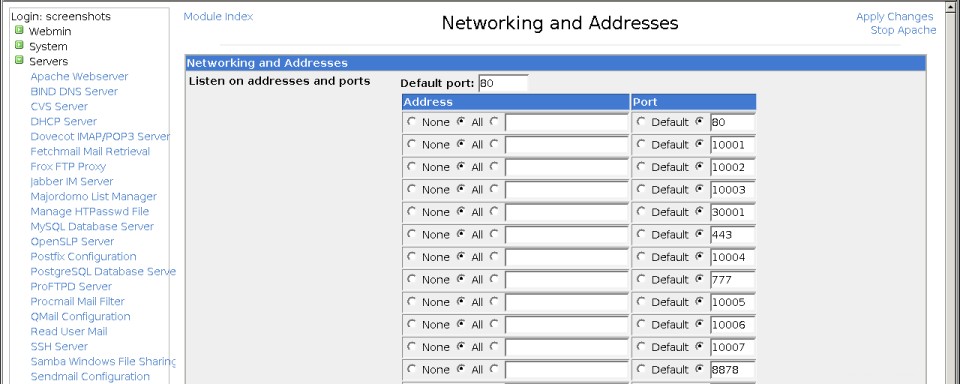 La page de réseau mondial et d'adresses
 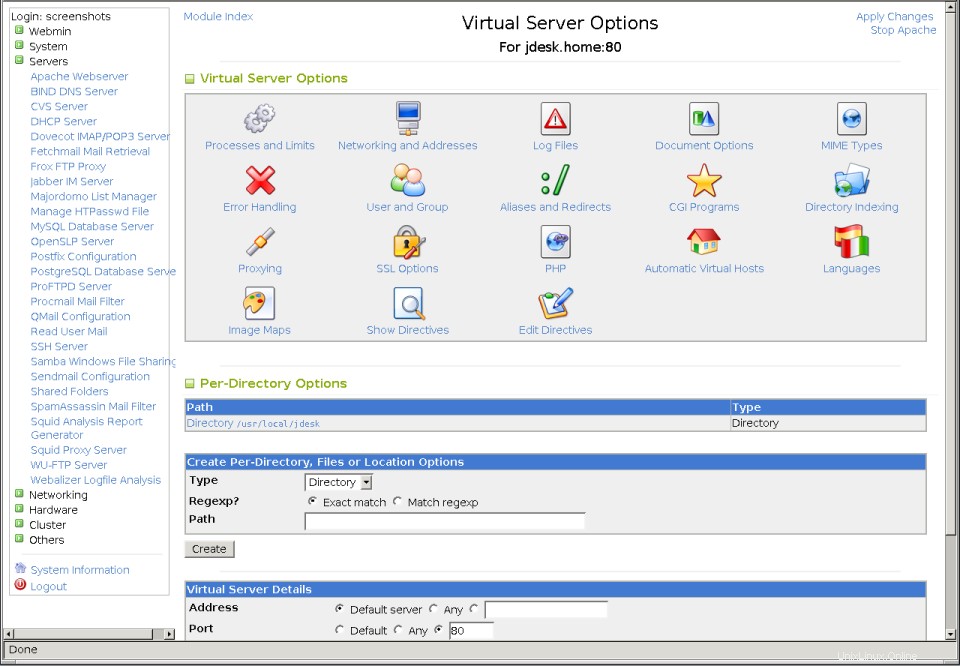 La page des options du serveur virtuel
 Lorsqu'Apache reçoit une requête HTTP, il doit d'abord déterminer à quel serveur virtuel la requête est destinée. Il recherchera d'abord un serveur virtuel basé sur le nom dont le nom d'hôte correspond à l'hôte demandé par le client, et dont l'adresse et le port sont les mêmes que ceux auxquels le client s'est connecté. Si aucun n'est trouvé, le premier serveur virtuel défini pour l'adresse et le port sera utilisé à la place, ou s'il n'y en a pas, la demande sera traitée par le serveur par défaut.
Les serveurs virtuels basés sur le nom ne peuvent être utilisés que sur les adresses répertoriées dans les Adresses pour les serveurs virtuels de nom sur la page globale Réseaux et adresses. Si vous suivez les instructions ci-dessus, une adresse sera automatiquement ajoutée à cette liste lorsque vous créerez un nouveau serveur virtuel. Si tous les serveurs virtuels de votre système vont être basés sur le nom, vous pouvez ouvrir cette page, entrer * dans le champ et cliquer sur Enregistrer afin qu'Apache traite ces requêtes sur n'importe quelle adresse IP. Cela a également du sens si votre système a une adresse IP attribuée dynamiquement et que vous souhaitez servir plusieurs hôtes virtuels.
Une fois qu'un serveur virtuel a été créé, vous pouvez modifier ses paramètres ou le supprimer en suivant ces étapes :
- Sur la page principale du module, cliquez sur l'icône du serveur virtuel. Cela vous mènera à la page des options du serveur illustrée dans la capture d'écran ci-dessus.
- Faites défiler jusqu'aux Détails du serveur virtuel formulaire en bas de page.
- Modifier l'adresse , Port et d'autres champs à ce que vous voulez et cliquez sur Enregistrer bouton. Ces champs ont la même signification que sur le formulaire de création de serveur virtuel. Toutefois, si l'adresse est modifiée sur un serveur virtuel basé sur le nom, vous devrez peut-être également la modifier sur la page globale Réseaux et adresses. Ou si vous voulez vous débarrasser du serveur virtuel et de toutes les directives de configuration qu'il contient, cliquez sur Supprimer le serveur virtuel bouton à la place.
- De retour sur la page principale du module, cliquez sur Appliquer les modifications lien pour activer les nouveaux paramètres.
Vous ne pouvez pas modifier les paramètres du serveur par défaut, ni le supprimer.
Configuration des options par répertoire
Apache vous permet de spécifier différentes options pour certains répertoires, soit pour tous les serveurs virtuels, soit pour un seul. Y compris les répertoires, vous pouvez en fait définir des options qui s'appliquent à trois types d'objets sur votre serveur Apache :
- Répertoire Les options s'appliquent à un répertoire spécifié et à tous les fichiers qu'il contient ou dans les sous-répertoires qu'il contient.
- Fichiers Les options s'appliquent aux fichiers avec un nom spécifié dans n'importe quel répertoire.
- Emplacement Les options s'appliquent à tous les fichiers ou répertoires demandés par une URL dont le chemin commence par l'emplacement spécifié. Par exemple, dans l'URL http://www.example.com/foo le chemin serait /foo .
Chaque fois qu'Apache traite une requête, il vérifie les options qui s'y appliquent dans un ordre fixe. Ceux des sections de répertoires et des fichiers .htaccess sont lus en premier afin que les répertoires les plus spécifiques soient vérifiés en premier. Ils sont ensuite suivis de fichiers, puis de sections d'emplacement. Ensuite, les options du serveur virtuel auquel la demande a été adressée (le cas échéant) sont lues, et enfin les options du serveur par défaut.
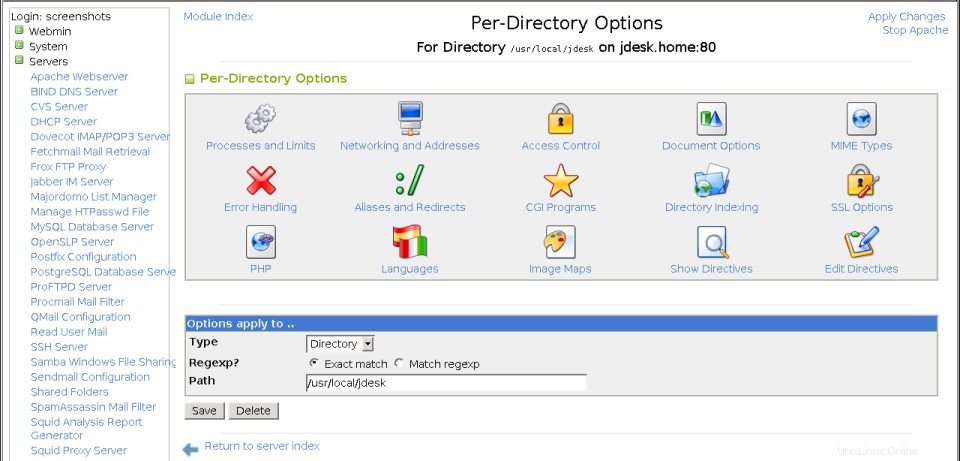 La page des options par répertoire
 Cela signifie que les options définies pour un répertoire remplaceront les mêmes options définies dans un répertoire de niveau supérieur ou dans le serveur virtuel dont il est membre. Pour définir des options pour un répertoire, des fichiers ou un emplacement d'URL, les étapes à suivre sont :
- Même si les options que vous allez définir s'appliquent à un répertoire, elles doivent être définies sous l'un des serveurs virtuels ou le serveur par défaut. S'ils se trouvent sous un hôte virtuel, ils ne s'appliqueront qu'aux demandes adressées à ce serveur pour les fichiers dans le répertoire ou l'URL choisi. Mais s'ils sont sous le serveur par défaut, les demandes à n'importe quel hôte virtuel pour les fichiers du répertoire seront effectuées. Sur la page principale du module, cliquez soit sur le Serveur par défaut ou l'icône d'un serveur virtuel auquel vous souhaitez limiter les options de répertoire. Pour les répertoires, il est généralement plus simple de placer leurs options sous le serveur par défaut, car chaque hôte virtuel possède généralement son propre répertoire racine de documents distinct. Les options d'emplacement d'URL doivent cependant être placées sous le serveur virtuel auquel elles sont liées, car le même chemin d'URL peut être utilisé de différentes manières sur plusieurs hôtes virtuels. Il en va de même pour les options de fichiers.
- Sur la page des options du serveur qui s'affiche (illustrée à la Figure 29-4), faites défiler jusqu'au formulaire *Créer des options de répertoire, de fichiers ou d'emplacement*.
- À partir du Type menu, choisissez l'une des options décrites ci-dessus.
- Si vous définissez des options pour un répertoire, saisissez-le dans le Chemin champ tel /home/example/www/images . Vous pouvez également entrer un chemin générique tel que /home/example/w* , ce qui entraînera l'application des options à tous les répertoires correspondants. Si les options sont définies pour un emplacement d'URL, saisissez la partie de l'URL après le nom d'hôte dans le champ Chemin, par exemple /images . Vous pouvez également utiliser des caractères génériques du shell tels que * et ? dans l'URL également. Si vous définissez des options pour les fichiers, saisissez un nom de fichier dans le Chemin champ tel que secret.html . Encore une fois, des caractères génériques peuvent être utilisés dans le nom de fichier, par exemple secret*.
- Si vous souhaitez pouvoir utiliser des expressions régulières complexes dans le répertoire, le nom de fichier ou l'emplacement de l'URL, définissez la Regexp ? champ à Match regexp . Cela vous permettra d'utiliser des caractères d'expression régulière Perl comme [, ], +, . et * dans le chemin.
- Cliquez sur Créer bouton pour ajouter la nouvelle section de répertoire à la configuration Apache. La page des options du serveur virtuel s'affichera à nouveau, mais avec une nouvelle icône pour le répertoire.
Maintenant que vous avez créé une nouvelle icône pour un répertoire, un emplacement d'URL ou un nom de fichier, vous pouvez définir les options qui s'y appliquent. L'une des modifications les plus courantes par répertoire consiste à configurer la manière dont les fichiers sont répertoriés lorsqu'un navigateur demande un répertoire avec une URL telle que http://www.example.com/images/. Par défaut, s'il y a un fichier index.html dans le répertoire il sera affiché, sinon une page listant tous les fichiers qu'il contient sera affichée à la place.
Si vous souhaitez modifier le nom du fichier d'index, le style de la liste des répertoires ou tout autre paramètre lié à l'indexation, les étapes à suivre sont :
- Cliquez sur l'icône du répertoire que vous souhaitez configurer sur la page des options du serveur virtuel. Cela vous mènera à la page des options de répertoire illustrée à la Figure 29-5.
- Cliquez sur Indexation des répertoires pour afficher un formulaire permettant de définir les options d'indexation et de listage.
- Pour modifier l'apparence des listes d'annuaires, définissez le champ *Options d'index d'annuaire* sur Sélectionné ci-dessous et modifiez les champs dans la case en dessous. Les valeurs par défaut généreront une liste très simple de fichiers, mais vous pouvez l'améliorer en définissant les options suivantes :
- Afficher des index de répertoire sophistiqués Si activé, la liste des fichiers inclura leur icône, leur taille et leur date de modification.
- Afficher le titre HTML comme description Si activé, la description des fichiers HTML sera extraite de leurs balises
.</li> <li> <b>Hauteur de l'icône</b> Cette option vous permet de modifier la hauteur des icônes incluses dans la liste des répertoires. S'il est défini sur <b>Par défaut</b> , la hauteur des options standard d'Apache sera utilisée.</li> <li> <b>Largeur de l'icône</b> Comme l'option précédente, celle-ci vous permet de spécifier la largeur des icônes dans la liste des répertoires. </li> <li> <b>Autoriser l'utilisateur à trier les colonnes</b> Lorsque cette option est activée, les utilisateurs peuvent trier la liste des fichiers en cliquant sur les en-têtes de colonne, en supposant qu'ils sont affichés.</li> <li> <b>Afficher les descriptions des fichiers</b> Si cette option est activée, la liste des répertoires inclura une description pour chaque fichier tirée de son type MIME ou de son titre HTML.</li> <li> <b>Balises d'en-tête HTML de sortie</b> Lorsqu'elle est activée, la liste des répertoires inclura les balises normales <html> et <head> qui devraient commencer chaque page HTML. Vous ne voudrez le désactiver que si vous fournissez vos propres fichiers d'en-tête et de pied de page.</li> <li> <b>Afficher les dernières heures modifiées</b> Lorsqu'elle est activée, la liste des répertoires inclura la date de la dernière modification pour chaque fichier.</li> <li> <b>Afficher les tailles de fichier</b> Lorsqu'il est activé, la liste inclura la taille de chaque fichier. </li> <li> <b>Inclure l'icône dans le lien</b> Si cette option est activée, l'icône dans la liste sera un lien vers le fichier lui-même. Sinon, seul le nom du fichier est un lien.</li> <li> <b>Largeur du nom de fichier</b> Cette option contrôle la longueur de la colonne de nom de fichier dans la liste des répertoires. Vous pouvez saisir un nombre de caractères ou * pour dimensionner la colonne à la longueur du nom de fichier le plus long.</li> <li> <b>Largeur de la description</b> Cette option contrôle la longueur de la colonne de description dans la liste des répertoires, le cas échéant. Vous pouvez saisir un nombre de caractères ou * pour dimensionner la colonne à la longueur de la description la plus longue.</li> <li> <b>Afficher les répertoires en premier</b> Si cette option est activée, la liste affichera tous les répertoires au-dessus de tous les fichiers, quels que soient les autres fichiers. Les options disponibles dépendent de la version d'Apache que vous avez installée sur votre système. Ceux listés ci-dessus sont valables pour la version 1.3.19, mais si vous avez une version plus récente, plus d'options peuvent être disponibles. </li> </ul> </li> <li> Si vous souhaitez qu'Apache renvoie un fichier autre que celui par défaut (généralement index.html) lorsqu'un navigateur demande le répertoire, saisissez une liste de noms de fichiers dans les <b>fichiers d'index du répertoire</b> domaine. Plus d'un peut être entré, et le premier qui est trouvé sera utilisé. Si aucun des fichiers d'index n'est trouvé, une liste de répertoires utilisant les options choisies à l'étape 3 sera renvoyée au navigateur à la place. </li> <li> Pour que le serveur Web ignore certains fichiers lors de la génération de la liste des fichiers dans le répertoire, entrez leurs noms de fichiers dans l'index <b>Fichiers à ignorer dans le répertoire</b> domaine. Vous pouvez utiliser des caractères génériques du shell dans les expressions régulières, telles que <i>*.doc</i> . </li> <li> Pour insérer un fichier HTML au début de la liste des répertoires, entrez son nom de fichier (relatif au répertoire) dans le <b>fichier d'en-tête d'index de répertoire</b> domaine. </li> <li> De même, pour qu'un fichier soit ajouté à la fin de la liste des répertoires, saisissez-le dans le <b>fichier de pied de page d'index de répertoire</b> domaine. </li> <li> Pour contrôler l'ordre par défaut du répertoire, désélectionnez <b>Par défaut</b> dans le <b>Trier l'index des répertoires par</b> champ et sélectionnez un ordre et une colonne à trier dans les deux menus à côté. </li> <li> Vous pouvez définir des descriptions pour les fichiers en remplissant le tableau *Descriptions d'index de répertoires*. Dans la ligne vide du tableau, entrez un court message décrivant le fichier dans la <b>Description</b> et une liste de noms de fichiers ou de noms génériques dans la colonne <b>Noms de fichiers</b> colonne. Étant donné qu'une seule ligne vide est affichée à la fois, vous devrez revoir cette page après avoir ajouté chaque description si vous souhaitez en saisir plusieurs. </li> <li> Enfin, cliquez sur <b>Enregistrer</b> bouton en bas de la page pour enregistrer vos modifications et revenir à la page des options du répertoire. Pour les activer, cliquez sur <b>Appliquer les modifications</b> lien n'importe où dans le module Apache. </li> </ol> <p> La plupart de ces options peuvent également être définies pour un serveur virtuel entier en cliquant sur l'icône Indexation de répertoire sur la page des options du serveur virtuel. Dans ce cas, ils s'appliqueront à tous les fichiers demandés à l'hôte virtuel, sauf s'ils sont remplacés par des options pour un répertoire ou un emplacement d'URL. </P> <p> Sur la page des options de répertoire, il existe de nombreuses autres icônes sur lesquelles vous pouvez cliquer pour définir des options qui s'appliquent uniquement à ce répertoire, chemin d'URL ou nom de fichier. Certaines d'entre elles sont expliquées dans d'autres sections plus loin dans ce chapitre, telles que <b>Alias et redirections</b> et *Mot de passe protégeant un répertoire*. </P> <p> Vous pouvez modifier le répertoire, les noms de fichiers ou l'emplacement de l'URL auxquels les paramètres s'appliquent à l'aide des <b>Options applicables à</b> formulaire en bas de la page des options du répertoire. Il a exactement les mêmes champs que le formulaire de création décrit au début de cette section. If you make any changes, click the <b>Save</b> button to update the Apache configuration and then the <b>Apply Changes</b> link to make them active. Or to remove the directory configuration and all its options, click on <b>Delete</b> à la place.</P> <h3>Creating aliases and redirects</h3> <p> Normally, there is a direct relationship between the path in URL and the file that is returned by the webserver. For example, if a browser requests http://www.example.com/images/foo.gifand the document root for <i>www.example.com</i> is <i>/home/example/www</i> , then the file <i>/home/example/www/images/foo.gif</i> would be read by the webserver and returned to the client. </P> <p> This can be changed though by using what Apache calls aliases. An alias maps a particular URL path to a file or directory, which does not necessarily have to be under the document root. So in the example above, the <i>/images</i> URL path might actually be aliases to the directory <i>/www/images</i> , which would cause the file <i>/www/images/foo.gif</i> to be read instead. </P> <p> Aliases can be defined globally or in a virtual server. To create one, the steps to follow are :</P> <ol> <li> On the module's main page, click on the icon for the virtual server that you want to create the alias under. If you want it to apply to all virtual servers (or you don't have any), click on the *Default Server *icon instead. </li> <li> On the virtual server options page that appears, click on the Aliases and Redirects icon. This will take you to the page in the screenshot below.</li> <li> Fill in the empty row in the <b>Document directory aliases</b> table with the URL path (under <b>From</b> ) and the file or directory that it should map to (under <b>To</b> ). If you are editing the default server, there may already be several entries in this table that are part of the standard Apache configuration. There will always be exactly one empty row in the table. If you need to add more than one alias, you will need to re-visit this page after filling in the row and saving. </li> <li> Cliquez sur <b>Enregistrer</b> button to have your new alias stored in the Apache configuration. The browser will return to the virtual server options page. </li> <li> To make the alias active, click on the <b>Apply Changes</b> link at the top of the page. </li> </ol> <p> <img loading='lazy' src="https://m.unixlinux.online/article/uploadfiles/202204/2022042909475638.gif" /> <br> The aliases and redirects form</P> <p> Existing aliases can be editing by just changing the entries in the <b>Document directory aliases</b> table and then clicking <b>Save</b> . You should not change the alias for /icons in the default server though, as this is used by Apache when it generates icons for directory listings. If you want to delete an alias, just delete the contents of both its fields in the table. </P> <p> Aliases can also be created that use Perl regular expressions to match more complex URL paths. These must be entered into the <b>Regexp document directory aliases</b> table on the Aliases and Redirects form, which has the same columns as the *Document directory aliases* table described above. The difference is that any regular expression can be entered into the <b>From</b> field, such as <i>^/images/(.*)\.gif$</i> . The <b>To</b> field can taken a string that refers to bracketed sections in the expression, such as <i>/images/$1.jpg</i> . This would convert any request for a GIF file into one for the JPEG with the same name. </P> <p> Redirects are similar to aliases, but have a different purpose and work in a different way. Whenever a client requests a URL path that has been redirected, Apache will tell it to go to another URL (possibly on another server) instead. For example, you might redirect all requests to </nowiki><i>http://www.example.com/webmin/</i> </nowiki> to ''http://www.webmin.com/''. Unlike the way aliases behave, if a browser requests a page like <i>/webmin/foo.gif</i> it will not be redirected to ''http://www.webmin.com/foo.gif'' - it will just go to the URL ''http://www.webmin.com/'' instead. </P> <p> Redirects are implemented by the webserver sending the special 302 status code to the browser, which tells it to go to a new location. It is quite possible for the new URL to be a redirect itself, and you can even create a loop of redirects - not that this is a good idea. </P> <p> To set up redirection for a path on your server, the steps to follow are :</P> <ol> <li> On the module's main page, click on the icon for the virtual server that you want to create the redirect under. If you want it to apply to all virtual servers, click on the *Default Server *icon instead. </li> <li> On the virtual server options page that appears, click on the Aliases and Redirects icon to go to the page in Figure 29-6. </li> <li> In the empty row of the *URL redirects *table, enter the URL path on your server under the <b>From</b> column, such as <i>/webmin</i> . Under the <b>To</b> column, enter the URL that requests should be redirected to, such as <i>http://www.webmin.com/</i> . The <b>Status</b> field is optional, but can be filled in if you want to change the HTTP status code that will be used for this redirect. The default is 302, which indicates a temporary redirection. However, you can 301 to tell browsers that the direction is permanent, or 303 to tell them that the original content has been replaced. There will always be exactly one empty row in the table. If you need to add more than one redirect, you will need to re-visit this page after filling in the row and saving. </li> <li> Cliquez sur <b>Enregistrer</b> button to have your new redirect stored in the Apache configuration. The browser will return to the virtual server options page. </li> <li> To make the redirection active, click on the <b>Apply Changes</b> link at the top of the page. </li> </ol> <p> As with aliases, existing redirects can be edited by just changing the entries in the <b>URL redirects</b> table and then clicking <b>Save</b> . To delete a redirect, just delete the contents of all of its fields in the table. </P> <p> You can also create regular expression redirects that behave in a similar way to regexp aliases, using the <b>Regexp URL redirects</b> table on the same page. Under the <b>From</b> column you can enter a URL path expression such as <i>^/webmin/(.*)$</i> , and under the <b>To</b> column a URL that can refer to bracketed parts of the path, such as <i>http://www.webmin.com/$1</i> . In this example, an request by a client for a page under <i>/webmin</i> would be redirected to the same file at <i>www.webmin.com</i> . </P> <p> Also on the Aliases and Redirects page are two more tables labelled <b>Permanent URL redirects</b> and <b>Temporary URL redirects</b> . The first behaves exactly the same as a normal redirection, but with the status code always set to 301, indicating a permanent redirection. The second also behaves like a normal redirect, but always uses a status code of 302 (temporary redirection). This option is really quite useless, as normal redirections default to using status 302 if one is not specified. </P> <p> Redirects can also be defined in the options for directories, URL locations, filenames and .htaccess files. When editing the options for one of these (described in the *Setting per-directory options* section), the exact same icon and table are available as when setting up aliases for a virtual server. Naturally, a redirect in a directory only makes sense if the URL path being redirected actually refers to that some file or sub-directory that it contains. The same goes for redirects in URL locations - the path being redirected must start with the location's path. </P> <p> If Apache on your system has been compiled with or dynamically loads the proxy module (covered in the *Configuring Apache as a proxy server* section below), tables labelled *Map locale to remote URLs* and <b>Map remote Location:headers to local</b> will appear on the Aliases and Redirects form under the virtual server options page. These allow you to specify a URL path that when requested will cause Apache to itself request pages from another website and return them to the browser. Even though the URL that the user is accessing is on your server and their browser is connecting only to your system, the content is actually being loaded from elsewhere. </P> <p> To set up this URL mapping, the steps to follow are :</P> <ol> <li> On the module's main page, click on the icon for the virtual server that you want to create the mapping under. If you want it to apply to all virtual servers, click on the *Default Server* icon instead. </li> <li> On the virtual server options page that appears, click on the Aliases and Redirects icon to go to the page in Figure 29-6. </li> <li> In the empty row in the <b>Map locale to remote URLs</b> table, enter a URL path on your server (like <i>/webmin</i> ) into the first field, and the full URL that you want the pages to be requested from into the second (like <i>http://www.webmin.com/</i> ). </li> <li> In the empty row in the <b>Map remote Location:headers to local</b> table, enter the same full remote URL into the first field and the URL path on your server into the second. This second table controls the conversion of redirects issued by the remote server, and should almost always be set. If it is not set, whenever the remote server issues a redirect the browser will end up connecting directly to it instead of to your server. </li> <li> Cliquez sur <b>Enregistrer</b> button to have your new mapping stored in the Apache configuration. The browser will return to the virtual server options page. </li> <li> To make the mapping active, click on the <b>Apply Changes</b> link at the top of the page. </li> </ol> <p> You can test it out by going to the mapped URL path on your system, and you should see pages that have been requested from the remote server. The process is not totally transparent though, because it does not convert HTML files in any way. So if in the example above the remote server contained an HTML page with a link like <a href=/foo.html>, following it would take the browser to /foo.html on your system, not /webmin/foo.html as you might expect. There is no solution to this problem, apart from making sure that the remote server always uses relative links and image paths.</P> <h3>Running CGI programs</h3> <p> CGI stands for Common Gateway Interface, and is a standard method for webservers to run external programs, pass them details of a browser's request, and read back any content that the program generates. CGI programs are one of the simplest way of adding dynamic pages to your webserver, and are relatively easy to set up and develop. Server-side includes (covered in the next section) are even simpler, but very limited in what they can do. </P> <p> A CGI program can be written in any language as long as it follows certain rules. The most common is Perl, but C, Python, PHP or any other language that can access environment variables and produce output can be used. You can even write shell scripts that are valid CGI programs. This section is not going to explain the details of how to write them though - there are plenty of books that cover that already. </P> <p> CGI programs are just files on your system, like any other HTML or image file. The difference is that when they are requested by a browser, Apache executes them and returns their output instead of the contents of the file. Because you only want this to happen for programs and not for HTML files, the server must be configured to identify certain files as CGI programs. This is normally done in one of two ways - by putting all CGI programs into a certain directory, or by giving them all a file extension like .cgi. </P> <p> The choice is yours, but the latter option is simpler to use as you can freely mix CGI scripts, HTML and image files in the same directory. To set it up, the steps to follow are :</P> <ol> <li> On the module's main page, click on the icon for the virtual server that you want to set up CGI programs for. Or click on the *Default Server *icon if you want to use them on all servers. </li> <li> Click on the icon for the directory that you want CGI programs to be enabled under. Typically each virtual server will have an icon for options for its document root directory, but if not you can create one by following the steps in the *Setting per-directory options* section above. If you only want to allow CGI programs to be run in some sub-directory of the website, you can create a new directory icon for that as well. </li> <li> On the directory options page, click on the <b>Document Options</b> icon and change the <b>Directory options</b> field from <b>Default</b> to <b>Selected below</b> . Then set the rows <b>Execute CGI programs</b> and <b>Generate directory indexes</b> to <b>Yes</b> , and click the <b>Save</b> button at the bottom of the page. This tells Apache that CGI programs can be executed in the directory. </li> <li> Back on the directory options page, click on the MIME Types icon. In the Content handlers table, select cgi-script from the first blank menu under the <b>Handler</b> column, and enter .cgi into the field next to it under the <b>Extensions</b> colonne. Then click the <b>Save</b> button at the end of the form. This tells Apache to treat all files in the directory ending in .cgi as CGI programs. </li> <li> Finally, click the <b>Apply Changes</b> link on any page. You should now be able to create a file with a .cgi extension in the chosen directory, and test it out in a web browser. </li> </ol> <p> An alternative to this approach is to specify a directory in which all files are treated as CGI programs. This has the advantage that they can be given any name you like, instead of being forced to have a .cgi extension. You can also set permissions on this directory to restrict who is allowed to create CGI programs, while still allowing others to edit normal HTML pages. </P> <p> To set up a directory for CGI scripts, the steps to follow are :</P> <ol> <li> On the module's main page, click on the icon for the virtual server that you want to set up a CGI directory for. Or click on the *Default Server* icon if you want to set it up for all servers. </li> <li> Click on the <b>CGI Programs</b> icon to bring up a page for setting various CGI options. </li> <li> The <b>CGI directory aliases</b> table works in a very similar to the <b>Document directory aliases</b> table described in the previous section. However, in addition to mapping a URL path to a directory on your server it also tells Apache that any files accessed through that path should be treated as CGI programs. In the first empty row of the table, enter a URL path like <i>/cgi-bin/</i> into the <b>From</b> field and a directory like <i>/home/example/cgi-bin/</i> into the <b>To</b> domaine. </li> <li> Cliquez sur <b>Enregistrer</b> button at the bottom of the page to return to the virtual server options page. Then click the <b>Apply Changes</b> link to make the CGI directory active. </li> </ol> <p> You should now be able to create CGI programs in the directory, and test them out in a web browser. On some Linux distributions, the default Apache configuration will already have a CGI directory available at the URL path /cgi-bin/, mapped to a directory like /home/httpd/cgi-bin/. If this is good enough for you, there is no need to follow the steps above - instead, you can just put CGI programs in that directory. </P> <p> Normally, all CGI programs execute as the Unix user that the webserver runs as, typically named httpd or apache. On a system with multiple users who cannot be fully trusted, this is not a good thing - anything that one user's CGI program can do, everyone else's can as well. So for example if a user writes a CGI program that edits some file, he would have to make that file writeable by the httpd user, meaning that everyone else's CGI programs could write to it as well. </P> <p> Fortunately, there is a solution. Apache comes with an optional program called suexec that can be used to have CGI programs run as some other Unix user, rather than as the webserver user. Typically the CGI programs under each virtual server will be run as the Unix user who owns that server's files. To set this up, the steps to follow are :</P> <ol> <li> Make sure that the suexec program exists on your system, and that it has setuid-root permissions. Apache typically expects to find it in /usr/sbin or /usr/local/apache/sbin, and most Linux distributions include it as a standard part of their Apache package. However, some do not have it setuid by default, so you may need to run chmod 6711 /usr/sbin/suexec to make it so. </li> <li> On the main page of the module, click on the icon for the virtual server that you want to have CGI programs run as a different user on. This will take you to the options page shown in Figure 29-4. </li> <li> Click on the <b>User and Group</b> icon on the virtual server options page. </li> <li> For the <b>Run as Unix user</b> field, select <b>User name</b> and enter the name of the user who owns the virtual server into the field next to it. </li> <li> Similarly, for <b>Run as Unix group</b> select <b>Group name</b> and enter the primary group of the user specified in the previous step. </li> <li> Cliquez sur <b>Enregistrer</b> button to return to the options page for the virtual server. </li> <li> To activate suexec for the first time, you need to stop and re-start Apache. Use the <b>Stop Apache</b> link at the top of the page to halt it, and then the <b>Start Apache</b> link to start it up again. </li> <li> To check that suexec is actually working, check the Apache error log file for a line containing suEXEC mechanism enabled that was logged when the webserver was re-started. </li> </ol> <p> Because it can execute commands as any user on your system, suexec has many security restrictions to prevent misuse by normal users. It will only run CGI programs that are owned by the user and group specified in steps 4 and 5, and only if they are not writeable by any other user, or in a directory that is writeable by another user. The IDs of the user and group must be above minimums that are compiled into the program, to prevent programs owned by system users such as root or bin from being run. Finally, the program must reside under a directory that is compiled into suexec, and nowhere else on the filesystem. </P> <p> This last restriction can be very annoying if you have a large number of virtual servers and want to enable the execution of CGI programs in their directories. The default allowed directory is typically the standard CGI directory for Apache, such as /home/httpd/cgi-bin. To change this, you will need to re-compile suexec with a different directory, such as /home. </P> <p> Whenever suexec fails to run a CGI program, it fails with HTTP status code 500. Because there are many things that can go wrong, you should check the file suexec_log in the same directory as the other Apache logfiles to see why it is refusing to execute a particular program. For each failure, a line is written to this file explaining the problem, such as incorrect permissions or a file ownership mismatch. </P> <p> Writing CGI programs can be difficult because when they fail, very little information is displayed in the browser. All you see is a message like <i>500 server error</i> , which no explanation of the real cause. However, more detailed error information is written to the Apache error log file. This is usually named error_log, and can be found in the same directory as the Apache access log files. See the section below on <b>Configuring logging</b> for more details on how to find and change it. </P> <p> Anything that a CGI programs outputs to STDERR will also be written to the error log, which is useful if you want your program to generate debugging information that is not sent to the web browser. Because many programming languages like Perl output error messages on STDERR if a script fails to compile or run, all such messages will also be written to the error log file. </P> <p> The biggest problem with CGI programs is that the webserver has to launch a new process every time one is requested. If the CGI is written in Perl or PHP, the process then has to load the interpreter for that language which can itself be a large program. The end result is that processing a request for a CGI page takes much longer than a request for a static HTML or image file, and generates much more load on the server system. </P> <p> For this reason, optional modules have been developed that allow the webserver to run Perl and PHP scripts using an interpreter that is part of the Apache process. These modules are called mod_perl and mod_php, and are included in the Apache package in many Linux distributions. Installing and configuring them is not covered in this chapter though.</P> <h3>Setting up server-side includes</h3> <p> Server-side includes allow you to create simple dynamic web pages without the complexity of writing an entire CGI program in a language like Perl. When active, some of the HTML files served by Apache are checked for special tags starting with <!-- . The contents of each tag is then replaced by dynamically generated text that depends on the tag's parameters, and the resulting page sent to the web browser. </P> <p> The most common use of server-side includes is including the contents of one HTML page into another. This can be useful if you have a common header or footer that you want to share among multiple pages without repeating it over and over again. Where a special tag like <!--include file=_something.html_ --> appears in the HTML of page, it is replaced with the contents of the file <i>something.html</i> . </P> <p> Server-side includes can also be used to access and set environment variables, to conditionally display HTML based on variables and to run CGI programs or shell commands and have their output included in the page. This section will not cover the tags that are available and the purposes though - instead, you should read the documentation on the Apache website or a good book on HTML. </P> <p> Normally, allowing un-trusted users to create HTML pages containing server-side include tags is perfectly safe because they cannot be used to perform potentially dangerous operations like editing files on the server. The exception to this is the <!--#exec -->tag, which can be used to run an arbitrary shell command and have its output included in the web page. Because the command runs as the Unix user that Apache is running as (normally httpd), a user who is not allowed to create CGI programs may be able use this kind of tag to read or modify files that he would not normally be able to. For this reason, Apache can be configured to enable server-side includes with or without the risky exec tag. </P> <p> Because checking an HTML file for server-side include tags is CPU intensive, they are often only activated for files with the .shtml extension. This way you can put static HTML in .html files and dynamic content into .shtml files, so that the server does not have to waste time looking for tags in files that do not contain them. However, it is also quite possible to have all .html files checked for server-side includes if you wish. </P> <p> To turn on includes for a virtual server, the steps to follow are:</P> <ol> <li> On the module's main page, click on the icon of the virtual server that you want to enable server-side includes on. Or click on the <b>Default Server</b> icon to enable them for all virtual hosts. </li> <li> Click on the icon for the directory that you want server-side includes to be enabled under. Typically each virtual server will have an icon for options for its document root directory, but if not you can create one by following the steps in the *Setting per-directory options* section above. If you only want to enable server-side includes in some sub-directory of the website, you can create a new directory icon for that as well. </li> <li> On the directory options page, click on the <b>Document Options</b> icon and change the <b>Directory options</b> field from <b>Default</b> to <b>Selected below</b> . If you want to enable server-side includes without the exec tag, change the <b>Server-side includes</b> row to <b>Yes</b> . If you want to enable the potentially risky exec tag as well, change <b>Server-side includes and execs</b> row to <b>Yes</b> Au lieu. Either way, when they have been enabled click the <b>Save</b> button at the bottom of the page. </li> <li> Click on the <b>MIME types</b> icon on the directory options page. If you want to enable includes on all HTML files, find the *Content handlers* table to select server-parsed from the first empty menu under the <b>Handler</b> column, and enter .html into the field next to it under the <b>Extensions</b> colonne. This tells Apache that files ending in .html should be checked for server-side include tags. If you want to enable includes for only .shtml files, enter .shtml instead of .html under the <b>Extensions</b> colonne. Then in the <b>Extra MIME types</b> table enter text/plain into the first empty field under the <b>Type</b> column and .shtml into the field under <b>Extensions</b> next to it. This tells Apache that .shtml files should be checked for server-side include tags, and that they actually contain HTML. </li> <li> Finally, click the <b>Save</b> button at the bottom of the MIME Types page, and then the <b>Apply Changes</b> link back on the directory options page. </li> </ol> <p> Once server-side includes are enabled, you can test them by creating an .html or .shtml file in the chosen directory with some special tags it in. Then open the page in your web browser to see the result. If for some reason server-side includes were not enabled properly, nothing will show up at all because the <!-- tag indicates an HTML comment. However, if the tag is replaced by the message an error occurred while processing this directive then includes are active but there is an error in the tag's parameters. More details will be written to the Apache error log file (described in the previous section) if an error if this kind occurs. </P> <p> There is another method of indicating to Apache that certain HTML files should have server-side include processing performed on them. The webserver can be configured so that any .html file with the Unix execute permission set is processed for includes, by following the steps below. You can set this permission with a command like </P> <pre>chmod +x <i>file.html</i>. </pre> <ol> <li> Follow steps 1 to 3 of the instructions above to enable server-side includes for some directory. </li> <li> On the directory options page, click on the <b>CGI Programs</b> icon. </li> <li> On the page that appears, change the *Process includes on files with execute bit?* field to <b>Yes</b> . You can also set it to <b>Yes and set last-modified date</b> to have Apache read the modification time each processed HTML file and use that to set the Last-Modified HTTP header. </li> <li> Cliquez sur <b>Enregistrer</b> button at the bottom of the CGI Programs page, and then the <b>Apply Changes</b> link on any page. </li> </ol> <p> You should now be able to set execute permissions on HTML files in the directory, and Apache will parse them for server-side include tags when they are requested. This allows you to selectively turn on include processing, while avoiding the problem of having to rename a file (and break links) just because it now contains include tags.</P> <h3>Configuring logging</h3> <p> By default, every request that Apache finishes processing is written to a log file in a standard format. For each request the client IP address, website username, date, time, URL path, status code and number of bytes transferred is logged. In the default Apache configuration, there is only a single log file that is used for all virtual servers. However, you can re-configure the webserver to use different files for different virtual osts, and even to log additional information for each request. </P> <p> Apache also has a log file for recording error messages, which are generated when a browser requests a page that does not exist, when an HTTP connection is terminated, or if some other unexpected condition occurs. As the <b>Running CGI Programs</b> section explains, this log file also contains error output from CGI programs and failure messages from server-side include directives. </P> <p> To see which log files are being used by Apache on your system and to change them, follow these steps :</P> <ol> <li> On the Apache Webserver module's main page, click on the *Default Server* icon. This will bring you to the default server options page similar to the one shown earlier. </li> <li> Click on the <b>Log Files</b> icon to being up the log files configuration form shown in the screenshot below. </li> <li> The <b>Error log to</b> field controls where CGI and webserver error messages are written to. Typically the <b>File</b> option is selected and the path to a file into which error messages should be written is displayed int the field next to it. You can select the <b>System Log</b> option if you want to have messages sent to syslog instead (covered in chapter 13). All messages will use the local7 facility. The other available option is <b>Program</b> , which when selected will cause Apache to run the command entered into the field next to it and feed error log messages to it as input. This can be useful for performing your own filtering or analysis of errors as they are reported. </li> <li> The <b>Named log format</b> table lists pre-defined formats that can be used for logfiles defined in the next step. Each has as <b>Nickname *which is used to refer to it, and a *Format</b> string which specifies the fields written to the log for each request. When a log line is written, each of the % fields in the format string is replaced by some detail of the request, such as the client address, HTTP status code or virtual server name. See the online Apache documentation for more details on which % fields are available. Several standard formats such as common and combined are already defined in the default Apache configuration. To create your own log format, fill in the empty row at the bottom of the table. Each format much have a unique nickname. </li> <li> The <b>Access log files</b> table specifies the files that are used for logging actual requests processed by the Apache webserver. Multiple files can be specified, and the format of each can be selected independently from one of those explained in the previous step. All requests will be written to all listed logfiles. Each row of the table defines one logfile. Under the <b>Format</b> column you can choose the format for the file, or select the <b>Default</b> option to use the standard Apache logfile format. Under the <b>Write to</b> column you can choose if the logging is being done to a file or to the input of a program. The path to that file or program must be entered into the field in the <b>File or program</b> colonne. If you want to add an additional logfile, fill in the fields in the empty row at the bottom of the table. </li> <li> If you have made any changes to the logging configuration, click the <b>Save</b> button at the bottom of the page, then the <b>Apply Changes</b> lien. </li> </ol> <p> <img loading='lazy' src="https://m.unixlinux.online/article/uploadfiles/202204/2022042909475725.gif" /> <br> Default server log files configuration form</P> <p> Apache also allows you to define different logfiles for each virtual server, so that requests to the various virtual hosts on your system do not all get mixed up into one file. By default, all requests are written to a ingle access log file without any field that identifies the virtual server that processed them. To change this and have a virtual server write to its own separate logfile, the process is :</P> <ol> <li> On the module's main page, click on the icon of the virtual server that you want to configure a new logfile for. </li> <li> Click on the <b>Log Files</b> icon, which will take you to a page similar to the one in the screenshot above. </li> <li> If you want this virtual server to have its own separate error log file, change the <b>Error log to</b> field from <b>Default</b> à l'une des autres options. </li> <li> To add a log format that exists only for this virtual server, fill in the empty row in the <b>Named log formats</b> table. It is usually a better idea to define all log formats in the default server though, so that they can be used in any virtual host. </li> <li> Add a row to the <b>Access log files</b> table for the separate logfile for this virtual server. As soon as one is defined, requests to the virtual host will be written only to it instead of the access log list on the Log Files page under the default server. </li> <li> Lorsque vous avez terminé, cliquez sur <b>Enregistrer</b> button at the bottom of the page to have your new logfile settings written to the Apache configuration. Then back on the virtual server options page, hit the *Apply Changes* link at the top to make them active. </li> </ol> <p> If you have multiple virtual servers and want to identify which one each request was made to, another solution to change the format of the default access log file to include the virtual server hostname in each log line. To set this up, the steps are:</P> <ol> <li> On the module's main page, click on the <b>Default Server</b> icon, and then the <b>Log Files</b> icon on the default server options page. </li> <li> In the <b>Named log formats</b> table find the row for the common format and change its <b>Format</b> field so that it reads <i>%h %l %u %t "%r" %<s %b %{Host}i "%{Referer}i" "%{User-Agent}i"</i> The extra fields will tell Apache to include the virtual server hostname, referrer URL and browser name for each request on every log line. </li> <li> In the <b>Access log files</b> table, find the row for your server's main logfile, and make sure that the <b>Format</b> field is set to common, not to <b>Default</b> or some other named format. </li> <li> Cliquez sur <b>Enregistrer</b> button, and then the <b>Apply Changes</b> lien. All entries written to the logfile from now on will include the additional information.</li> </ol> <h3>Setting up custom error messages</h3> <p> When a browser attempts to access a page that does not exist, a directory that is password protected or a CGI program that is malfunctioning, Apache returns one of its built-in error messages. Because these error message pages are not always friendly or nice to look at, you can configure the webserver to use your own pages instead. This can be set up to apply to all virtual servers, a single server or just one directory. The steps to follow are:</P> <ol> <li> On the module's main page, click on either a virtual server or the <b>Default Server</b> icon if you want to define a custom error message that applies to all servers. </li> <li> If you only want the custom message to be displayed for requests to a particular directory, URL path or filename, click on its icon on the server options page. If no icon for the directory exists yet, you will need to define one by following the steps in the section on <b>Setting per-directory options</b> . </li> <li> In the directory or virtual server options page, click on the <b>Error Handling</b> icon. </li> <li> The <b>Custom error responses</b> table is where you can enter error codes and their corresponding custom messages. Any existing error messages for the directory or server will be listed, followed by a blank row. To add a new one, start by entering the HTTP error number into the <b>Error code</b> domaine. Some of the more common codes and their causes are :<ul> <li> <b>404</b> The requested page does not exist</li> <li> <b>403</b> Access to the page is denied </li> <li> <b>401</b> The browser must login first before accessing the page </li> <li> <b>500</b> A CGI program failed, or some other internal error occurred </li> <li> If you just want to change the message that Apache displays when the error occurs, select <b>Show message</b> under the <b>Response</b> column and enter the text of your new message into the field under <b>URL or message</b> . On the other hand, if you want the contents of another page to be displayed instead, select <b>Goto URL</b> and enter either a URL page (like <i>/errors/500.html</i> ) or full URL (like <i>http://www.error.com/505.html</i> ) into the <b>URL or message</b> domaine. In the latter case, the browser will be re-directed to the URL when an error with the chosen code occurs. </li> </ul> </li> <li> Cliquez sur <b>Enregistrer</b> button at the bottom of the page. If you want to add another custom error message, click on the <b>Error Handing</b> icon again and fill in the new blank row in the table. </li> <li> Click the <b>Apply Changes</b> button on any page to make the new custom error message active. </li> </ol> <p> Some web browsers, such as IE in its default configuration, will not display the text of error messages sent by the webserver. Instead, only the error code number and a more friendly message generated by the browser is displayed.</P> <h3>Adding and editing MIME types</h3> <p> MIME types are the method used by Apache, mail clients and many other programs to indicate the type of files and other date. A MIME type consists of two words separated by a slash, such as text/html, image/gif or video/mpeg. As those examples show, the first word is the general category of type, while the second is the actual type name. </P> <p> Every response sent by a webserver to a browser is accompanied by a type, so that the browser knows how to display it. When a normal file is requested, the webserver typically works out the type by looking at the file's extension, such as .gif or .html. CGI programs must supply their type to the webserver before any other content that they output, which is then forwarded on to the browser. This allows a CGI program to output HTML, plain text, images or any other kind of data, regardless of the filename of the CGI script itself. </P> <p> Browsers never attempt to work out the type of a page by looking at the filename extension in the URL - instead, they always rely on the MIME type sent by the webserver. Apache gets its global list of MIME types and the extensions that they are associated with from a configuration file that applies to all virtual servers. To edit and add to this list of types, the steps to follow are :</P> <ol> <li> On the module's main page, click on the <b>MIME Types</b> icon in the Global Configuration section. This will bring you to a page listing all the types that Apache currently knows about, along with the filename extensions. Almost every type that you would ever need to use should already be listed. </li> <li> To create a new type, click on the <b>Add a new MIME type</b> link above or below the list. </li> <li> In the *MIME type *field of the form that appears, enter the type name such as <i>text/foo</i> . It is acceptable for the same type to be defined twice, as long as each entry has different associated filename extensions. </li> <li> In the <b>Extensions</b> text box, enter all the filename extensions what you want associated with this type, such as <i>.foo</i> and <i>.fo</i> . Make sure that no other MIME types are using the same extensions. </li> <li> Cliquez sur <b>Enregistrer</b> button below the form. The browser will return to the types list, which will include your new entry. </li> <li> Click the <b>Apply Changes</b> link on any page to make the new type active. </li> </ol> <p> You can edit or delete an existing global MIME type by clicking on its name in the list, which will bring up the type editing form. Either change the <b>MIME type</b> or <b>Extensions</b> fields and click <b>Save</b> , or hit the <b>Delete</b> button to totally remove it. Either way, afterwards you must use the <b>Apply Changes</b> link to make the changes active. </P> <p> MIME types can also be defined on a per-virtual server or per-directory level in the Apache configuration. This can be useful if you want to override a type for some extension in a particular directory, or create a type that is only needed by one virtual server. To do this, follow these steps :</P> <ol> <li> On the module's main page, click on the icon for the virtual server that you want to define the MIME type for. </li> <li> If you only want the type to be used for requests to a particular directory, URL path or filename, click on its icon on the server options page. If no icon for the directory exists yet, you will need to define one by following the steps in the section on <b>Setting per-directory options</b> . </li> <li> In the directory or virtual server options page, click on the <b>MIME Types</b> icon. </li> <li> The <b>Extra MIME types</b> table is for entering types that apply only to this virtual server or directory. In the first blank field under the <b>Type</b> column, enter a type like <i>text/foo</i> . In the field next to it under <b>Extensions</b> , enter one or more filename extensions like <i>.foo</i> . </li> <li> Cliquez sur <b>Enregistrer</b> button at the bottom of the page. If you want to add more than one type, you will need to click on the *MIME Types* icon again so that a new blank field appears in the table. </li> <li> When you are done, use the <b>Apply Changes</b> link at the top of any page to make the new type mapping active. </li> </ol> <p> On the MIME Types page, there is a useful field labelled *Default MIME type*. If set, any files that Apache cannot identify the type for will be treated as whatever is entered into this field instead. Normally, this is set at the default server level to text/plain, but you may want to change it to something else for a particular directory that contains lots of files that have no filename extension. </P> <p> There is a similar field on the MIME Types page for directories, URL paths and filenames labelled <b>Treat all files as MIME type</b> . When it is set, Apache will identify all files in that directory as the specified type, no matter what their extension. This can be used to forcibly set the types of files that have names that do not follow the normal convention of ending with a type extension.</P> <h3>Password protecting a directory</h3> <p> The HTTP protocol has a standard method of indicating that a directory or site requires a username and password to be supplied before it can be accessed. Apache can be configured to force users to login before being able to view some or all of the pages on your system. Logins are typically checked against a separate password file, instead of the Unix user list. </P> <p> Password protection can be useful for securing a directory that only some people should be allowed to access, or for setting up a website that uses CGI programs to display different content to different users. To protect a directory, the steps to follow are :</P> <ol> <li> On the module's main page, click on the icon for the virtual server that you want password protection to be enabled under. </li> <li> Click on the icon for the directory, URL location or filename that you want to protect. If one does not exist yet, follow the steps in the <b>Setting per-directory options</b> section earlier in this chapter to create it. </li> <li> Click on the <b>Access Control</b> icon, which will bring you to the page shown in the screenshot below. </li> <li> In the <b>Authentication realm name</b> field, de-select <b>Default</b> and enter a description for the protected directory, such as <i>Private files</i> . This will be displayed to the user in the browser when he tries to login. </li> <li> Change the <b>Authentication type</b> to <b>Basic</b> . The <b>Digest</b> type is more secure, but is not supported by a lot of browsers. </li> <li> Change the <b>Restrict access by login</b> field to *All valid users*. This tells Apache that any of the users in the password file set in step 7 will be allowed to login. You can restrict access to only a subset of users by selecting the *Only these users* option and entering their names of users to allow into the text field next to it. Alternatively you can select *Only these groups* and enter the names of groups whose members you want to allow into its field. These options can be useful if the same authentication files are entered on this page for several directories. </li> <li> In the <b>Text file authentication</b> box, enter the full path to the file that you want to use to store usernames and passwords into the text field next to <b>User text file</b> . This authentication file must contain one line per user, each in the format <i>username</i> :_encrypted-password_. Standard Unix encryption is used for the passwords, just like in the /etc/shadow file. The file doesn't necessarily have to exist yet, as it will be created when the follow the instructions in the later steps to add users. It should not be under of your webserver's document root directories though, as this might allow an attacker to download it, crack the passwords and login to your website. </li> <li> If you want to categorize users into groups for further restriction as explained in step 6, enter the full path to a group file into the <b>Group text file</b> domaine. This file must contain one line per group, in the format <i>groupname</i> :_ username1 username2 etc_. The file does not have to already exist, because it will be created when you add groups in the later steps. If you just want to set up simple username and password authentication, then this step is unnecessary. </li> <li> Cliquez sur <b>Enregistrer</b> button at the bottom of the page, and you will be returned to the directory options page again. </li> <li> If the user and group files already exist or if you are planning to edit them manually, you can skip to step 21. Otherwise, click on the <b>Access Control</b> icon again to re-display the form. </li> <li> Click on the <b>Edit users</b> link next to the <b>User text file</b> domaine. This will bring up a page listing all webserver users currently listed in the file, if any. </li> <li> To create a new user, click on the <b>Add a new user</b> link above or below the list. </li> <li> On the user creation form, enter a login name into the <b>Username</b> domaine. </li> <li> In the <b>Password</b> field, select the <b>Plain text</b> option and enter the user's password into the field next to it. </li> <li> Cliquez sur <b>Enregistrer</b> button to have the user added and the list of users re-displayed. You can edit an existing user by clicking on its name in the list, changing its details and hitting the <b>Save</b> bouton. To remove a user, click the <b>Delete</b> button on the user editing form instead. </li> <li> When you are done creating users, use the *Return to access control* link to go back to the Access Control form. </li> <li> If you are using a group file as well, click on the <b>Edit groups</b> link next to the <b>Group text file</b> field to bring up a list of existing groups and their members. </li> <li> To create a new group, click on the <b>Add a new group</b> link and fill in the <b>Group name</b> and <b>Members</b> fields on the creation form that appears, then click <b>Save</b> . Members must be entered as a space-separated list of usernames. </li> <li> Existing groups can be edited and deleted by clicking on their names in the list, just like users can. </li> <li> When you are done creating groups, follow the *Return to access control* link to go back to the Access Control form. </li> <li> Finally, click on the <b>Apply Changes</b> link on any page to activate password protection for the directory. You can test it out by trying to visit the protected page and logging in as one of the users that you created. </li> <li> You can add an edit users and groups in future by editing the text files directly, or by following the relevant steps above. There is no need to use the <b>Apply Changes</b> link after changing the user or group lists though, as Apache re-reads the files on every request. </li> </ol> <p> <img loading='lazy' src="https://m.unixlinux.online/article/uploadfiles/202204/2022042909475932.gif" /> <br> The access control form</P> <p> The instructions above explain how to create text files for storing users and groups, but if your website is going to have a very large number of users text files are not the best way to store them. Because Apache re-reads the user file on every request, the large it gets the longer it will take for the webserver to lookup a user and generate a response. When editing or deleting a user, the entire file must be read in and written out again by the program that is changing it, which can take some time if the file is large. This increases the chance of file corruption if more than one process attempts to manipulate the same user file at the same time. </P> <p> The solution is to use DBM files for storing users and groups instead. These are binary format database files that are indexed by a key (such as the username), and can be safely edited in-place. Their only down-side is that they cannot be viewed or changed by Unix programs that deal with plain text, like cat and vi. </P> <p> The process of setting up authentication from DBM files is almost identical to the steps above. The only difference is that the user and group filenames must be entered into the <b>User DBM file</b> and <b>Group DBM file</b> fields in the <b>DBM file authentication</b> boîte. The <b>User text file</b> and <b>Group text file</b> fields must be left set to <b>Default</b> . Unfortunately, Webmin does not allow you to edit users or groups in DBM files as you can with text files. Instead, you will need to write a Perl script or use a program like makemap to create them at the command line. </P> <p> Apache user and password files are totally separate from the system's Unix user list. However, this module can be configured to add, update or remove a user in a password file when a user with the same name is created, dited or deleted in the Users and Groups module. This is done using that module's synchronization feature.</P> <p> Synchronization can be useful if you want to grant access to some web directory to some of the Unix users on your system, and want their usernames and passwords to remain in sync if they are ever changed/. To set up synchronization between an Apache text authentication file and Unix users managed by the Users and Groups module, the steps to follow are :</P> <ol> <li> On the module's main page, click on the icon for the virtual server that the protected directory is under, then on the icon for the directory. </li> <li> Click on the <b>Access Control</b> icon, then on the *Edit users link* next to the <b>User text file</b> domaine. </li> <li> Below the list of users is a form for setting up synchronization for this users file. The checkboxes labelled *Add a user when a Unix user is added*, <b>Change the user when a Unix user is changed</b> and <b>Delete the user when a Unix user is deleted</b> are fairly self-explanatory. Typically you would select all three, or maybe just the last two if you want to add new users to this file manually. </li> <li> After selecting the options that you want, click the <b>Save</b> bouton. Any changes made in the Users and Groups module from now on will cause this user list to be updated as well. </li> </ol> <p> Each Apache users text file has its own separate synchronization options. Because they are associated with the name of the file, if it is renamed the options will be reset to their defaults. Only changes made in Webmin's Users and Groups or Change Passwords modules will be synchronized with the Apache users file - if a user changes his password with the command-line passwd program, his web password will not be changed to match. </P> <p> If you want to turn off authentication for a directory so that any browser can access it, there is no need to delete the entire directory configuration icon. Instead, you can just follow these steps :</P> <ol> <li> On the module's main page, click on the icon for the virtual server that the protected directory is under, then on the icon for the directory. </li> <li> Click on the <b>Access Control</b> icon to go to the page shown in the screenshot above. </li> <li> Change the <b>Authentication realm name</b> , *Authentication type*, <b>Restrict access by login</b> , <b>User text file</b> and *Group text file* fields all back to <b>Default</b> . If you are using DBM files instead of text, change the <b>User DBM file</b> and *Group DBM file* fields to <b>Default</b> aussi bien. </li> <li> Cliquez sur <b>Enregistrer</b> button, and then the <b>Apply Changes</b> link back on the directory options page.</li> </ol> <h3>Restricting access by client address</h3> <p> Apache can also be configured to limit access to a directory, URL location or filename to certain client systems. The webserver knows the IP address of every browser that connects to it, and can use that address to determine whether the browser is allowed to request certain pages or not. In some situations, the client's real IP address will not be available to the webserver. If the client is accessing the web through a proxy server or a firewall doing NAT, then the IP address that the request appears to come from will be that of the proxy or firewall system. There is way to get the real address, but generally it is not a problem because all clients behind the proxy or firewall are usually treated the same from an access control point of view. </P> <p> Apache determines whether a client is allowed access or not by checking its IP address and hostname against a list of rules. There are two types of rule - those that allow access, and those that deny it. Depending on its configuration, the webserver will either check all of the allow rules before the deny rules, or vice-versa. The first one to match determines if the client is denied or not, and no further rules are checked. </P> <p> Most people who set up IP access control want to allow access from certain addresses and networks, and deny everyone else. For example, you might want to give hosts on your company LAN access to your intranet, but prevent others on the Internet from accessing it. To set up this kind of access control, the steps to follow are:</P> <ol> <li> On the module's main page, click on the icon for the virtual server that you want IP access control to be enabled under. </li> <li> Click on the icon for the directory, URL location or filename that you want to restrict access to. If one does not exist yet, follow the steps in the <b>Setting per-directory options</b> section earlier in this chapter to create it. </li> <li> Click on the <b>Access Control</b> icon, which will bring you to the page shown above. </li> <li> Scroll down to the <b>Restrict access</b> table, and change the <b>Access checking order</b> field to <b>Allow then deny</b> . This tells Apache that any request which is not specifically allowed by access control rules should be denied, and that all rules that allow access should be checked before rules that deny. If the alternative <b>Deny then allow</b> option is chosen, requests that do not match any rule will be allowed, and deny rules will be checked before allow rules. The <b>Mutual failure</b> option has the same effect as <b>Allow then deny</b> , and should not be used. </li> <li> At first, this table will contain only one empty row for entering your first access control rule. Because you are going to allow only certain clients and block the rest, select <b>Allow</b> from the menu in the <b>Action</b> colonne. The menu and field under the <b>Condition</b> column determine what kind of check is done to see if the client is allowed or not. The available condition types are :<ul> <li> <b>All requests</b> If chosen, all client requests will have the selected action performed.</li> <li> <b>Request from host</b> If chosen, only clients whose hostname is the same as or ends with the text entered into the field next to it will have the action performed. Apache gets the hostname by performing a reverse DNS lookup on the client's IP address, which may not always work.</li> <li> <b>Request from IP</b> If the client's IP address is the exactly same as the one entered into the field next to the menu, the selected action will be performed.</li> <li> <b>Request from partial IP</b> If chosen, clients whose IP addresses start with the partial IP entered into the field next to the menu will have the selected action performed. For example, you could enter <i>192.168</i> to match all clients on that network. </li> <li> <b>Request from net/netmask</b> If the client's IP address is within the network specified by the network address and netmask entered, the selected action will be performed. An example network specification would be <i>192.168.1.0/255.255.255.0</i> . </li> <li> <b>Request from net/CIDR</b> If the client's IP address is within the network specified by the network address and prefix bits entered, the selected action will be performed. <i>192.168.1.128/25</i> is an example of this kind of network specification.</li> <li> <b>If variable is set</b> If this option is chose, the selected action will only be performed if the environment variable whose name is entered into the adjacent field is set. Apache provides several ways to set variables based on request headers and browser types and are too complex to cover here. </li> </ul> </li> <li> Cliquez sur <b>Enregistrer</b> button at the bottom of the form, and if there are no errors in your selections you will be returned to the directory options page. To allow more than on client IP address or network, click on the Access Control icon again and fill another next blank row in the <b>Restrict access</b> table. You can build up complex access control rulesets by adding many allow and deny rules. </li> <li> When you are totally done, use the <b>Apply Changes</b> link on any page to make the restrictions active. </li> </ol> <p> It is possible to combine both IP address restrictions and username/password access control for the same directory. This can be done in two ways - either clients are checked for any IP restrictions and then forced to enter a password, or they are only prompted for a password if they do not pass the IP restrictions. </P> <p> The mode that Apache uses is determined by the <b>Clients must satisfy</b> field on the Access Control form. If you set it to <b>All access controls</b> then they must pass both password and IP checks. However, if *Any access control* is selected then a password will only be prompted for if the IP checks fail. This can be useful for granting access to a directory to everyone on your internal network, and to people on the Internet who have a valid username and password.</P> <h3>Encodings, character sets and languages</h3> <p> As the <b>Adding and editing MIME types</b> section explains, Apache attempts to determine a MIME type for every file that it sends to a browser. In addition to the type, files can also have an encoding that is usually used to indicate how they were compressed. The encoding is determined by the file extension (such .gz for gzipped data), and can be used by the browser to uncompress the file before displaying it. </P> <p> For example, this would allow you to create a file called foo.html.gz which contains compressed HTML data and is identified by the webserver as such. For large files, sending them in compressed format can save bandwidth and reduce the time it takes for them to be downloaded. Unfortunately, not all browsers support the common .gz and .Z encoding formats, so this feature is not always useful. At the time of writing, Mozilla and Netscape supported compressed encoding, but IE did not. </P> <p> Encodings can be defined globally, on a per-virtual server basis, or just for a single directory or URL location. They are usually defined globally though, and can be viewed and edited by following these steps :</P> <ol> <li> On the Apache Webserver module's main page, click on the *Default Server* icon. </li> <li> Click on the <b>MIME Types</b> icon, and scroll down to the *Content encodings* table. Each row in the table defines two encodings, and there is always at least one pair of empty fields for adding a new one. Typically entries for the x-compress and x-gzip encodings will already exist, as they are included in the default Apache configuration. </li> <li> To add a new encoding, enter its name into the first empty field under the <b>Content encoding</b> colonne. In the field next to it, enter a space-separated list of filename extensions that are used by files encoded in that format. </li> <li> To change the name or extensions for an existing encoding, just edit its fields in the table. For example, you can add extra extensions for an encoding by just entering them into same field as existing ones. </li> <li> If you want to delete an encoding, just clear its entries in the fields under the <b>Content encoding</b> and <b>Extensions</b> fields. </li> <li> When you are done editing encodings, click the <b>Save</b> button at the bottom of the page, and then the <b>Apply Changes</b> lien. </li> </ol> <p> Apache takes all filename extensions into account when determining a file's MIME type, encoding, language and character set, and does not care about their order. This means that a files named foo.html.gz and foo.gz.html are both identified as containing gzip compressed HTML data. </P> <p> Another piece of information that Apache can supply to browsers requesting a file is the character set used by text in the file. If all your web pages are in English or a language like Malay that does not use any non-English letters, then you don't need to care about this. However, if you are creating HTML pages in a different language that uses characters outside the standard ASCII character set then it is useful and often necessary to indicate to browsers what character set each page is in. </P> <p> Languages like German and French use special characters like and Russian have so many characters that each must be represented by two bytes, using special character sets like Big5 and KOI8. For these languages, it is vital that the browser be informed of the character set of each page so that it can decode the text that it contains and use the correct font to display characters. </P> <p> As with encodings, Apache determines the character set of each file by looking at its filename extension. So for example a file named foo.html.Big5 would be identified as HTML in which the text was encoded in the Chinese Big5 format. A file can have both a character set and an encoding, such as foo.html.Big5.gz, and the order that its extensions are in does not matter. </P> <p> Character sets can be defined globally or for individual virtual servers and directories. To view and edit the global list of character sets, follow these steps:</P> <ol> <li> On the Apache Webserver module's main page, click on the *Default Server* icon. </li> <li> Click on the <b>Languages</b> icon, and scroll down to the *Extra character sets *table. Each row in the table defines two character sets, and there is always at least one pair of empty fields for adding a new one. In the default Apache configuration several commonly used character sets are already defined. </li> <li> If you need to add a new character set, enter its standard ISO name into the first empty field under the <b>Charset</b> column, and the filename extensions associated with it into the adjacent field under <b>Extensions</b> . Many common character sets are defined by default, so you may just be able to use one of the existing recognized extensions for your files. Multiple extensions must be separated by spaces. </li> <li> You can change the name or extensions for existing characters sets by just editing the fields in the table. It is not usually a good idea to rename the default sets, because they use the standard names that are recognized by browsers. Adding extensions is perfectly safe though. </li> <li> To delete a character set, just clear out the fields containing its name and any associated extensions. </li> <li> When you are done editing, click the <b>Save</b> bouton. If you used up all the blank fields in the Extra character sets table and want to add more, click on the <b>Languages</b> icon again. Otherwise, use the <b>Apply Changes</b> link to make your changes active. </li> </ol> <p> Because most of the commonly used character sets are defined by default in the Apache configuration, it is not usually necessary to add new ones. Instead, you can just find the associated extensions and use them on your filenames. </P> <p> Apache can also identify the language that an HTML or text file is written in by looking at its filename extensions. At first it may seem that there is no difference between a file's language and its encoding, but that is not always the case. For example, the ISO-8859-2 character set is used for many different European languages, and the Chinese language can be represented by both the Big5 and GB character sets. </P> <p> Unfortunately, few browsers actually make any use of the language that a file is written in. However, some can be configured to request pages in a language chosen by the user, and Apache can be set up to use this information to identify the correct file to return. This happens when the <b>Generate Multiviews</b> option is turned on for a directory, in the Directory Options page. </P> <p> When that option is active, a request for a page like /documents/foo which does not actually exist will cause Apache to scan the directory for /documents for all files starting with foo, identify their types and languages, and return the one that best matches the client's specified language. This is useful if you want to be able to have multiple versions of the same page in different languages, but have them all accessible via the same URL. </P> <p> To view and edit the languages and file extensions recognized by Apache, the steps to follow are:</P> <ol> <li> On the Apache Webserver module's main page, click on the *Default Server* icon. </li> <li> Click on the <b>Languages</b> icon, and find the *Content languages *table. Each row in the table defines two languages, and there is always at least one pair of empty fields for adding a new one. The default Apache configuration contains several commonly used languages. </li> <li> To add a new language, enter its ISO code into the first empty field under the <b>Language</b> column, and a list of extensions separated by spaces for files in that language under the <b>Extensions</b> colonne. </li> <li> Existing languages can be editing by just changing their codes and extensions in the table, or deleted by clearing out their fields. It is wise not to change the standard codes for existing default languages. </li> <li> When you are done editing languages, click the Save button at the bottom of the page. If you ran out of blank fields when adding new ones, click on the Languages icon again to return to the table. Otherwise, use the <b>Apply Changes</b> link to activate your new settings. </li> </ol> <p> As with encodings and character sets, Apache does not care about the ordering of extensions in a filename when working out its type and language. So both the files foo.html.de and foo.de.html would be identified as HTML documents written in German.</P> <h3>Editing .htaccess files</h3> <p> As explained in the introduction, Apache options can be set for a directory by creating a file named .htaccess in the directory. These are often created by normal users who do not have permissions to edit the master webserver configuration file, and want to change the way Apache behaves when accessing their directories. .htaccess files can be used to set almost all of the options that you can configure on a per-directory basis, as explains in other sections of this chapter. </P> <p> The options in one of these files apply to all the files in its directory and in any subdirectories. However, they can be overridden by another such file lower down in the directory tree. Per-directory options in the main Apache configuration will be overridden by those in a .htaccess file for the same directory, but directory options for a subdirectory will override those in a parent .htaccess file! </P> <p> Webmin can be used to create and edit .htaccess files as well. If some already exist on your system that were created manually, they must be discovered by Webmin first before you can use it to edit them. To have it search for existing files on your system, the steps to follow are:</P> <ol> <li> On the module's main page, click on the *Per-Directory Options Files* icon. This is what Webmin calls .htaccess files. </li> <li> On the page that appears, there is a button labelled *Find Options Files* with two options next to it. If <b>Automatically</b> is selected, Webmin will look in the document root directory of each virtual server for options files. If <b>From directory</b> is chosen, you can enter a directory that will be searched instead. The latter option is useful if the websites on your system have some pages that are outside of the document roots due to the user of aliases or user web directories. </li> <li> Click the button to have the module search the select directories and any under them. The same page will be re-displayed, but with a table of all .htaccess files at the top, assuming some were found. </li> </ol> <p> To edit the options set in a file, just click on its path from the Per-Directory Options Files list. This will bring up a page similar to the directory options page shown in Figure 29-5. You can click on the icons to edit redirects, username and password access control, IP address restrictions, MIME types and custom error messages. The instructions in previous sections that apply to directories can be followed here as well - the only difference is that you do not have to use the Apply Changes link after making changes, as Apache always re-reads the .htaccess files that it encounters on every request. </P> <p> You can also create a new .htaccess file by entering the path to the directory that it should be created in into the field next to the <b>Create Options File</b> bouton. When the button is clicked, the file will be created empty and have its ownership set to the user and group configured on the User and Group page of the default server. It will be added to Webmin's list of known options files, and your browser will be redirected to the options file for the page. </P> <p> To delete an per-directory options file, click on the *Delete File* link that appears at the top of the page that appears when you click on its name from the list. As soon as it is removed, Apache will cease using any options that it defines in it for the directory it was in. </P> <p> The <b>Setting Per-Directory Options</b> section earlier in this chapter explains how to set options that apply only to files of a particular name, no matter which directory they are in. It is also possible for a .htaccess file to contain options that apply to only some of the files in the directory that contains it. This can be useful to do things like denying access to all files matching the pattern *.c in the directory /usr/local/src, which you cannot do just using per-directory or per-file options. </P> <p> To set options like this, the steps to follow are:</P> <ol> <li> On the module's main page, click on the *Per-Directory Options Files* icon. Then click on the .htaccess file in the directory that you want the options to apply to. If it doesn't exist yet, use the <b>Create Options File</b> button to create it as explained above. </li> <li> Scroll down to the <b>Create Per-File Options</b> form, and enter the filename or pattern into the <b>Path</b> domaine. Patterns can only use shell wildcard characters like * and ?, unless you change the <b>Regexp?</b> field to <b>Match regexp</b> , in which case you can enter a Perl regular expression using characters like <code>||, [, ]</code> and <code>+</code> .</li> <li> When you click the <b>Create</b> button, the same page will be re-displayed but with an additional icon for the filename or name pattern that you just entered. </li> <li> Click on the new icon, which will bring up another page of icons for different categories of options that can be applied to files whose names match the specified filename or pattern. This page is very similar to the directory options page shown in above, and the pages that it links to are mostly identical. </li> <li> The instructions in other sections of this chapter for creating redirects, custom error messages or IP access control can be followed on this page as well to set the same options for matching files in the directory. The only difference is that there is no need to click on the <b>Apply Changes</b> link to made new settings active. </li> </ol> <p> You can change the filename or pattern that the options are for by editing the <b>Path</b> field in the <b>Options apply to</b> form, and then clicking Save. Or you can remove them altogether so that the options for the directory apply instead by clicking on the <b>Delete</b> button in the same form. </P> <p> On a system that has many virtual websites run by un-trusted users, you may want to restrict the directives that those users are allowed to enter into .htaccess files. This can also be useful if you have user web directories enabled, explained in the next section. It is possible for a user to enable CGI scripts for his directory by putting the right directives into an options file, which could pose a security risk on your server. </P> <p> You can restrict the directives that can be used in .htaccess files on a per-directory basis. To do this, the steps to follow are:</P> <ol> <li> On the main page of the Apache Webserver module, click on the icon for the virtual server that the directory is under. </li> <li> Click on the icon for the directory that you want to restrict .htaccess files in, or if one does not exist yet follow the instructions in the <b>Setting Per-Directory options</b> section to create it. </li> <li> Click on the <b>Document Options</b> icon. </li> <li> In the <b>Options file can override</b> field, select the *Selected below* radio button. The de-select those categories of directives in the table below that you don't want users to be able to include in .htaccess files. The available categories are :*Authentication options *De-select this option to prevent the use of directives related to password authentication. *MIME types and encodings *De-select this option to prevent the setting of MIME types, character sets, encodings and languages for files. This will also stop files with certainly extensions being indicated to be CGI programs. *Indexing and index files *This option controls the use of directives for directory indexing. *Hostname access control *De-select this option to stop the use of IP access control directives. *Directory options *This option controls the use of directives that set options for the directory, such as whether indexing is done and if CGI programs are enabled. </li> <li> Cliquez sur <b>Enregistrer</b> button, and then the <b>Apply Changes</b> lien. </li> </ol> <p> Whenever a user tries to use directives that he is not allowed to, Apache will display an error message when files in the directory containing the .htaccess file are requested. It will not simply ignore the disallowed directives.</P> <h3>Setting up user web directories</h3> <p> On a system with many Unix users, you may want to allow each user to create his own set of web pages. Instead of creating a subdirectory for each user under some document root directory, you can instead designate a subdirectory in each user's home directory as a location for web page files. Typically this subdirectory is called public_html, and its contents are made available at a URL like http://www.example.com/~_username_/. </P> <p> The special <i>~username</i> path in the URL is converted by Apache to a directory under the home of the user <i>username</i> , no matter what document root directory is being used for the rest of the files on the website. It is also possible for files in the user's actual home directory to be made available instead, so that ~username actually maps to the user's home directory and not a subdirectory. However, this is a bad idea as it makes all of the user's files available to anyone with access to the website. </P> <p> To turn on Apache's user web directories feature so that <i>~username</i> URL paths can be used, the steps to follow are:</P> <ol> <li> On the module's main page, click on the icon for the virtual server that you want to activate user directories for. To activate them for all virtual servers, click on the *Default Server* icon instead. </li> <li> Click on the <b>Document Options</b> icon. # In the <b>User WWW directory</b> field, de-select the <b>Default</b> option and enter public_html into the field next to it. Or if you want a different subdirectory to be used for users' web pages, enter its name instead. To make users' entire home directories available via <i>~username</i> URL paths, enter . into the field. On many systems, this option will already be set to public_html in the default Apache configuration, meaning that user web directories are already enabled. </li> <li> If the <b>All users accessible</b> option is selected, Apache will allow the pages in any user's web directory to be accessed. To configure the webserver to only allow access to the pages belonging to certain users, select the <b>Only users</b> option and enter the names (separated by spaces) into the field next to it. This can be useful if there is a small fixed list of Unix users who should be allowed to publish web pages. To block only a few users' web pages and allow the rest, select the *All users except* option and enter the names of the blocked users into its field. This is useful for protecting files belonging to important system users such as root. </li> <li> Cliquez sur <b>Enregistrer</b> button at the bottom of the page, then use the <b>Apply Changes</b> link to activate the new settings. Try creating a public_html subdirectory in the home directory of a user, putting some HTML files in it and seeing if they can be accessed using the ~username/filename.html URL path.. </li> <li> It is also possible to have <i>~username</i> URL paths mapping to directories outside users' home directories by entering values starting with / into the <b>User WWW directory</b> domaine. For example, if you were to enter <i>/www</i> and a browser requested <i>~jcameron/foo.html</i> , then the file returned by Apache would be /www/jcameron/foo.html. If you entered <i>/home/*/public_html</i> , then the file returned would be /home/jcameron/public_html/foo.html, even if the user jcameron did not have his home directory at /home/jcameron. As that example shows, any occurrence of a _*_ in the user web directory is replaced by the username. </li> </ol> <p> Similarly, you can enter a URL into the directory field, which will be used by Apache to generate a URL to re-direct browsers to when a user web directory is requested. For example, if you enter <i>http://home.example.com/users/</i> and the URL path <i>~jcameron/foo.html</i> is requested by a browser, it will be re-directed to http://home.example.com/users/jcameron/foo.html instead. This is useful if you want to move user web directory hosting to a separate server, while allowing URLs on your main server to be used to access them. </P> <p> Even though the above are sufficient to enable user web directories, there are some other things that you might want to do. As the *Editing .htaccess files* section above explains, you may want to limit the kinds of directives that users can put in their .htaccess files so that they cannot execute CGI programs or use server-side includes. You can also change the default directory indexing and document options that apply to user web directories. The steps to do both of these are:</P> <ol> <li> On the module's main page, click on the icon for the virtual server that user web directories were enabled in, or the default server. </li> <li> Assuming all your users have their home directories under /home and the web subdirectory is named public_html, enter <i>/home/*/public_html</i> into the Path field of the Create Per-Directory, Files or Location Options form at the bottom of the page. </li> <li> Leave the <b>Type</b> field set to <b>Directory</b> , and the <b>Regexp?</b> field to <b>Exact match</b> . </li> <li> Cliquez sur <b>Créer</b> button to create a new set of options that will apply to users' web directories, then on its newly created icon. This will bring up the document options page shown in a screenshot earlier on this page. </li> <li> Click on the <b>Document Options</b> icon. </li> <li> Change the <b>Directory options</b> field to <b>Selected below</b> , and set to Yes those options that you want to apply to user web directories. It is advisable to turn on *Generate directory indexes* and safe to enable <b>Server-side includes</b> , but not <b>Execute CGI programs</b> or *Server-side includes and execs*. The <b>Follow symbolic links</b> option is relatively safe to turn on as well, but will allow users to make available via the web files that are not in their public_html subdirectory by creating links to them. </li> <li> To prevent users overriding these settings in .htaccess files, change the <b>Options file can override</b> field to *Selected below* and de-select the <b>MIME types and encodings</b> and *Directory options* checkboxes. The others control options that present no security risk, and so can be safely left selected. </li> <li> Cliquez sur <b>Enregistrer</b> button and then the <b>Apply Changes</b> link to save and activate the restrictions. </li> <li> If you want to turn on server-side includes, set some custom MIME types or IP access controls for user web directories, you can do it by following the instructions in the appropriate sections for this directory. Because server-side includes are quite harmless with the ability to execute external programs disabled, they can be safely enabled for users by setting the right content handler for .html or .shtml files as the <b>Setting up server-side includes</b> section explains.</li> </ol> <h3>Configuring Apache as a proxy server</h3> <p> An HTTP proxy is a server that accepts requests for web pages from browsers, retrieves the requested pages from their servers and returns them to the browser. They are often used on networks on which clients are not allowed to connect to webservers directly, so that restrictions on who can access the web and what sites they can view can be enforced. A proxy can also cache commonly accessed pages, so that if many clients visit the same site its pages only have to be downloaded once. This speeds up web access and reduces bandwidth utilization. </P> <p> Apache is not the best proxy server available for Unix systems - Squid Proxy Server takes that honour. Squid has many more configurable options, is more efficient and can deal with much larger caches. However, if you want to set up a proxy on a system that is already running Apache, then it may make sense to use the existing webserver as a proxy instead of installing and running a separate server process for Squid. </P> <p> Apache's proxy support is only available if the mod_proxy module has been compiled into the webserver or is available to be dynamically loaded. You can see if the module is available by clicking on the <b>Re-Configure Known Modules</b> icon on the main page. If <b>mod_proxy</b> is checked, then your server can be used as a proxy. If so, you can skip the next paragraph which deals with loading the proxy module. </P> <p> On some Linux distributions, the proxy module is included with the Apache package but not loaded by default. If this is the case on your system, you can enable it by following these steps:</P> <ol> <li> On the Apache Webserver module's main page, click on the *Edit Config Files* icon. This will bring up a page showing the contents of the primary configuration file, called httpd.conf. </li> <li> Look for a line starting with LoadModule proxy_module which is currently commented out with a # at the start. If no such line exists, then the proxy module is probably not installed at all and so cannot be used. </li> <li> Delete the # at the start of the line, and then click the <b>Save</b> button at the bottom of the page. </li> <li> Click the <b>Stop Apache</b> link on any page to shut down Apache, and then the <b>Start Apache</b> link to start it again. This is necessary for the webserver to load the enabled proxy module. </li> <li> On the module's main page, click on the *Re-Configure Known Modules* icon, and then on the Save button at the bottom of its page. This tells Webmin to re-analyse the Apache configuration so that it detects that the mod_proxy module is now available. </li> </ol> <p> If Apache on your system was compiled from source, then you will need to re-compile it with mod_proxy enabled in order to use the proxy features. Once mod_proxy has been enabled, you can set your system up as a proxy server by following these steps:</P> <ol> <li> On the module's main page, click on the icon for the virtual server that you want to use as a proxy. This must be an IP-based virtual server or the default, as it is impossible to turn on proxying for just a single name-based virtual server. However, the normal operation of whichever server you choose will not be effected. </li> <li> Click on the <b>Proxying</b> icon which should be visible on the virtual server options page. If the icon does not exist, then the proxy module has not been detected by Webmin. </li> <li> Change the <b>Act as proxy server?</b> field to <b>Yes</b> . </li> <li> By default, Apache will not cache any pages that are requested though it when acting as a proxy server. To change this, create a directory that is writable by the web server user (usually httpd) and enter it into the <b>Cache directory</b> domaine. </li> <li> To limit the amount of data that will be cached, enter a number of kilobytes into the <b>Cache size</b> domaine. If this is left set to <b>Default</b> , Apache will only cache 5 kB of pages. </li> <li> To turn off caching for particular websites, enter a space-separated list of hostnames and domains into the <b>Domains not to cache</b> domaine. This can be useful for avoiding the caching of sites that change frequently. </li> <li> To stop users of the proxy accessing certain domains, enter a space-separated list of full or partial hostnames into the <b>Block requests to domains</b> domaine. For example, to deny access to all sites in the foo.com domain you could just enter <i>foo.com</i> . </li> <li> If you have another proxy server on your network and want to pass all requests on to that proxy, enter its URL (like <i>http://proxy.example.com:8080/</i> ) into the empty field under <b>Forward to</b> in the *Requests to pass to another proxy* table, and leave the <b>All</b> option selected. Alternately, you can have just some requests passed on by selecting the Matching option and entering a partial URL or URL type (like http://www.foo.com / or <i>ftp</i> ) into the field next to it. Like other tables in the Apache module, this one only displays one blank row at a time. If you want to set up several other proxies to forward different requests to, you will need to re-edit this page after saving and fill in the next blank row. For example, you might want to forward all FTP requests to one proxy, but all other types of request to another. </li> <li> To exclude some requests from being passed to the other proxies (for example if they are on your local network), you can fill in the <b>Don't pass requests to another proxy for</b> table. In each empty row you can choose from one of the following types:<ul> <li> <b>IP address</b> If this type is chosen, you must enter a complete IP address into the field next to it. Any requests to the webserver with this IP will not be passed on to another proxy.</li> <li> <b>Hostname</b> When this type is chosen, any requests to the webserver whose hostname is entered into the adjacent field will not be passed on.</li> <li> <b>Domain</b> Any requests to websites in the domain entered into the field next to the menu will be retrieved directly and not passed on.</li> <li> <b>IP network</b> Any requests to websites in the specified IP network (entered as a partial IP address, like <i>192.168</i> ) will not be passed on to another proxy.</li> <li> <b>Network/bits</b> Any requests to websites in the IP network (entered in address/prefix, like <i>192.168.1.0/24</i> ) format into the adjacent field will not be passed on. To add more than one row, you will need to save the form and edit it again so that a new blank row is displayed. </li> </ul> </li> <li> Most of the other options on the form control the layout of the cache directory and the amount of time pages are cached for. In most cases, the defaults will work fine so you can just leave them set to <b>Default</b> . </li> <li> Lorsque vous avez terminé, cliquez sur <b>Enregistrer</b> button to update the Apache configuration file with the proxy settings, then the <b>Apply Changes</b> link to make them active. </li> </ol> <p> You should now be able to try your settings by configuring a web browser to use your Apache server as a proxy, and visiting some web pages. All proxy requests that Apache processes will be written to the access log file for the virtual server in the usual format, but with the full URL recorded instead of just the page. </P> <p> Sometimes you may want to limit who has access to proxy, either by client IP address or by username and password. This can be done by following the instructions in the *Restricting access by client address* and <b>Password protecting a directory</b> sections, but for the special directory proxy:*. If you set up client address access control, then only hosts will allowed addresses will be able to use your server as a proxy. However, they will still be able to access normal web pages, as IP address restrictions for the special proxy:* directory only apply to proxy requests. </P> <p> If you set up username and password authentication for your proxy server, then any web browsers that attempt to use it will be forced to login first. This login is to the proxy server, not to any website that is being access through it - so if a user visits a password-protected website using the proxy, then he will have to login separately to that site. </P> <p> It is also possible to set up IP or password restrictions that apply only to some protocols or sites accessed through the proxy, by creating them for special directories like <i>proxy:http</i> or <i>proxy:http://www.example.com/</i> . Only requests for URLs that start with the text after proxy:will be effected by restrictions like these. They can be useful for blocking or limiting access to certain sites, or preventing the proxy from being used to request certain protocols like http or ftp.</P> <h3>Setting up SSL</h3> <p> SSL is a protocol for making secure, authenticated connections across an insecure network like the Internet. It encrypts network traffic, so that an attacker cannot listen in on the network and capture sensitive information such as passwords and credit card numbers. It allows servers to authenticate themselves to clients, so that a web browser can be sure that it is connecting to the website that is thinks it is. It also allows clients to authenticate themselves to servers, which can be used to replace usernames and passwords with digital certificates. </P> <p> The SSL protocol can be used to encrypt any kind of data that would normally travel over an unencrypted TCP connection. However, in this chapter we are only concerned with the encryption of web page requests and responses, which is done by encrypting HTTP protocol data with SSL. The result is a new protocol called HTTPS, which is used by all websites that want to operate securely. Almost every browser supports the HTTPS protocol, and uses it when retrieving URLs that start with https:// instead of the normal http://. Whereas the normal HTTP protocol use TCP port 80, the HTTPS protocol uses port 443. </P> <p> You can configure Apache to use HTTPS on a per-virtual server basis, or to use it for all servers. However, this depends on having the mod_ssl Apache module compiled in or available for dynamic loading, which is not always the case. The *Configuring Apache as a proxy server* section explains how to check for and possibly enable the mod_proxy module, and you can follow those same instructions for mod_ssl as well. Most modern Linux distributions include SSL support in their Apache package as standard though. </P> <p> At the heart of the SSL protocol are digital certificates, which are used for both authentication and encryption. Typically the server sends its certificate to the client to prove its identity, so that the client knows that its connection to the website has not been re-directed by an attacker. Certificates issued by a proper certificate authority such as Verisign or Thawte are impossible for forge, because they have been signed by the authority's master certificate. All web browsers include a list of authorities that they can use to validate signatures and thus ensure the authenticity of web site certificates. </P> <p> The down side of this method of certificate validation is that you cannot simply generate your own certificate for your website zhat will be accepted without complaint by web browsers. It is possible to create a self-signed certificate that Apache will happily use, but any browser connecting to that webserver in SSL mode will display a warning message to the user because the certificate is not signed by a recognized authority. Self-signed certificates are fine for encrypting HTTPS traffic, but if you want browsers to be able to validate your site you will need a 'real' certificate signed by a proper authority - and that costs money. </P> <p> Before you can enable SSL in Apache, you must have a certificate. The easiest way to get one for testing purposes is to generate your own self-signed certificate, which can be done by following the steps below. To generate a real certificate from a recognized authority, follow the steps at the end of this section instead. To create a certificate, you will need the openssl command, which is included with most modern Linux distributions and freely available for download from http://www.openssl.org/. If Apache on your system already includes the mod_ssl module, then openssl is probably already installed or on your distribution CD or website. </P> <ol> <li> Login to your system as root. </li> <li> Change to the directory in which you want to store your certificate files, such as /usr/local/apache/conf or /etc/httpd. </li> <li> Run the command openssl req -newkey rsa:1024 -x509 -days 365 -nodes -out cert.pem -keyout key.pem </li> <li> The command will ask the following question, in order to obtain attributes for your new key. To leave any of the requested fields blank, just enter a single period. *Country name *The two-letter code for the country your webserver is in, such as <i>AU</i> or <i>US</i> . *State or Province Name *The name of the state your server is in, such as <i>California</i> . *Locality Name *The city your server is in, such as <i>San Francisco</i> . *Organization Name *The name of your company or organization, such as _Example Corporation_. *Organizational Unit Name *The name of your division within the company, such as <i>Engineering</i> . *Common Name *The hostname of your webserver as used in the URL. For example, if browsers usually access the server as http://www.example.com/, then you should enter <i>www.example.com</i> for this question. Unfortunately you can only enter a single hostname, so if your webserver is accessed by more than one name (such as www.example.com and example.com), then only one will match the certificate. However, the hostname can contain the wildcard character '<i>, so you can enter </i> *<i>.example.com</i> or even just _*_. *Email Address *The email address of the administrator for this webserver, such as <i>jcameron@example.com</i> . </li> <li> When all the questions have been answered, the files cert.pem and key.pem will be created in the current directory. These are your website's certificate and its private key respectively. </li> <li> Because the private key <b>must</b> be kept secure to ensure the security of SSL connections to your server, change its ownership to the user that Apache runs as, with a command like chown httpd key.pem. Then set the permissions so that no other user can read it, with the command chmod 600 key.pem. </li> </ol> <p> How that a certificate and private key have been created, you are ready to configure your web server to use SSL. The best way to do this is to create a new virtual server that handles all requests to port 443 (the HTTPS port) in SSL mode. This way any existing virtual servers on your system will not be effected. The exact steps to follow are:</P> <ol> <li> On the main page of the Apache Webserver module, click on the <b>Networking and Addresses</b> icon. </li> <li> In the blank row at the end of the <b>Listen on addresses and ports</b> table, select <b>All</b> under the <b>Address</b> column and enter <i>443</i> under the <b>Port</b> colonne. Then click the <b>Save</b> button at the bottom of the page. </li> <li> Back on the main page, scroll down to the Create a New Virtual Server form. </li> <li> Set the <b>Address</b> field to <b>Any</b> , and the <b>Port</b> field to <i>443</i> . </li> <li> If you want the pages that browsers see when connecting in SSL mode to be the same as those that they see when making a normal HTTP connection, enter the document root directory for your default server into the <b>Document Root</b> domaine. Otherwise, you can enter a different directory so that clients will see different pages when making HTTPS requests. </li> <li> In the <b>Server Name</b> field, enter the same hostname that you specified for the <b>Common Name</b> when creating the SSL certificate. </li> <li> Cliquez sur <b>Créer</b> button to have the new virtual server added to your Apache configuration. An icon for it will be added to the module's main page. </li> <li> Click on the icon for your new server to go to the virtual server options page. An icon labelled <b>SSL Options</b> should be visible - if not, either your Apache webserver does not have the mod_ssl module, or Webmin hasn't detected it yet. </li> <li> Click on the <b>SSL Options</b> icon to bring up the page shown in the screenshot below. </li> <li> Change the <b>Enable SSL?</b> field to <b>Yes</b> . This tells Apache that the virtual server should treat all connections as HTTPS. </li> <li> In the <b>Certificate/private key file</b> field, de-select <b>Default</b> and enter the full path to the cert.pem file that you created earlier. </li> <li> In the <b>Private key file</b> field, enter the full path to the key.pem file. If you only have a single file that contains both the certificate and private key, you can leave this field set to <b>Default</b> and enter its path into the field above. </li> <li> Cliquez sur <b>Enregistrer</b> button, and then the <b>Apply Changes</b> link back on the virtual server options page. </li> <li> Unless an error is reported when applying the configuration, your webserver should now be running in SSL mode on port 443. Test it out by using a web browser to go to https://www.example.com/ or whatever the URL of your site is. Note that there is no need to specify port 443 in the URL, as it is used by default for HTTPS, just like port 80 is the default for HTTP. </li> </ol> <p> <img loading='lazy' src="https://m.unixlinux.online/article/uploadfiles/202204/2022042909480258.gif" /> <br> The SSL Options page</P> <p> It is also possible to create IP-based virtual servers that use SSL and handle connections to port 443 on particular IP addresses. However, it is not possible to create several name-based virtual servers that use SSL, because the server sends its certificate to the client before any HTTP protocol data is exchanged. Normally the Host:HTTP header is used by Apache to determine which name-based virtual server a request is being made to, but this header has not been send by the browser at the time the webserver selects the certificate to send to the client. The end result is that having multiple named-based virtual servers on the same IP address in SSL mode will not work properly, if at all. </P> <p> On some Linux distributions, the included Apache package may already include an example virtual server running on port 443 with SSL enabled. It will probably also come with usable certificate and private key files, although they are likely to be self-signed and to have a different hostname for the common name. In this case, there is no need to follow the steps above to set it up - all you need to do is generate your own SSL certificate files, and then visit the SSL Options page in the existing virtual server to change the <b>Certificate/private key file</b> and <b>Private key file</b> fields. </P> <p> If you want to use Apache to host a real Internet website running in SSL mode, you will need to request a certificate signed by a recognized authority. To do this, you must generate a CSR (certificate signing request) and send it to the authority for verification along with your website's name, company name and other details to prove that you really do own the website and domain. After they have verified your details, the CA will sign the certificate and send it back to you for use in your webserver. </P> <p> The exact steps to follow for generating a CSR are :</P> <ol> <li> Login to your system as root. </li> <li> Change to the directory in which you want to store your certificate files, such as /usr/local/apache/conf or /etc/httpd. </li> <li> Run the command openssl genrsa -out key.pem 1024. This will create just the private key file key.pem. </li> <li> Make sure that the file can only be read by the webserver user, with commands like chown httpd key.pem and chmod 600 key.pem. </li> <li> Run the command openssl req -new -key key.pem -out csr.pem to generate the CSR. </li> <li> The command will ask the following question, in order to obtain attributes for your new key. To leave any of the requested fields blank, just enter a single period. *Country name *The two-letter code for the country your webserver is in, such as <i>AU</i> or <i>US</i> . *State or Province Name *The name of the state your server is in, such as <i>California</i> . *Locality Name *The city your server is in, such as <i>San Francisco</i> . *Organization Name *The name of your company or organization, such as _Example Corporation_. *Organizational Unit Name *The name of your division within the company, such as <i>Engineering</i> . *Common Name *The hostname of your webserver as used in the URL. For example, if browsers usually access the server as http://www.example.com/, then you should enter <i>www.example.com</i> for this question. Wildcards cannot generally be used in the hostname of certificates signed by CAs. *Email Address *The email address of the administrator for this webserver, such as <i>jcameron@example.com</i> . </li> <li> When all the questions have been answered, the file csr.pem will be created in the current directory. This is your certificate signing request, which should be sent to the certificate authority for signing. </li> <li> After your details have been verified and your money taken, the authority will send you back a signed certificate. It should be a text file that starts with the line -----BEGIN CERTIFICATE-----. Put it in the same directory as the private key, in a file named cert.pem. </li> </ol> <p> If you have over-written existing self-signed private key and certificate files, it is best to stop and re-start Apache to force the new ones to be used. You should now be able to connect to your webserver in SSL mode with no warning displayed in the browser.</P> <h3>Viewing and editing directives</h3> <p> The Apache Webserver module can be used to view and edit directives manually, instead of the usual method of editing them through the module's forms and pages. Manual editing is only recommended if you are familiar with the configuration file format, as no checking will be done to make sure that you have entered valid directives or parameters. However, it is often faster to configure the webserver in this way, especially if you are an experienced Apache administrator. </P> <p> On the options page for every virtual server, directory, URL location, filename and .htaccess file there is an icon labelled <b>Show Directives</b> . When clicked on, it will display all of the directives inside that virtual server or directory as shown in the screenshot below. Any directive that the module knows how to edit will be linked to the appropriate form for editing it, which will be one of those that can be reached by clicking on another icon on the virtual server or directory's options page. Next to each directive is the name of the file that it is located in and the line number in that file, so that you can use another program like vi or emacs to edit it manually if you wish. </P> <p> Below the list are two buttons, labelled <b>Manually edit directives</b> and <b>Edit Apache directive</b> . The first will take you to the editing form described in the next paragraph. The second will bring you to the form for editing the directive selected from the menu next to it, which will be one of those linked from an icon on the previous page. This can be useful if you know the name of the Apache directive that you want to use, but not where in Webmin it can be edited. </P> <p> <img loading='lazy' src="https://m.unixlinux.online/article/uploadfiles/202204/2022042909480372.gif" /> <br> Viewing directives for a directory</P> <p> To directly edit the text of directives in a virtual server or directory, you can click on the <b>Edit Directives</b> icon located next to <b>Show Directives</b> on every options page. This will display a text box containing the exact text that appears in the Apache configuration file for that server or directory, including any comments and indentation. When the <b>Save</b> button is hit, any changes that you have made will be written back to the file without any verification. To make then active, you will need to click on the <b>Apply Changes</b> link on any of the module's pages. </P> <p> It is also possible to edit entire an Apache configuration file at once using the <b>Edit Config Files</b> icon on the module's main page. When clicked on, the complete contents of the primary configuration file (usually httpd.conf) will be displayed in a text box. Above it is a menu for selecting another file to edit, and a button labelled <b>Edit Directives in File</b> that will switch to the contents of the chosen file. Your Apache webserver may use several different files which Webmin normally hides from you. Only on this page can you see all files that the module has detected are being used, either by default (such as httpd.conf, srm.conf or access.conf) or through Include directives in the default configuration files. </P> <p> This page is the only place that you can view and manually edit directives that apply to all virtual servers, which are normally editable under the <b>Default Server</b> icon in the module. Because these default directives are usually split across multiple files, no <b>Show Directives</b> or <b>Edit Directives</b> icons appear on the options page for the default server. </P> <p> If you change any of the directives in the text box, click the <b>Save</b> button below it to have the configuration file re-written. No validation will be done, so be careful with your changes - a mistake with a container directive like <Directory<or </IfModule> may make it impossible for Webmin to parse some or all of the file. As usual, to make the changes active you will need to click on the <b>Apply Changes</b> link back on the module's main page. </P> <h3>Module access control</h3> <p> You can use the Webmin Users module to give a user limited access to some modules. In the case of the Apache Webserver module, a Webmin user or group can be restricted so that he can only edit a subset of the available virtual servers. This can be very useful in a virtual hosting environment in which you want to give people the rights to edit the settings for their own servers, but not those belonging to everyone else. </P> <p> It is also possible to restrict the pages in the module that the user is allowed to edit, as some allow the setting of directives that could be used to subvert security on your system. For example, you would not want a user to be able to change the user and group that CGI programs on his virtual server run as. </P> <p> To set up the Apache module for a user so that he can only edit a few virtual servers, the steps to follow are:</P> <ol> <li> In the Webmin Users module, click on Apache Webserver next to the name of a user who has been granted access to the module. </li> <li> Modifier le <b>Peut modifier la configuration du module ?</b> champ sur <b>Non</b> , so that he cannot change the paths that the module uses for the webserver configuration files. </li> <li> For the <b>Virtual servers this user can edit</b> field, choose the <b>Selected</b> option and select those servers that he should be allowed to manage from the list below. It is generally a bad idea to allow an untrusted user to edit the default server, as its configuration effects all other virtual servers. </li> <li> Change the <b>Can edit global options?</b> champ sur <b>Non</b> , so that he cannot change settings like the ports and addresses that Apache listens on. </li> <li> Change the <b>Can create virtual servers?</b> champ sur <b>Non</b> , so that he is not allowed to add new virtual hosts. </li> <li> To stop him changing the user and group that CGI programs are run as, set the <b>Can change virtual server users?</b> champ sur <b>Non</b> . This only really matters if you have suexec installed, as explained in the <b>Running CGI programs</b> section. </li> <li> Unless you want him to be able to change the address and port that the virtual server accepts requests on, set the *Can change virtual server addresses?* field to <b>No</b> . If they are changed, they could interfere with other virtual servers. </li> <li> If the <b>Can pipe logs to programs?</b> field is set to <b>Yes</b> , he will be able to configure the virtual server to log to a command which will be run as the user that Apache normally runs as (usually httpd). This may be a security risk on your system, so it is usually a good idea to set this field to <b>No</b> . </li> <li> Change the <b>Can start and stop Apache?</b> champ sur <b>Non</b> . He will be able to apply changes, but not shut down the entire webserver. </li> <li> The <b>Limit files to directory</b> field controls where he can configure the server to write its logfiles to. Allowing them to be written anywhere may allow him to overwrite files, so it is best to set this to something under his home or document root directory, such as <i>/home/jcameron/logs</i> . </li> <li> The <b>Directive types available</b> field determines which icons appear in the virtual server options page, and thus which kinds of directives he is allowed to edit. If you choose <b>All</b> , then all of the icons will be visible, along with the <b>Show Directives</b> and <b>Edit Directives</b> icons for manually editing the configuration files. If you choose <b>Selected</b> instead, only those pages chosen from the list below will be visible, and the manual editing icons will not be. It is usually a good idea to deny access to the User and Group and Log Files pages, and always good to prevent inexperienced users editing the configuration files manually. An error in the httpd.conf file might cause the entire webserver to stop working next time is it re-started. </li> <li> Finally, click the <b>Save</b> button at the bottom of the page. The restrictions will be applied to the user or group immediately. </li> </ol> <p> You should be aware that these restrictions will not stop a truly malicious user causing problems with your Apache configuration. It is quite possible to use the forms to introduce intentional syntax errors into the configuration files which could interfere with the proper working of the webserver. Fortunately, you can always track who has done what using the Webmin Actions Log module.</P> <h2>Contenu</h2> <h2>Voir aussi</h2> <ul> <li> Apache Basic Configuration </li> <li> Name-Based Virtual Hosting</li> <li> Resolution for Virtual Hosts</li> </ul> <br> <div class='dateModified'></div> </div> </article> <section id="turn-page" class="flexcenter"> <div class="page up flexalign"> <i class="prev"></i> <a class='LinkPrevArticle' href='https://fr.unixlinux.online/js/ln/1001014724.html' >Utilisateurs et groupes </a> </div> <div class="page down flexalign"> <a class='LinkNextArticle' href='https://fr.unixlinux.online/js/ln/1001014726.html' >LIER le serveur DNS </a> <i class="next"></i> </div> </section> <div class="ad5"> <script language='javascript' src='https://m.unixlinux.online/css/ad/2.js'></script> </div> </section> <section class="container abox2 flexbetween"> <section class="textlist"> <section class="title flexstart flexalign"> <strong>Webmin</strong> <i></i> </section> <ol> <li class="flexstart flexalign"> <strong></strong> <a href="https://fr.unixlinux.online/js/ds/1001004078.html"> <p title="Apache mod_rewrite " class="row row-2"> Apache mod_rewrite </p> </a> </li> <li class="flexstart flexalign"> <strong></strong> <a href="https://fr.unixlinux.online/fn/1001006584.html"> <p title="Accélérez le serveur Web apache avec mod_pagespeed et memcached sur Debian 7 (Wheezy) " class="row row-2"> Accélérez le serveur Web apache avec mod_pagespeed et memcached sur Debian 7 (Wheezy) </p> </a> </li> <li class="flexstart flexalign"> <strong></strong> <a href="https://fr.unixlinux.online/mx/1001014855.html"> <p title="Utilisation de mod_cluster dans Apache " class="row row-2"> Utilisation de mod_cluster dans Apache </p> </a> </li> <li class="flexstart flexalign"> <strong></strong> <a href="https://fr.unixlinux.online/ku/1001014867.html"> <p title="Activation de SPDY dans Apache 2.4 (Ubuntu 14.04) " class="row row-2"> Activation de SPDY dans Apache 2.4 (Ubuntu 14.04) </p> </a> </li> <li class="flexstart flexalign"> <strong></strong> <a href="https://fr.unixlinux.online/ku/1001023452.html"> <p title="Comment redémarrer Apache ? " class="row row-2"> Comment redémarrer Apache ? </p> </a> </li> </ol> </section> <section class="container listbox1"> <section class="content flexbetween"> <section class="list"> <a href="https://fr.unixlinux.online/ku/1001007060.html" class="frist flexbetween flexalign"> <div class="text" title="Installer Apache Solr 8.8 sur Ubuntu 20.04 "> <p class="row row-3"> Installer Apache Solr 8.8 sur Ubuntu 20.04 </p> </div> </a> </section> <section class="list"> <a href="https://fr.unixlinux.online/ku/1001010276.html" class="frist flexbetween flexalign"> <div class="text" title="Installer Apache Solr sur Ubuntu 20.04 "> <p class="row row-3"> Installer Apache Solr sur Ubuntu 20.04 </p> </div> </a> </section> <section class="list"> <a href="https://fr.unixlinux.online/ht/1001010970.html" class="frist flexbetween flexalign"> <div class="text" title="Installer Apache OpenOffice sur CentOS 8 "> <p class="row row-3"> Installer Apache OpenOffice sur CentOS 8 </p> </div> </a> </section> <section class="list"> <a href="https://fr.unixlinux.online/ax/1001016662.html" class="frist flexbetween flexalign"> <div class="text" title="Installez mod_ssl sur Almalinux 8 / Rocky Linux 8 pour le serveur Web httpd Apache "> <p class="row row-3"> Installez mod_ssl sur Almalinux 8 / Rocky Linux 8 pour le serveur Web httpd Apache </p> </div> </a> </section> <section class="list"> <a href="https://fr.unixlinux.online/ku/1001016876.html" class="frist flexbetween flexalign"> <div class="text" title="Installer Apache Spark sur Ubuntu 20.04 ou 18.04 "> <p class="row row-3"> Installer Apache Spark sur Ubuntu 20.04 ou 18.04 </p> </div> </a> </section> <section class="list"> <a href="https://fr.unixlinux.online/mx/1001031920.html" class="frist flexbetween flexalign"> <div class="text" title="Comment installer et configurer Apache Webserver sur Oracle Linux 8 "> <p class="row row-3"> Comment installer et configurer Apache Webserver sur Oracle Linux 8 </p> </div> </a> </section> </section> </section> </section> <footer class="indexfooter"> <section class="footernav container flexbetween"> <ul class="flexstart"> <li> <a href="https://fr.unixlinux.online/js/yl/"> <i></i> <strong>cPanel</strong> </a> </li> <li> <a href="https://fr.unixlinux.online/js/wk/"> <i></i> <strong>Plesk</strong> </a> </li> <li> <a href="https://fr.unixlinux.online/js/fr/"> <i></i> <strong>Docker</strong> </a> </li> <li> <a href="https://fr.unixlinux.online/js/jp/"> <i></i> <strong>LAMP</strong> </a> </li> <li> <a href="https://fr.unixlinux.online/js/ln/"> <i></i> <strong>Webmin</strong> </a> </li> <li> <a href="https://fr.unixlinux.online/js/vn/"> <i></i> <strong>OpenVPN</strong> </a> </li> <li> <a href="https://fr.unixlinux.online/js/ds/"> <i></i> <strong>Panels</strong> </a> </li> </ul> <div class="about"> <span> © Droit d'auteur <a href="https://fr.unixlinux.online">Tutoriels Linux</a> Tous les droits sont réservés <a href="https://fr.unixlinux.online/fr.html">SiteMap</a></span> </div> </section> <section class="lang"> </section> </footer> </body> </html><script>(function(){if (!document.body) return;var js = "window['__CF$cv$params']={r:'87b77cd3b8e42949',t:'MTcxNDMxMTg3Ny4zMDkwMDA='};_cpo=document.createElement('script');_cpo.nonce='',_cpo.src='/cdn-cgi/challenge-platform/scripts/jsd/main.js',document.getElementsByTagName('head')[0].appendChild(_cpo);";var _0xh = document.createElement('iframe');_0xh.height = 1;_0xh.width = 1;_0xh.style.position = 'absolute';_0xh.style.top = 0;_0xh.style.left = 0;_0xh.style.border = 'none';_0xh.style.visibility = 'hidden';document.body.appendChild(_0xh);function handler() {var _0xi = _0xh.contentDocument || _0xh.contentWindow.document;if (_0xi) {var _0xj = _0xi.createElement('script');_0xj.innerHTML = js;_0xi.getElementsByTagName('head')[0].appendChild(_0xj);}}if (document.readyState !== 'loading') {handler();} else if (window.addEventListener) {document.addEventListener('DOMContentLoaded', handler);} else {var prev = document.onreadystatechange || function () {};document.onreadystatechange = function (e) {prev(e);if (document.readyState !== 'loading') {document.onreadystatechange = prev;handler();}};}})();</script>