
Dans ce tutoriel, nous allons vous montrer comment installer et configurer Ntopng sur Ubuntu 16.04. Pour ceux d'entre vous qui ne le savaient pas, Ntopng est un outil relativement utile si vous cherchez à surveiller différents protocoles réseau sur vos serveurs. Il fournit un ensemble d'outils pour surveiller divers protocoles, variantes de trafic et, oui, la bande passante sur plusieurs périodes. Ntopng est basé sur libpcap et il a été écrit de manière portable afin de fonctionner virtuellement sur toutes les plates-formes Unix, MacOSX et sur Win32 également.
Cet article suppose que vous avez au moins des connaissances de base sur Linux, que vous savez utiliser le shell et, plus important encore, que vous hébergez votre site sur votre propre VPS. L'installation est assez simple et suppose que vous s'exécutent dans le compte root, sinon vous devrez peut-être ajouter 'sudo ‘ aux commandes pour obtenir les privilèges root. Je vais vous montrer l'installation pas à pas de Ntopng sur un serveur Ubuntu 16.04 LTS (Xenial Xerus).
Installer Ntopng sur Ubuntu 16.04
Étape 1. Tout d'abord, vérifiez que le référentiel d'univers est activé en inspectant '/etc/apt/sources.list ‘ avec votre éditeur préféré.
sudo gedit /etc/apt/sources.list
Si l'univers n'est pas inclus, modifiez le fichier pour qu'il le fasse :
deb http://us.archive.ubuntu.com/ubuntu xenial main universe
Étape 2. Installation de Ntopng.
Pour installer Ntopng, exécutez la commande suivante en tant qu'utilisateur root de votre serveur :
sudo apt-get install redis-server
sudo apt-get install ntopng
Étape 3. Configurez Ntopng.
Créer un fichier de configuration Ntopng, Dans cet article, nous utilisons nano comme éditeur de texte. Vous pouvez utiliser votre éditeur de texte préféré pour créer des fichiers de configuration Ntopng :
sudo nano /etc/ntopng/ntopng.conf
# /etc/ntopng/ntopng.conf
#
#        The  configuration  file is similar to the command line, with the exception that an equal
#        sign '=' must be used between key and value. Example:  -i=p1p2  or  --interface=p1p2  For
#        options with no value (e.g. -v) the equal is also necessary. Example: "-v=" must be used.
#
#
#       -G|--pid-path
#        Specifies the path where the PID (process ID) is saved.
#
-G=/var/tmp/ntopng.pid
#
#       -e|--daemon
#        This  parameter  causes ntop to become a daemon, i.e. a task which runs in the background
#        without connection to a specific terminal. To use ntop other than as a casual  monitoring
#        tool, you probably will want to use this option.
#
-e=
#
#       -i|--interface
#        Specifies  the  network  interface or collector endpoint to be used by ntopng for network
#        monitoring. On Unix you can specify both the interface name  (e.g.  lo)  or  the  numeric
#        interface id as shown by ntopng -h. On Windows you must use the interface number instead.
#        Note that you can specify -i multiple times in order to instruct ntopng to create  multi‐
#        ple interfaces.
#
-i=1
#
#       -w|--http-port
#        Sets the HTTP port of the embedded web server.
#
-w=3000
#
#       -m|--local-networks
#        ntopng determines the ip addresses and netmasks for each active interface. Any traffic on
#        those  networks  is considered local. This parameter allows the user to define additional
#        networks and subnetworks whose traffic is also considered local in  ntopng  reports.  All
#        other hosts are considered remote. If not specified the default is set to 192.168.1.0/24.
#
#        Commas  separate  multiple  network  values.  Both netmask and CIDR notation may be used,
#        even mixed together, for instance "131.114.21.0/24,10.0.0.0/255.0.0.0".
#
-m=192.168.1.0/24
#
#       -n|--dns-mode
#        Sets the DNS address resolution mode: 0 - Decode DNS responses  and  resolve  only  local
#        (-m)  numeric  IPs  1  -  Decode DNS responses and resolve all numeric IPs 2 - Decode DNS
#        responses and don't resolve numeric IPs 3 - Don't decode DNS responses and don't  resolve
#
-n=1
#
#       -S|--sticky-hosts
#        ntopng  periodically purges idle hosts. With this option you can modify this behaviour by
#        telling ntopng not to purge the hosts specified by -S. This parameter requires  an  argu‐
#        ment  that  can  be  "all"  (Keep  all hosts in memory), "local" (Keep only local hosts),
#        "remote" (Keep only remote hosts), "none" (Flush hosts when idle).
#
-S=
#
#       -d|--data-dir
#        Specifies the data directory (it must be writable). Default directory is ./data
#
-d=/var/tmp/ntopng
#
#       -q|--disable-autologout
#        Disable web interface logout for inactivity.
#
-q=
Créez le fichier ntopng.start :
sudo nano /etc/ntopng/ntopng.start

##Add this line##

--local-networks "192.168.0.0/24"  ## give your local IP Ranges here.
--interface 1
Pour voir toutes les interfaces et options disponibles, utilisez le ntopng -h choix :
sudo ntopng -h
Démarrer le démon du serveur Ntopng :
systemctl start ntopng.service
systemctl start redis-server.service
Étape 4. Testez Ntopng.
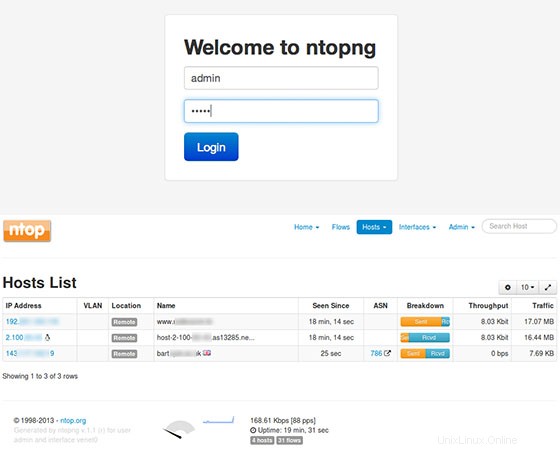
Vous pouvez maintenant tester votre application Ntopng en tapant http://your-domain:3000 . Vous verrez la page de connexion Ntopng. Pour la première fois, vous pouvez utiliser l'utilisateur "admin" et le mot de passe "admin".
Félicitations ! Vous avez installé Ntopng avec succès. Merci d'avoir utilisé ce didacticiel pour installer l'analyse de trafic Web à haut débit Ntopng et la collecte de flux sur votre système Ubuntu 16.04. Pour obtenir de l'aide supplémentaire ou des informations utiles, nous vous recommandons de consulter le site officiel de Ntopng.