La suite de collaboration Zimbra a deux versions :l'édition réseau et l'édition open source. Dans ce didacticiel, nous explorerons le moyen le plus rapide et le plus simple d'installer le serveur de messagerie zimbra (édition gratuite) ainsi que d'autres composants tels que LDAP, antivirus, antispam, Amavis (amavisd-new) - Vérificateur de contenu, Aspell - Correcteur orthographique, MySQL et d'autres fonctionnalités de collaboration et un client de messagerie Web ajax. Zimbra recommande de désactiver le pare-feu dans le processus d'installation, une fois l'installation terminée, activez le pare-feu et ajoutez les règles de pare-feu pour autoriser le trafic vers le serveur de messagerie zimbra. Il est également recommandé d'installer ZCS dans un nouveau système.
Configuration requise
Ubuntu 16.04 avec au moins 4 Go de RAM
IP du serveur Ubuntu - 172.31.26.109
Nom de domaine complet du serveur Ubuntu - mail.zimbra-demo.com
DNS Server IP - 172.31.26.109 (Même serveur, conseillé de le conserver sur un serveur séparé de votre réseau)
IP de passerelle - 172.31.0.2
Nom de domaine - zimbra-demo.com
1. Configurer le nom d'hôte
Modifiez /etc/hosts et ajoutez la ligne 172.31.26.109 mail.zimbra-demo.com mail. Remplacez 172.31.26.109 par l'adresse IP que vous souhaitez utiliser.
root@mail:~# cat /etc/hosts
127.0.0.1 localhost
172.31.26.109 mail.zimbra-demo.com mail
Modifiez également /etc/hostname et la ligne 'mail'
root@mail:~# cat /etc/hostname
mail
Redémarrez le système et testez le FQDN de votre serveur avec la commande hostname -f et hostname.
root@mail:~# hostname -f
mail.zimbra-demo.com

root@mail:~# hostname
mail
Si vous utilisez un service d'hébergement basé sur le cloud, assurez-vous d'avoir défini la valeur du paramètre preserve_hostname sur true.
2. Installer / Configurer BIND DNS
Nous installerons le serveur de noms BIND dans le même système où ZCS sera installé. Vous êtes libre d'installer le serveur de noms BIND dans un autre système de votre réseau interne.
Installez bind9 en exécutant la commande suivante dans le terminal.
# sudo apt-get install bind9 bind9utilsModifiez maintenant le fichier /etc/bind/named.conf et supprimez '//' des redirecteurs et ajoutez l'adresse IP du serveur DNS comme ci-dessous.
forwarders {
8.8.8.8; 8.8.4.4;
};
root@mail:~# cat /etc/bind/named.conf.options
options {
directory "/var/cache/bind";

forwarders {
8.8.8.8; 8.8.4.4;
};

dnssec-validation auto;

auth-nxdomain no;    # conform to RFC1035
listen-on-v6 { any; };
};
Modifier /etc/bind/named.conf.local et ajoutez ce qui suit.
zone "zimbra-demo.com" {
type master;
file "/etc/bind/db.zimbra-demo.com";
};

zone "1.31.172.in-addr.arpa" {
type master;
file "/etc/bind/db.1.31.172";
};

zone "0.0.127.in-addr.arpa" {
type master;
file "/etc/bind/db.0.0.127";
};
Créez et éditez le fichier /etc/bind/db.zimbra-demo.com et ajoutez ce qui suit. Modifiez le nom du fichier en fonction de votre nom de domaine.
$TTL    604800
@       IN      SOA     mail.zimbra-demo.com. admin.zimbra-demo.com.        (
030512  ; Serial
604800  ; Refresh
86400   ; Retry
2419200 ; Expire
604800 ); Negative Cache TTL
;
@                 IN      NS              mail
IN                MX    10               mail
IN                A                           172.31.26.109
mail            IN       A                172.31.26.109
Créez et modifiez le fichier /etc/bind/db.0.0.127 et ajoutez ce qui suit.
$TTL 3D
@         IN      SOA    mail.zimbra-demo.com. admin.zimbra-demo.com. (
2         ; Serial
8H      ; Refresh
2H       ; Retry
4W      ; Expire
1D)      ; Minimum TTL
NS       mail.zimbra-demo.com.
1         PTR     localhost.
Créez et modifiez le fichier /etc/bind/db.1.31.172 et ajoutez ce qui suit.
$TTL 3D
@               IN       SOA    mail.zimbra-demo.com.  admin.zimbra-demo.com. (
1           ; Serial
8H       ; Refresh
2H       ; Retry
4W       ; Expire
1D)       ; Minimum TTL
NS        zimbra-demo.com.
10         PTR    zimbra-demo.com.
Redémarrer le service de liaison
# /etc/init.d/bind9 restartPour configurer une adresse IP statique, modifiez /etc/network/interfaces et ajoutez ce qui suit. Modifiez les valeurs en fonction de votre configuration réseau.
source /etc/network/interfaces.d/*.cfg

auto eth0
iface eth0 inet static
address 172.31.26.109
netmask 255.255.255.0
network 172.31.0.0
broadcast 172.31.0.255
gateway 172.31.0.2
dns-search zimbra-demo.com
dns-nameservers 172.31.26.109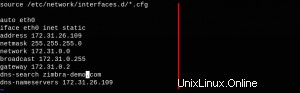
Modifiez également le fichier /etc/resolv.conf et ajoutez ce qui suit.
nameserver 172.31.26.109
search zimbra-demo.com
Testez maintenant l'enregistrement DNS de vos serveurs de noms avec dig
root@mail:~# creuser zimbra-demo.com
; <<>> DiG 9.10.3-P4-Ubuntu <<>> zimbra-demo.com
;; global options: +cmd
;; Got answer:
;; ->>HEADER<<- opcode: QUERY, status: NOERROR, id: 33646
;; flags: qr aa rd ra; QUERY: 1, ANSWER: 1, AUTHORITY: 1, ADDITIONAL: 2

;; OPT PSEUDOSECTION:
; EDNS: version: 0, flags:; udp: 4096
;; QUESTION SECTION:
;zimbra-demo.com.               IN      A

;; ANSWER SECTION:
zimbra-demo.com.                604800  IN      A       172.31.26.109

;; AUTHORITY SECTION:
zimbra-demo.com.                604800  IN      NS      mail.zimbra-demo.com.

;; ADDITIONAL SECTION:
mail.zimbra-demo.com.        604800  IN      A       172.31.26.109

;; Query time: 1 msec
;; SERVER: 172.31.26.109#53(172.31.26.109)
;; WHEN: Thu Aug 04 04:30:43 UTC 2016
;; MSG SIZE  rcvd: 95
root@mail :~# creuser facebook.com
; <<>> DiG 9.10.3-P4-Ubuntu <<>> facebook.com
;; global options: +cmd
;; Got answer:
;; ->>HEADER<<- opcode: QUERY, status: NOERROR, id: 22708
;; flags: qr rd ra; QUERY: 1, ANSWER: 1, AUTHORITY: 13, ADDITIONAL: 1

;; OPT PSEUDOSECTION:
; EDNS: version: 0, flags:; udp: 4096
;; QUESTION SECTION:
;facebook.com.                   IN      A

;; ANSWER SECTION:
facebook.com.           27      IN      A       173.252.89.132

;; AUTHORITY SECTION:
.                       2574    IN      NS      g.root-servers.net.
.                       2574    IN      NS      e.root-servers.net.
.                       2574    IN      NS      a.root-servers.net.
.                       2574    IN      NS      m.root-servers.net.
.                       2574    IN      NS      i.root-servers.net.
.                       2574    IN      NS      h.root-servers.net.
.                       2574    IN      NS      d.root-servers.net.
.                       2574    IN      NS      c.root-servers.net.
.                       2574    IN      NS      b.root-servers.net.
.                       2574    IN      NS      k.root-servers.net.
.                       2574    IN      NS      f.root-servers.net.
.                       2574    IN      NS      l.root-servers.net.
.                       2574    IN      NS      j.root-servers.net.

;; Query time: 11 msec
;; SERVER: 172.31.26.109#53(172.31.26.109)
;; WHEN: Thu Aug 04 04:32:04 UTC 2016
;; MSG SIZE  rcvd: 268
Jusqu'à présent, nous avons configuré le nom de domaine complet du serveur et un serveur de noms.
3. Télécharger / Installer Zimbra
Désactivez d'abord le pare-feu en exécutant la commande suivante dans le terminal..
# sudo service ufw disable
OR
# sudo service iptables stop
Téléchargez zimbra à l'aide de wget, extrayez-le et exécutez le programme d'installation dans le répertoire extrait.
# cd ~
# wget https://files.zimbra.com/downloads/8.7.0_GA/zcs-8.7.0_GA_1659.UBUNTU16_64.20160628202554.tgz
# tar xf zcs-8.7.0_GA_1659.UBUNTU16_64.20160628202554.tgz
# cd zcs-8.7.0_GA_1659.UBUNTU16_64.20160628202554/
# ./install.sh
Maintenant, l'installation va commencer. Lisez attentivement et répondez Oui/Non ou d'autres valeurs selon votre configuration.
WARNING: ZCS is currently only supported on Ubuntu Server 12.04 and 14.04 LTS. You are attempting to install on Ubuntu 16.04.1 LTS which may not work. Support will not be provided if you choose to continue.

Do you wish to continue? [N] y

Operations logged to /tmp/install.log.4P2y60cn
Checking for existing installation...
zimbra-ldap...NOT FOUND
zimbra-logger...NOT FOUND
zimbra-mta...NOT FOUND
zimbra-dnscache...NOT FOUND
zimbra-snmp...NOT FOUND
zimbra-store...NOT FOUND
zimbra-apache...NOT FOUND
zimbra-spell...NOT FOUND
zimbra-convertd...NOT FOUND
zimbra-memcached...NOT FOUND
zimbra-proxy...NOT FOUND
zimbra-archiving...NOT FOUND
zimbra-core...NOT FOUND

----------------------------------------------------------------------
PLEASE READ THIS AGREEMENT CAREFULLY BEFORE USING THE SOFTWARE.
SYNACOR, INC. ("SYNACOR") WILL ONLY LICENSE THIS SOFTWARE TO YOU IF YOU
FIRST ACCEPT THE TERMS OF THIS AGREEMENT. BY DOWNLOADING OR INSTALLING
THE SOFTWARE, OR USING THE PRODUCT, YOU ARE CONSENTING TO BE BOUND BY
THIS AGREEMENT. IF YOU DO NOT AGREE TO ALL OF THE TERMS OF THIS
AGREEMENT, THEN DO NOT DOWNLOAD, INSTALL OR USE THE PRODUCT.

License Terms for this Zimbra Collaboration Suite Software:
https://www.zimbra.com/license/zimbra-public-eula-2-6.html
----------------------------------------------------------------------

Do you agree with the terms of the software license agreement? [N] y

Checking for installable packages

Found zimbra-core
Found zimbra-ldap
Found zimbra-logger
Found zimbra-mta
Found zimbra-dnscache
Found zimbra-snmp
Found zimbra-store
Found zimbra-apache
Found zimbra-spell
Found zimbra-memcached
Found zimbra-proxy

Use Zimbra's package repository [Y] y
Configuring package repository

Select the packages to install

Install zimbra-ldap [Y] y

Install zimbra-logger [Y] y

Install zimbra-mta [Y] y

Install zimbra-dnscache [Y] n

Install zimbra-snmp [Y] y

Install zimbra-store [Y] y

Install zimbra-apache [Y] y

Install zimbra-spell [Y] y

Install zimbra-memcached [Y] y

Install zimbra-proxy [Y] y
Checking required space for zimbra-core
Checking space for zimbra-store
Checking required packages for zimbra-store
zimbra-store package check complete.

Installing:
zimbra-core
zimbra-ldap
zimbra-logger
zimbra-mta
zimbra-snmp
zimbra-store
zimbra-apache
zimbra-spell
zimbra-memcached
zimbra-proxy

The system will be modified.  Continue? [N] y

Removing /opt/zimbra
Removing zimbra crontab entry...done.
Cleaning up zimbra init scripts...done.
Cleaning up /etc/security/limits.conf...done.

Finished removing Zimbra Collaboration Server.

Installing packages

Local packages  zimbra-core zimbra-ldap zimbra-logger zimbra-mta zimbra-snmp zimbra-store zimbra-apache zimbra-spell zimbra-proxy selected for installation
Monitor /tmp/install.log.4P2y60cn for package installation progress
Remote package installation started
Installing zimbra-core-components  zimbra-ldap-components zimbra-mta-components zimbra-snmp-components zimbra-store-components zimbra-apache-components zimbra-spell-components zimbra-memcached zimbra-proxy-components....
Local package installation started
Installing  zimbra-core zimbra-ldap zimbra-logger zimbra-mta zimbra-snmp zimbra-store zimbra-apache zimbra-spell zimbra-proxy...

done
Unescaped left brace in regex is deprecated, passed through in regex; marked by <-- HERE in m/\${ <-- HERE zimbra_home}/ at /opt/zimbra/libexec/zmupgrade.pm line 1514, <DATA> line 755.
Unescaped left brace in regex is deprecated, passed through in regex; marked by <-- HERE in m/\${ <-- HERE zimbra_home}/ at /opt/zimbra/libexec/zmupgrade.pm line 1557, <DATA> line 755.
Unescaped left brace in regex is deprecated, passed through in regex; marked by <-- HERE in m/\${ <-- HERE zimbra_home}/ at /opt/zimbra/libexec/zmupgrade.pm line 1686, <DATA> line 755.
Unescaped left brace in regex is deprecated, passed through in regex; marked by <-- HERE in m/\${ <-- HERE zimbra_home}/ at /opt/zimbra/libexec/zmupgrade.pm line 1727, <DATA> line 755.
Unescaped left brace in regex is deprecated, passed through in regex; marked by <-- HERE in m/\${ <-- HERE zimbra_home}/ at /opt/zimbra/libexec/zmupgrade.pm line 1736, <DATA> line 755.
Unescaped left brace in regex is deprecated, passed through in regex; marked by <-- HERE in m/\${ <-- HERE zimbra_home}/ at /opt/zimbra/libexec/zmupgrade.pm line 1745, <DATA> line 755.
Unescaped left brace in regex is deprecated, passed through in regex; marked by <-- HERE in m/\${ <-- HERE zimbra_home}/ at /opt/zimbra/libexec/zmupgrade.pm line 1754, <DATA> line 755.
Unescaped left brace in regex is deprecated, passed through in regex; marked by <-- HERE in m/\${ <-- HERE zimbra_home}/ at /opt/zimbra/libexec/zmupgrade.pm line 1763, <DATA> line 755.
Operations logged to /tmp/zmsetup.20160804-170455.log
Installing LDAP configuration database...done.
Setting defaults...

DNS ERROR resolving MX for mail.zimbra-demo.com
It is suggested that the domain name have an MX record configured in DNS
Re-Enter domain name? [Yes] yes
Create domain: [mail.zimbra-demo.com] zimbra-demo.com
MX: mail.zimbra-demo.com (172.31.26.109)

Interface: 172.31.26.109
Interface: 127.0.0.1
Interface: ::1
done.
Checking for port conflicts

Main menu

1) Common Configuration:
2) zimbra-ldap:                                                 Enabled
3) zimbra-logger:                                              Enabled
4) zimbra-mta:                                                  Enabled
5) zimbra-snmp:                                               Enabled
6) zimbra-store:                                                Enabled
+Create Admin User:                                       yes
+Admin user to create:                                    admin@zimbra-demo.com
******* +Admin Password                             UNSET
+Anti-virus quarantine user:                          virus-quarantine.h4n6gggw@zimbra-demo.com
+Enable automated spam training:                yes
+Spam training user:                                        spam.wv02wfpi@zimbra-demo.com
+Non-spam(Ham) training user:                    ham.c4zyg7r9m@zimbra-demo.com
+SMTP host:                                                      mail.zimbra-demo.com
+Web server HTTP port:                                 8080
+Web server HTTPS port:                               8443
+Web server mode:                                           https
+IMAP server port:                                           7143
+IMAP server SSL port:                                   7993
+POP server port:                                              7110
+POP server SSL port:                                      7995
+Use spell check server:                                    yes
+Spell server URL:                                             http://mail.zimbra-demo.com:7780/aspell.php
+Enable version update checks:                       TRUE
+Enable version update notifications:            TRUE
+Version update notification email:                admin@zimbra-demo.com
+Version update source email:                         admin@zimbra-demo.com
+Install mailstore (service webapp):               yes
+Install UI (zimbra,zimbraAdmin webapps): yes

7) zimbra-spell:                                                   Enabled
8) zimbra-proxy:                                                 Enabled
9) Default Class of Service Configuration:
s) Save config to file
x) Expand menu
q) Quit

Address unconfigured (**) items  (? - help) 6
Maintenant, vous devez configurer les éléments marqués de quelques étoiles (****) devant eux. Comme vous le voyez dans la sortie ci-dessus, l'élément "mot de passe administrateur" n'est pas configuré. Cet élément se trouve sous le module Zimbra Store, qui porte le numéro 6. Pour configurer le mot de passe administrateur, entrez le numéro 6.
Paramétrage de la boutique
1) État :Activé
2) Créer un utilisateur administrateur :oui
3) Utilisateur admin à créer :admin@zimbra-demo.com
** 4) Mot de passe administrateur UNSET
5) Utilisateur de la quarantaine antivirus :virus-quarantine.h4n6gggw@zimbra-demo.com
6) Activer la formation automatique au spam :oui
7) Utilisateur de la formation anti-spam :spam.wv02wfpi@zimbra-demo.com
8) Utilisateur de formation non spam (Ham) :ham.c4zyg7r9m@zimbra-demo.com
9) Hôte SMTP :mail.zimbra-demo.com
10) Port HTTP du serveur Web :8080
11) Port HTTPS du serveur Web :8443
12) Mode serveur Web :https
13) Port du serveur IMAP :7143
14) Port SSL du serveur IMAP :7993
15) Port du serveur POP :7110
16) Port SSL du serveur POP :7995
17) Utiliser le serveur de vérification orthographique :oui
18) URL du serveur orthographique :http://mail.zimbra-demo.com:7780/aspell.php
19) Activer les vérifications de mise à jour de version :TRUE
20) Activer les notifications de mise à jour de version :TRUE
21) E-mail de notification de mise à jour de version :admin@zimbra-demo.com
22) E-mail de la source de mise à jour de la version :admin@zimbra-demo.com
23) Installer mailstore (service webapp) :oui
24) Installer l'interface utilisateur (zimbra, zimbraAdmin webapps) :oui
Sélectionnez, ou 'r' pour le menu précédent [r] 4
Définissez maintenant le mot de passe pour l'utilisateur administrateur.
Password for admin@zimbra-demo.com (min 6 characters): [gbjep4Py1] zimbra.123
Store configuration

1) Status:                                             Enabled
2) Create Admin User:                                  yes
3) Admin user to create:                               admin@zimbra-demo.com
4) Admin Password                                      set
5) Anti-virus quarantine user:                         virus-quarantine.h4n6gggw@zimbra-demo.com
6) Enable automated spam training:                  yes
7) Spam training user:                                 spam.wv02wfpi@zimbra-demo.com
8) Non-spam(Ham) training user:                     ham.c4zyg7r9m@zimbra-demo.com
9) SMTP host:                                          mail.zimbra-demo.com
10) Web server HTTP port:                              8080
11) Web server HTTPS port:                             8443
12) Web server mode:                                   https
13) IMAP server port:                                  7143
14) IMAP server SSL port:                              7993
15) POP server port:                                   7110
16) POP server SSL port:                               7995
17) Use spell check server:                            yes
18) Spell server URL:                                  http://mail.zimbra-demo.com:7780/aspell.php
19) Enable version update checks:                      TRUE
20) Enable version update notifications:            TRUE
21) Version update notification email:                admin@zimbra-demo.com
22) Version update source email:                       admin@zimbra-demo.com
23) Install mailstore (service webapp):                yes
24) Install UI (zimbra,zimbraAdmin webapps):  yes

Select, or 'r' for previous menu [r] r
Maintenant, entrez 'r' pour revenir au menu précédent.
Main menu

1) Common Configuration:
2) zimbra-ldap:                              Enabled
3) zimbra-logger:                            Enabled
4) zimbra-mta:                               Enabled
5) zimbra-snmp:                             Enabled
6) zimbra-store:                             Enabled
7) zimbra-spell:                             Enabled
8) zimbra-proxy:                            Enabled
9) Default Class of Service Configuration:
s) Save config to file
x) Expand menu
q) Quit
La configuration est maintenant terminée. Appuyez sur "a" pour appliquer et tapez "oui" pour terminer la configuration.
*** CONFIGURATION COMPLETE - press 'a' to apply
Select from menu, or press 'a' to apply config (? - help) a
Save configuration data to a file? [Yes] yes
Save config in file: [/opt/zimbra/config.31029]
Saving config in /opt/zimbra/config.31029...done.
The system will be modified - continue? [No] yes
Operations logged to /tmp/zmsetup.20160804-170455.log
Setting local config values...done.
Initializing core config...Setting up CA...done.
Deploying CA to /opt/zimbra/conf/ca ...done.
Creating SSL zimbra-store certificate...done.
Creating new zimbra-ldap SSL certificate...done.
Creating new zimbra-mta SSL certificate...done.
Creating new zimbra-proxy SSL certificate...done.
Installing mailboxd SSL certificates...done.
Installing MTA SSL certificates...done.
Installing LDAP SSL certificate...done.
Installing Proxy SSL certificate...done.
Initializing ldap...done.
Setting replication password...done.
Setting Postfix password...done.
Setting amavis password...done.
Setting nginx password...done.
Setting BES searcher password...done.
Creating server entry for mail.zimbra-demo.com...done.
Setting Zimbra IP Mode...done.
Saving CA in ldap...done.
Saving SSL Certificate in ldap...done.
Setting spell check URL...done.
Setting service ports on mail.zimbra-demo.com...done.
Setting zimbraFeatureTasksEnabled=TRUE...done.
Setting zimbraFeatureBriefcasesEnabled=TRUE...done.
Checking current setting of zimbraReverseProxyAvailableLookupTargets
Querying LDAP for other mailstores
Searching LDAP for reverseProxyLookupTargets...done.
Adding mail.zimbra-demo.com to zimbraReverseProxyAvailableLookupTargets
Setting TimeZone Preference...done.
Initializing mta config...done.
Setting services on mail.zimbra-demo.com...done.
Adding mail.zimbra-demo.com to zimbraMailHostPool in default COS...done.
Creating domain zimbra-demo.com...done.
Setting default domain name...done.
Creating domain zimbra-demo.com...already exists.
Creating admin account admin@zimbra-demo.com...done.
Creating root alias...done.
Creating postmaster alias...done.
Creating user spam.wv02wfpi@zimbra-demo.com...done.
Creating user ham.c4zyg7r9m@zimbra-demo.com...done.
Creating user virus-quarantine.h4n6gggw@zimbra-demo.com...done.
Setting spam training and Anti-virus quarantine accounts...done.
Initializing store sql database...done.
Setting zimbraSmtpHostname for mail.zimbra-demo.com...done.
Configuring SNMP...done.
Setting up syslog.conf...done.
Starting servers...done.
Installing common zimlets...
com_zimbra_mailarchive...done.
com_zimbra_srchhighlighter...done.
com_zimbra_viewmail...done.
com_zimbra_attachmail...done.
com_zimbra_url...done.
com_zimbra_ymemoticons...done.
com_zimbra_cert_manager...done.
com_zimbra_proxy_config...
com_zimbra_url...done.
com_zimbra_ymemoticons...done.
com_zimbra_cert_manager...done.
com_zimbra_proxy_config...done.
com_zimbra_adminversioncheck...done.
com_zimbra_tooltip...done.
com_zimbra_date...done.
com_zimbra_webex...done.
com_zimbra_email...done.
com_zimbra_bulkprovision...done.
com_zimbra_attachcontacts...done.
com_zimbra_phone...done.
com_zimbra_clientuploader...done.
Finished installing common zimlets.
Restarting mailboxd...done.
Creating galsync account for default domain...done.

You have the option of notifying Zimbra of your installation.
This helps us to track the uptake of the Zimbra Collaboration Server.
The only information that will be transmitted is:
The VERSION of zcs installed (8.7.0_GA_1659_UBUNTU16_64)
The ADMIN EMAIL ADDRESS created (admin@zimbra-demo.com)

Notify Zimbra of your installation? [Yes] Notifying Zimbra of installation via http://www.zimbra.com/cgi-bin/notify.cgi?VER=8.7.0_GA_1659_UBUNTU16_64&MAIL=admin@zimbra-demo.com

Notification complete
Setting up zimbra crontab...done.
Moving /tmp/zmsetup.20160804-154559.log to /opt/zimbra/log
Configuration complete - press return to exit
L'installation de Zimbra est maintenant terminée. Accédez à la console d'administration à l'aide de votre navigateur Web préféré sur https://mail.zimbra-demo.com:7071
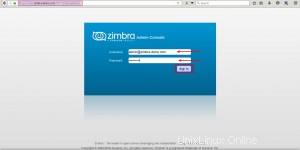
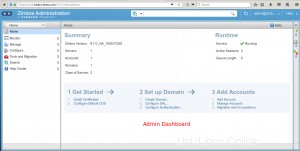
Cliquez sur "Connexion", vous serez redirigé vers le tableau de bord d'administration de Zimbra.
Accédez à la console Web à l'aide de votre navigateur Web préféré sur https://mail.zimbra-demo.com:7071
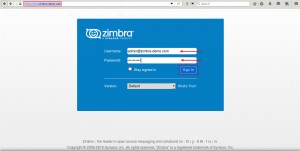
Cliquez sur "Connexion", vous serez dans la boîte aux lettres de l'administrateur.
Vous pouvez obtenir l'erreur suivante en essayant d'accéder aux URL ci-dessus.
Problem accessing ZCS upstream server. Reason: Cannot connect to the ZCS upstream server. Connection timeout.
Possible reasons:

upstream server is blocked by a firewall

upstream server is failing to send back the response in time

upstream server is down

Please contact your ZCS administrator to fix the problem.
Powered by Nginx-Zimbra://
Accéder à l'URL à l'aide de curl entraîne la même erreur de délai d'attente de la passerelle 504
zimbra@mail:/root$ curl -I -k https://mail.zimbra-demo.com
HTTP/1.1 504 Gateway Time-out
Server: nginx
Date: Fri, 05 Aug 2016 01:45:12 GMT
Content-Type: text/html
Content-Length: 1193
Connection: keep-alive
ETag: "5760599a-4a9"
Cela est dû au fait que le serveur en amont prend plus de temps que la valeur de délai d'attente configurée et, par conséquent, le client a fermé la connexion en amont. Remplacez les valeurs de délai d'attente par une valeur supérieure. Exécutez les deux commandes suivantes pour ignorer les échecs qui déconnectent les serveurs de boîtes aux lettres et également pour vous reconnecter immédiatement à tous les serveurs de boîtes aux lettres en cas d'échec.
root@mail:~$ su zimbra
zimbra@mail:~$ cd /opt/zimbra/bin
zimbra@mail:~/bin$ ./zmprov mcf zimbraMailProxyReconnectTimeout 0
zimbra@mail:~/bin$ ./zmprov mcf zimbraMailProxyMaxFails 0
Redémarrez les proxys pour régénérer les fichiers de configuration nginx avec les valeurs mises à jour pour 'fail_timeout' &'max_fails'.
zimbra@mail:~/bin$ zmproxyctl restart
Arrêt du proxy... terminé.
Démarrage du proxy... terminé.

Essayez d'accéder à l'URL de messagerie à l'aide de CURL.
zimbra@mail:~/bin$ curl -I -k https://mail.zimbra-demo.com
HTTP/1.1 200 OK
Server: nginx
Date: Fri, 05 Aug 2016 02:17:16 GMT
Content-Type: text/html;charset=utf-8
Content-Length: 0
Connection: keep-alive
X-Frame-Options: SAMEORIGIN
Expires: -1
Cache-Control: no-store, no-cache, must-revalidate, max-age=0
Pragma: no-cache
Content-Language: en-US
Set-Cookie: ZM_TEST=true;Secure
Vary: User-Agent
X-UA-Compatible: IE=edge
Vous pourrez maintenant vous connecter au serveur de messagerie .
4. Configurer le pare-feu
ZCS utilise de nombreux ports pour offrir ses services. C'est à vous de décider quels services vous souhaitez restreindre du domaine public ou qui sont offerts au public. Une liste complète des numéros de port utilisés par ZCS peut être trouvée ici https://wiki.zimbra.com/wiki/Ports Supposons que vous souhaitiez accéder à la console d'administration de zimbra depuis l'extérieur de votre réseau, c'est-à-dire depuis le domaine public, vous allez ajouter le règles suivantes en fonction du pare-feu que vous utilisez.
# sudo ufw allow 7071/tcp
OR
# sudo iptables -A INPUT -m state --state NEW -p tcp --dport 7071 -j ACCEPT
Par défaut, vous souhaitez ouvrir les ports suivants pour un accès public.
25 80 110 143 443 465 587 993 995 3443 9071
Démarrez maintenant le pare-feu.
# service ufw enable
OR
# service iptables start
5. Commandes Zimbra
Vous pouvez contrôler le serveur zimbra à l'aide de la commande zmcontrol pour démarrer/arrêter le serveur zimbra.
Arrêtez le serveur en utilisant la commande suivante.
zimbra@mail:~$ zmcontrol stop

Host mail.zimbra-demo.com
Stopping zmconfigd...Done.
Stopping zimlet webapp...Done.
Stopping zimbraAdmin webapp...Done.
Stopping zimbra webapp...Done.
Stopping service webapp...Done.
Stopping stats...Done.
Stopping mta...Done.
Stopping spell...Done.
Stopping snmp...Done.
Stopping cbpolicyd...Done.
Stopping archiving...Done.
Stopping opendkim...Done.
Stopping amavis...Done.
Stopping antivirus...Done.
Stopping antispam...Done.
Stopping proxy...Done.
Stopping memcached...Done.
Stopping mailbox...Done.
Stopping logger...Done.
Stopping dnscache...Done.
Stopping ldap...Done.
Démarrez le serveur en utilisant la commande suivante.
root@mail:~# sur zimbra
zimbra@mail:/root$ zmcontrol start
Host mail.zimbra-demo.com
Starting ldap...Done.
Starting zmconfigd...Done.
Starting logger...Done.
Starting mailbox...Done.
Starting memcached...Done.
Starting proxy...Done.
Starting amavis...Done.
Starting antispam...Done.
Starting antivirus...Done.
Starting opendkim...Done.
Starting snmp...Done.
Starting spell...Done.
Starting mta...Done.
Starting stats...Done.
Starting service webapp...Done.
Starting zimbra webapp...Done.
Starting zimbraAdmin webapp...Done.
Starting zimlet webapp...Done.
Trouvez l'état du serveur zimbra.
zimbra@mail:/root$ zmcontrol status
Host mail.zimbra-demo.com
amavis                   Running
antispam               Running
antivirus                Running
ldap                      Running
logger                    Running
mailbox                 Running
memcached           Running
mta                       Running
opendkim              Running
proxy                     Running
service webapp      Running
snmp                      Stopped
zmswatch is not running.
spell                     Running
stats                     Running
zimbra webapp       Running
zimbraAdmin webapp      Running
zimlet webapp           Running
zmconfigd               Running
zmbackup - Prend des sauvegardes complètes et des sauvegardes incrémentielles de l'hôte de messagerie.
zmclamdctl – Start, stop and find the status of Clam AV.
zmlocalconfig – To set or get the local configuration of a Zimbra server for tuning zimbra.
zmloggerctl – Start, stop, reload and find the status of the Zimbra logger service.
Conclusion
Although zimbra comes with lot of features, it consumes a lot of server resources. So it is advisable to install it in a server that matches the basic requirements like at least 4GB RAM, 2GHz. processor speed etc. The advantages of using zimbra are many - zimbra is open source, it has powerful admin tool, reliable message threading, BES support, extends zimbras's functionality with zimlets, spam protection, virus protection and above all you are retaining the data. So whatever is the requirement for mail server in a business environment, zimbra is likely to deliver efficiently.