Installation et configuration d'Icinga (solution de surveillance) sur CentOS
Icinga est un système de surveillance open source de niveau entreprise qui surveille les réseaux et toute ressource réseau imaginable, avertit l'utilisateur des erreurs et des récupérations et génère des données de performance pour les rapports. Évolutif et extensible, Icinga peut surveiller des environnements complexes et étendus sur des sites dispersés.
Je vais avec l'installation de base d'Icinga et c'est similaire à Nagios et ce document peut également être référencé pour l'installation de Nagios. De nombreux documents sont disponibles sur Internet et ils seront installés avec l'utilisateur nagios mais pour ma configuration, j'ai utilisé l'utilisateur par défaut qui est déjà présent dans le système (démon) et je ne l'installerai pas sur le chemin par défaut à la place Je ferai référence à /opt car je le trouve très pratique. L'interface utilisateur d'Icinga est bien meilleure que celle de Nagios.
Dans ce tutoriel, j'utiliserai trois serveurs :
192.168.1.20 – Serveur de surveillance Icinga (centos5)
192.168.1.30 – Win 2008 à surveiller
192.168.1.40 – Serveur Ubuntu 10.10 à surveiller
Exigences
Remarque :Assurez-vous que les outils de développement et les bibliothèques de développement ont été installés lors de l'installation :
- Compilateur GCC
- Bibliothèques de développement C/C++
- Bibliothèques de développement GD
Packages nécessaires
1. Xampp pour Linux :
[[email protected]~]# mkdir /software
[[email protected]~]# cd /software
[[email protected] software]# wget http://sourceforge.net/projects/xampp /files/XAMPP%20Linux/1.7.3/xampp-linux-1.7.3.tar.gz/download
2. Noyau glacé :
[[email protected] software]# wget http://sourceforge.net/projects/icinga/files/icinga/1.2.1/icinga-1.2.1.tar.gz/download
Installation d'Icinga
1. Décompressez le package xampp :
[[email protected] software]# tar -zxvf xampp-linux-1.7.3.tar.gz
[[email protected] software]# mv lampp/ /opt/
Le package Xampp est un package très soigneusement compilé et l'extraire est plus que suffisant pour plus de détails, vous pouvez vous référer à la page xampp :
http://www.apachefriends.org/en/xampp.html
2. Décompressez le package Icinga :
[[email protected] software]# tar -zxvf icinga-1.2.1.tar.gz
[[email protected] software]# cd icinga-1.2.1
[[email protected] icinga-1.2 .1]# ./configure --prefix=/opt/icinga --with-icinga-user=daemon --with-icinga-group=daemon --with-httpd-conf=/opt/lampp/etc
Remarque :assurez-vous de ne pas avoir d'erreur lors de la compilation. Si vous obtenez des erreurs, assurez-vous que les packages requis sont installés.
[[email protected] icinga-1.2.1]# make all
[[email protected] icinga-1.2.1]# make install
[[email protected] icinga-1.2.1]# make install -config
[[email protected] icinga-1.2.1]# make install-commandmode
[[email protected] icinga-1.2.1]# make install-webconf
3. Il faut maintenant configurer Apache avec Icinga :
[[email protected] icinga-1.2.1]# cd /opt/lampp/etc/
[[email protected]]# vim httpd.conf
4. Ajoutez la ligne suivante :
Include etc/icinga.conf
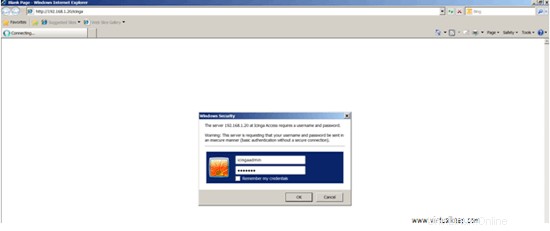
5. Définissez le mot de passe pour la connexion :
[[email protected] /]# cd /opt/lampp/bin/
[[email protected] bin]# ./htpasswd –c /opt/icinga/etc/htpasswd.users icingaadmin
Nouveau mot de passe :
Retaper le nouveau mot de passe :
Ajout du mot de passe pour l'utilisateur icingaadmin
6. Démarrez Apache :
[[email protected]]# cd /opt/lampp/
[[email protected]]# ./lamp startapache
XAMPP :Démarrage d'Apache avec SSL (et PHP5)...
XAMPP :Erreur 1 ! Impossible de démarrer Apache !
XAMPP :Démarrage du diagnostic...
XAMPP :Adapter le fichier httpd.conf à votre système.
XAMPP :Prochain essai...
XAMPP :Démarrage Apache avec SSL (et PHP5)...
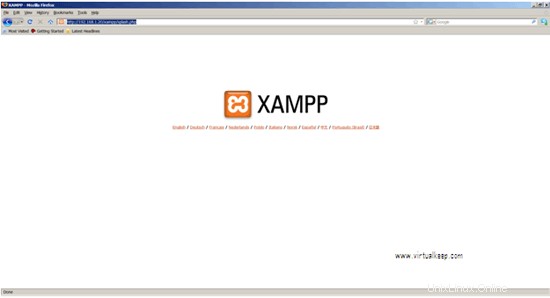
7. Vérifiez si Apache fonctionne :
http://192.168.1.20
8. Maintenant, nous devons démarrer Icinga mais avant cela, nous devons vérifier si Icinga a été compilé correctement et si toute la configuration est définie :
[[email protected]]# cd /opt/icinga/
9. Avant de configurer Icinga, nous allons commencer et voir si nous obtenons la page :
[[email protected]]# /opt/icinga/bin/icinga –v /opt/icinga/etc/icinga.cfg
Total des avertissements :0
Total des erreurs :0
Tout semble correct - Aucun problème sérieux n'a été détecté lors de la vérification pré-vol.
10. Maintenant, démarrez Icinga puisque nous n'obtenons aucune erreur :
[[email protected]]# /opt/icinga/bin/icinga -d /opt/icinga/etc/icinga.cfg
[[email protected]]# ps -ef|grep icinga
démon 6961 1 0 19:03 ? 00:00:00 /opt/icinga/bin/icinga -d /opt/icinga/etc/icinga.cfg
root 6998 2929 0 19:05 pts/1 00:00:00 grep icinga
[[email protected]]# chmod 777 /opt/
[[email protected]]# chmod 777 /opt/icinga/
[[email protected]]# chmod 777 /opt/icinga/var/
[[email protected]]# chmod 777 /opt/icinga/var/rw/
[[email protected]]# chmod 777 /opt/icinga/var/rw/icinga.cmd
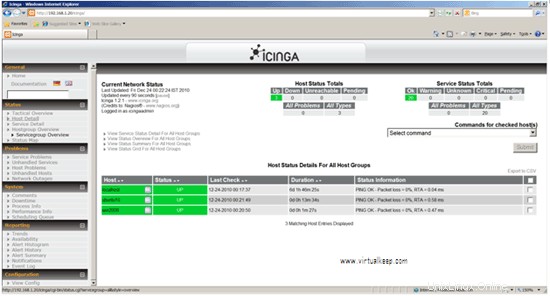
11. Connectez-vous pour vérifier si le site Web d'Icinga s'ouvre :

Installation des plugins Nagios pour le monitoring
1. Téléchargez le plugin Nagios et compilez-le :
[[email protected] software]# wget http://prdownloads.sourceforge.net/sourceforge/nagiosplug/nagios-plugins-1.4.15.tar.gz
[[email protected] software]# tar -zxvf nagios -plugins-1.4.15.tar.gz
[[email protected] logiciel]# cd nagios-plugins-1.4.15
[[email protected] nagios-plugins-1.4.15]# ./ configure --prefix=/opt/icinga/ --with-nagios-user=daemon --with-nagios-group=daemon
[[email protected] nagios-plugins-1.4.15]# make &&make install
Personnalisation d'Icinga
Configuration des alertes mail :
[[email protected] /]# cd /opt/icinga/etc/
[[email protected]]# vi objects/contacts.cfg
define contact{
contact_nameicingaadmin             ; Short name of user
use     generic-contact         ; Inherit default values from generic-contact template (defined above)
alias Icinga Admin            ; Full name of user
[email protected]        ; <<***** CHANGE THIS TO YOUR EMAIL ADDRESS ******
        }
Remplacez l'adresse e-mail [email protected] par votre adresse e-mail [email protected].
Assurez-vous d'avoir configuré smarthost sur le serveur CentOS.
Pour configurer l'hôte intelligent dans CentOS
[[email protected]]# rpm -qa|grepsendmail
sendmail-8.13.8-2.el5
[[email protected]]# vim /etc/mail/sendmail.mc
Désactivez la ligne suivante :
DAEMON_OPTIONS(`Port=smtp,Addr=127.0.0.1, Name=MTA')dnl
dnl#DAEMON_OPTIONS(`Port=smtp,Addr=127.0.0.1, Name=MTA')dnl
Activez la ligne suivante :
dnl define(`SMART_HOST', `smtp.your.provider')dnl
Donnez votre adresse smtp ici - dans ce cas sunil.cc :
define(`SMART_HOST', `smtp.sunil.cc')dnl
[[email protected] /]#m4 /etc/mail/sendmail.mc> /etc/mail/sendmail.cf
[[email protected] /]#/etc/init.d/sendmail restart
Installation du plugin Nagios et nrpe dans Ubuntu 192.168.1.40
1. Pour qu'Ubuntu soit surveillé par le serveur Icinga, nous devons installer le plugin Nagios et nrpe :
[email protected]:~# apt-get install gcc*
[email protected]:~#wget http://prdownloads.sourceforge.net/sourceforge/nagiosplug/nagios-plugins-1.4.15.tar.gz
[email protected]:~# tar -zxvf nagios-plugins-1.4.15.tar.gz
2. Compilation du plugin Nagios :
[email protected] :~# cd nagios-plugins-1.4.15/
[email protected] :~/nagios-plugins-1.4.15# ./configure --with-nagios-user=daemon --with -nagios-group=daemon
[email protected] :~/nagios-plugins-1.4.15# make &&make install
[email protected] :~/nagios-plugins-1.4.15# chown - Démon R :démon /usr/local/nagios/
Installation de NRPE (Nagios Remote Plugin Executor)
1. Téléchargez et compilez NRPE :
[email protected]:~# wget http://prdownloads.sourceforge.net/sourceforge/nagios/nrpe-2.12.tar.gz
[email protected] :~# tar -zxvf nrpe-2.12.tar.gz
[email protected] :~# cd nrpe-2.12/
[email protected] :~/nrpe-2.12# apt- get install openssllibssl-dev
[email protected] :~# make all
[email protected] :~# make install-plugin
[email protected] :~# make install-daemon
[email protected] :~# make install-daemon-config
[email protected] :~/nrpe-2.12# apt-get installxinetd
[email protected] :~# make install-xinetd
2. Nous devons configurer le nrpe en tant que service xinetd :
[email protected]:~/nrpe-2.12# vim /etc/xinetd.d/nrpe
servicenrpe
{
flags           = REUSE
socket_type     = stream
port            = 5666
wait            = no
user            = daemon
group           = daemon
server          = /usr/local/nagios/bin/nrpe
server_args     = -c /usr/local/nagios/etc/nrpe.cfg --inetd
log_on_failure  += USERID
disable         = no
only_from       = 127.0.0.1
}
3. Modifiez en ajoutant l'IP du serveur Icinga dans only_from :
servicenrpe
{
flags           = REUSE
socket_type     = stream
port            = 5666
wait            = no
user            = daemon
group           = daemon
server          = /usr/local/nagios/bin/nrpe
server_args     = -c /usr/local/nagios/etc/nrpe.cfg --inetd
log_on_failure  += USERID
disable         = no
only_from       = 127.0.0.1 192.168.1.20
}
4. Nous devons maintenant l'exécuter en tant que service en ajoutant la ligne suivante :
[email protected]:~# vim /etc/services
nrpe 5666/tcp
5. Redémarrez le service xinetd :
[email protected]:~# /etc/init.d/xinetd restart
6. Vérifiez si nrpe a démarré :
[email protected]:~# netstat -a |grep nrpe
Pour vérifier si Ubuntu est capable de communiquer avec le serveur Icinga :
[email protected]:~# /usr/local/nagios/libexec/check_nrpe -H localhost
NRPE v2.12
Vous devriez pouvoir obtenir cette sortie.
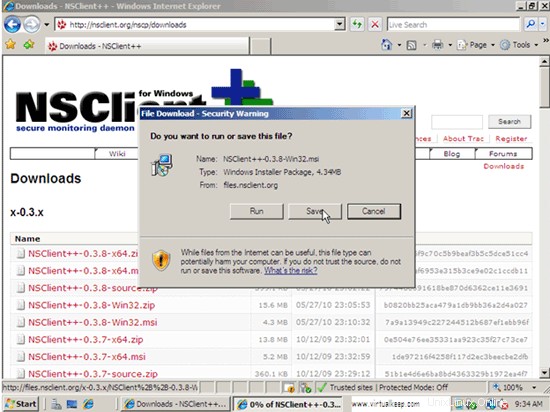
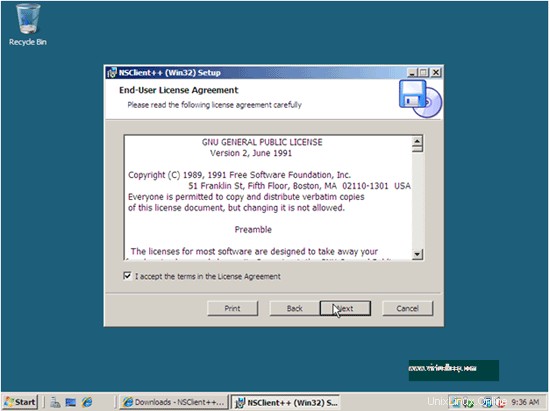
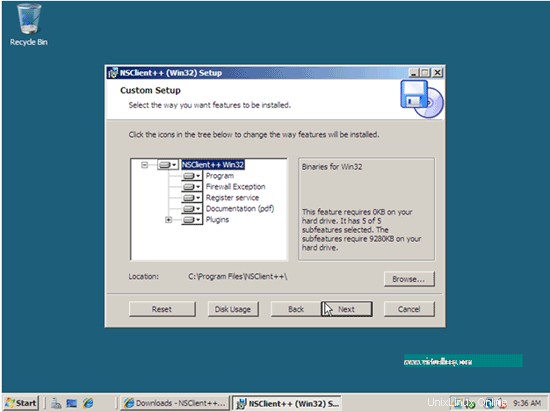
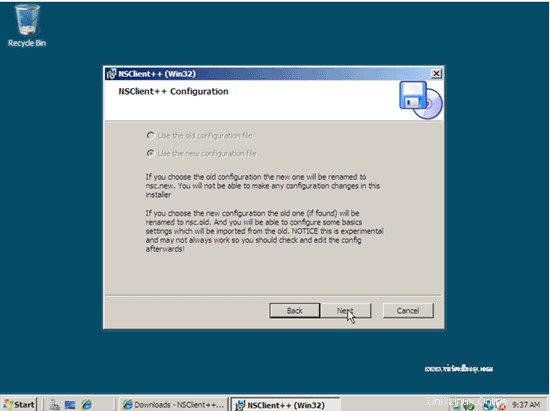
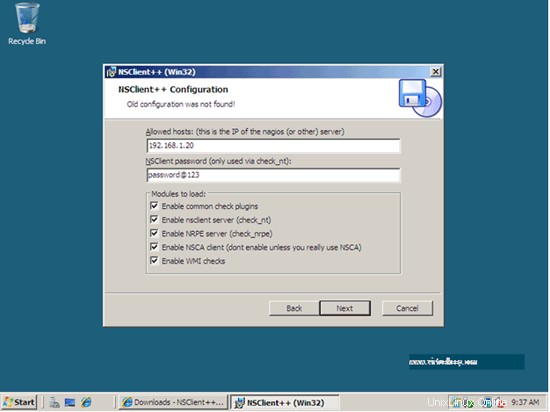
Configuration côté client Windows 2008 (192.168.1.30)
1. Téléchargez depuis http://nsclient.org/nscp/downloads.
2. Suivez simplement les captures d'écran :


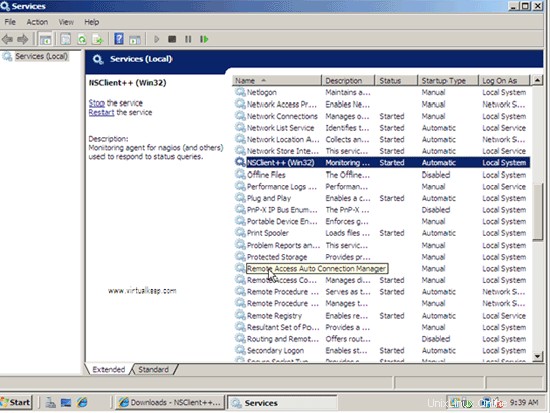
3. Vérifiez que nsclient++ s'exécute en tant que service :
Configuration d'Ubuntu et Win 2008 côté serveur
1.
[[email protected] /]# cd /opt/icinga/etc/objects/
2. Nous configurons d'abord le client Ubuntu.
3. Créez un fichier cfg pour le même avec le contenu suivant, vous pouvez également vous référer à localhost.cfg présent dans le même répertoire :
[[email protected] ~]# vim /opt/icinga/etc/objects/ubuntu10.cfg
define host{
uselinux-server
host_name ubuntu10
alias ubuntu10
address 192.168.1.40
}
define service{
use local-service
host_name ubuntu10
service_description PING
check_command check_ping!100.0,20%!500.0,60%
}
define service{
use local-service
host_name ubuntu10
service_description Root
check_command check_local_disk!20%!10%!/
}
define service{
use local-service
host_name ubuntu10
service_description Current Users
check_command check_local_users!20!50
}
define service{
use local-service
host_name ubuntu10
service_description Total Processes
check_command check_local_procs!250!400!RSZDT
}
define service{
use local-service
host_name ubuntu10
service_description Current Load
check_command check_local_load!5.0,4.0,3.0!10.0,6.0,4.0
}
define service{
use local-service
host_name ubuntu10
service_description Swap Usage
check_command check_local_swap!20!10
}
define service{
use local-service
host_name ubuntu10
service_description SSH
check_commandcheck_ssh
notifications_enabled 0
}
Pour regrouper les serveurs, vous pouvez ajouter cette ligne à ubuntu10.cfg :
definehostgroup{
hostgroup_namelinux-servers ; The name of the hostgroup
alias           Linux Servers ; Long name of the group
memberslocalhost, ubuntu10     ; Comma separated list of hosts that belong to this group
        }
4. Pour Windows 2008, nous ferons référence à windows.cfg :
define host{
use             windows-server  ; Inherit default values from a template
host_namewin2008 ; The name we're giving to this host
alias           My Windows Server       ; A longer name associated with the host
address         192.168.1.30    ; IP address of the host
        }

define service{
use                     generic-service
host_name               win2008
service_descriptionNSClient++ Version
check_commandcheck_nt!CLIENTVERSION
        }
define service{
use                     generic-service
host_name               win2008
service_description     Uptime
check_commandcheck_nt!UPTIME
        }
define service{
use                     generic-service
host_name               win2008
service_description     CPU Load
check_commandcheck_nt!CPULOAD!-l 5,80,90
        }
define service{
use                     generic-service
host_name               win2008
service_description     Memory Usage
check_commandcheck_nt!MEMUSE!-w 80 -c 90
        }
define service{
use                     generic-service
host_name               win2008
service_description     C:\ Drive Space
check_commandcheck_nt!USEDDISKSPACE!-l c -w 80 -c 90
        }
5. Nous devons définir le mot de passe pour nous connecter au serveur Windows :
[[email protected] etc]# vim objects/commands.cfg
# 'check_nt' command definition
define command{
command_namecheck_nt
command_line    $USER1$/check_nt -H $HOSTADDRESS$ -p 12489 -v $ARG1$ $ARG2$
        }
6. Ajoutez votre mot de passe :
define command{
command_namecheck_nt
command_line    $USER1$/check_nt -H $HOSTADDRESS$ -p 12489 –s [email protected] -v $ARG1$ $ARG2$
        }
[[email protected] objects]# chown -R daemon:daemon /opt/icinga/
[[email protected]]# vimicinga.cfg
cfg_file=/opt/icinga/etc/objects/ubuntu10.cfg
cfg_file=/opt/icinga/etc/objects/win2008.cfg
Ajoutez les deux lignes.
Arrêtez et démarrez Icinga.