Ghost est une plate-forme de blogs gratuite, open-source et légère basée sur Node.js. Il est simple, personnalisable, et vous permet de créer et publier votre contenu sur internet. Il est spécialement conçu pour les blogs, il est donc beaucoup plus rapide que les autres plateformes de blogs. Il offre un riche ensemble de fonctionnalités, dont certaines sont répertoriées ci-dessous :
- Éditeur Markdown
- Publication planifiée
- Fournir une application pour Linux, Mac et Windows
- Fournit des centaines de thèmes gratuits et premium
- Analyses intégrées
- Fournir un plug-in de migration pour migrer de WordPress vers Ghost
Ce tutoriel vous expliquera comment installer Ghost avec Nginx et Let's Encrypt SSL sur Ubuntu 20.04.
Prérequis
- Un serveur exécutant Ubuntu 20.04.
- Un nom de domaine valide pointant vers l'adresse IP de votre serveur.
- Un mot de passe root est configuré sur votre serveur.
Mise en route
Tout d'abord, il est recommandé de mettre à jour le cache du package APT vers la dernière version. Vous pouvez le mettre à jour avec la commande suivante :
apt-get update -y
Une fois le cache APT mis à jour, installez les autres dépendances requises à l'aide de la commande suivante :
apt-get install gnupg2 curl unzip git acl -y
Ensuite, vous devrez également installer Node.js sur votre système.
Tout d'abord, ajoutez le dépôt Node.js avec la commande suivante :
curl -sL https://deb.nodesource.com/setup_12.x | bash -
Une fois le référentiel installé, exécutez la commande suivante pour installer Node.js sur votre système.
apt-get install nodejs -y
Une fois l'installation terminée, vérifiez la version de Node.js à l'aide de la commande suivante :
node -v
Vous devriez obtenir le résultat suivant :
v12.22.1
Ensuite, vérifiez la version de NPM avec la commande suivante :
npm -v
Vous devriez obtenir le résultat suivant :
6.14.12
Installer Nginx et MariaDB
Ensuite, vous devrez installer le serveur Web Nginx et le serveur de base de données MariaDB sur votre système. Vous pouvez installer les deux packages avec la commande suivante :
apt-get install mariadb-server nginx -y
Une fois l'installation terminée, sécurisez l'installation de MariaDB et définissez le mot de passe root de MariaDB avec la commande suivante :
mysql_secure_installation
Répondez à toutes les questions pour sécuriser l'installation de MariaDB :
Enter current password for root (enter for none):
Set root password? [Y/n] Y
New password:
Re-enter new password:
Remove anonymous users? [Y/n] Y
Disallow root login remotely? [Y/n] Y
Remove test database and access to it? [Y/n] Y
Reload privilege tables now? [Y/n] Y
Ensuite, connectez-vous à MariaDB avec la commande suivante :
mysql -u root -p
Une fois connecté, créez une base de données et un utilisateur pour Ghost avec la commande suivante :
MariaDB [(none)]> CREATE DATABASE ghostdb;
MariaDB [(none)]> CREATE USER 'ghostuser'@'localhost' IDENTIFIED BY 'password';
Ensuite, accordez tous les privilèges à la base de données Ghost avec la commande suivante :
MariaDB [(none)]> GRANT ALL ON ghostdb.* TO 'ghostuser'@'localhost';
Ensuite, videz les privilèges et quittez MariaDB avec la commande suivante :
MariaDB [(none)]> FLUSH PRIVILEGES;
MariaDB [(none)]> EXIT;
Une fois que vous avez terminé, vous pouvez passer à l'étape suivante.
Installer Ghost Cli
Ensuite, vous devrez installer le Ghost Cli pour installer et gérer le Ghost. Vous pouvez l'installer à l'aide du NPM comme indiqué ci-dessous :
npm install -g [email protected]
Une fois installé, vérifiez la version installée de Ghost Cli avec la commande suivante :
ghost version
Vous devriez voir le résultat suivant :
Ghost-CLI version: 1.16.3
Installer Ghost
Commencez par créer un utilisateur distinct pour Ghost avec la commande suivante :
adduser user1
Ensuite, ajoutez user1 au groupe sudo et www-data avec la commande suivante :
adduser user1 sudo
adduser user1 www-data
Ensuite, connectez-vous avec user1 et créez un répertoire pour Ghost avec la commande suivante :
su - user1
sudo mkdir /var/www/ghost
Ensuite, définissez l'autorisation et la propriété appropriées avec la commande suivante :
sudo chown -R www-data:www-data /var/www/ghost
sudo chown -R www-data:www-data /var/www/
sudo chmod 775 /var/www/ghost
sudo setfacl -R -m u:user1:rwx /var/www/ghost/
Ensuite, changez le répertoire en ghost et installez la plateforme de blogs Ghost avec la commande suivante :
cd /var/www/ghost
ghost install
Il vous sera demandé de fournir l'URL de votre blog, le nom de la base de données, le nom d'utilisateur, le mot de passe et d'autres informations comme indiqué ci-dessous :
? Enter your blog URL: https://ghost.linuxbuz.com
? Enter your MySQL hostname: localhost
? Enter your MySQL username: ghostuser
? Enter your MySQL password: [hidden]
? Enter your Ghost database name: ghostdb
? Configuring Ghost
? Setting up instance
+ sudo useradd --system --user-group ghost
+ sudo chown -R ghost:ghost /var/www/ghost/content
? Setting up "ghost" system user
? Setting up "ghost" mysql user [skipped]
? Do you wish to set up Nginx? Yes
+ sudo mv /tmp/ghost-linuxbuz-com/ghost.linuxbuz.com.conf /etc/nginx/sites-available/ghost.linuxbuz.com.conf
+ sudo ln -sf /etc/nginx/sites-available/ghost.linuxbuz.com.conf /etc/nginx/sites-enabled/ghost.linuxbuz.com.conf
+ sudo nginx -s reload
? Setting up SSL [skipped]
? Do you wish to set up Systemd? Yes
+ sudo mv /tmp/ghost-linuxbuz-com/ghost_ghost-linuxbuz-com.service /lib/systemd/system/ghost_ghost-linuxbuz-com.service
+ sudo systemctl daemon-reload
? Setting up Systemd
+ sudo systemctl is-active ghost_ghost-linuxbuz-com
? Do you want to start Ghost? (Y/n)
À ce stade, Ghost est installé et démarré.
Sécuriser Ghost avec Let's Encrypt SSL
Ensuite, vous devrez sécuriser Ghost avec Let's Encrypt SSL.
Tout d'abord, installez le client Certbot avec la commande suivante :
sudo apt-get install certbot python3-certbot-nginx -y
Une fois installé, exécutez la commande suivante pour télécharger le SSL Let's Encrypt et configurer Nginx pour utiliser ces certificats :
sudo certbot --nginx -d ghost.linuxbuz.com
Il vous sera demandé de fournir votre adresse e-mail et d'accepter les conditions d'utilisation comme indiqué ci-dessous :
Saving debug log to /var/log/letsencrypt/letsencrypt.log
Plugins selected: Authenticator nginx, Installer nginx
Enter email address (used for urgent renewal and security notices) (Enter 'c' to
cancel): [email protected]

- - - - - - - - - - - - - - - - - - - - - - - - - - - - - - - - - - - - - - - -
Please read the Terms of Service at
https://letsencrypt.org/documents/LE-SA-v1.2-November-15-2017.pdf. You must
agree in order to register with the ACME server at
https://acme-v02.api.letsencrypt.org/directory
- - - - - - - - - - - - - - - - - - - - - - - - - - - - - - - - - - - - - - - -
(A)gree/(C)ancel: A

- - - - - - - - - - - - - - - - - - - - - - - - - - - - - - - - - - - - - - - -
Would you be willing to share your email address with the Electronic Frontier
Foundation, a founding partner of the Let's Encrypt project and the non-profit
organization that develops Certbot? We'd like to send you email about our work
encrypting the web, EFF news, campaigns, and ways to support digital freedom.
- - - - - - - - - - - - - - - - - - - - - - - - - - - - - - - - - - - - - - - -
(Y)es/(N)o: Y
Obtaining a new certificate
Performing the following challenges:
http-01 challenge for ghost.linuxbuz.com
Waiting for verification...
Cleaning up challenges
Deploying Certificate to VirtualHost /etc/nginx/sites-enabled/ghost.linuxbuz.com.conf
Ensuite, choisissez de rediriger ou non le trafic HTTP vers HTTPS :
Please choose whether or not to redirect HTTP traffic to HTTPS, removing HTTP access.
- - - - - - - - - - - - - - - - - - - - - - - - - - - - - - - - - - - - - - - -
1: No redirect - Make no further changes to the webserver configuration.
2: Redirect - Make all requests redirect to secure HTTPS access. Choose this for
new sites, or if you're confident your site works on HTTPS. You can undo this
change by editing your web server's configuration.
- - - - - - - - - - - - - - - - - - - - - - - - - - - - - - - - - - - - - - - -
Select the appropriate number [1-2] then [enter] (press 'c' to cancel): 2
Tapez 2 et appuyez sur Entrée pour terminer l'installation.
Redirecting all traffic on port 80 to ssl in /etc/nginx/sites-enabled/ghost.linuxbuz.com.conf

- - - - - - - - - - - - - - - - - - - - - - - - - - - - - - - - - - - - - - - -
Congratulations! You have successfully enabled https://ghost.linuxbuz.com

You should test your configuration at:
https://www.ssllabs.com/ssltest/analyze.html?d=ghost.linuxbuz.com
- - - - - - - - - - - - - - - - - - - - - - - - - - - - - - - - - - - - - - - -

IMPORTANT NOTES:
 - Congratulations! Your certificate and chain have been saved at:
   /etc/letsencrypt/live/ghost.linuxbuz.com/fullchain.pem
   Your key file has been saved at:
   /etc/letsencrypt/live/ghost.linuxbuz.com/privkey.pem
   Your cert will expire on 2021-07-13. To obtain a new or tweaked
   version of this certificate in the future, simply run certbot again
   with the "certonly" option. To non-interactively renew *all* of
   your certificates, run "certbot renew"
 - Your account credentials have been saved in your Certbot
   configuration directory at /etc/letsencrypt. You should make a
   secure backup of this folder now. This configuration directory will
   also contain certificates and private keys obtained by Certbot so
   making regular backups of this folder is ideal.
 - If you like Certbot, please consider supporting our work by:

   Donating to ISRG / Let's Encrypt:   https://letsencrypt.org/donate
   Donating to EFF:                    https://eff.org/donate-le
Maintenant, vous pouvez vérifier le site Web de Ghost avec la commande suivante :
ghost ls
Vous devriez voir le résultat suivant :
+ sudo systemctl is-active ghost_ghost-linuxbuz-com
??????????????????????????????????????????????????????????????????????????????????????????????????????????????????????????????
? Name               ? Location       ? Version ? Status               ? URL                        ? Port ? Process Manager ?
??????????????????????????????????????????????????????????????????????????????????????????????????????????????????????????????
? ghost-linuxbuz-com ? /var/www/ghost ? 4.2.1   ? running (production) ? https://ghost.linuxbuz.com ? 2368 ? systemd         ?
??????????????????????????????????????????????????????????????????????????????????????????????????????????????????????????????
Vous pouvez également vérifier le service Ghost avec la commande suivante :
sudo systemctl status ghost_ghost-linuxbuz-com
Vous devriez voir le résultat suivant :
? ghost_ghost-linuxbuz-com.service - Ghost systemd service for blog: ghost-linuxbuz-com
     Loaded: loaded (/lib/systemd/system/ghost_ghost-linuxbuz-com.service; enabled; vendor preset: enabled)
     Active: active (running) since Wed 2021-04-14 07:05:33 UTC; 9min ago
       Docs: https://ghost.org/docs/
   Main PID: 7546 (node)
      Tasks: 22 (limit: 2353)
     Memory: 134.3M
     CGroup: /system.slice/ghost_ghost-linuxbuz-com.service
             ??7546 ghost run
             ??7590 /usr/bin/node current/index.js

Apr 14 07:13:44 ubuntu node[7590]: [2021-04-14 07:13:44] INFO "GET /ghost/assets/img/dashboard/start-membership-baafa2c6558d118ae59cb1fddab045>
Apr 14 07:13:44 ubuntu node[7590]: [2021-04-14 07:13:44] INFO "GET /ghost/assets/img/dashboard/the-browser-f5e7e199fe82d8435913e84d022fa7e1.pn>
Apr 14 07:13:44 ubuntu node[7590]: [2021-04-14 07:13:44] INFO "GET /ghost/assets/img/dashboard/join-community-bb5478f7dca6c04a2d0baf2b02f880fb>
Apr 14 07:13:44 ubuntu node[7590]: [2021-04-14 07:13:44] INFO "GET /ghost/api/canary/admin/members/?filter=status%3Apaid&order=created_at%20as>
Apr 14 07:14:11 ubuntu node[7590]: [2021-04-14 07:14:11] INFO "GET /" 200 475ms
Apr 14 07:14:11 ubuntu node[7590]: [2021-04-14 07:14:11] INFO "GET /" 200 480ms
Apr 14 07:14:15 ubuntu node[7590]: [2021-04-14 07:14:15] INFO "GET /members/api/site/" 200 12ms
Apr 14 07:14:18 ubuntu node[7590]: [2021-04-14 07:14:18] INFO "GET /" 304 142ms
Apr 14 07:14:25 ubuntu node[7590]: [2021-04-14 07:14:25] INFO "GET /members/api/site/" 304 4ms
Apr 14 07:14:26 ubuntu node[7590]: [2021-04-14 07:14:26] INFO "GET /members/api/member/" 401 4ms
Accéder à l'interface d'administration Ghost
Maintenant, ouvrez votre navigateur Web et accédez à l'interface d'administration de Ghost en utilisant l'URL https://ghost.linuxbuz.com/ghost/ . Vous devriez voir la page suivante :
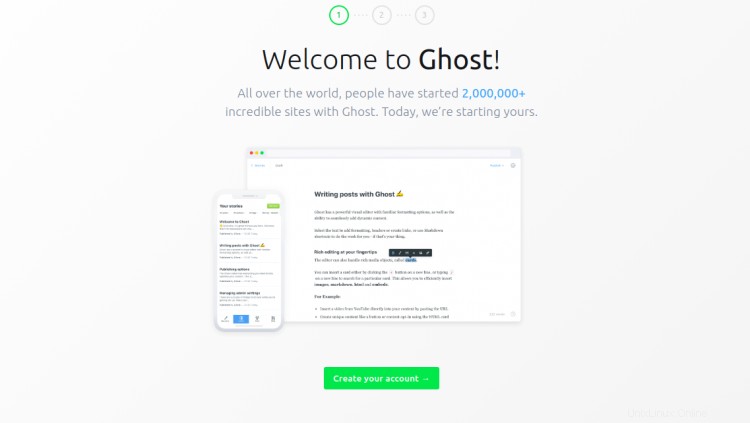
Cliquez sur Créer votre compte bouton pour créer votre premier compte :
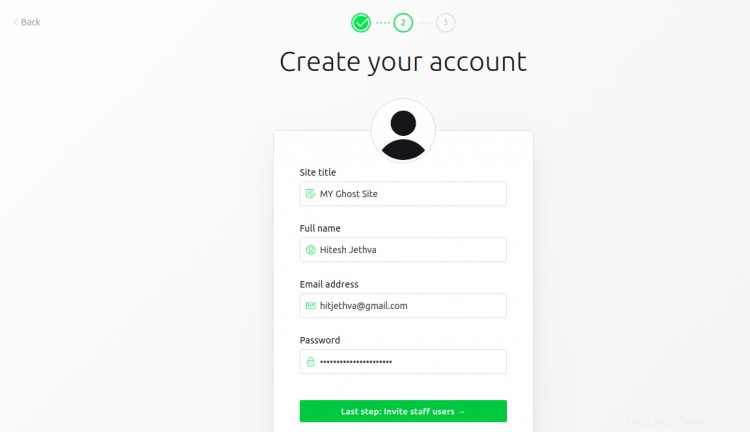
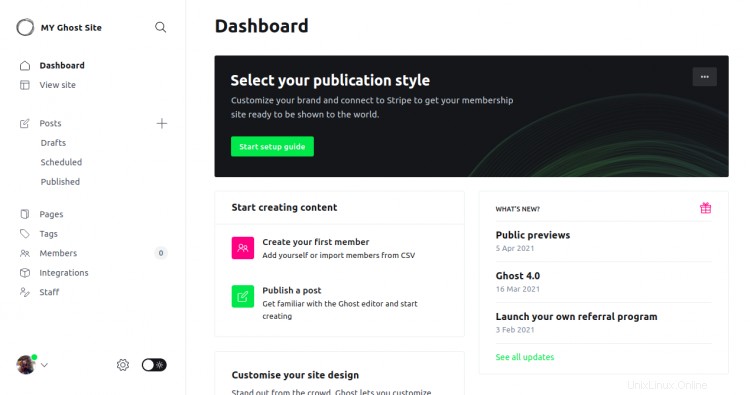
Fournissez les détails de votre compte et cliquez sur Je le ferai plus tard en bas de l'écran. Vous devriez voir l'interface d'administration de Ghost sur la page suivante :
Vous pouvez également accéder à votre site Web Ghost en utilisant l'URL https://ghost.linuxbuz.com/. Vous devriez voir la page suivante :

Conclusion
Toutes nos félicitations! vous avez installé avec succès la plateforme de blogs Ghost sur Ubuntu 20.04. Vous pouvez désormais créer et publier votre propre contenu depuis l'interface Ghost.