Let's Encrypt est une autorité de certification largement connue qui fournit des certificats SSL gratuits pour les sites Web, lancée en avril 2016.
Avec l'aide du client Certbot, la création, la validation, la signature, la mise en œuvre et le renouvellement des certificats sont entièrement automatisés.
Prérequis
Suivez les liens pour installer la pile LAMP ou uniquement le serveur Web Apache sur votre système.
LIRE :Comment installer la pile LAMP sur CentOS 8 / RHEL 8
LIRE :Comment installer la pile LAMP sur CentOS 7 / RHEL 7
Installer le client Certbot
Pour générer et installer un certificat pour n'importe quel domaine, vous devez disposer d'un accès au terminal et du client Certbot ACME installé sur le système. Le client Certbot automatise l'émission et l'installation de certificats sans temps d'arrêt.
Le client Certbot est disponible sur le référentiel EPEL pour CentOS 7 / RHEL 7. Mais nous devons télécharger manuellement le client Certbot pour CentOS 8 / RHEL 8 à partir de son site officiel.
### CentOS 8 / RHEL 8 ###

yum install -y httpd mod_ssl

curl -O https://dl.eff.org/certbot-auto

mv certbot-auto /usr/local/bin/certbot-auto

chmod 0755 /usr/local/bin/certbot-auto

### CentOS 7 ###

rpm -ivh https://dl.fedoraproject.org/pub/epel/epel-release-latest-7.noarch.rpm

yum install -y certbot python2-certbot-apache

### RHEL 7 ###

rpm -ivh https://dl.fedoraproject.org/pub/epel/epel-release-latest-7.noarch.rpm

subscription-manager repos --enable rhel-7-server-optional-rpms

yum install -y certbot python2-certbot-apache
Créer un hôte virtuel
Nous allons créer un hébergeur virtuel pour le domaine :www.itzgeek.net.
Cet hôte virtuel gère la version HTTP de votre domaine.vi /etc/httpd/conf.d/www.itzgeek.net.conf
Utilisez les informations ci-dessous.
<VirtualHost *:80>
  ServerName itzgeek.net
  ServerAlias www.itzgeek.net
  DocumentRoot /var/www/www.itzgeek.net

  <Directory /var/www/www.itzgeek.net>
      Options -Indexes +FollowSymLinks
      AllowOverride All
  </Directory>

  ErrorLog /var/log/httpd/www.itzgeek.net-error.log
  CustomLog /var/log/httpd/www.itzgeek.net-access.log combined
</VirtualHost>
Créez une racine de document pour placer vos fichiers HTML.
mkdir -p /var/www/www.itzgeek.net
Placez le fichier HTML à la racine du document de votre domaine.
echo "This is a test site @ www.itzgeek.net" > /var/www/www.itzgeek.net/index.html
Modifier l'autorisation du répertoire.
chown -R apache:apache /var/www/www.itzgeek.net
Redémarrez le service Apache.
systemctl restart httpd
Créer/mettre à jour l'enregistrement DNS
Accédez à votre bureau d'enregistrement de domaine et créez un enregistrement A/CNAME pour votre domaine. Ex :www.itzgeek.net.

Attendez un moment pour laisser l'enregistrement se propager.
Vérifiez la propagation DNS à l'aide de l'utilitaire Nslookup yum install -y bind-utils.

Installer le certificat SSL Let's Encrypt
Utilisez la commande certbot pour générer et installer le certificat Let's Encrypt.
### RHEL 8 ###

/usr/local/bin/certbot-auto --apache

### CentOS 7 / RHEL 7 ###

certbot --apache
Suivez l'invite interactive et installez le certificat.
Saving debug log to /var/log/letsencrypt/letsencrypt.log
Plugins selected: Authenticator apache, Installer apache
Enter email address (used for urgent renewal and security notices) (Enter 'c' to
cancel): itzgeek.web@gmail.com  << Enter Email address to receive notifications

- - - - - - - - - - - - - - - - - - - - - - - - - - - - - - - - - - - - - - - -
Please read the Terms of Service at
https://letsencrypt.org/documents/LE-SA-v1.2-November-15-2017.pdf. You must
agree in order to register with the ACME server at
https://acme-v02.api.letsencrypt.org/directory
- - - - - - - - - - - - - - - - - - - - - - - - - - - - - - - - - - - - - - - -
(A)gree/(C)ancel: A  << Agree to Terms of Sevice

- - - - - - - - - - - - - - - - - - - - - - - - - - - - - - - - - - - - - - - -
Would you be willing to share your email address with the Electronic Frontier
Foundation, a founding partner of the Let's Encrypt project and the non-profit
organization that develops Certbot? We'd like to send you email about our work
encrypting the web, EFF news, campaigns, and ways to support digital freedom.
- - - - - - - - - - - - - - - - - - - - - - - - - - - - - - - - - - - - - - - -
(Y)es/(N)o: Y  << Subscribe to Newsletter

Which names would you like to activate HTTPS for?
- - - - - - - - - - - - - - - - - - - - - - - - - - - - - - - - - - - - - - - -
1: itzgeek.net
2: www.itzgeek.net
- - - - - - - - - - - - - - - - - - - - - - - - - - - - - - - - - - - - - - - -
Select the appropriate numbers separated by commas and/or spaces, or leave input
blank to select all options shown (Enter 'c' to cancel): 2  << Choose the domain to install Let's Encrypt SSL certificate
Obtaining a new certificate
Performing the following challenges:
http-01 challenge for www.itzgeek.net
Waiting for verification...
Cleaning up challenges
Created an SSL vhost at /etc/httpd/conf.d/www.itzgeek.net-le-ssl.conf
Deploying Certificate to VirtualHost /etc/httpd/conf.d/www.itzgeek.net-le-ssl.conf

Please choose whether or not to redirect HTTP traffic to HTTPS, removing HTTP access.
- - - - - - - - - - - - - - - - - - - - - - - - - - - - - - - - - - - - - - - -
1: No redirect - Make no further changes to the webserver configuration.
2: Redirect - Make all requests redirect to secure HTTPS access. Choose this for
new sites, or if you're confident your site works on HTTPS. You can undo this
change by editing your web server's configuration.
- - - - - - - - - - - - - - - - - - - - - - - - - - - - - - - - - - - - - - - -
Select the appropriate number [1-2] then [enter] (press 'c' to cancel): 2  << Redirect from HTTP to HTTPS
Redirecting vhost in /etc/httpd/conf.d/www.itzgeek.net.conf to ssl vhost in /etc/httpd/conf.d/www.itzgeek.net-le-ssl.conf

- - - - - - - - - - - - - - - - - - - - - - - - - - - - - - - - - - - - - - - -
Congratulations! You have successfully enabled https://www.itzgeek.net

You should test your configuration at:
https://www.ssllabs.com/ssltest/analyze.html?d=www.itzgeek.net
- - - - - - - - - - - - - - - - - - - - - - - - - - - - - - - - - - - - - - - -

IMPORTANT NOTES:
 - Congratulations! Your certificate and chain have been saved at:
   /etc/letsencrypt/live/www.itzgeek.net/fullchain.pem
   Your key file has been saved at:
   /etc/letsencrypt/live/www.itzgeek.net/privkey.pem
   Your cert will expire on 2019-11-10. To obtain a new or tweaked
   version of this certificate in the future, simply run certbot-auto
   again with the "certonly" option. To non-interactively renew *all*
   of your certificates, run "certbot-auto renew"
 - Your account credentials have been saved in your Certbot
   configuration directory at /etc/letsencrypt. You should make a
   secure backup of this folder now. This configuration directory will
   also contain certificates and private keys obtained by Certbot so
   making regular backups of this folder is ideal.
 - If you like Certbot, please consider supporting our work by:

   Donating to ISRG / Let's Encrypt:   https://letsencrypt.org/donate
   Donating to EFF:                    https://eff.org/donate-le
Pare-feu
Configurez le pare-feu pour autoriser les requêtes HTTPS.
firewall-cmd --permanent --add-port=443/tcp

firewall-cmd --reload
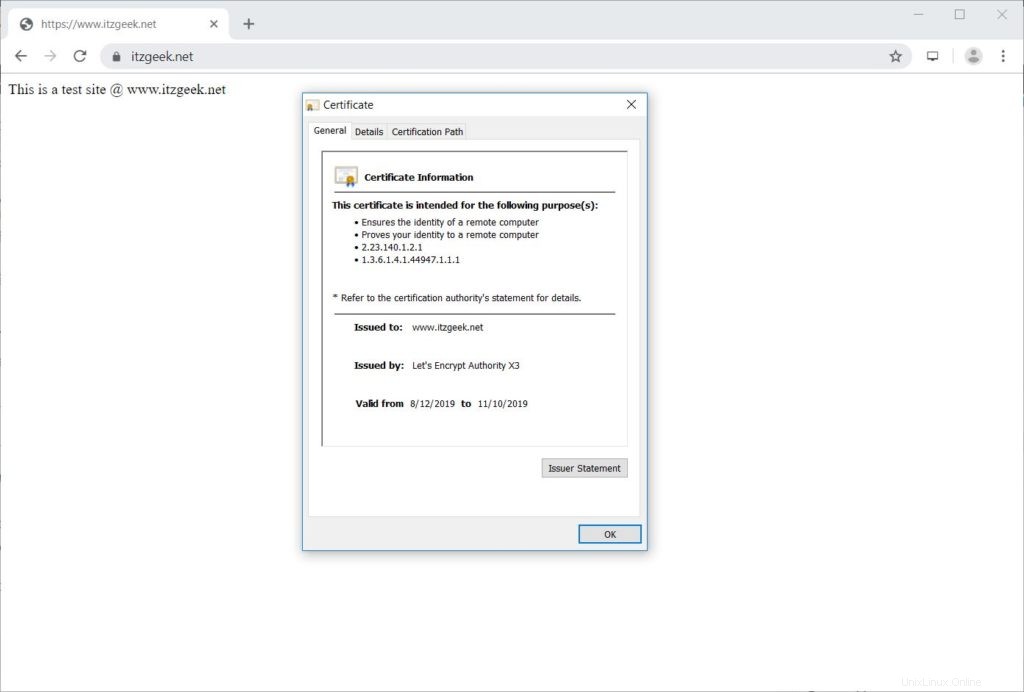
Vérifier le certificat Let's Encrypt
Vérifiez le certificat Let's Encrypt en visitant la version HTTPS de votre site Web.
http://votre-http-site-webOU
https://votre-https-site-webVous devriez maintenant obtenir une version HTTPS de votre site.
Tester le certificat SSL Let's Encrypt
Testez votre certificat SSL pour les problèmes et ses cotes de sécurité en accédant à l'URL ci-dessous.
https://www.ssllabs.com/ssltest/analyze.html?d=www.itzgeek.net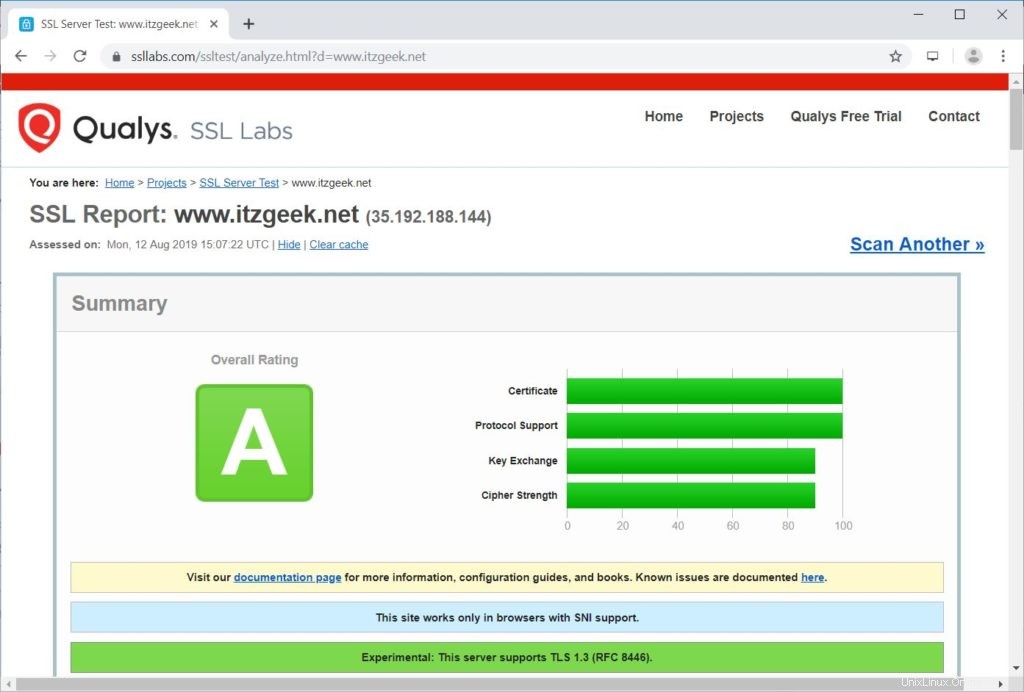
Renouveler le certificat Let's Encrypt
Le certificat Let's Encrypt est valide pendant 90 jours à compter de la date d'émission et doit être renouvelé avant son expiration.
Dans CentOS 7 / RHEL 7, par défaut, le client certbot crée une entrée de planificateur cron pour renouveler automatiquement les certificats Let's Encrypt.
Malheureusement, pour CentOS 8 / RHEL 8, nous devons configurer le planificateur cron manuellement.
echo "0 0,12 * * * root python -c 'import random; import time; time.sleep(random.random() * 3600)' && /usr/local/bin/certbot-auto renew" | sudo tee -a /etc/crontab > /dev/null
Vous pouvez également simuler le processus de renouvellement du certificat avec la commande ci-dessous pour vous assurer que le renouvellement se déroule sans heurts.
### CentOS 8 / RHEL 8 ###

/usr/local/bin/certbot-auto renew --dry-run

### CentOS 7 / RHEL 7 ###

certbot renew --dry-run
Pour renouveler le certificat Let's Encrypt, exécutez la commande ci-dessus sans
--dry-run option. Sortie :
Saving debug log to /var/log/letsencrypt/letsencrypt.log

- - - - - - - - - - - - - - - - - - - - - - - - - - - - - - - - - - - - - - - -
Processing /etc/letsencrypt/renewal/www.itzgeek.net.conf
- - - - - - - - - - - - - - - - - - - - - - - - - - - - - - - - - - - - - - - -
Cert not due for renewal, but simulating renewal for dry run
Plugins selected: Authenticator apache, Installer apache
Renewing an existing certificate
Performing the following challenges:
http-01 challenge for www.itzgeek.net
Waiting for verification...
Cleaning up challenges

- - - - - - - - - - - - - - - - - - - - - - - - - - - - - - - - - - - - - - - -
new certificate deployed with reload of apache server; fullchain is
/etc/letsencrypt/live/www.itzgeek.net/fullchain.pem
- - - - - - - - - - - - - - - - - - - - - - - - - - - - - - - - - - - - - - - -

- - - - - - - - - - - - - - - - - - - - - - - - - - - - - - - - - - - - - - - -
** DRY RUN: simulating 'certbot renew' close to cert expiry
**          (The test certificates below have not been saved.)

Congratulations, all renewals succeeded. The following certs have been renewed:
  /etc/letsencrypt/live/www.itzgeek.net/fullchain.pem (success)
** DRY RUN: simulating 'certbot renew' close to cert expiry
**          (The test certificates above have not been saved.)
- - - - - - - - - - - - - - - - - - - - - - - - - - - - - - - - - - - - - - - -

IMPORTANT NOTES:
 - Your account credentials have been saved in your Certbot
   configuration directory at /etc/letsencrypt. You should make a
   secure backup of this folder now. This configuration directory will
   also contain certificates and private keys obtained by Certbot so
   making regular backups of this folder is ideal.
Si la sortie ne signale aucun problème, le renouvellement du certificat fonctionnera comme prévu.
Conclusion
C'est tout. J'espère que vous avez appris à configurer le certificat SSL Let's Encrypt avec Apache sur CentOS 8 / RHEL 8 et CentOS 7 / RHEL 7. Partagez vos commentaires dans la section des commentaires.