Matomo, anciennement connu sous le nom de Piwik, est une application d'analyse Web gratuite et open-source développée par une communauté de développeurs. Il est utilisé pour suivre votre site Web et donner des informations détaillées sur votre site Web et ses visiteurs, y compris les moteurs de recherche et les mots-clés qu'ils ont utilisés, la langue qu'ils parlent, les pages qu'ils aiment, les fichiers qu'ils téléchargent et bien plus encore. Il offre de nombreuses fonctionnalités, notamment Google AdWords, Facebook Ads, Yahoo, Search Marketing, Tracking and Reporting API et Cost Per Click (CPC).
Dans ce tutoriel, je vais vous montrer comment installer Matomo sur Debian 11 avec un serveur web Apache2 et un certificat SSL Let's Encrypt gratuit.
Prérequis
- Un serveur exécutant Debian 11.
- Un nom de domaine valide pointé vers l'adresse IP de votre serveur.
- Un mot de passe root est configuré sur le serveur.
Installer Apache, MariaDB et PHP
Tout d'abord, vous devrez installer le serveur Web Apache, le serveur de base de données MariaDB, PHP et d'autres extensions PHP sur votre serveur. Vous pouvez tous les installer en exécutant la commande suivante :
apt-get install apache2 mariadb-server php libapache2-mod-php php-cli php-fpm php-fpm php-json php-json php-common php-mysql php-zip php-gd php-mbstring php-curl php-xml php-pear php-bcmath curl unzip -y
Après avoir installé tous les packages, démarrez et activez les services Apache et MariaDB à l'aide de la commande suivante :
systemctl start apache2 mariadb
systemctl enable apache2 mariadb
Une fois que vous avez terminé, vous pouvez passer à l'étape suivante.
Créer une base de données MariaDB pour Matomo
Matomo utilise une MariaDB comme backend de base de données. Vous devrez donc créer une base de données et un utilisateur pour Matomo.
Tout d'abord, connectez-vous à MariaDB avec la commande suivante :
mysql
Une fois connecté, créez une base de données et un utilisateur avec la commande suivante :
MariaDB [(none)]> CREATE DATABASE matomodb;
MariaDB [(none)]> CREATE USER 'matomo'@'localhost' IDENTIFIED BY 'password';
Ensuite, accordez tous les privilèges à la base de données Matomo avec la commande suivante :
MariaDB [(none)]> GRANT ALL ON matomodb.* TO 'matomo'@'localhost' WITH GRANT OPTION;
Ensuite, videz les privilèges et quittez le shell MariaDB avec la commande suivante :
MariaDB [(none)]> FLUSH PRIVILEGES;
MariaDB [(none)]> EXIT;
Après avoir configuré la base de données MariaDB, vous pouvez passer à l'étape suivante.
Télécharger Matomo
Ensuite, visitez le site officiel de Matomo et téléchargez la dernière version de Matomo avec la commande suivante :
wget http://builds.matomo.org/matomo-latest.zip
Une fois le téléchargement terminé, décompressez le fichier téléchargé avec la commande suivante :
unzip matomo-latest.zip
Ensuite, déplacez le répertoire extrait vers le répertoire racine Web d'Apache :
mv matomo /var/www/html/matomo
Ensuite, modifiez la propriété et l'autorisation du répertoire Matomo :
chown -R www-data:www-data /var/www/html/matomo
chmod -R 755 /var/www/html/matomo
Une fois que vous avez terminé, vous pouvez passer à l'étape suivante.
Configurer Apache pour Matomo
Ensuite, vous devrez créer un fichier de configuration d'hôte virtuel Apache pour héberger Matomo sur Internet. Vous pouvez le créer avec la commande suivante :
nano /etc/apache2/sites-available/matomo.conf
Ajoutez les lignes suivantes :
<VirtualHost *:80>

ServerAdmin [email protected]
ServerName matomo.example.com
DocumentRoot /var/www/html/matomo/

<Directory /var/www/html/matomo>
DirectoryIndex index.php
Options FollowSymLinks
AllowOverride All
Require all granted
</Directory>

<Files "console">
Options None
Require all denied
</Files>

<Directory /var/www/html/matomo/misc/user>
Options None
Require all granted
</Directory>

<Directory /var/www/html/matomo/misc>
Options None
Require all denied
</Directory>

<Directory /var/www/html/matomo/vendor>
Options None
Require all denied
</Directory>

ErrorLog ${APACHE_LOG_DIR}/matomo_error.log
CustomLog ${APACHE_LOG_DIR}/matomo_access.log combined


</VirtualHost>
Enregistrez et fermez le fichier lorsque vous avez terminé puis activez l'hôte virtuel Matomo et le module de réécriture Apache avec la commande suivante :
a2ensite matomo.conf
a2enmod rewrite
Ensuite, redémarrez le service Apache pour appliquer les modifications :
systemctl restart apache2
Vous pouvez également vérifier l'état d'Apache avec la commande suivante :
systemctl status apache2
Vous obtiendrez le résultat suivant :
? apache2.service - The Apache HTTP Server
     Loaded: loaded (/lib/systemd/system/apache2.service; enabled; vendor preset: enabled)
     Active: active (running) since Sun 2022-03-06 06:33:24 UTC; 5s ago
       Docs: https://httpd.apache.org/docs/2.4/
    Process: 55482 ExecStart=/usr/sbin/apachectl start (code=exited, status=0/SUCCESS)
   Main PID: 55486 (apache2)
      Tasks: 6 (limit: 4679)
     Memory: 12.4M
        CPU: 108ms
     CGroup: /system.slice/apache2.service
             ??55486 /usr/sbin/apache2 -k start
             ??55487 /usr/sbin/apache2 -k start
             ??55488 /usr/sbin/apache2 -k start
             ??55489 /usr/sbin/apache2 -k start
             ??55490 /usr/sbin/apache2 -k start
             ??55491 /usr/sbin/apache2 -k start

Mar 06 06:33:24 debian11 systemd[1]: Starting The Apache HTTP Server...
Mar 06 06:33:24 debian11 apachectl[55485]: AH00558: apache2: Could not reliably determine the server's fully qualified domain name, using 209>
Mar 06 06:33:24 debian11 systemd[1]: Started The Apache HTTP Server.
Accéder à l'interface Web Matomo
Maintenant, ouvrez votre navigateur Web et accédez à l'interface Web Matomo en utilisant l'URL http://matomo.example.com . Vous serez redirigé vers la page suivante :
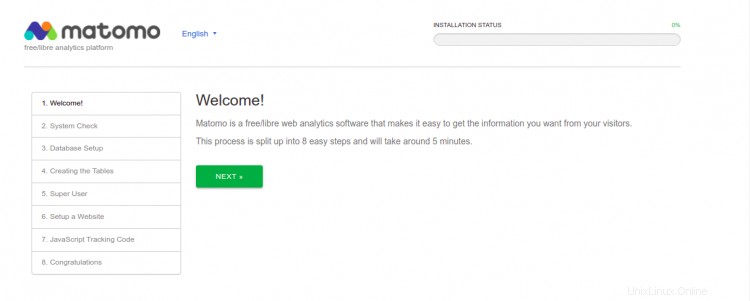
Cliquez sur Suivant bouton. Vous devriez voir la page de vérification de la configuration PHP :

Assurez-vous que toutes les configurations sont correctes, puis cliquez sur SUIVANT bouton. Vous devriez voir la page de configuration de la base de données MariaDB :

Fournissez votre serveur de base de données, nom d'utilisateur, nom de base de données, mot de passe puis cliquez sur SUIVANT bouton. Vous devriez voir la page suivante :

Cliquez sur SUIVANT bouton. Vous devriez voir la page de création de super utilisateur :

Indiquez votre nom d'utilisateur, votre mot de passe, votre adresse e-mail et cliquez sur SUIVANT bouton. Vous devriez voir la page de configuration du site :

Indiquez le nom de votre site Web, l'URL, le fuseau horaire et cliquez sur SUIVANT bouton. Vous devriez voir la page suivante :

Cliquez sur SUIVANT bouton. Vous devriez voir la page de vérification de la configuration :
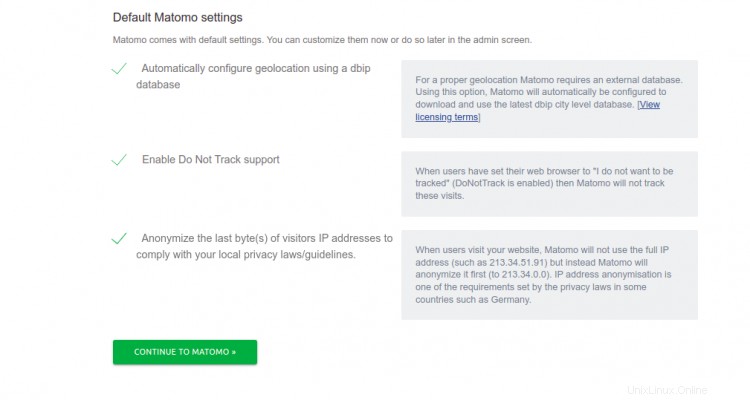
Cliquez sur CONTINUER VERS MATOMO . Vous devriez voir la page de connexion Matomo :
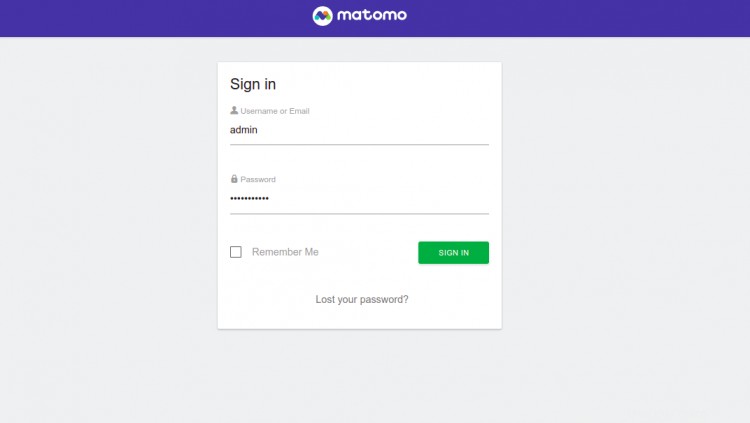
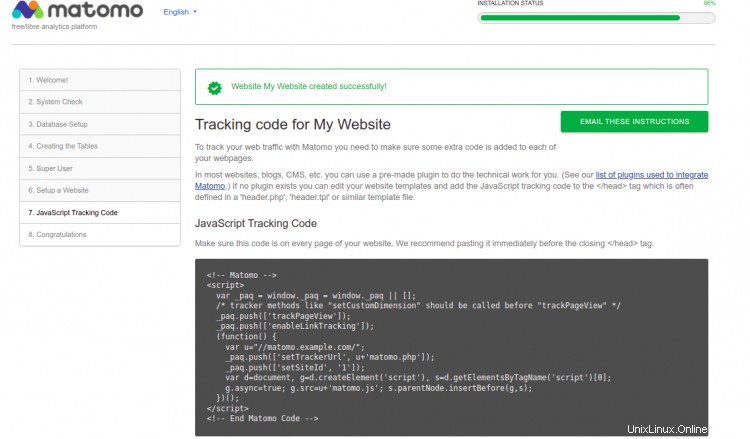
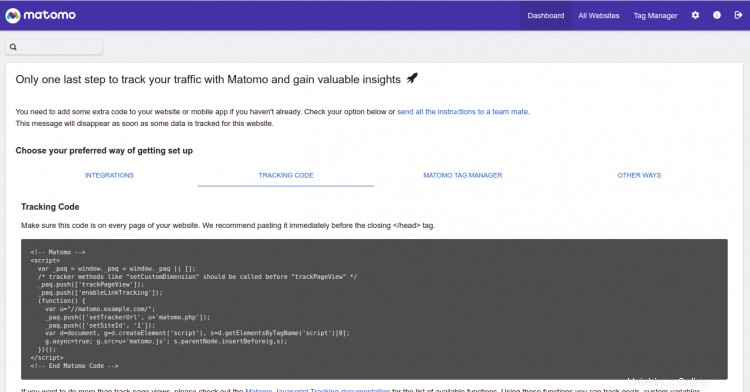
Indiquez votre nom d'utilisateur et votre mot de passe d'administrateur, puis cliquez sur CONNEXION bouton. Vous devriez voir le tableau de bord Matomo sur la page suivante :vous pouvez maintenant copier le code de suivi affiché dans l'image ci-dessus et le coller sur chaque page de votre site Web.
Sécuriser Matomo avec Let's Encrypt SSL
Ensuite, vous devrez installer le client Certbot pour installer le SSL Let's Encrypt pour votre site Web. Vous pouvez l'installer avec la commande suivante :
dnf install epel-release -y dnf install certbot python3-certbot-apache
Ensuite, obtenez et installez un certificat SSL pour votre domaine Lets avec la commande suivante :
certbot --apache -d matomo.example.com
Il vous sera demandé de fournir votre adresse e-mail et d'accepter les conditions d'utilisation :
Saving debug log to /var/log/letsencrypt/letsencrypt.log
Plugins selected: Authenticator apache, Installer apache
Enter email address (used for urgent renewal and security notices)
 (Enter 'c' to cancel): [email protected]

- - - - - - - - - - - - - - - - - - - - - - - - - - - - - - - - - - - - - - - -
Please read the Terms of Service at
https://letsencrypt.org/documents/LE-SA-v1.2-November-15-2017.pdf. You must
agree in order to register with the ACME server. Do you agree?
- - - - - - - - - - - - - - - - - - - - - - - - - - - - - - - - - - - - - - - -
(Y)es/(N)o: Y

- - - - - - - - - - - - - - - - - - - - - - - - - - - - - - - - - - - - - - - -
Would you be willing, once your first certificate is successfully issued, to
share your email address with the Electronic Frontier Foundation, a founding
partner of the Let's Encrypt project and the non-profit organization that
develops Certbot? We'd like to send you email about our work encrypting the web,
EFF news, campaigns, and ways to support digital freedom.
- - - - - - - - - - - - - - - - - - - - - - - - - - - - - - - - - - - - - - - -
(Y)es/(N)o: Y
Account registered.
Requesting a certificate for matomo.example.com
Performing the following challenges:
http-01 challenge for matomo.example.com
Waiting for verification...
Cleaning up challenges
Deploying Certificate to VirtualHost /etc/httpd/conf.d/matomo.conf
Redirecting all traffic on port 80 to ssl in /etc/httpd/conf.d/matomo.conf

- - - - - - - - - - - - - - - - - - - - - - - - - - - - - - - - - - - - - - - -
Congratulations! You have successfully enabled https://matomo.example.com
- - - - - - - - - - - - - - - - - - - - - - - - - - - - - - - - - - - - - - - -
Subscribe to the EFF mailing list (email: [email protected]).


IMPORTANT NOTES:
 - Congratulations! Your certificate and chain have been saved at:
   /etc/letsencrypt/live/matomo.example.com/fullchain.pem
   Your key file has been saved at:
   /etc/letsencrypt/live/matomo.example.com/privkey.pem
   Your certificate will expire on 2022-05-09. To obtain a new or
   tweaked version of this certificate in the future, simply run
   certbot again with the "certonly" option. To non-interactively
   renew *all* of your certificates, run "certbot renew"
 - If you like Certbot, please consider supporting our work by:

   Donating to ISRG / Let's Encrypt:   https://letsencrypt.org/donate
   Donating to EFF:                    https://eff.org/donate-le
Conclusion
Toutes nos félicitations! vous avez installé avec succès Matomo sur Debian 11. Vous pouvez maintenant ajouter un code de suivi à votre site Web et commencer à le surveiller à partir du tableau de bord Matomo. N'hésitez pas à me demander si vous avez des questions.