Bitwarden est un gestionnaire de mots de passe gratuit et open source qui stocke les informations d'identification du site Web dans un coffre-fort crypté. Il vous permet de stocker toutes vos informations de connexion et de les synchroniser entre tous vos appareils. Il est conçu pour les individus, les équipes et les entreprises afin de gérer leurs informations d'identification à partir d'un emplacement centralisé. Bitwarden fournit une application client pour PC de bureau ainsi que pour smartphones et tablettes. Il fournit également un générateur de mots de passe pour générer des mots de passe forts et sécurisés.
Dans cet article, nous vous montrerons comment installer le gestionnaire de mots de passe Bitwarden sur Debian 11.
Prérequis
- Un serveur exécutant Ubuntu 20.04.
- Un mot de passe root est configuré sur le serveur.
Installer Docker et Docker Compose
Bitwarden fournit une version gratuite que vous pouvez installer avec Docker. Par défaut, la dernière version de Docker n'est pas incluse dans le référentiel par défaut de Debian 11. Vous devrez donc l'installer à partir du référentiel officiel de Docker.
Tout d'abord, installez toutes les dépendances requises à l'aide de la commande suivante :
apt-get install apt-transport-https ca-certificates curl gnupg-agent software-properties-common
Une fois toutes les dépendances installées, téléchargez et ajoutez la clé GPG avec la commande suivante :
curl -fsSL https://download.docker.com/linux/debian/gpg | gpg --dearmor -o /usr/share/keyrings/docker-archive-keyring.gpg
Ensuite, ajoutez le référentiel Docker CE à l'APT à l'aide de la commande suivante :
echo "deb [arch=amd64 signed-by=/usr/share/keyrings/docker-archive-keyring.gpg] https://download.docker.com/linux/debian $(lsb_release -cs) stable" | tee /etc/apt/sources.list.d/docker.list
Ensuite, mettez à jour le référentiel et installez Docker CE avec la commande suivante :
apt-get update -y
apt-get install docker-ce docker-ce-cli containerd.io -y
Une fois l'installation terminée, vous pouvez vérifier la version de Docker CE à l'aide de la commande suivante :
docker --version
Vous obtiendrez le résultat suivant :
Docker version 20.10.9, build c2ea9bc
Vous pouvez également vérifier l'état du Docker avec la commande suivante :
systemctl status docker
Vous devriez voir le résultat suivant :
? docker.service - Docker Application Container Engine
     Loaded: loaded (/lib/systemd/system/docker.service; enabled; vendor preset: enabled)
     Active: active (running) since Sat 2021-10-25 09:33:15 UTC; 14min ago
TriggeredBy: ? docker.socket
       Docs: https://docs.docker.com
   Main PID: 11656 (dockerd)
      Tasks: 29
     Memory: 1.0G
     CGroup: /system.slice/docker.service
             ??11656 /usr/bin/dockerd -H fd:// --containerd=/run/containerd/containerd.sock
             ??27717 /usr/bin/docker-proxy -proto tcp -host-ip 0.0.0.0 -host-port 80 -container-ip 172.18.0.5 -container-port 8052

Oct 25 09:33:14 ubuntu2004 dockerd[11656]: time="2021-10-03T09:33:14.865741428Z" level=info msg="Default bridge (docker0) is assigned with an >
Oct 25 09:33:14 ubuntu2004 dockerd[11656]: time="2021-10-03T09:33:14.951326143Z" level=info msg="Loading containers: done."
Oct 25 09:33:14 ubuntu2004 dockerd[11656]: time="2021-10-03T09:33:14.974570590Z" level=info msg="Docker daemon" commit=4484c46d9d graphdriver(>
Oct 25 09:33:14 ubuntu2004 dockerd[11656]: time="2021-10-03T09:33:14.974729712Z" level=info msg="Daemon has completed initialization"
Oct 25 09:33:15 ubuntu2004 dockerd[11656]: time="2021-10-03T09:33:15.030128906Z" level=info msg="API listen on /run/docker.sock"
Oct 25 09:33:15 ubuntu2004 systemd[1]: Started Docker Application Container Engine.
Oct 25 09:45:52 ubuntu2004 dockerd[11656]: time="2021-10-03T09:45:52.583474433Z" level=info msg="ignoring event" module=libcontainerd namespac>
Oct 25 09:45:52 ubuntu2004 dockerd[11656]: time="2021-10-03T09:45:52.619380786Z" level=info msg="ignoring event" module=libcontainerd namespac>
Oct 25 09:45:52 ubuntu2004 dockerd[11656]: time="2021-10-03T09:45:52.635359740Z" level=info msg="ignoring event" module=libcontainerd namespac>
Oct 25 09:45:52 ubuntu2004 dockerd[11656]: time="2021-10-03T09:45:52.637507396Z" level=info msg="ignoring event" module=libcontainerd namespac
Ensuite, téléchargez la dernière version de Docker Composer avec la commande suivante :
wget https://github.com/docker/compose/releases/download/v2.0.1/docker-compose-linux-x86_64
Ensuite, copiez le binaire téléchargé dans le chemin système à l'aide de la commande suivante :
mv docker-compose-linux-x86_64 /usr/bin/docker-compose
Ensuite, définissez l'autorisation d'exécution sur le binaire Docker Compose :
chmod 755 /usr/bin/docker-compose
Installer Bitwarden sur Debian 11
Tout d'abord, rendez-vous sur le site Web de Bitwarden et indiquez votre adresse e-mail comme indiqué ci-dessous :
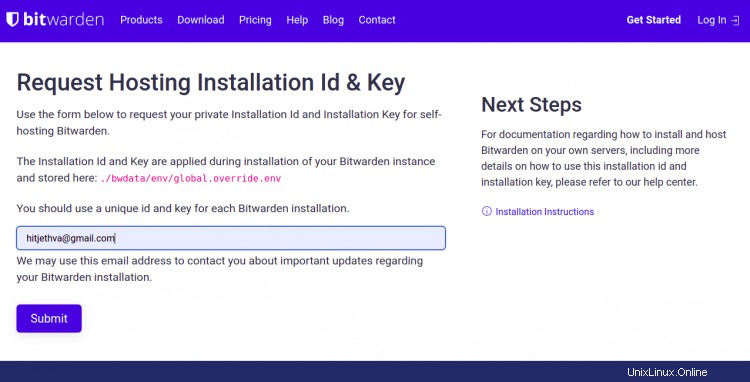
Ensuite, cliquez sur soumettre bouton. Vous obtiendrez l'identifiant et la clé d'installation sur l'écran suivant. Notez-les car vous en aurez besoin plus tard lors de l'installation.
Maintenant, téléchargez le script d'installation de Bitwarden à l'aide de la commande suivante :
curl -Lso bitwarden.sh https://go.btwrdn.co/bw-sh
Une fois le script téléchargé, définissez l'autorisation d'exécution avec la commande suivante :
chmod +x bitwarden.sh
Ensuite, lancez l'installation à l'aide de la commande suivante :
./bitwarden.sh install
Il vous sera demandé de fournir votre nom de domaine ou votre adresse IP et votre coffre-fort comme indiqué ci-dessous :
 _     _ _                         _
| |__ (_) |___      ____ _ _ __ __| | ___ _ __
| '_ \| | __\ \ /\ / / _` | '__/ _` |/ _ \ '_ \
| |_) | | |_ \ V  V / (_| | | | (_| |  __/ | | |
|_.__/|_|\__| \_/\_/ \__,_|_|  \__,_|\___|_| |_|

Open source password management solutions
Copyright 2015-2021, 8bit Solutions LLC
https://bitwarden.com, https://github.com/bitwarden

===================================================

bitwarden.sh version 1.43.0
Docker version 20.10.9, build c2ea9bc
docker-compose version 1.25.0, build unknown

(!) Enter the domain name for your Bitwarden instance (ex. bitwarden.example.com): 69.28.84.207

(!) Do you want to use Let's Encrypt to generate a free SSL certificate? (y/n): n

(!) Enter the database name for your Bitwarden instance (ex. vault): vault
Fournissez toutes les informations requises, puis appuyez sur Entrée . Il vous sera demandé de fournir votre identifiant d'installation et votre clé comme indiqué ci-dessous :
Digest: sha256:29bd0777de8b902bd26a67f74c832c8032f1bea41e716277a98f7d439a8f2912
Status: Downloaded newer image for bitwarden/setup:1.43.0
docker.io/bitwarden/setup:1.43.0

(!) Enter your installation id (get at https://bitwarden.com/host): xxxxxxx-xxxxxx-xxxx-xxxx-xxxxxxxxxx

(!) Enter your installation key: xxxxxxxxxxx

(!) Do you have a SSL certificate to use? (y/n): n

(!) Do you want to generate a self-signed SSL certificate? (y/n): y
Fournissez toutes les informations requises, puis appuyez sur Entrée pour lancer l'installation. Une fois l'installation terminée, vous obtiendrez le résultat suivant :
Generating self signed SSL certificate.
Generating a RSA private key
.....++++
...........................................................................................................................++++
writing new private key to '/bitwarden/ssl/self/69.28.84.207/private.key'
-----
Generating key for IdentityServer.
Generating a RSA private key
........................................................................................................................................................................++++
..............................................................................................................++++
writing new private key to 'identity.key'
-----

!!!!!!!!!! WARNING !!!!!!!!!!
You are using an untrusted SSL certificate. This certificate will not be
trusted by Bitwarden client applications. You must add this certificate to
the trusted store on each device or else you will receive errors when trying
to connect to your installation.

Building nginx config.
Building docker environment files.
Building docker environment override files.
Building FIDO U2F app id.
Building docker-compose.yml.

Installation complete

If you need to make additional configuration changes, you can modify
the settings in `./bwdata/config.yml` and then run:
`./bitwarden.sh rebuild` or `./bitwarden.sh update`

Next steps, run:
`./bitwarden.sh start`
Ensuite, démarrez Bitwarden à l'aide de la commande suivante :
./bitwarden.sh start
Vous obtiendrez le résultat suivant :
 _     _ _                         _
| |__ (_) |___      ____ _ _ __ __| | ___ _ __
| '_ \| | __\ \ /\ / / _` | '__/ _` |/ _ \ '_ \
| |_) | | |_ \ V  V / (_| | | | (_| |  __/ | | |
|_.__/|_|\__| \_/\_/ \__,_|_|  \__,_|\___|_| |_|

Open source password management solutions
Copyright 2015-2021, 8bit Solutions LLC
https://bitwarden.com, https://github.com/bitwarden

===================================================

bitwarden.sh version 1.43.0
Docker version 20.10.9, build c2ea9bc
docker-compose version 1.25.0, build unknown

Pulling mssql         ... done
Pulling web           ... done
Pulling attachments   ... done
Pulling api           ... done
Pulling identity      ... done
Pulling sso           ... done
Pulling admin         ... done
Pulling portal        ... done
Pulling icons         ... done
Pulling notifications ... done
Pulling events        ... done
Pulling nginx         ... done

Creating network "docker_default" with the default driver
Creating network "docker_public" with the default driver
Creating bitwarden-web           ... done
Creating bitwarden-mssql         ... done
Creating bitwarden-sso           ... done
Creating bitwarden-icons         ... done
Creating bitwarden-attachments   ... done
Creating bitwarden-identity      ... done
Creating bitwarden-notifications ... done
Creating bitwarden-api           ... done
Creating bitwarden-events        ... done
Creating bitwarden-admin         ... done
Creating bitwarden-portal        ... done
Creating bitwarden-nginx         ... done
1.43.0: Pulling from bitwarden/setup
Digest: sha256:29bd0777de8b902bd26a67f74c832c8032f1bea41e716277a98f7d439a8f2912
Status: Image is up to date for bitwarden/setup:1.43.0
docker.io/bitwarden/setup:1.43.0


Bitwarden is up and running!
===================================================

visit https://69.28.84.207
to update, run `./bitwarden.sh updateself` and then `./bitwarden.sh update`
Une fois que vous avez terminé, vous pouvez passer à l'étape suivante.
Accéder à l'interface Web Bitwarden
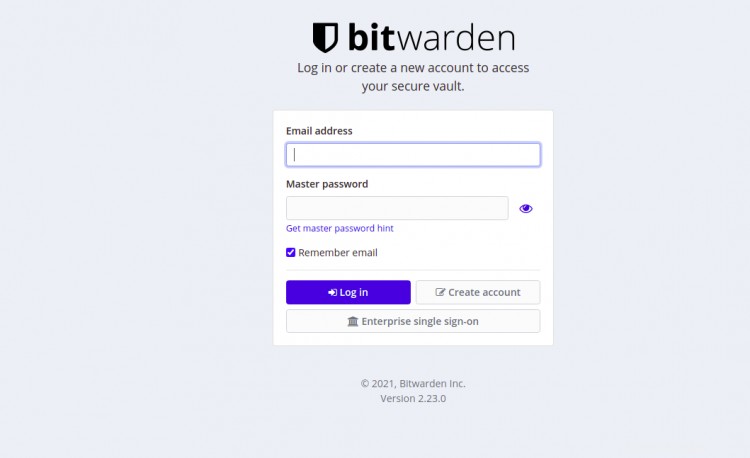
Maintenant, ouvrez votre navigateur Web et accédez à l'interface Web Bitwarden en utilisant l'URL https://your-server-ip . Vous obtiendrez la page suivante :
Cliquez sur Créer un compte bouton. Vous obtiendrez la page suivante :
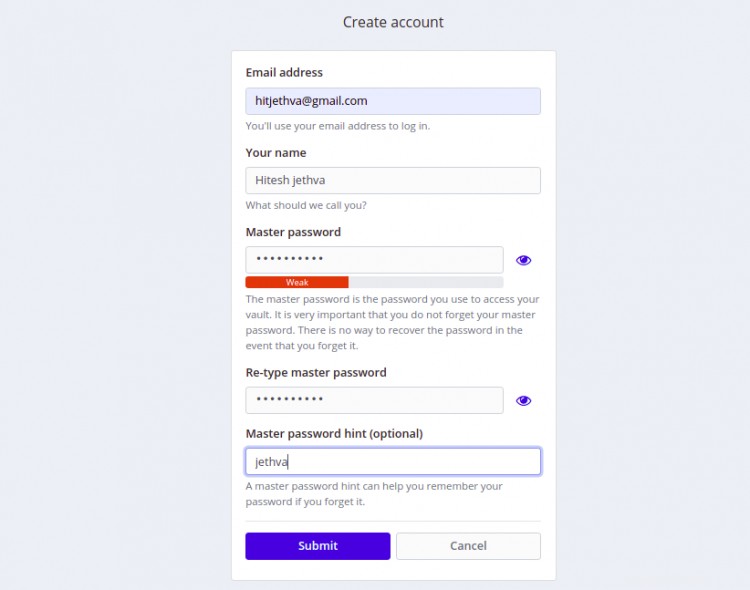
Indiquez votre adresse e-mail, votre nom, votre mot de passe principal et cliquez sur Soumettre bouton. Vous obtiendrez l'écran de connexion Bitwarden :

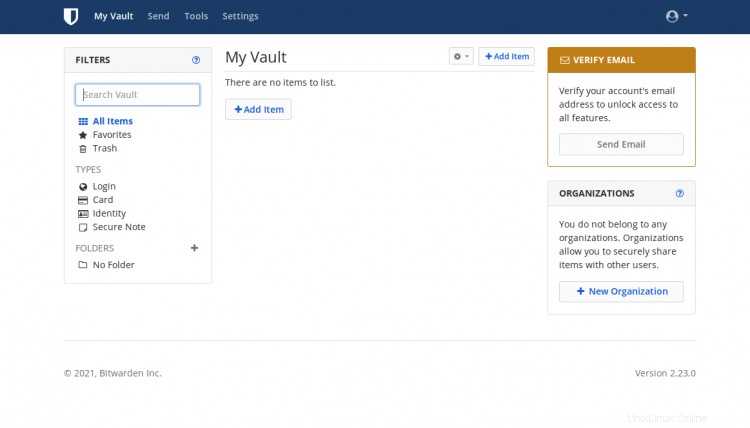
Indiquez votre adresse e-mail, votre mot de passe et cliquez sur le bouton Connexion. Vous devriez voir le tableau de bord Bitwarden sur la page suivante :
Conclusion
Toutes nos félicitations! vous avez installé avec succès le gestionnaire de mots de passe Bitwarden sur Debian 11. Vous pouvez maintenant implémenter cette solution dans votre organisation et commencer à gérer toutes les informations d'identification à partir de l'emplacement central. N'hésitez pas à me demander si vous avez des questions.