Sur cette page le protocole DNS et le serveur DNS BIND sont expliqués, ainsi que le module Webmin de création et de gestion des domaines DNS.
- Voir Introduction au système de noms de domaine
Contenu
Le module Serveur DNS BIND
BIND (Berkeley Internet Name Domain) est le serveur DNS le plus courant pour les systèmes Unix. Plusieurs versions ont été publiées au fil des ans, la plus récente étant la version 9. Le module BIND DNS Server (qui se trouve dans la catégorie Serveurs) prend en charge la configuration des versions 8 et 9. L'ancienne version 4 a un format de fichier de configuration différent et peut être configuré à l'aide du module BIND 4 DNS Server, documenté dans une section ultérieure de ce chapitre.
Parce que BIND est disponible pour presque tous les systèmes Unix et fonctionne de manière identique quel que soit le système d'exploitation, les instructions de ce chapitre s'appliquent non seulement à Linux mais aussi aux autres versions d'Unix. La plupart des versions d'Unix et de Linux incluent BIND 8 ou 9 en tant que package standard, il est donc rarement nécessaire de l'installer. Si le module ne trouve pas le serveur DNS, un message d'erreur s'affichera sur la page principale - si cela se produit, vérifiez le CD de votre système d'exploitation ou votre site Web pour un package BIND, ou téléchargez et compilez la source à partir de http://www.isc .org/.
Le fichier de configuration principal de BIND est /etc/named.conf, qui contient toutes les zones hébergées par le serveur et les paramètres de configuration globaux qui s'appliquent à toutes les zones. Les enregistrements de chaque zone sont stockés dans des fichiers séparés, généralement situés dans le répertoire /var/named. Ce module Webmin met toujours à jour tous ces fichiers directement, au lieu de communiquer avec le processus BIND en cours d'exécution. Cela signifie que si vous exécutez un autre programme qui met à jour dynamiquement les zones en communiquant avec BIND (comme un serveur DHCP), alors ce module ne doit pas être utilisé car il peut interférer avec ces changements. Cependant, très peu de systèmes ont ce type de mise à jour dynamique activé.
Les versions 9 de BIND ont certaines fonctionnalités que la version 8 n'a pas. Le plus important pris en charge par ce module Webmin est celui des vues. Une vue est un ensemble de zones qui ne sont visibles que par certains clients DNS. Normalement, tous les clients voient les mêmes zones, mais avec BIND 9, vous pouvez limiter la visibilité de certains domaines à certains clients particuliers, identifiés par leurs adresses IP. Cela peut être utile pour créer des zones qui ne sont visibles que pour les systèmes sur un réseau interne, même si votre serveur DNS est connecté à Internet.
Si vous n'avez jamais configuré BIND sur votre système, lorsque vous entrez dans le module pour la première fois, la page principale affiche un formulaire de configuration du serveur DNS, comme indiqué ci-dessous. Ce formulaire ne s'affiche que si Webmin détecte que le fichier de configuration nommé.conf n'existe pas, ou si le répertoire des fichiers de zone spécifié n'existe pas. Si vous êtes certain que votre configuration BIND est valide et que le serveur DNS est déjà en cours d'exécution, ne cliquez pas sur Créer , car votre fichier named.conf sera écrasé. Au lieu de cela, cliquez sur Module Config lien et vérifiez que tous les chemins sont corrects pour votre système.
-
 Lier l'installation
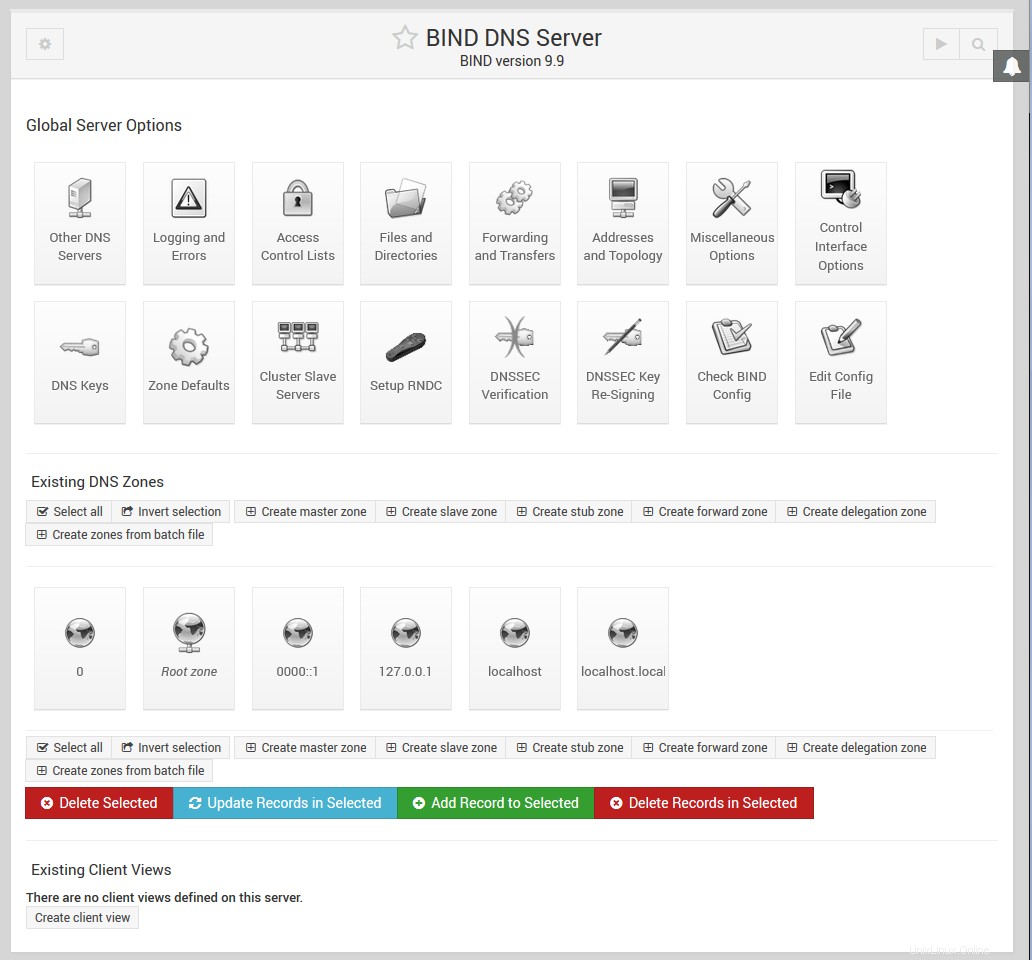
Lorsque BIND a été configuré sur votre système, la page principale apparaîtra comme indiqué dans la capture d'écran ci-dessous. En haut se trouve un tableau d'icônes permettant de définir les options globales qui s'appliquent à l'ensemble de votre serveur DNS. En dessous se trouvent des icônes pour chacune des zones hébergées par votre serveur, suivies d'icônes pour les vues si vous exécutez BIND version 9. Tout en bas se trouvent des boutons pour appliquer la configuration DNS actuelle ou démarrer le serveur BIND.
Si vous venez de configurer BIND pour la première fois, il n'y aura probablement qu'une seule icône de zone - la zone racine. Certaines distributions Linux qui incluent un package BIND sont livrées avec un fichier de configuration de base qui définit des zones telles que localdomain et 127.0.0, qui sont utilisées pour résoudre le nom d'hôte et l'adresse IP de bouclage localhost et 127.0.0.l.
-
 Lier la page principale du serveur DNS
Créer une nouvelle zone maître
Une zone maître est une zone pour laquelle votre serveur DNS est la source d'informations faisant autorité. Une seule zone peut être hébergée par plusieurs serveurs, mais un seul est le maître - tous les autres sont des esclaves. Si vous souhaitez ajouter une nouvelle zone maître à la configuration de votre serveur, les étapes à suivre sont :
- Décidez d'un nom pour la nouvelle zone, comme exemple.com ou interne. S'il s'agit d'un domaine Internet qui sera visible par tous les autres dans le monde, le nom de domaine ne doit pas encore avoir été enregistré par quelqu'un d'autre. Cependant, vous ne pouvez normalement pas l'enregistrer vous-même tant que votre serveur DNS n'a pas été configuré pour l'héberger.
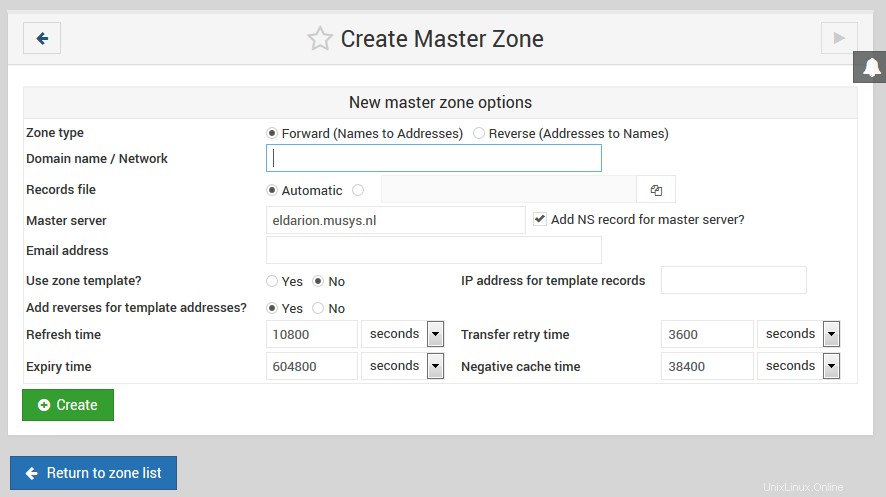
- Sur la page principale du module, cliquez sur Créer une nouvelle zone maître lien sous le tableau des zones existantes. Cela vous amènera à la page montrée dans l'image ci-dessous pour entrer les détails de la nouvelle zone.
- S'il s'agit d'une zone de transfert comme example.com ou foo.com.au, laissez le Type de zone champ défini sur Transférer . Cependant, s'il s'agit d'une zone inversée pour rechercher des noms d'hôte à partir d'adresses IP, définissez le champ sur Inverse .
- Dans le Nom de domaine / Réseau champ, entrez le nom de la zone sans aucun point final. Pour une zone inversée, entrez simplement l'adresse réseau comme 192.168.1. Webmin le convertira automatiquement au format in-addr.arpa pour vous lors de la création du domaine.
- Le fichier des enregistrements le champ contrôle où le fichier de configuration contenant les enregistrements de la zone est stocké. Si vous le laissez défini sur Automatique , le nom de fichier sera déterminé automatiquement en fonction de la configuration du module et du paramètre de répertoire dans le fichier named.conf. Il s'agit généralement de la meilleure option, car cela entraînera la création du fichier d'enregistrements dans le même répertoire que toutes les zones existantes, telles que /var/named. Cependant, si vous désélectionnez l'option Automatique option et entrez un nom de fichier à la place, tous les enregistrements de la zone seront écrits dans ce fichier. Si vous entrez le nom d'un fichier existant, il sera écrasé lors de la création du domaine.
- Dans le serveur maître , entrez le nom de domaine complet du serveur DNS maître pour cette zone. Il doit s'agir du nom canonique de votre système, tel que serveur.exemple.com, et non d'un nom court comme serveur. Ce serveur (et les valeurs du prochain champs
- ) sont utilisés pour créer l'enregistrement SOA de la nouvelle zone.
- Dans l'adresse e-mail champ, entrez l'adresse de la personne responsable de cette zone. Vous pouvez utiliser le symbole @ dans l'adresse, que Webmin convertira automatiquement en un point pour l'inclure dans l'enregistrement SOA.
- Le temps de rafraîchissement Le champ détermine la fréquence à laquelle les serveurs secondaires doivent vérifier auprès de ce serveur maître les mises à jour de la zone. La valeur par défaut est raisonnable, mais vous pouvez l'augmenter pour les zones qui changent rarement ou la diminuer pour celles qui sont fréquemment mises à jour.
- Le temps de nouvelle tentative de transfert détermine combien de temps un serveur secondaire doit attendre après l'échec d'un transfert de zone avant de réessayer.
- Le Délai d'expiration contrôle la durée maximale pendant laquelle un serveur DNS secondaire pour la zone doit mettre en cache les enregistrements avant de les retransférer depuis le maître.
- La durée de vie par défaut Le champ détermine le TTL des enregistrements de la zone qui n'en ont pas défini explicitement.
- Cliquez sur Créer bouton en bas de la page. Tant que le formulaire a été rempli correctement et que la zone n'existe pas déjà sur votre serveur, vous serez redirigé vers une page permettant d'ajouter de nouveaux enregistrements à la zone.
- Revenez à la page principale du module qui inclura désormais une icône pour votre nouvelle zone, et cliquez sur Appliquer les modifications bouton en bas pour l'activer.
- Créer une zone maître.png
Une zone nouvellement créée ne contiendra qu'un seul enregistrement (sauf si vous avez configuré un modèle). Pour en ajouter d'autres, suivez les instructions de la section suivante. Une fois que vous avez configuré les enregistrements de base dans votre domaine, vous pouvez l'enregistrer auprès de l'autorité qui gère le domaine parent, comme .com ou .com.au. Certaines autorités de domaine ne vous permettront pas d'enregistrer des zones qui n'ont pas au moins deux serveurs (un maître et un esclave) et des enregistrements de serveur de noms dans la zone pour ces serveurs.
Ajouter et modifier des enregistrements
-
 Lier - Modifier la zone maître
La fonctionnalité la plus utile du module BIND DNS Server est la possibilité d'ajouter, de modifier et de supprimer des enregistrements dans les zones maîtres hébergées par votre serveur. Par exemple, si vous souhaitez configurer un serveur Web dans votre domaine example.com, vous devrez ajouter un enregistrement d'adresse pour www.example.com avec l'adresse IP du serveur. Pour ajouter un nouvel enregistrement comme celui-ci, les étapes à suivre sont :
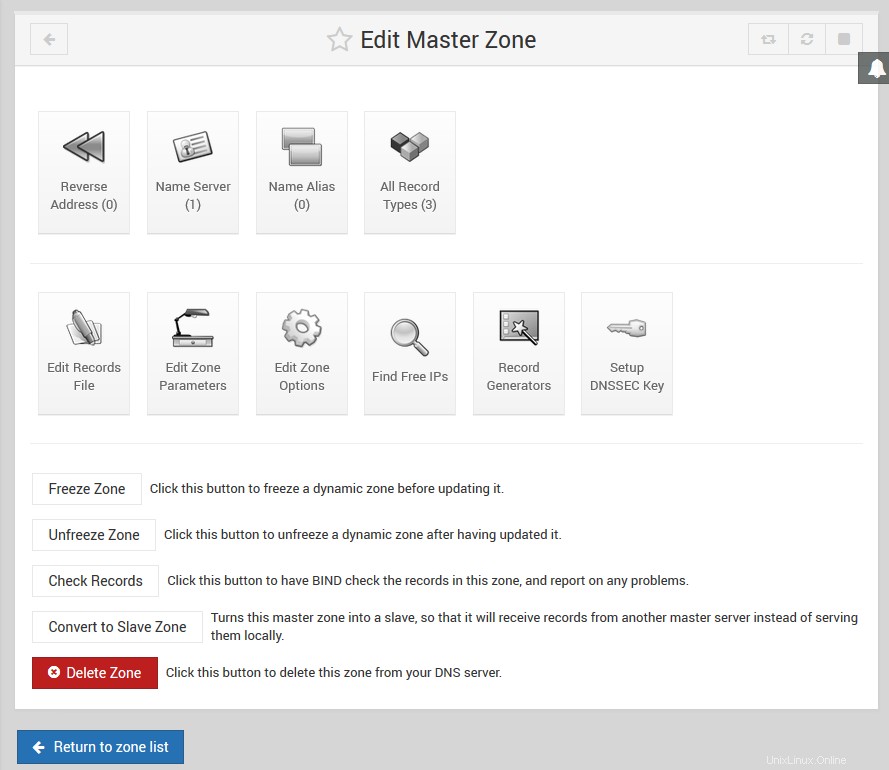
- Sur la page principale du module, cliquez sur l'icône de la zone que vous souhaitez ajouter. Cela fera apparaître la page ci-dessous, en haut de laquelle se trouve un tableau d'icônes, une pour chaque type d'enregistrement.
- Cliquez sur l'icône du type d'enregistrement que vous souhaitez ajouter. Le type le plus courant est Adresse , qui associe une adresse IP à un nom d'hôte. Voir les types d'#enregistrements section ci-dessous pour une liste complète de tous les types d'enregistrement pris en charge.
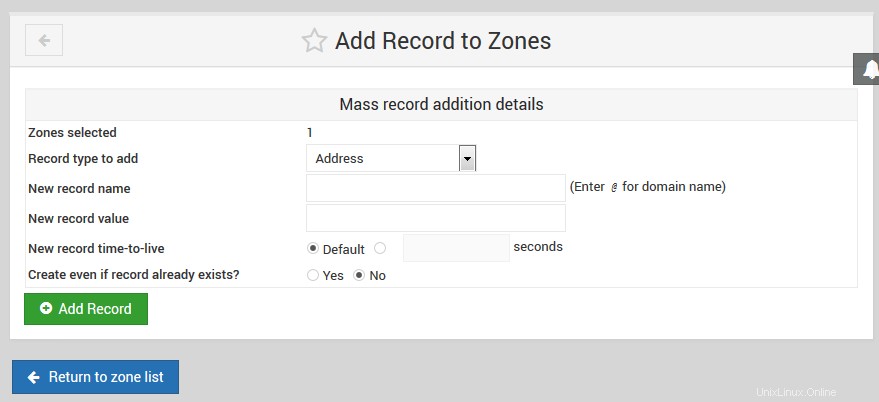
- Cliquez sur l'icône pour accéder à une page répertoriant tous les enregistrements existants de ce type. Au-dessus de la liste se trouve un formulaire pour saisir un nouvel enregistrement.
- Dans le Nom champ, saisissez le nom du nouvel enregistrement par rapport au nom de la zone. Par exemple, si vous souhaitez ajouter l'enregistrement www.example.com, vous devez simplement saisir www . Il est également possible d'entrer le nom complet de l'enregistrement, à condition qu'il ait un point à la fin pour indiquer qu'il n'est pas relatif à la zone. Ne saisissez pas uniquement www.example.com , car il sera converti en www.example.com.example.com, ce qui n'est probablement pas ce que vous souhaitez.
- Si cet enregistrement va changer plus fréquemment que le reste de la zone, modifiez le Time-To-Live champ de Par défaut au temps estimé entre les changements. Cela détermine la durée pendant laquelle les clients DNS et les autres serveurs mettront en cache l'enregistrement.
- Si vous ajoutez un enregistrement d'adresse, saisissez l'adresse IP complète de l'hôte dans Adresse domaine. Voir le tableau ci-dessous pour une description des champs qui apparaissent lors de l'ajout d'autres types d'enregistrements et leur signification.
- Le champ Mise à jour inversée ? apparaît uniquement lors de l'ajout d'un enregistrement d'adresse. Il contrôle la création automatique d'un enregistrement correspondant dans une zone inverse qui associe le nom d'hôte à l'adresse IP. Naturellement, cela ne peut être fait que si l'adresse IP que vous entrez se trouve dans un réseau pour lequel votre système est le principal serveur DNS inverse. Cela maintient les zones avant et arrière synchronisées, ce qui peut être très utile. Si Oui est sélectionné, un enregistrement d'adresse inverse sera ajouté tant qu'il n'en existe pas déjà dans la zone inverse pour la même adresse IP. Souvent, de nombreux noms d'hôte auront la même adresse IP, comme ceux utilisés pour l'hébergement virtuel basé sur le nom. Dans de tels cas, vous ne souhaitez pas modifier le mappage inverse s'il en existe déjà un. L'option *Oui (et remplacer l'existant)* fonctionne de la même manière que Oui , mais si un enregistrement inversé pour l'adresse IP existe déjà, il sera mis à jour avec le nouveau nom d'hôte. Cela peut être utile si vous savez qu'il existe un enregistrement existant que vous souhaitez remplacer. Si Non est sélectionné, aucune adresse inverse ne sera créée même si cela est possible.
- Lorsque vous avez terminé de remplir le formulaire, cliquez sur Créer bouton en bas. Tant qu'il est rempli correctement, l'enregistrement sera ajouté à la liste sous le formulaire. Lors de l'écriture dans le fichier d'enregistrements de la zone, Webmin utilisera le format canonique complet pour le nom d'enregistrement, tel que www.example.com., même si vous entrez simplement www.
- Pour activer le nouvel enregistrement afin qu'il puisse être consulté par les clients DNS et d'autres serveurs, vous devrez cliquer sur Appliquer les modifications bouton sur la page principale du module. Si vous envisagez d'ajouter ou de modifier plusieurs enregistrements, il est généralement préférable d'attendre que toutes les modifications soient terminées avant d'appuyer sur le bouton Appliquer. S'il est disponible, vous pouvez utiliser à la place le bouton Appliquer les modifications en bas de la page de la zone principale illustrée ci-dessous. Cela utilise la commande ndc pour dire à BIND de ne relire que le fichier pour cette zone, ce qui peut être beaucoup plus rapide sur un système qui héberge un grand nombre de domaines.
-
 Lier - Ajouter un enregistrement aux zones
Bien que les instructions ci-dessus se concentrent sur l'ajout d'un enregistrement d'adresse, le processus d'ajout d'autres types d'enregistrement à une zone de transfert est presque identique. La Mise à jour inversée ? le champ n'existe pas, et l'Adresse champ est remplacé par un ou plusieurs champs différents. Les types d'enregistrement La section ci-dessous explique en détail quels champs sont disponibles pour chaque type d'enregistrement connu de Webmin.
Lors de l'ajout d'un enregistrement d'adresse inversée à une zone inversée, le formulaire est assez différent. L'adresse le champ apparaît avant le nom d'hôte , et le nom d'hôte doit toujours être saisi sous forme canonique avec un point à la fin, comme www.example.com. . La Mise à jour inversée ? champ est remplacé par Mise à jour vers l'avant ? , qui contrôle la création automatique d'un enregistrement dans la zone de renvoi correspondante. Cependant, il n'y a pas d'option pour écraser un enregistrement de transfert existant - s'il en existe déjà un avec le même nom, il ne sera pas touché même si Oui est sélectionné.
Chaque fois qu'un enregistrement est ajouté ou mis à jour dans une zone à l'aide de Webmin, son numéro de série sera automatiquement incrémenté. Cela s'applique également aux zones inversées qui sont automatiquement mises à jour lors de l'ajout d'un enregistrement d'adresse, et vice-versa. Cela signifie que lorsque vous appliquez les modifications, d'autres serveurs DNS pourront détecter que la zone a changé en comparant le nouveau numéro de série avec l'ancien qu'ils ont mis en cache.
Pour modifier un enregistrement existant dans une zone, les étapes à suivre sont :
- Sur la page principale du module, cliquez sur l'icône de la zone que vous souhaitez modifier, ce qui vous amènera à la page ci-dessus.
- Cliquez sur l'icône du type d'enregistrement que vous souhaitez modifier, ce qui affichera une page listant tous les enregistrements de ce type dans la zone. Vous pouvez également cliquer sur Tous les types d'enregistrement icône qui fera apparaître une liste de chaque enregistrement unique dans la zone quel que soit le type.
- Cliquez sur le nom de l'enregistrement que vous souhaitez modifier. Votre navigateur affichera un formulaire similaire à celui utilisé pour ajouter un enregistrement, mais avec les champs déjà remplis avec les détails de l'adresse existante.
- Pour renommer l'enregistrement, modifiez le contenu du Nom domaine. Il sera initialement affiché sous forme canonique avec un point à la fin, mais vous pouvez le changer en un nom relatif au domaine si vous le souhaitez.
- Ajustez la durée de vie champ dans lequel vous souhaitez que cet enregistrement ait un TTL différent, ou définissez-le sur Par défaut pour le rendre identique au reste de la zone.
- S'il s'agit d'un enregistrement d'adresse, modifiez l'adresse IP dans Adresse domaine. Pour les autres types d'enregistrement, les champs sont les mêmes que ceux du formulaire de création d'enregistrement et ont la même signification.
- Pour les enregistrements d'adresse, le champ Mise à jour inversée ? est affiché. Sélection Oui entraînera la modification du nom et de l'adresse de l'enregistrement correspondant dans la zone inverse pour correspondre à cet enregistrement vers l'avant. Si vous changez l'adresse IP pour que l'adresse inverse ne soit plus dans le même réseau, elle sera supprimée de l'ancienne zone inverse et ajoutée à la nouvelle zone inverse (si elle est hébergée par votre serveur).
- Pour les enregistrements d'adresse inversée, le champ Mise à jour vers l'avant ? est affiché à la place. Si Oui est sélectionné, l'enregistrement d'adresse correspondant dans sa zone de transfert sera modifié pour correspondre aux modifications que vous apportez sur ce formulaire.
- Cliquez sur Enregistrer pour mettre à jour l'enregistrement dans le fichier de zone et revenir à la liste des types d'enregistrement.
- Pour activer les modifications, cliquez sur Appliquer les modifications bouton de retour sur la page principale du module.
Pour supprimer un enregistrement d'une zone, cliquez sur le bouton Supprimer bouton sur le formulaire d'édition au lieu de Enregistrer . Pour les enregistrements d'adresse, si l'option Mise à jour inversée ? le champ est défini sur Oui , l'enregistrement d'adresse inverse correspondant sera également supprimé. En dehors de cela, le processus de suppression d'un enregistrement est identique quel que soit son type. La même chose se produit lors de la suppression d'un enregistrement d'adresse inversée - l'enregistrement d'adresse correspondant est également supprimé, tant que le Mise à jour vers l'avant ? le champ est défini sur Oui .
La liste des enregistrements d'une zone est initialement triée selon la configuration du module, ce qui signifie généralement que les enregistrements seront affichés dans l'ordre dans lequel ils ont été ajoutés. Pour changer cela, vous pouvez cliquer sur un en-tête de colonne comme Nom , Adresse ou vrai nom pour les trier par cette colonne à la place. Le tri n'est cependant que temporaire et sera perdu si vous revenez à la page principale et rouvrez la zone. Pour le modifier définitivement, consultez l'Ordre d'affichage des enregistrements dans champ dans la section Configuration du module Serveur DNS BIND .
Types d'enregistrement
Webmin ne prend pas en charge tous les types d'enregistrements connus de BIND, uniquement ceux qui sont les plus couramment utilisés. La liste ci-dessous couvre tous les types pris en charge et explique à quoi ils servent et quels champs sont disponibles lors de l'ajout ou de la modification d'un enregistrement de ce type dans Webmin. À côté de chaque nom de type se trouve le code abrégé utilisé par BIND lui-même pour identifier le type dans le fichier d'enregistrements.
- Adresse (A)
- Un enregistrement d'adresse associe une adresse IPv4 à un nom d'hôte. Tout système auquel vous souhaitez pouvoir vous connecter via HTTP, telnet ou tout autre protocole utilisant son nom d'hôte doit avoir un enregistrement d'adresse afin que les clients puissent rechercher son adresse IP. Un seul nom d'hôte peut avoir plusieurs enregistrements d'adresse, ce qui est souvent fait pour répartir la charge d'un site Web sur plusieurs serveurs. Il est également valable de créer plusieurs enregistrements de ce type avec des noms différents mais la même adresse IP, comme lors de la configuration de serveurs virtuels Apache basés sur le nom. Lors de la création ou de la modification d'un enregistrement d'adresse, le champ Adresse s'affiche pour saisir l'adresse IP associée au nom d'hôte. Un champ intitulé Mise à jour inversée ? apparaît également, qui contrôle la création et la modification automatique d'un enregistrement d'adresse inversée dans la zone inversée appropriée. Consultez la rubrique Ajout et modification d'enregistrements section ci-dessus pour plus de détails.
- Adresse IPv6 (AAAA)
- Un enregistrement d'adresse IPv6 associe une adresse IPv6 à un nom d'hôte similaire à un enregistrement A.
- Serveur de noms (NS)
- Les enregistrements de ce type définissent un serveur de noms responsable d'une zone. Chaque zone doit avoir au moins un enregistrement de serveur de noms pour elle-même et peut avoir des enregistrements supplémentaires qui spécifient les serveurs DNS responsables des sous-domaines. Si vous configurez un serveur DNS secondaire pour une zone, veillez à ajouter un enregistrement de serveur de noms pour la zone sur le serveur maître. Dans ce cas, le nom de l'enregistrement sera le nom canonique de la zone, tel que example.com. . Lors de la création ou de la modification d'un enregistrement de ce type, un champ intitulé Name Server sera affiché. Celui-ci doit être rempli avec l'adresse IP ou le nom d'hôte du serveur DNS responsable de la zone. Si vous entrez un nom d'hôte, il doit avoir une adresse IP définie par un enregistrement d'adresse dans une zone de votre serveur.
- Alias du nom (CNAME)
- Ce type d'enregistrement crée un nom supplémentaire pour un enregistrement d'adresse ou d'adresse inversée existant. Lorsqu'un client DNS demande l'adresse IP d'un enregistrement de ce type, il obtiendra à la place l'adresse IP de l'enregistrement vers lequel l'alias de nom pointe. Ce type d'enregistrement peut être utile si vous avez un seul hôte qui doit être accessible sous plusieurs noms différents, comme un serveur Web faisant de l'hébergement virtuel basé sur le nom. Même si cela peut également être fait en créant plusieurs enregistrements d'adresse, la création d'une seule adresse et de plusieurs alias de nom est plus flexible car elle permet une mise à jour plus facile si l'adresse IP de l'hôte change. Les formulaires de modification et de création d'enregistrements d'alias de nom contiennent un champ intitulé Nom réel . Celui-ci doit être rempli avec le nom canonique de l'enregistrement vers lequel l'alias pointe (tel que webserver.example.com. ), ou avec un nom court relatif à la zone dans laquelle se trouve l'enregistrement d'alias de nom.
- Serveur de messagerie (MX)
- Les enregistrements du serveur de messagerie indiquent aux programmes de livraison de courrier comme Sendmail et Qmail quel système contacter lors de la livraison de courrier à un domaine ou à un hôte. Sans enregistrement de ce type, le courrier d'un domaine sera remis au système dont l'adresse IP est spécifiée dans l'enregistrement d'adresse de la zone elle-même. Ce n'est pas toujours souhaitable, car vous souhaiterez peut-être que cette adresse IP soit l'adresse d'un serveur Web, afin que les navigateurs Web puissent se connecter à http://example.com/ ainsi qu'à http://www.example.com/. Un enregistrement de serveur de messagerie peut résoudre ce problème en n'ayant que les e-mails de example.com envoyés à d'autres hôtes, et tout le reste du trafic vers le serveur Web. Chaque enregistrement de serveur de messagerie a une priorité, qui indique aux programmes de distribution de courrier quel serveur de messagerie doit être essayé en premier. L'enregistrement avec la priorité la plus basse doit pointer vers le système qui reçoit et stocke réellement les e-mails pour le domaine, tandis que ceux avec des priorités plus élevées pointent généralement vers des systèmes qui se contenteront de relayer le courrier. Les programmes de livraison essaieront chacun à tour de rôle en commençant par le plus bas, de sorte que si le serveur de messagerie principal est en panne, l'e-mail sera toujours envoyé à un relais qui peut le conserver jusqu'à ce que le serveur principal se rétablisse.
- Lors de l'ajout ou de la modification d'un enregistrement de serveur de messagerie, deux champs supplémentaires s'affichent. Le premier est étiqueté Mail Server , et doit être rempli avec le nom d'hôte canonique ou relatif d'un système qui peut accepter le courrier pour le domaine ou le nom d'hôte saisi dans le Nom domaine. La seconde est étiquetée Priorité , et doit être utilisé pour spécifier une priorité numérique pour ce serveur de messagerie particulier. Normalement, une priorité de 5 est utilisée pour le serveur de messagerie principal et de 10 pour les relais de secours. Si vous n'avez qu'un seul serveur de messagerie pour votre domaine, peu importe le numéro entré dans ce champ. Il est possible que deux serveurs aient la même priorité, auquel cas l'un sera choisi au hasard pour livrer. Un enregistrement de serveur de messagerie peut utiliser le caractère générique * dans son nom, ce qui indique aux programmes de messagerie qu'un serveur de messagerie particulier est responsable de tous les hôtes d'un domaine. Par exemple, un enregistrement nommé comme *.example.com correspondrait au nom d'hôte pc1.example.com et à tous les autres hôtes de la zone. Cela peut être utile si vous souhaitez forcer le courrier qui serait autrement distribué directement aux postes de travail de votre domaine à passer par un serveur de messagerie central à la place. Webmin ne vous laissera pas utiliser de caractères génériques à moins que l'option Autoriser les caractères génériques l'option de configuration du module est définie sur Oui cependant, comme expliqué dans la section *Configuration du module BIND DNS Server*.
- Informations sur l'hôte (HINFO)
- Les enregistrements de ce type sont utilisés pour enregistrer des informations sur le matériel et le système d'exploitation d'un hôte particulier. Par exemple, vous pouvez en créer un indiquant que server1.example.com est un PC x86 sous Linux. Cependant, ils sont très rarement utilisés et sont en fait considérés comme un risque de sécurité, car ils fournissent des informations à des attaquants potentiels qui pourraient être utilisées pour prendre le contrôle d'un serveur. Lors de la création ou de la modification d'un enregistrement d'informations sur l'hôte, les champs Matériel et Système d'exploitation sont affichés pour saisir l'architecture et le type de système d'exploitation d'un hôte. Les valeurs que vous entrez ne doivent pas contenir d'espaces - généralement, elles sont remplacées dans les chaînes de type de matériel et de système d'exploitation par des caractères _.
- Texte (TXT)
- Un enregistrement de texte associe un message arbitraire quelconque à un nom. Les enregistrements TXT peuvent être utilisés pour fournir des informations de propriété aux installations de messagerie en tant que SPF et DKIM. Sachez cependant que de tels commentaires seront accessibles à toute personne sur Internet pouvant rechercher des enregistrements dans votre domaine, et ne doivent donc pas contenir d'informations sensibles. Le champ Message s'affiche lors de la saisie ou de la modification d'un enregistrement de texte. Vous pouvez saisir le texte de votre choix, y compris les espaces.
- Service bien connu (WKS)
- Un enregistrement de ce type associe un nom d'hôte, un port et un protocole à un nom. Il peut être considéré comme une variante généralisée de l'enregistrement du serveur de messagerie, qui indique aux clients quel hôte fournit un service particulier pour un domaine ou un nom d'hôte. Cependant, presque aucun programme ne recherche réellement les enregistrements WKS, donc en pratique, ils sont pratiquement inutiles. Lors de l'ajout ou de la modification d'un de ces enregistrements, les champs Adresse , Protocole et Services sont disponibles. La première consiste à entrer l'adresse IP d'un hôte qui fournit les services pour l'hôte ou le domaine entré dans le Nom domaine. La seconde consiste à sélectionner le protocole réseau utilisé par les services, TCP ou UDP. Le dernier permet d'entrer une liste de numéros de port ou de noms (à partir du fichier /etc/services) pour les services fournis par l'hôte.
- Personne responsable (RP)
- Ce type d'enregistrement est utilisé pour spécifier la personne ou le groupe responsable d'un hôte particulier. Chacun de ces enregistrements est associé à deux valeurs :une adresse e-mail et le nom de l'enregistrement texte contenant le nom de la personne. Les enregistrements de personne responsable sont rarement vus et ne sont utilisés par aucun programme de livraison de courrier ou client Internet. L'adresse e-mail le champ affiché lors de la modification ou de l'ajout d'un de ces enregistrements sert à saisir l'adresse complète (comme [email protected] ) de la personne responsable de l'hébergeur dont le nom est inscrit dans le champ Nom domaine. Le Nom de l'enregistrement de texte champ sert à saisir le nom relatif ou canonique d'un enregistrement de texte contenant le vrai nom de la personne.
- Emplacement (LOC)
- Les enregistrements d'emplacement sont utilisés pour spécifier l'emplacement physique en latitude et longitude d'un hôte. Ils ne sont presque jamais vus et ne sont donc pas utilisés par de nombreux programmes. Cependant, ils peuvent être utiles dans les grandes organisations qui ont des hôtes dans de nombreux pays. Lors de l'ajout ou de la modification d'un enregistrement d'emplacement, le champ *Latitude et longitude* s'affiche pour entrer l'emplacement de l'hôte dans le Nom domaine. Il doit être au format _42 21 43.528 N 71 05 06.284 W 12.00m 30.00m 10000.00m 10.00m_.
- Adresse de service (SRV)
- Les enregistrements de ce type sont utilisés pour associer un nom de domaine, un nom de service et un protocole à un hôte particulier. Ils vous permettent de spécifier quel serveur un client doit contacter pour un service et un nom d'hôte particuliers, au lieu de simplement se connecter à l'hôte. D'une certaine manière, ils ressemblent aux enregistrements du serveur de messagerie, mais en beaucoup plus flexibles. Par exemple, vous pouvez spécifier que le serveur POP3 pour example.com est mail.example.com , mais le serveur Web est www.example.com . Au moment de la rédaction, les enregistrements SRV sont principalement utilisés par les systèmes clients Windows. Lors de l'ajout ou de la modification d'un enregistrement d'adresse de service, les champs Protocole et Nom du service sont affichés à côté du Nom zone de texte. Pour le protocole, vous devez sélectionner TCP ou UDP dans le menu. Pour le nom du service, vous devez entrer un nom bien connu du fichier /etc/services, tel que pop3 ou telnet . Pour rechercher un enregistrement SRV, un client combine le nom du service, le protocole et le nom pour obtenir un nom d'enregistrement tel que ___telnet.___tcp.example.com . Webmin le fait automatiquement pour vous lors de la modification ou de l'ajout d'un enregistrement d'adresse de service, mais vous pouvez voir le nom combiné sur la page répertoriant les enregistrements de ce type. Webmin a également ajouté automatiquement les _s avant le service et le protocole, mais les masque lorsqu'un enregistrement SRV est affiché ou modifié. Cela signifie qu'il n'est pas nécessaire de les saisir manuellement lors de la création ou de la modification d'un enregistrement de ce type. La priorité doit être utilisé pour entrer une priorité numérique pour ce serveur, qui a la même signification que la priorité dans un enregistrement de serveur de messagerie. Le poids Le champ doit contenir une pondération pour ce serveur particulier, ou zéro s'il n'y a qu'un seul enregistrement avec le même nom, protocole et nom de service. Une pondération plus élevée indique aux clients d'essayer ce serveur plus souvent qu'un autre avec une pondération inférieure. Le Port doit contenir un numéro de port auquel les clients peuvent se connecter sur le serveur, qui ne doit pas nécessairement être le port standard du service. Dans le Serveur , vous devez entrer le nom d'hôte ou l'adresse IP du système qui fournit réellement le service et auquel les clients se connectent réellement.
Les types d'enregistrements supportés par Webmin dans les reverse zones sont :
- Adresse inversée (PTR)
- Un enregistrement d'adresse inverse associe un nom d'hôte à une adresse IP dans une zone inverse. Pour que les clients DNS puissent rechercher des noms d'hôte à partir d'adresses IP de votre réseau, vous devrez créer un enregistrement de ce type pour chaque hôte. Cependant, la plupart du temps, cela est fait automatiquement par Webmin lors de l'ajout et de la modification des enregistrements d'adresse. Si vous créez vos propres enregistrements d'adresse inversée, assurez-vous qu'ils sont synchronisés avec les enregistrements d'adresse correspondants. Lors de l'ajout ou de la modification d'un enregistrement de ce type, les champs Adresse et Nom d'hôte sont affichés. La première consiste à entrer une adresse IP complète, comme 192.168.1.10 . Celui-ci sera automatiquement converti par Webmin au format in-addr.arpa utilisé en interne par le système DNS pour les adresses inversées. Le deuxième champ permet de saisir un nom d'hôte sous forme canonique, tel que pc1.example.com. , assurez-vous de toujours mettre un point à la fin, sinon le nom d'hôte sera relatif à la zone inverse, ce qui n'est certainement pas ce que vous voulez.
- Serveur de noms (NS)
- Les enregistrements de serveur de noms dans une zone inversée ont un objectif identique à ceux d'un domaine de transfert - ils indiquent aux autres serveurs DNS l'adresse IP ou le nom d'hôte d'un serveur responsable de la zone ou d'un sous-domaine. Cela signifie qu'il faut en ajouter un pour chaque serveur DNS principal ou secondaire de la zone. Le champ *Nom de la zone* qui apparaît lors de l'ajout ou de la modification d'un enregistrement de ce type permet de saisir le nom de la zone dont le serveur est responsable, qui sera généralement la zone qui contient l'enregistrement. Cependant, contrairement aux enregistrements d'adresse inversée, ce champ n'est pas automatiquement converti au format in-addr.arpa. Au lieu de cela, vous devez le saisir sous une forme entièrement qualifiée comme 1.168.192.in-addr.arpa. si vous définissez un serveur de noms pour le 192.168.1 réseau. Dans le champ *Name Server*, vous devez entrer une adresse IP ou un nom d'hôte de forme canonique pour le serveur DNS, tel que ns1.example.com. .
- Alias du nom (CNAME)
- Les enregistrements de ce type se comportent exactement de la même manière dans les zones inverses que dans les domaines directs. Cependant, vous devez renseigner le Nom et vrai nom les champs avec des noms inversés au format in-addr.arpa, car Webmin ne les convertira pas pour vous. Les champs Nom d'alias sont particulièrement utiles dans les zones inversées pour effectuer une délégation partielle de sous-réseau, comme indiqué dans la section *Délégation inversée partielle* ci-dessous.
Modifier une zone maître
You can use Webmin to edit many of the settings that apply to an entire master zone, such as the expiry and retry times, and the clients that are allowed to query it. These settings effectively apply to all records in the zone, although some (such as the TTL) can be overridden on a per-record basis.
Webmin uses the term zone parameters to refer to all information stored in the domain's SOA record, including the primary nameserver, administrator email address and retry and expiry times. All of these are set when the zone is created, but you can edit them at any time by following these steps:
- On the module's main page, click on the icon for the zone that you want to edit.
- Click on the Zone Parameters icon, which will bring up a form for editing the parameters.
- The Master server field only needs to be edited if the Internet hostname of the DNS server has changed. Enter a fully-qualified hostname, with a dot at the end.
- To change the address of the person responsible for the zone, edit the Email address domaine. Any @ symbols that it contains will be automatically converted to dots for use in the SOA record, as BIND requires.
- The Refresh time , Transfer retry time , Expiry time and Default time-to-live fields all have the same meanings as explained in the section on Creating a new master zone . If records in your zone are going to be changing frequently in future, you may want to reduce some of these times. However, any changes, may not be detected by secondary servers and DNS clients until the old refresh or expiry time has elapsed, even if the new times are much lower. This is because they will wait for the old times to elapse before checking with the master server again to discovered the new ones.
- Cliquez sur Enregistrer button at the bottom of the page when you are done, and then the Apply Changes button back on the module's main page. The serial number in the SOA record will be automatically incremented when the form is saved, so that secondaries now that the zone has changed.
There is another set of options that you can edit for a master zone, stored in the named.conf file in the zone's section. These control which servers and clients are allowed to query records in the zone, do zone transfers and update records over the network. The most useful of these options specifies a list of slave DNS servers for the zone that should be notified when a change occurs, so that they can perform immediate zone transfers and thus remain synchronized.
To edit these master zone options, the process to follow is:
- On the module's main page, click on the icon for the zone that you want to edit. This will take you to the form shown in Figure 30-4.
- Click on the Edit Zone Options icon, which will bring up a form showing the existing settings.
- The Check names? field determines the level of checking that BIND performs on records in this zone when it reads the records file. The available options are :
- Warn
- If an invalid record is found, an error will be written to the system log file but processing of other records continues normally.
- Fail
- Invalid records cause the entire zone to be rejected, but other zones will still be processed normally.
- Ignore
- No checking is done at all.
- Default
- The global default from the Zone Defaults page is used. If it is not set, then the default complied into BIND will be used instead, which is to fail when invalid records are encounterd.
- To have secondary servers notified when records in the zone change, set the Notify slaves of changes? field to Yes . BIND works out which slaves will be notified by looking at the Name Server records for the zone, and the list of IP addresses in the Also notify slaves domaine. If your zone has an secondary servers, then you should definitely turn this option on.
- To allow some systems to update records in the zone dynamically, fill in the Allow updates from field with a list of IP addresses, IP networks (like 192.168.1.0/24) and BIND ACL names. Only those hosts that match will be able to modify records using commands like nsupdate, and if the list is left empty updates will not be allowed at all. You should be careful allowing the dynamic update of zones in which Webmin is also being used to edit records, as it is very likely that updates made dynamically will be overwritten by changes made in this module, or vice-versa.
- By default, all DNS clients and servers will be able to lookup records in the zone. This may not be what you want for a zone that is used only on an internal network, as it may give away sensitive information to potential attackers. To restrict queries, fill in the Allow queries from field with a list of IP addresses, IP networks and BIND ACL names. If the field is left empty, the field with the same name on the global Zone Defaults page determines which clients are allowed.
- To restrict the clients and servers that are allowed to perform zone transfers of all the records in this domain, fill in the Allow transfers from domaine. Often you will only want to allow secondary servers to perform transfers, especially if your zone is very large or contains records that you want to hide from attackers. Enter a list of IP addresses, IP networks and ACL names into the field to limit transfers to only matching clients. If it is left empty, the Allow transfers from field on the Zone Defaults page applies instead.
- To specify additional slave servers to be notified when the zone changes, fill in the Also notify slaves field with a list of IP addresses. BIND normally works out with addresses of all secondary servers for the zone from its Name Server records, but this may not always be complete.
- Lorsque vous avez terminé, cliquez sur Enregistrer button at the bottom of the page to update the BIND configuration file with your changes. You will need to use the Apply Changes button on the module's main page to make them active.
If a master zone is no longer needed, you can use this Webmin module to totally delete it along with all the records that it contains. To do this, the steps to follow are:
- On the module's main page, click on the icon for the zone that you want to edit.
- Click on the Delete Zone bouton en bas de la page.
- When deleting a forward zone, the field *Delete reverse records in other zones?* controls whether matching Reverse Address records in hosted reverse zones for all of the Address records in this one should be removed as well. This is generally safe to set to Yes , as only records with the exact same IP address and hostname will be deleted.
- Similarly, when deleting a reverse zone the field *Delete forward records in other zones?* determines whether matching forward records should be deleted too.
- Once you have made your selection and are sure you want to go ahead with the deletion, click the Delete bouton. The zone's entry in the named.conf file will be removed, and its records file deleted.
You can convert a master zone to a slave zone of the same name without needing to delete and re-create it. This can be useful if the new server is taking over as the master for some domain, or if the master and secondary servers are switching roles. The section on Editing a slave zone explains how to carry out the reverse action of converting a slave zone to a master, which may be useful in this situation.
To convert a zone, the steps to follow are:
- On the module's main page, click on the icon for the zone that you want to edit, then on the Edit Zone Options icône.
- When you click on the Convert to slave zone button , zone's entry in named.conf will be immediately updated to convert it to a slave zone. The browser will then return to the module's main page.
- Normally, every slave zone has a list of master server IP addresses that it can use to perform zone transfers from. In the case of converted zones, this list will be initially empty unless the Default master server(s) for slave zones module configuration option is set. Follow the instructions in the *Edit a slave zone* section to set the master servers addresses correctly.
- To activate the change, click on the Apply Changes button the module's main page.
Creating a new slave zone
A slave or secondary zone is one for which your DNS server gets the list of records from a master server for the zone. Generally, slave servers are used to reduce the load on the primary server, or act as a backup in case it goes down. For important zones (such as a company's Internet domain), you should always have at least one slave server so that your website is still accessible and email can still be delivered even if the primary goes down.
The secondary DNS server for a domain should not usually be located on the same network as the master, so that the failure of that network cannot take them both down. Many ISPs and hosting companies will host secondary zones for their customer's domains for free, on their own DNS servers. If your ISP provides this service and you want to set up a secondary server for an Internet domain, you should take advantage of it. If so, most of this section can be skipped. However, if you want to add a slave server for an internal domain or have a large company network with many connections to the Internet, then the instructions below explain how to set it up:
- On the main page of the BIND DNS Server module, click on the Create a new slave zone link above or below the list of existing zones. This will bring up the form shown below, for entering the details of the new domain.
- For a forward zone like example.com , set the Zone type field to Forward and enter the zone name into the *Domain name / Network* field. For a reverse zone that maps IP addresses to hostnames for a network, choose the Reverse option and enter the network address (like 192.168.1 ) into the *Domain name / Network* text field.
- The Records file field determines if BIND keeps a cache of the records in this zone in a file, and if so where that file is located. If the option None is chosen, records that the DNS server transfers from the master will be kept in memory only, and lost when the server is re-started. This should only be chosen if there is a good network connect between the master and slave servers, as it will increase the number of zone transfers that your server must perform. If you choose Automatic , Webmin will generate a filename in the zone files directory specified in the named.conf file (usually /var/named). Whenever your server does a zone transfer, all records will be written to this file in the standard format. If the final option is selected, you can enter the full path to a file in which records should be stored into the field next to. This can be useful if you want to separate the records files for master and slave zones.
- In the Master servers field, enter the IP addresses of the master DNS server and any other secondary servers for the zone. BIND will try these servers in order when doing a zone transfer, so the master should be first on the list. You must enter at least one address, so that your server knows where to get records from.
- Cliquez sur Créer button to have the new slave zone added to your server's configuration. Your browser will be re-directed to a page for editing options for the zone.
- Return to the module's main page, and click the Apply Changes button on the main page to make the addition active.
- On the master server, add a new Name Server (NS) record for the zone with the IP address of the secondary server. This can be easily done in Webmin by following the instructions in the Adding and editing records section.
- Configure the master DNS server to notify this slave of any changes to records in the zone. The steps in the section on Editing a master zone expliquer comment.
- If this is an Internet domain, notify the registrar for the parent zone of the new secondary server. Most provide online forms for editing the list of nameservers for a domain, to which you can add the secondary's IP. This is necessary so that other hosts on the Internet know to use the slave server is the master is down.

The slave zone creation form
Another type of zone that is closely related to the slave zone is the stub. They are like slave zones, but only contain Name Server records that have been transferred from a master server, instead of all the records. Stub zones are rarely used, but can be useful for ensuring that the Name Server records in a zone for its sub-domains are the same as those use in the sub-domain itself. The steps for creating one are almost identical to those above, but in step 1 you must use the Create a new stub zone link on the main page instead.
Editing a slave zone
After a slave zone has been created, it is still possible to edit several options that apply to it. Naturally there is no way to add or edit the actual records within the zone, but you can still change the list of master servers, the records file and the clients that allowed to query it. To change these setting, the steps to follow are:
- On the module's main page, click on the icon for the slave zone that you want to edit. Your browser will display the form shown in the screenshot below.
- Scroll down to the Zone Options form at the bottom of the page.
- To edit the list of other master and slave servers for this zone, change the IP addresses in the *Master servers *field. If a new secondary server has been added, it should be added to this list on all other secondaries so that they can do zone transfers from it. If the IP address of the master has changed, the list must be updated with the new address.
- To change the amount of time that the server will wait before giving up on a zone transfer, de-select Default for the Maximum transfer time field and enter a number of minutes into the text box next to it.
- If the Records file field is set to None , records transferred from the master server for this zone will be kept in memory only. However if a filename is entered, records will be written to that file instead in the standard format. This is the best option, as it minimizes zone transfers and allows you to view the records on the secondary server, as explained below.
- To have this DNS server notify others when the zone changes, change the Notify slaves of changes? field to Yes . This is only really useful if there are other secondary servers that perform zone transfers from this one, and may not be able to receive update notifications from the master server. The DNS servers to notify are determined from the Name Server records for the zone, and the contents of the *Also notify slaves* field.
- By default, all DNS clients and servers will be able to lookup records in the zone. To change this, fill in the *Allow queries from* field with a list of IP addresses, IP networks and BIND ACL names. If the field is left empty, the field with the same name on the global Zone Defaults page determines which clients are allowed.
- To restrict the clients and servers that are allowed to perform zone transfers of all the records in this domain, fill in the Allow transfers from field with a list of IP addresses, IP networks and ACL names. If it is left empty, the *Allow transfers from* field on the Zone Defaults page applies instead.
- The other fields on the form such as Check names? and *Allow updates from?* are not really used for slave zones, and so can be left unchanged.
- When you are done making changes, click the Save button. As long as there were no syntax errors in your input, you will be returned to the module's main page. Click the Apply Changes button there to make the modifications active. Note that this will not always force a re-transfer of the zone, even if the master servers have changed. For slave zones that use records files, BIND will only do a transfer when it the zone expires or the server receives notification of a change.

The slave zone editing form
When editing a slave zones that uses a records file, it is possible to browse the records in Webmin. At the top of the page that appears when you click on the slave zone's icon is a table of record types, just like the one that appears on the master zone form. Each can be clicked on to list the names and values of records of that type in the zone, as known to the secondary server. Editing or adding to them is impossible of course, as any changes must be made on the master server which is the authoritative source of records for the domain.
To stop your system acting as a slave server for a zone, you will need to delete it from the BIND configuration. This is generally a safe procedure, as the all the records in the zone have been copied from a master server and can be easily replaced. However, you should update the Name Server records in the zone and notify the parent domain's registrar that you system is no longer a secondary for the zone, so that other DNS servers do not waste time querying it.
To delete a slave zone, the steps to follow are:
- On the module's main page, click on the icon for the slave zone that you want to edit. This will take you to the form shown in the screenshot above.
- Click on the Delete button in the bottom right-hand corner of the page, which will display a confirmation form.
- Hit the Delete button if you are sure you want to delete the zone.
- After your browser returns to the module's main page, click on Apply Changes to make the deletion active.
- On the master server, remove the Name Server (NS) record for this secondary server from the zone.
- If this is an Internet domain, notify the parent zone registrar of the removal of this secondary server. Failure to do so could cause problems if other DNS servers attempt to query this one for records in the domain when it cannot provide answers.
The final thing that you can do to a slave zone is convert it to a master. This is only possible for zones that use a records file, so that Webmin can view and edit that file in future. If you do such a conversion, make sure that the original master server is changed to become a slave or stops hosting the zone altogether - the same domain cannot be served by two masters.
The steps to convert a zone are:
- Click on its icon on the module's main page.
- Scroll down to the bottom of the slave zone page, and hit the Convert to master zone bouton. This will immediately update the named.conf file to change the zone's type, but will not make any other changes.
- To make the conversion active, click on the Apply Changes button on the module's main page.
- You can now edit records in the domain just as you would with any normal master zone, by following the instructions in the section on Adding and editing records .
Creating and editing a forward zone
A forward zone is one for which your DNS server simply forwards queries to another server on behalf of whoever is making the request. They can be useful if the zone is actually hosted by another server that cannot be reached by clients of this server. It is possible to set up BIND to forward all requests for any non-hosted zones to another server, as explained in the *Configuring forwarding and transfers* section below. A forward zone entry does the same thing, but for just a single domain.
To set one up, the steps to follow are:
- On the module's main page, click on the *Create a new forward zone* link above or below the list of existing domain icons. This will take you to the zone creation form.
- Set the Zone type field to either Forward or Reverse , as when creating master and slave zones.
- For a forward zone, enter its full name (without a dot at the end) into the Domain name / Network domaine. For a reverse zone, enter its network (like 192.168.1 ) into the field instead - Webmin will automatically convert it to in-addr.arpa format when the zone is added.
- In the Master servers field, enter a list of IP addresses for the DNS servers that can be queried to lookup records in the zone. These must all be master, slave or forward hosts for the domain. If no addresses are entered at all, BIND will always perform normal lookups of records in the zone instead of forwarding requests to another server. This can be used to override the global forwarding settings on the Forwarding and Transfers page for a single zone.
- Cliquez sur Créer button to have the zone added to BIND's configuration file. Your browser will be taken to a page for editing options in the new domain.
- Return to the module's main page, and hit the Apply Changes button to make it active.
After a forward zone has been created, you can delete it or edit the few settings that it has by following these steps :
- Click on the icon for the zone on the module's main page, which will bring your browser to a small form for editing its options.
- To change the list of DNS servers that requests are forwarded to, edit the IP addresses in the Master servers domaine. If none are entered, requests for records in this domain will be looked up directly.
- If the Try other servers? field is set to Yes , BIND will try a normal direct lookup for requests in this zone if it cannot contact any of the listed servers.
- Cliquez sur Enregistrer button to store your changes, and then Apply Changes back on the main page to activate them. Or to delete the forward zone, click on Delete and then Delete again on the confirmation page.
Creating a root zone
As the introduction explains, a root zone is one that contains the information that your DNS server needs to contain the Internet root servers. Without one, it is impossible to resolve records in domains other than those hosted by your server. Fortunately, one will almost always exist already in your BIND configuration, created either by Webmin or included as part of the default setup.
You may need to create a root zone if one does not exist yet because you selected the internal non-internet use only option when setting up the module for the first time, but have now connected your system to the Internet. Adding a second root zone can also be useful when views have been configured, as explained in the Using BIND views section.
Webmin will only allow you to create a root zone if none exists yet, or if a view exists that does not contain one, because there is no point having two such zones. To add one, the steps to follow are:
- On the module's main page, click on the Create a new root zone icône.
- Fill in the Store root servers in file field with a filename to use for the root zone file. If one already exists, then this field will already contain its path - otherwise, you should enter something like /var/named/db.cache.
- The Get root servers from field controls where Webmin copies the root file from. The choices are :*Download from root FTP server *This is the best option, as it tells the module to make an FTP connection to rs.internic.net and download the latest version of the file. However, this may not work if your system cannot make perform FTP downloads due to a firewall. *Use Webmin's older root server information *This option should be used if the first will not work. If selected, the module will use a copy of the root zone file that comes with Webmin, which will work but may not be up to date. *Existing root servers in file *If the file entered in step 2 already exists, then this option should be chosen. If you are adding a root zone to a view and one already exists in another view, it will be selected by default so that the file can be shared between both zones.
- Cliquez sur Créer button to add the zone and return to the module's main page. Then hit Apply Changes to make it active.
Once a root zone has been added, an icon representing it will appear on the main page. You can delete it by clicking on the icon and hitting the Delete button - however, this may prevent the lookup of records in non-hosted Internet domains from working as explained above.
Editing zone defaults
Defaults for new master zones
If you add lots of zones that contain similar records, then it can be a lot of work to add them manually after creating each one. For example, in a web hosting company all of your domains might contain a www Address record for the IP address of your webserver, and an Mail Server record that directs mail to a central server. Fortunately, Webmin allows you to create a list of records that get added to all new domains, called a zone template.
A template consists of one or more records, each of which has a name, type and value. For Address records, the value can be option which indicates that it can be entered by the user at zone creation time. This is useful if one of the records (such as www) in the new domains does not have a fixed address, and you want to be able to easily set it when the zone is added. Templates can only be used when creating forward zones, as they do not make much sense for reverse zones.
It is also possible to edit the default expiry, refresh, TTL and retry times for new zones. Webmin's initial defaults are reasonable, but may not be appropriate for your network. To change these defaults and set up template records, the steps to follow are:
- On the module's main page, click on the Zone Defaults icône. The form at the top of the page labeled Defaults for new master zones contains all the fields that need to be edited.
- Edit the Refresh time , Transfer retry time , Expiry time and Default time-to-live fields if you want to change the defaults times for new zones. Existing master zones will not be effected by any changes you make here though.
- If all your new domains are managed by the same person, enter his address into the Default email address domaine. This will save you from having to type it in on the master zone creation page every time.
- In the Template records table, two blanks rows appear for entering new records. To add more than two, you will need to save this page and re-edit it. The records in existing rows can be edited by just changing their fields, or deleted by clearing out the record name. Under the Record name column you must enter the name of the record relative to the zone, such as www or ftp. To create a record for the zone itself (such as a Mail Server record for the domain), just enter a single dot. Under the Type column, select a type for the record from the list. See the #Record types section for more information on what each is used for. As its name suggests, the field under the Value column is for entering a value for the new record. For the Address type, you can select From form in which case you will be able to enter an address when creating a new domain, which will be used by all template records that have this option selected. For Mail Server records, both the priority and server name must be entered separated by a space, such as _5 mail.example.com._. Values for records of all other types should be entered in the same format as is used when adding a record to a zone.
- If you are familiar with the records file format used by BIND, you can create your own file of records to be included in new zones. If a filename is entered into the Additional template file field, its contents will be added to the zone file created by Webmin for new master domains.
- When you are done adding template records, click the Save bouton en bas de la page. The changes will apply to any new master zones created from now on.
Now that you have created a template, you can choose whether or not to use it for each new master zone that you create. On the creation form (explained in the Creating a new master zone section) is a field labeled Use zone template? , which is set to Yes by default if there are any template records. Next to it is a field named IP address for template records , which used for entering the IP for records for which the From form option est sélectionnée. If you chose to use a template and if there are any records that do not have an IP address specified, then this field must be filled in.
Default zone settings
At the bottom of the Zone Defaults page you will find several options that apply to all existing domains, but can all be set or overridden on a per-zone basis as explained in the Editing a master zone section. You can control which clients are allowed to query the server, and what kind of checking is done for the records of various domain types. Being able to limit the allowed client hosts is particularly useful, so that you can stop non-internal clients using your DNS server. However, you should make sure that master Internet zones hosted by your server are accessible to everyone, so that other DNS servers on the Internet can look them up.
To change these global options, the steps to follow are:
- On the module's main page, click on the Zone Defaults icon and scroll down to the Default zone settings section.
- To control which hosts are allowed to query your DNS server, change the Allow queries from field to Listed and enter a list of IP addresses, IP networks (like 192.168.1.0/24) and ACL names into the text box below. Clients that do not match any entry on the list will be denied, unless they are requesting a record in a zone which has its own separate settings allowing them.
- To control which hosts are allowed to perform zone transfers from your server, change the Allow transfers from field to Listed and fill in the text box below with a list of IP addresses, IP networks and ACL names. Only servers that are acting as secondaries for zones that this server hosts really need to be able to do transfers, so it is usually a good idea to enter just their IP addresses. If you are restricting queries, this field must be filled in so that hosts that cannot lookup records are not allowed to perform transfers either.
- The fields Check names in master zones? and Check names in slave zones? control the checking of records in all zone files for master and slave zones respectively. The available options for each are:
- Warn
- If an invalid record is found, an error will be written to the system log file but processing of other records continues normally.
- Fail
- Invalid records cause the entire zone to be rejected, but other zones will still be processed normally.
- Ignore
- No checking is done at all.
- Default
- The default checking level is used, which is Fail .
- To have BIND check responses that it receives from other DNS servers, set the Check names in responses? field to Warn or Fail . The default is simply to pass potentially erroneous responses on to clients.
- The Notify slaves of changes? field determines whether BIND sends a notification to all slaves of master zones hosted by this server when they change. To turn this on, select Yes - otherwise, select No or Default . Enabling notification is a good idea, as it ensures that secondary servers are kept in sync with the master.
- Lorsque vous avez terminé, cliquez sur Enregistrer button at the bottom of the page to update the BIND configuration file, and then the Apply Changes button on the module's main page to make the changes active. The new settings will apply to all zones that do not explicitly override them on their own options pages.
Configuring forwarding and transfers
BIND can be configured to forward all requests for zones that it is not the master or slave for to another DNS server. When doing this, it acts like a DNS client itself, accepting requests from real clients and then sending them off to another server or servers for resolution instead of carrying out the normal process of contacting the root zone servers and finding the correct server for the domain. This can be useful if your DNS server is unable to contact the rest of the Internet, but can still communicate with a DNS server that does have full network access. For example, it may be on an internal network behind a firewall that only allows connections to a limited set of destinations.
To set up forwarding, the steps to follow are:
- On the module's main page, click on the Forwarding and Transfers icône.
- In the form that appears, fill in the Servers to forward queries to field the IP addresses of DNS servers that requests should be sent to. BIND will try them in order until one returns a positive or negative a response. If the list is empty, the server will revert to the normal method of looking up records by contacting the root servers and so on.
- If you want your server to attempt to resolve a client's query directly when it cannot contact any of the forwarding servers, set the Lookup directly if no response from forwarder field to Yes . This is only useful if your server is actually capable of doing lookups.
- Cliquez sur Enregistrer button at the bottom of the page, and then hit Apply Changes back on the main page to make the new setting active. Assuming the forwarding list was filled in, your server will now send all client queries to the listed servers.
The same form also contains fields for configuring BIND's behavior when doing zone transfers. You can control how long it will wait for a transfer to complete, the protocol used for transfers and the number that can be active at the same time. To edit these settings, follow these steps:
- On the module's main page, click on the Forwarding and Transfers icône.
- By default, BIND will wait 120 minutes (2 hours) for a zone transfer from a master to complete. To change this, enter a different number of minutes into the *Maximum zone transfer time* field. This can also be set or overridden on a per-slave zone basis.
- BIND versions before 8.1 only support the transfer of a single zone at a time. Because this can be slow when transferring many zones from the same master server, the *Zone transfer format* field can be set to Many to use a new format that combines multiple domains into the same transfer. If One at a time or Default is chosen, then each zone will be transferred separately. This is the best choice unless you are sure that all slave servers are running BIND 8.1 or above.
- By default, your nameserver will not carry out more than 2 concurrent zone transfers from the same master server. To increase this limit, change the *Maximum concurrent zone transfers* field to something higher. This can speed up the process of transferring a large number of domains, but at the expense of putting a higher load on the master server.
- Cliquez sur Enregistrer button when you are done making changes, and then Apply Changes on the main page to activate them. The new settings will apply to all subsequent zone transfers.
Editing access control lists
An access control list (or ACL) is list of IP addresses, IP networks or other ACLs that are grouped together under a single name. The ACL name can then be used when specifying the list of clients allowed to query, update or perform zone transfers from a zone. This can make be used to reduce the amount of duplication in your BIND configuration, and to make it clearer. For example, the ACL corpnet might match the IP networks 192.168.1.0/24 , 192.168.2.0/24 and 1.2.3.0/24 , which are all part of your company's network. When configuring who can query a zone, you could just enter corpnet instead of that list of network addresses. To view and edit ACLs in Webmin, the steps to follow are :
- On the module's main page, click on the Access Control Lists icône. This will take you to a page listing existing ACLs and allowing the addition of one more. If you want to add more than one ACL, you will need to save the form and re-edit it to force the display of a new blank row.
- To add a new ACL, find the blank row at the bottom of the table and enter a short name consisting of only letters and numbers in the ACL Name colonne. Then in the field under *Matching addresses, networks and ACLs*, enter a list of IP addresses, IP networks and other ACL names that this new ACL will contain. IP addresses must be entered in their standard format like 192.168.1.1 , but hostnames are not allowed. IP networks must be entered in network/prefix format like 192.168.1.0/24 or 192.168.1/24 . You can also precede any address, network or ACL name with a ! to negate it, so for example the entry !192.168.1.0/24 would match all hosts outside the_ 192.168.1 _network.
- Existing entries in the list can be edited by changing their fields in the table, and ACLs can be deleted by clearing out the field containing their names.
- When you are done adding and editing ACLs, click the Save bouton. To activate the changes, hit Apply Changes back on the main page. As soon as an ACL is created, it can be used in other query, transfer and update restrictions of other zones.
BIND has four built-in ACLs that can be used in all the same places that user-defined ACLs can. Ce sont :
- any
- Matches any client address.
- none
- Matches nothing.
- localhost
- Matches the IP addresses of all network interfaces on your system. Even though it is called localhost, it doesn't just match 127.0.0.1.
- localnets
- Matches all clients on all networks that your system is directly connected to. BIND works this out by looking at the IP addresses and netmasks of all network interfaces.
Setting up partial reverse delegation
Partial reverse zone delegation is method for transferring the management of a small set of reverse IP addresses to another DNS server. Normally, reverse zones cover an entire class C network containing 256 addresses. However, many organizations have networks much smaller than this, containing maybe 16 or 32 addresses. Normally, this would make it impossible for the organization to manage its own reverse address mappings, as the addresses come from a network that is owned by an ISP or hosting company.
Fortunately, there is a solution - the ISP can set up Name Alias (CNAME) records in the reverse zone for the parent network that point to Reverse Address records in a special zone on the organization's DNS server. The parent zone must also contain a Name Server (NS) record for the special sub-zone that points to the customer's server, so that other DNS clients know where to look when resolving the Name Alias records.
An example may make this clearer - imagine for example than an ISP had granted addresses in the range 192.168.1.100 to 192.168.1.110 to Example Corporation, which owns the example.com domain. The company already runs its own DNS server to host the example.com zone, but wants to control reverse address resolution for its IP range as well. The ISP would create Name Alias records in the 192.168.1 zone pointing to the special sub-zone 192.168.1.100-110, which will contain the actual Reverse Address records named like 192.168.1.100-100.101. The ISP also needs to create a Name Server record for 192.168.1.100-110 which tells other servers that Example Corporation's DNS server should be used to find records under that zone.
Webmin handles reverse address delegation well, and automatically converts special network zones like 192.168.1.100-110 to and from the real zone names used by BIND such as 100-110.1.168.192.in-addr.arpa. The exact steps to follow on both the server that hosts the actual class C network zone and the server that a subset of it is being delegated to are :
- Decide on the range of addresses that are being delegated, such as 192.168.1.100 to 192.168.1.110 . Typically, the sub-zone name is based on the range of addresses being delegated, but this does not have to be the case as long as it is under the parent network domain.
- On the server that hosts the class C network zone, add a Name Server record for 192.168.1.100-110 with the server set to the IP address or name of the sub-zone's DNS server.
- For each address in the range, add a Name Alias record to the reverse zone named like 101.1.168.192.in-addr.arpa. with the Real Name set like 101.100-110.1.168.192.in-addr.arpa . As you can see, the alias points to a record inside the zone for the sub-network.
- When all of the Name Alias records have been created, everything that needs to be done on this server is finished and you can hit Apply Changes .
- On the DNS server for the sub-network, create a new master zone for the reverse network 192.168.1.100-110 . Webmin will automatically convert this to the correct in-addr.arpa format for you.
- Add Reverse Address records to the new zone as normal for IP addresses like 192.168.1.100-110.101 . Adding a record for the IP 192.168.1.101 will not work.
- When you are done creating reverse records, click the *Apply Changes* button to make them active. You should now be able to look them up using a command like nslookup on the server for the parent network zone.
The instructions above can be used to delegate multiple ranges from a single class C network to several different DNS servers. There is no limit on the size of ranges, nor any requirement that they follow normal network block boundaries - however, for routing reasons most IP allocation is done in power-of-two sized blocks (like 4, 8, 16 and so on), which means that any sub-zone ranges will be the same size.
The only problem with reverse address delegation when using Webmin is that Reverse Address are not automatically created and updated when Address records are. This means that you will have to create all such records manually on the sub-zone server, as in the steps above.
One inconvenience in setting up partial reverse delegation is the number of similar Name Alias records that must be created on the parent network zone server. Fortunately, there is a simpler alternative - record generators. A generator is a special BIND configuration entry that creates multiple similar records using an incrementing counter. This module allows you to created and edit generators, by following these steps :
- On the module's main page, click on the icon for the reverse zone that you want to create records in. This will typically be a class C network domain that is going to have a range of addresses delegated to some other Server.
- Click on the Record Generators icône. This takes you to a page containing a table of existing generators, with a blank row for adding a new one.
- In the empty row, select CNAME from the menu under the Type colonne.
- Under the Range column, enter numbers for the start and end of the address range into the first two fields, such as 100 and 110 . The third field is for entering the gap between each step, and should be left blank. If you were to enter 2, then the range would go 100 , 102 , 104 etc.
- In the Address pattern field, enter _$_ (a single dollar sign). When the records are created, the $ will be replaced with the number of each record, which will in turn resolve to an IP address in the range. You could also enter $.1.168.192.in-addr.arpa. , which makes things more obvious but is longer to type.
- In the Hostname pattern field, enter $.100-110 . Similarly, the $ will be replace with the number of each record, which will resolve to something like 101.100-110. 1.168.192.in-addr.arpa. .
- If you like, enter a comment that describes what this generator is for into the Comment domaine.
- Cliquez sur Enregistrer button, return to the module's main page and click on Apply Changes .
A generator can replace the Name Alias records that the first set of instructions in this section tell you to create, so there is no need for them anymore. Note that the automatically generated replacements will not be visible or editable in the normal way, only through the Record Generators page.
Using BIND views
BIND version 9 introduced the concept of views, which are groups of zones that are visible only to certain DNS clients. Views can be used to hide internal zones from the Internet, to present the same zone in two different ways, or to stop non-local clients resolving non-hosted domains through your server. Every view has a unique name, and a list of matching IPs addresses and IP networks that determines which clients and servers it is visible to.
When it detects that you are running BIND 9, several additional features are available in the module. You can create views, move zones from one view to another, and choose which view zones are created in. On the main page, each current view is represented by an icon under Existing Client Views heading, and each zone icon has a label that indicates which view it is in.
If any views exist, then every zone must be in a view. Only if none are defined will Webmin allow the creation of zones outside views, as this is not supported by BIND. This includes the root zone, which must be available to a client for DNS requests for records in domains not hosted by this server to succeed. For this reason, it often makes sense to put the root zone in a view that is available to all clients.
To add a new view to your BIND configuration, the steps to follow are:
- On the module's main page, click on the Create a new view link in the Existing Client Views section. This will take you to a form for entering its details.
- Enter a short alphanumeric name for the view (such as internal or everyone ) into the View name domaine. Each view must have a unique name.
- Leave the DNS records class field set to Default .
- If this zones in this view are to be visible to everyone, set the Apply this view to clients field to All clients . Otherwise, choose Selected addresses, networks and ACLs and enter a list of IP addresses, IP networks and BIND ACL names into the text box below. Only clients that match one of the entries in this list will have access to the view.
- Cliquez sur Créer button at the bottom of the form. You will be returned to the main page, which will include an icon for your new view.
- Move any existing zones that you want to be in this view into it. A zone can be moved by clicking on its icon, then on *Edit Zone Options*, and then selecting the new view from the menu next to the Move to view button before clicking it. If this is your first view, all existing zones must be moved into it (or another view) before the new configuration will be accepted by BIND.
- When you are done moving zones, click the Apply Changes button on the main page.
Once a view has been created, you can change the list of addresses and networks that it matches by clicking on its icon on the main page and updating the Apply this view to clients domaine. Then hit the Save button followed by Apply Changes to make the new client list active.
A view can be deleted by clicking the Delete button on the same form. This will bring up a confirmation page that allows you to choose what should happen to the zones that it contains, if any. The available options are:
- Delete totally
- All zones in the view are deleted, along with their records files.
- Move out of views
- Zones in the view are moved out to the top level. This option should only be used when deleting the last view, for the reasons explained above.
- Move to view
- Zones are moved to a different existing view.
When one or more views have been defined on your system, you can choose which one to use when adding new zones. This is done using the Create in view field on the master, slave, forward and root zone creation forms, which allows you to select a view from its menu. Naturally, there is no option for creating a zone outside of any views as this is not allowed by BIND.
One common use of views is hiding internal zones from clients outside your internal network. This is a good way of hiding the structure of your network and the hosts on it from potential attackers. To set it up, the steps to follow are:
- Create a new view called internal that matches clients on your internal LAN.
- Create a second view called everyone that matches all clients.
- Move any zones that are for internal use only into the internal voir. Zones for Internet domains such as example.com must not be put in this view, as that would make them inaccessible to the rest of the world.
- Move all other zones (including the root zone) to the everyone voir.
Views can also be used to prevent clients outside your network looking up non-hosted domains on your server, as follows:
- Create a new view called internal that matches clients on your internal LAN.
- Create a second view called everyone that matches all clients.
- Move the root zone to the internal view, which will prevent the server from looking up records for non-local clients that require contact with the root servers.
- Move all other zones to the everyone voir.
Contrôle d'accès aux modules
Like others, the BIND DNS Server module allows you to control which of its features are available to a particular Webmin user or group. This can be useful for giving people the rights to manage only records in their own zones and nobody else's. Even though this would normally require root access to the records files, with Webmin it can be granted to people without giving them level of power that a root login would allow.
Once you have created a user with access to the module as explained on WebminUsers, the steps to limit his access to only certain zones are:
- Click on the BIND DNS Server next to the name of the user in the Webmin Users module. This will being up a page of access control options.
- Modifier le Peut modifier la configuration du module ? champ sur Non , so that the user is not allowed to change the paths that the module uses to named.conf and other files.
- For the *Domains this user can edit *field, choose *Selected zones* and select the ones that you want him to have access to from the list to its right. If you want him to be able to edit almost all zones, it may be better to choose All except selected and select only those that he should not be allowed to manage records in. If your DNS server uses views, you can use the *Zones in view* options to allow or deny access to all zones in a view as well.
- Change the fields Can create master zones? , *Can create slave/stub zones?*, Can create forward zones? and *Can edit global options?* to No .
- If you want Reverse Address records in zones that the user does not have access to to be updated by changes to Address records in zones that he does, set the *Can update reverse addresses in any domain?* field to Yes . This may not be a good idea from a security point of view though, as he would be able to change almost any existing Reverse Address record on your system. For that reason, I suggest that this field be set to No .
- To stop the user creating more than one Address record with the same IP, set the *Can multiple addresses have the same IP? field to *No . Even though creating multiple records is harmless, you may want to set this to No to prevent the user allocating the same IP twice.
- Leave the Read-only access mode? field set to No . If it is changed to Yes , the user will only be able to view zones and records using the module, and not change anything. This might be useful for creating a different kind of restricted user though - one who can see all settings, but not edit them.
- Leave the Can apply changes? field set to Yes , so that he can use the Apply Changes button to make his additions and modifications active.
- Unless you want the user to be able to edit his records file manually, change the Can edit records file? champ sur Non . Most un-trusted users are not smart enough to perform manual editing.
- The Can edit zone parameters? field determines if the user can see and use the Edit Zone Parameters icon for his domains. Setting this to Yes is quite safe, as the user can only harm his own zones by setting the parameters to silly values.
- Similarly, the Can edit zone options? field determines if the Edit Zone Options icon is visible or not. You should set this to No , as it is possible for a user to create a syntax error in named.conf by improper use of the zone options form.
- Unless you want the user to be able to delete his own domains, change the Can delete zones? champ sur Non . Users should contact the master administrator instead if they can to delete zones.
- The Can edit record generators? field can be left set to Yes , as it simply allows the creation of multiple records at once. However, some users may get confused by this feature so it might be a good idea to change the field to No .
- The Can lookup WHOIS information? And *Can search for free IP numbers?* fields can also be left on Yes , as those features mere display information to the user.
- Change the Can create and edit views? champ sur Non , so that the user cannot manage BIND 9 views. If the user is allowed to create zones, you can use the *Views this user can edit and add zones to* field to limit those that he can create zones in.
- Can create slave zones on remote servers? should be set to No , but this doesn't really matter as the user is not going to be allowed to create master or slave zones anyway.
- Finally, click the Save button to make the new restrictions for the user active.
See also:
- Resolution for Virtual Hosts