Pour vous connecter au serveur de file d'attente de messages RabbitMQ, vous pouvez écrire votre programme client à l'aide de divers langages de programmation. Actuellement, vous pouvez écrire un client en utilisant C#, erlang, java, perl, PHP, python et ruby.
Ce tutoriel explique comment installer et configurer la bibliothèque client RabbitMQ et l'extension PHP AMQP.
Une fois que vous avez installé l'extension PHP AMQP, vous pouvez écrire un programme PHP en utilisant AMQP, qui peut se connecter au serveur RabbitMQ pour manipuler les messages .
Partie 1 :Installer la bibliothèque client RabbitMQ
1. Installer cmake
cmake est un système de construction open source utilisé par la bibliothèque rabbitmq-c. Nous devons installer la bibliothèque rabbitmq-c avant d'installer l'extension PHP AMQP. Mais, pour installer la bibliothèque rabbitmq-c, nous avons besoin de cmake.
Depuis la page de téléchargement de cmake, descendez jusqu'à la section Linux i386 et téléchargez le fichier cmake-2.8.10.2-Linux-i386.sh. Ou, utilisez le wget pour le télécharger sur votre système.
cd /usr/src
wget http://www.cmake.org/files/v2.8/cmake-2.8.10.2-Linux-i386.sh
Exécutez le fichier cmake-2.8.10.2-Linux-i386.sh, qui installera cmake sous votre répertoire actuel comme indiqué ci-dessous.
# /bin/sh cmake-2.8.10.2-Linux-i386.sh
Do you accept the license? [yN]: y
By default the CMake will be installed in:
  "/usr/src/cmake-2.8.10.2-Linux-i386"
Do you want to include the subdirectory cmake-2.8.10.2-Linux-i386?
Saying no will install in: "/usr/src" [Yn]: y
Using target directory: /usr/src/cmake-2.8.10.2-Linux-i386
Extracting, please wait...
tar: Read 4096 bytes from -
Unpacking finished successfully
Renommez le répertoire cmake et vérifiez que cmake est correctement installé.
# cd /usr/src
# mv cmake-2.8.10.2-Linux-i386 cmake
# /usr/save/cmake/bin/cmake --version
cmake version 2.8.10.2
2. Télécharger le client RabbitMQ
Installez d'abord la bibliothèque librabbitmq, qui est requise par l'extension PHP AMQP.
Téléchargez le fichier zip à partir du référentiel git rabbitmq-c.
cd /usr/src
unzip rabbitmq-c-master.zip
cd rabbitmq-c-master
3. Configurer le client RabbitMQ
Utilisez cmake pour configurer le client rabbitmq pour l'installation. Assurez-vous de spécifier le PREFIX comme /usr/local, où le client rabbitmq sera installé.
# mkdir build
# cd build
# /usr/src/cmake/bin/cmake -DCMAKE_INSTALL_PREFIX=/usr/local ..
-- The C compiler identification is GNU 4.1.2
-- Check for working C compiler: /usr/bin/cc
-- Check for working C compiler: /usr/bin/cc -- works
-- Detecting C compiler ABI info
-- Detecting C compiler ABI info - done
-- CMAKE_BUILD_TYPE not specified. Creating Release build
-- Found C inline keyword: inline
-- Looking for getaddrinfo
-- Looking for getaddrinfo - found
-- Looking for socket
-- Looking for socket - found
-- Looking for htonll
-- Looking for htonll - not found
-- Found POPT: /usr/include
-- Could NOT find XMLTO (missing:  XMLTO_EXECUTABLE)
-- Building rabbitmq as a shared library - yes
-- Building rabbitmq as a static library - no
-- Configuring done
-- Generating done
-- Build files have been written to: /usr/save/rabbitmq-c-master/build
4. Installer le client RabbitMQ
Après la configuration, utilisez cmake pour installer le client rabbitmq comme indiqué ci-dessous. Cela installera la bibliothèque librabbitmq sous /usr/local. La sortie partielle est illustrée ci-dessous.
#  /usr/src/cmake/bin/cmake --build . --target install
Scanning dependencies of target rabbitmq
[  2%] Building C object librabbitmq/CMakeFiles/rabbitmq.dir/amqp_framing.c.o
[  4%] Building C object librabbitmq/CMakeFiles/rabbitmq.dir/amqp_api.c.o
..
[ 95%] Built target amqp-publish
[ 97%] Building C object tests/CMakeFiles/test_parse_url.dir/test_parse_url.c.o
[100%] Building C object tests/CMakeFiles/test_tables.dir/test_tables.c.o
[100%] Built target test_tables
Install the project...
-- Install configuration: "Release"
-- Installing: /usr/local/lib/pkgconfig/librabbitmq.pc
-- Installing: /usr/local/lib/librabbitmq.so.1.0.1
-- Installing: /usr/local/lib/librabbitmq.so.1
-- Installing: /usr/local/lib/librabbitmq.so
-- Installing: /usr/local/include/amqp.h
-- Installing: /usr/local/include/amqp_framing.h
-- Installing: /usr/local/bin/amqp-publish
-- Removed runtime path from "/usr/local/bin/amqp-publish"
-- Installing: /usr/local/bin/amqp-get
-- Removed runtime path from "/usr/local/bin/amqp-get"
-- Installing: /usr/local/bin/amqp-consume
-- Removed runtime path from "/usr/local/bin/amqp-consume"
-- Installing: /usr/local/bin/amqp-declare-queue
-- Removed runtime path from "/usr/local/bin/amqp-declare-queue"
-- Installing: /usr/local/bin/amqp-delete-queue
-- Removed runtime path from "/usr/local/bin/amqp-delete-queue"
5. Vérifier le client RabbitMQ
La bibliothèque est livrée avec un exemple de programme que vous pouvez utiliser pour vérifier qu'il fonctionne comme prévu.
Depuis un terminal, procédez comme suit. Ce sera dans un état d'attente.
# cd /usr/src/rabbitmq-c-master/build
# ./examples/amqp_listen localhost 5672 amq.direct test
Ouvrez un autre terminal et procédez comme suit. Cela enverra un message "hello world" à la file d'attente.
# cd /usr/src/rabbitmq-c-master/build
# ./examples/amqp_sendstring localhost 5672 amq.direct test "hello world"
Revenez maintenant au premier terminal qui était en attente, où vous verrez maintenant le message "hello world" comme indiqué ci-dessous.
# ./examples/amqp_listen localhost 5672 amq.direct test
Result 0
Frame type 1, channel 1
Method AMQP_BASIC_DELIVER_METHOD
Delivery 1, exchange amq.direct routingkey test
Content-type: text/plain
----
00000000: 68 65 6C 6C 6F 20 77 6F : 72 6C 64                 hello world
0000000B:
Partie 2 :Installer l'extension PHP AMQP
Vous pouvez installer amqp en utilisant pecl, ou vous pouvez compiler à partir des sources.
Pour installer à l'aide de pecl, procédez comme suit :
# pecl search amqp
amqp    1.0.9/(1.0.9 stable)       Communicate with any AMQP compliant server

# pecl install amqp
Pour installer à partir de la source (ce que je préfère), suivez les étapes ci-dessous.
6. Télécharger l'extension PHP AMQP
Téléchargez la dernière version stable de l'extension PHP AMQP. La version stable actuelle est la 1.0.10
cd /usr/src
wget http://pecl.php.net/get/amqp-1.0.10.tgz
tar xvfz amqp-1.0.10.tgz
cd amqp-1.0.9
7. Configurer AMQP
Exécutez phpize et configurez comme indiqué ci-dessous.
# phpize
Configuring for:
PHP Api Version:         20090626
Zend Module Api No:      20090626
Zend Extension Api No:   220090626

# ./configure --with-amqp
checking for egrep... grep -E
checking for a sed that does not truncate output... /bin/sed
..
creating libtool
appending configuration tag "CXX" to libtool
configure: creating ./config.status
config.status: creating config.h
8. Installer AMQP
Installez AMQP en utilisant make et make install comme indiqué ci-dessous. Une sortie partielle est affichée.
# make
..
creating amqp.la
(cd .libs && rm -f amqp.la && ln -s ../amqp.la amqp.la)
/bin/sh /usr/save/amqp-1.0.9/libtool --mode=install
cp ./amqp.la /usr/save/amqp-1.0.9/modules
cp ./.libs/amqp.so /usr/save/amqp-1.0.9/modules/amqp.so
cp ./.libs/amqp.lai /usr/save/amqp-1.0.9/modules/amqp.la
PATH="$PATH:/sbin" ldconfig -n /usr/save/amqp-1.0.9/modules
----------------------------------------------------------------------
Libraries have been installed in:
   /usr/save/amqp-1.0.9/modules

If you ever happen to want to link against installed libraries
in a given directory, LIBDIR, you must either use libtool, and
specify the full pathname of the library, or use the `-LLIBDIR'
flag during linking and do at least one of the following:
   - add LIBDIR to the `LD_LIBRARY_PATH' environment variable
     during execution
   - add LIBDIR to the `LD_RUN_PATH' environment variable
     during linking
   - use the `-Wl,--rpath -Wl,LIBDIR' linker flag
   - have your system administrator add LIBDIR to `/etc/ld.so.conf'

See any operating system documentation about shared libraries for
more information, such as the ld(1) and ld.so(8) manual pages.
----------------------------------------------------------------------
Build complete.
# make install Installing shared extensions: /usr/local/lib/php/extensions/no-debug-non-zts-20090626/ .. You should add "extension=amqp.so" to php.ini
9. Modifiez php.ini et ajoutez l'extension AMQP
Localisez le fichier php.ini sur votre système et ajoutez-y la ligne suivante.
# vi /usr/local/lib/php.ini
extension=amqp.so
10. Vérifier l'extension PHP AMQP
Créez la page de test suivante qui affichera phpinfo et placez-la sous les htdocs de votre Apache.
# vi /usr/local/apache2/htdocs/test.php
<?php
phpinfo();
?>
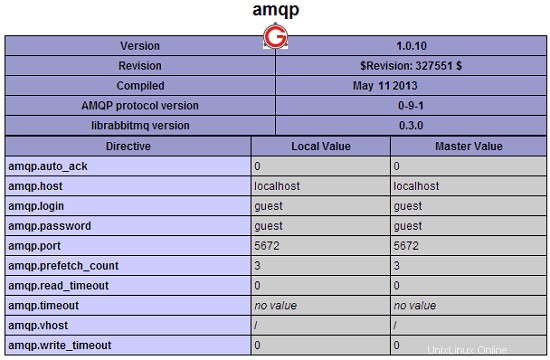
Maintenant, si vous appelez test.php depuis votre navigateur, vous verrez que l'extension PHP AMQP est affichée sur la page comme indiqué ci-dessous. Maintenant, vous pouvez écrire des appels AMQP dans votre code PHP pour parler au serveur RabbitMQ.