Certbot est un client automatique convivial qui récupère et déploie des certificats SSL/TLS pour votre serveur Web. Il s'agit d'un outil EFF qui est utilisé pour obtenir des certificats de Let's Encrypt et activer automatiquement HTTPS sur votre serveur. En bref, il agit comme un "client Let's Encrypt" officiel ou "le client Let's Encrypt Python". Il utilise l'environnement de gestion automatisée des certificats (ACME) pour déployer automatiquement des certificats SSL gratuits approuvés par la majorité des navigateurs. Par conséquent, cela fonctionne pour toutes les autres autorités de certification prenant en charge le protocole ACME.
Dans cet article, j'expliquerai comment obtenir et installer des certificats SSL gratuits Let's encrypt à l'aide de Certbot pour Apache et Nginx sur les serveurs Ubuntu 18.04.
Pré-requis
- Un serveur Ubuntu Bionic Beaver (18.04) avec des privilèges root pour installer les packages requis conformément aux exigences.
- Un domaine pleinement qualifié qui est enregistré et possède des enregistrements DNS appropriés. Ici, dans cet article, j'utilise le domaine fosscloudy.com partout.
Installer Certbot
Dans un premier temps, pour récupérer les certificats SSL Letsencrypt, nous devrons installer le logiciel Certbot. Même si Certbot est mis à disposition dans Ubuntu ces derniers temps, les packages ont tendance à y être obsolètes. Par conséquent, il est conseillé d'utiliser les référentiels de logiciels Ubuntu avec les derniers logiciels d'installation. Vous pouvez installer Certbot à l'aide des commandes suivantes :
#add-apt-repository ppa:certbot/certbot
#apt update
#apt install certbot
Vous pouvez confirmer la version de Certbot installée avec cette commande ci-dessous :
# certbot --version
certbot 0.23.0
De plus, nous pouvons utiliser cette commande "plugins certbot" pour connaître les plugins Certbot disponibles installés sur votre serveur.
# certbot plugins
Saving debug log to /var/log/letsencrypt/letsencrypt.log

* standalone
Description: Spin up a temporary webserver
Interfaces: IAuthenticator, IPlugin
Entry point: standalone = certbot.plugins.standalone:Authenticator

* webroot
Description: Place files in webroot directory
Interfaces: IAuthenticator, IPlugin
Entry point: webroot = certbot.plugins.webroot:Authenticator
-------------------------------------------------------------------------------
Par défaut, seuls les plug-ins autonomes et Webroot seront inclus dans ce package. Selon notre objectif, nous pouvons également activer tous les plugins requis un par un.
Configuration du certificat SSL Let's Encrypt sur Apache
Certbot fournit un plugin Apache pour émettre plus facilement les certificats SSL avec cet outil. Nous pouvons installer ce plugin en exécutant cette commande ci-dessous :
#apt install python-certbot-apacheNous sommes maintenant prêts à utiliser cet outil, mais pour configurer SSL pour les domaines, nous devrons vérifier certains des fichiers de configuration Apache. Pour émettre le certificat SSL pour un domaine, Certbot essaiera de récupérer l'hôte virtuel de domaine exact dans la configuration de votre serveur Apache. Vous pouvez vous référer à mon article précédent qui vous assistera dans la mise en place d'un hébergeur virtuel de domaine. En supposant la présence d'un hôte virtuel approprié pour notre domaine, nous pouvons exécuter cette commande pour installer SSL pour notre domaine fosscloudy.com.
# certbot --apache -d fosscloudy.com -d www.fosscloudy.com
Saving debug log to /var/log/letsencrypt/letsencrypt.log
Plugins selected: Authenticator apache, Installer apache
Obtaining a new certificate
Performing the following challenges:
http-01 challenge for fosscloudy.com
http-01 challenge for www.fosscloudy.com
Enabled Apache rewrite module
Waiting for verification...
Cleaning up challenges
Created an SSL vhost at /etc/apache2/sites-available/fosscloudy.com-le-ssl.conf
Deploying Certificate to VirtualHost /etc/apache2/sites-available/fosscloudy.com-le-ssl.conf
Enabling available site: /etc/apache2/sites-available/fosscloudy.com-le-ssl.conf
Deploying Certificate to VirtualHost /etc/apache2/sites-available/fosscloudy.com-le-ssl.conf
Please choose whether or not to redirect HTTP traffic to HTTPS, removing HTTP access.
-------------------------------------------------------------------------------
1: No redirect - Make no further changes to the webserver configuration.
2: Redirect - Make all requests redirect to secure HTTPS access. Choose this for
new sites, or if you're confident your site works on HTTPS. You can undo this
change by editing your web server's configuration.
-------------------------------------------------------------------------------
Select the appropriate number [1-2] then [enter] (press 'c' to cancel): 2
Enabled Apache rewrite module
Redirecting vhost in /etc/apache2/sites-enabled/fosscloudy.com.conf to ssl vhost in /etc/apache2/sites-available/fosscloudy.com-le-ssl.conf
-------------------------------------------------------------------------------
Congratulations! You have successfully enabled https://fosscloudy.com and
https://www.fosscloudy.com
You should test your configuration at:
https://www.ssllabs.com/ssltest/analyze.html?d=fosscloudy.com
https://www.ssllabs.com/ssltest/analyze.html?d=www.fosscloudy.com
-------------------------------------------------------------------------------
IMPORTANT NOTES:
- Congratulations! Your certificate and chain have been saved at:
/etc/letsencrypt/live/fosscloudy.com-0002/fullchain.pem
Your key file has been saved at:
/etc/letsencrypt/live/fosscloudy.com-0002/privkey.pem
Your cert will expire on 2018-09-03. To obtain a new or tweaked
version of this certificate in the future, simply run certbot again
with the "certonly" option. To non-interactively renew *all* of
your certificates, run "certbot renew"
- If you like Certbot, please consider supporting our work by:
Donating to ISRG / Let's Encrypt: https://letsencrypt.org/donate
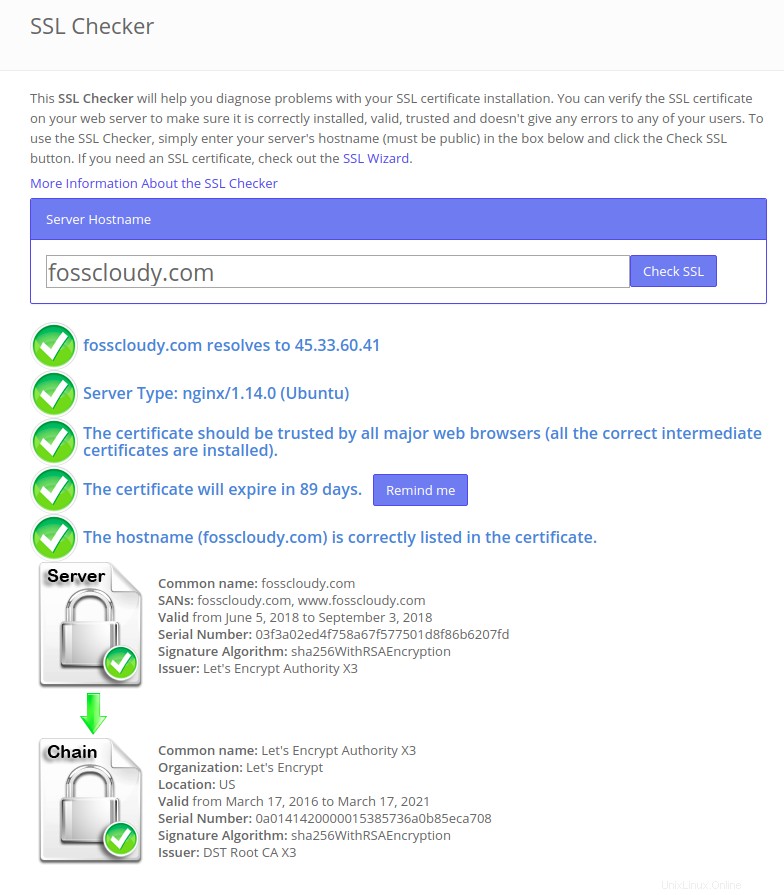
Donating to EFF: https://eff.org/donate-leLa procédure interactive ci-dessus vous guidera à travers toutes les informations nécessaires pour signer/installer le certificat pour votre domaine sélectionné. Votre domaine SSL sera téléchargé, installé et configuré correctement dans votre hôte virtuel de domaine automatiquement avec l'exécution de cette commande. Vous pouvez maintenant accéder à votre domaine avec HTTPS et confirmer son fonctionnement ou vérifier le statut SSL dans le vérificateur SSL.

Si vous avez plusieurs hôtes virtuels/domaines configurés, vous pouvez éventuellement utiliser la commande ci-dessous pour installer des certificats SSL pour eux.
#certbot --apacheCertbot vous demandera de sélectionner les domaines inclus dans le nouveau certificat.
De plus, si vous ne souhaitez pas que Certbot installe/configure automatiquement votre hôte virtuel de domaine avec le nouveau certificat SSL, vous pouvez utiliser la commande suivante pour simplement générer le certificat SSL. Vous pourrez le configurer manuellement plus tard.
#certbot --apache certonlyConfiguration du certificat SSL Let's Encrypt sur Nginx
Pour vos serveurs exécutant le serveur Web Nginx, nous pouvons utiliser le plug-in Certbot Nginx pour obtenir et installer automatiquement les certificats SSL. Vous pouvez installer ce plugin en exécutant cette commande ci-dessous :
#apt install python-certbot-nginxNous sommes maintenant prêts à utiliser cet outil, mais pour configurer SSL pour les domaines, nous devrons vérifier certains des fichiers de configuration Nginx pour le même. Pour émettre le certificat SSL pour un domaine, Certbot essaiera de récupérer l'hôte virtuel de domaine exact dans la configuration Nginx de votre serveur. En supposant la présence d'un hôte virtuel approprié pour notre domaine, nous pouvons exécuter cette commande pour installer SSL pour notre domaine fosscloudy.com.
# certbot --nginx -d fosscloudy.com -d www.fosscloudy.com
Saving debug log to /var/log/letsencrypt/letsencrypt.log
Plugins selected: Authenticator nginx, Installer nginx
Enter email address (used for urgent renewal and security notices) (Enter 'c' to
cancel): admin_linoxide@gmail.com

-------------------------------------------------------------------------------
Please read the Terms of Service at
https://letsencrypt.org/documents/LE-SA-v1.2-November-15-2017.pdf. You must
agree in order to register with the ACME server at
https://acme-v01.api.letsencrypt.org/directory
-------------------------------------------------------------------------------
(A)gree/(C)ancel: A

-------------------------------------------------------------------------------
Would you be willing to share your email address with the Electronic Frontier
Foundation, a founding partner of the Let's Encrypt project and the non-profit
organization that develops Certbot? We'd like to send you email about EFF and
our work to encrypt the web, protect its users and defend digital rights.
-------------------------------------------------------------------------------
(Y)es/(N)o: N
Obtaining a new certificate
Performing the following challenges:
http-01 challenge for fosscloudy.com
http-01 challenge for www.fosscloudy.com
Waiting for verification...
Cleaning up challenges
Deploying Certificate to VirtualHost /etc/nginx/sites-enabled/fosscloudy.com.conf
Deploying Certificate to VirtualHost /etc/nginx/sites-enabled/fosscloudy.com.conf

Please choose whether or not to redirect HTTP traffic to HTTPS, removing HTTP access.
-------------------------------------------------------------------------------
1: No redirect - Make no further changes to the webserver configuration.
2: Redirect - Make all requests redirect to secure HTTPS access. Choose this for
new sites, or if you're confident your site works on HTTPS. You can undo this
change by editing your web server's configuration.
-------------------------------------------------------------------------------
Select the appropriate number [1-2] then [enter] (press 'c' to cancel): 2
Redirecting all traffic on port 80 to ssl in /etc/nginx/sites-enabled/fosscloudy.com.conf
Redirecting all traffic on port 80 to ssl in /etc/nginx/sites-enabled/fosscloudy.com.conf

-------------------------------------------------------------------------------
Congratulations! You have successfully enabled https://fosscloudy.com and
https://www.fosscloudy.com

You should test your configuration at:
https://www.ssllabs.com/ssltest/analyze.html?d=fosscloudy.com
https://www.ssllabs.com/ssltest/analyze.html?d=www.fosscloudy.com
-------------------------------------------------------------------------------

IMPORTANT NOTES:
- Congratulations! Your certificate and chain have been saved at:
/etc/letsencrypt/live/fosscloudy.com/fullchain.pem
Your key file has been saved at:
/etc/letsencrypt/live/fosscloudy.com/privkey.pem
Your cert will expire on 2018-09-03. To obtain a new or tweaked
version of this certificate in the future, simply run certbot again
with the "certonly" option. To non-interactively renew *all* of
your certificates, run "certbot renew"
- Your account credentials have been saved in your Certbot
configuration directory at /etc/letsencrypt. You should make a
secure backup of this folder now. This configuration directory will
also contain certificates and private keys obtained by Certbot so
making regular backups of this folder is ideal.
- If you like Certbot, please consider supporting our work by:

Donating to ISRG / Let's Encrypt: https://letsencrypt.org/donate
Donating to EFF: https://eff.org/donate-le
Cette procédure interactive explicite vous aidera à générer/installer/configurer automatiquement un certificat SSL pour votre domaine. Votre domaine SSL sera téléchargé, installé et configuré correctement dans votre hôte virtuel de domaine automatiquement avec l'exécution de cette commande. Vous pouvez maintenant accéder à votre domaine avec HTTPS et confirmer son fonctionnement ou vérifier le statut SSL dans le vérificateur SSL. Vous pouvez remplacer mon domaine fosscloudy.com par le vôtre et exécuter la même commande pour générer votre certificat SSL.
Semblable au plugin Apache, si vous avez plusieurs hôtes/domaines virtuels configurés, vous pouvez utiliser la commande ci-dessous pour installer des certificats SSL pour chacun d'eux.
#certbot --nginxCertbot vous demandera de sélectionner les domaines inclus dans le nouveau certificat.
De plus, si vous ne souhaitez pas que Certbot installe/configure automatiquement votre hôte virtuel de domaine avec le nouveau certificat SSL, vous pouvez utiliser la commande suivante pour générer simplement le certificat SSL que vous pourrez ensuite configurer manuellement.
#certbot --nginx certonlyConfiguration des certificats génériques Let's Encrypt à l'aide de Certbot
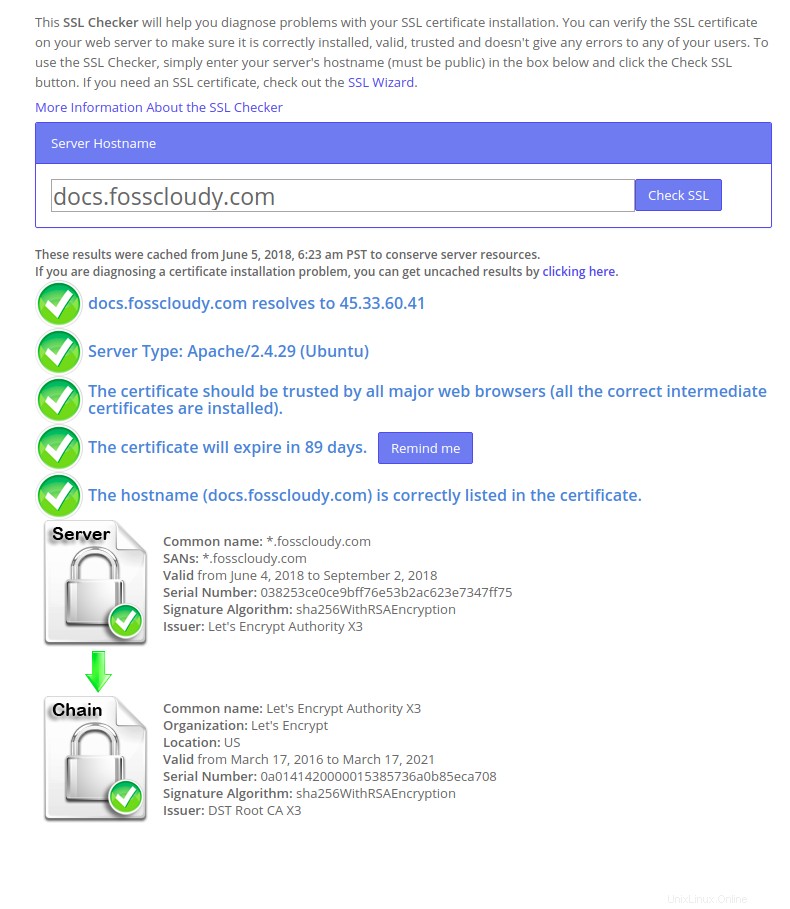
Let's Encrypt a récemment commencé à prendre en charge les certificats génériques à l'aide de son nouveau protocole ACME2. Cela signifie que vous pouvez avoir un seul certificat générique comme *.fosscloudy.com et l'utiliser sur tous les autres sous-domaines de domaine comme docs.fosscloudy.com, blog.fosscloudy.com, mail.fosscloudy.com etc. très facile à gérer efficacement les certificats pour les nombreux sous-domaines du domaine. Vous pouvez générer ce certificat SSL générique pour fosscloudy.com en exécutant cette commande ci-dessous. Vous pouvez modifier cette commande en remplaçant fosscloudy.com par votre domaine préféré.
# certbot certonly --manual -d *.fosscloudy.com --agree-tos --no-bootstrap --manual-public-ip-logging-ok --preferred-challenges dns-01 --server https://acme-v02.api.letsencrypt.org/directory
Saving debug log to /var/log/letsencrypt/letsencrypt.log
Plugins selected: Authenticator manual, Installer None
Obtaining a new certificate
Performing the following challenges:
dns-01 challenge for fosscloudy.com

-------------------------------------------------------------------------------
Please deploy a DNS TXT record under the name
_acme-challenge.fosscloudy.com with the following value:

z25SzIfe37x5va0ynh6KdmEYVjjuSvdUOGM_t_twsVk

Before continuing, verify the record is deployed.
-------------------------------------------------------------------------------
Press Enter to Continue
Waiting for verification...
Cleaning up challenges

IMPORTANT NOTES:
- Congratulations! Your certificate and chain have been saved at:
/etc/letsencrypt/live/fosscloudy.com-0001/fullchain.pem
Your key file has been saved at:
/etc/letsencrypt/live/fosscloudy.com-0001/privkey.pem
Your cert will expire on 2018-09-03. To obtain a new or tweaked
version of this certificate in the future, simply run certbot
again. To non-interactively renew *all* of your certificates, run
"certbot renew"
- If you like Certbot, please consider supporting our work by:

Donating to ISRG / Let's Encrypt: https://letsencrypt.org/donate
Donating to EFF: https://eff.org/donate-le
Comme mentionné dans cette procédure interactive, il vous sera demandé d'ajouter un enregistrement TXT spécifique à vos enregistrements DNS. Dans mon cas, il a signalé la configuration du TXT comme ci-dessous :
-------------------------------------------------------------------------------
Please deploy a DNS TXT record under the name
_acme-challenge.fosscloudy.com with the following value:

z25SzIfe37x5va0ynh6KdmEYVjjuSvdUOGM_t_twsVk

Before continuing, verify the record is deployed.
-------------------------------------------------------------------------------
Press Enter to Continue
Dans votre fournisseur DNS, vous allez créer un nouvel enregistrement DNS TXT avec :
Record Name: _acme-challenge (you may or may not need the .fosscloudy.com suffix depending on your DNS provider.
Record Value: z25SzIfe37x5va0ynh6KdmEYVjjuSvdUOGM_t_twsVk (replace this with the value provided by Certbot)
Enregistrez vos paramètres DNS et appuyez sur Entrée dans la fenêtre Certbot pour déclencher la vérification et terminer la vérification. Vous devrez attendre un certain temps pour que le nouvel enregistrement DNS se propage sur Internet. J'ai attendu 30 minutes et j'ai appuyé sur Entrée. Vous pouvez même définir une valeur TTL inférieure pour accélérer ce processus.
Toutes nos félicitations!! Le certificat générique pour votre domaine fosscloudy.com est généré. Vous pouvez désormais utiliser ce certificat générique avec n'importe quel sous-domaine que vous créez pour votre nom de domaine. Par exemple, j'ai créé un sous-domaine pour ce domaine à savoir docs.fosscloudy.com. Il utilisera ces certificats SSL génériques installés pour le domaine principal. Vous pouvez accéder à votre sous-domaine avec HTTPS dans le navigateur et confirmer son fonctionnement.
Renouvellement automatique des certificats SSL
Vous pouvez utiliser l'une des méthodes mentionnées ci-dessus pour obtenir vos certificats SSL. Mais tous ces certificats Let's Encrypt sont de courte durée et ne seront valables que pendant 90 jours. Il est donc obligatoire de renouveler ces certificats avant leur expiration pour faciliter le fonctionnement normal de vos sites Web. Vous pouvez le faire manuellement si vous en avez besoin ou vous pouvez automatiser ce processus à l'aide de cronjobs ou du client Certbot.
Lorsqu'un certificat est installé avec succès par l'exécution des méthodes ci-dessus, vous obtenez un message similaire à celui-ci :
IMPORTANT NOTES:
- Congratulations! Your certificate and chain have been saved at:
/etc/letsencrypt/live/fosscloudy.com/fullchain.pem
Your key file has been saved at:
/etc/letsencrypt/live/fosscloudy.com/privkey.pem
Your cert will expire on 2018-09-03. To obtain a new or tweaked
version of this certificate in the future, simply run certbot again
with the "certonly" option. To non-interactively renew *all* of
your certificates, run "certbot renew"
Ce message indique clairement comment renouveler votre certificat à l'avenir avec le "certbot renew" commande.
Testons le processus de renouvellement automatique avec la commande suivante :
#certbot renewCette commande vérifiera si les SSL de domaine doivent être renouvelés et renouvellera les SSL de domaine qui doivent être renouvelés.
La bonne nouvelle est que les packages Certbot sur notre serveur sont livrés avec un cronjob qui renouvellera automatiquement nos certificats SSL avant leur expiration. Étant donné que les certificats Let's Encrypt durent 90 jours, il est fortement conseillé de profiter de cette fonctionnalité.
# cat /etc/cron.d/certbot
# /etc/cron.d/certbot: crontab entries for the certbot package
#
# Upstream recommends attempting renewal twice a day
#
# Eventually, this will be an opportunity to validate certificates
# haven't been revoked, etc. Renewal will only occur if expiration
# is within 30 days.
SHELL=/bin/sh
PATH=/usr/local/sbin:/usr/local/bin:/sbin:/bin:/usr/sbin:/usr/bin

0 */12 * * * root test -x /usr/bin/certbot -a \! -d /run/systemd/system && perl -e 'sleep int(rand(43200))' && certbot -q renew
Ce cron s'exécutera deux fois par jour, mais ne renouvellera pas les certificats à moins qu'ils ne soient sur le point d'expirer.
A lire aussi :
- Installer WordPress sur Docker LEMP Stack avec Letsencrypt SSL
Let's Encrypt a littéralement changé la façon dont nous générons, installons et utilisons les certificats SSL. Grâce à ses procédures automatisées utilisant l'outil Certbot, vous pouvez voir avec quelle facilité vous pouvez obtenir vos certificats SSL gratuits en quelques secondes, à partir de Let's Encrypt et les installer en quelques minutes, automatiquement. J'espère que cet article est instructif et utile pour vous. Veuillez publier vos précieux commentaires et suggestions à ce sujet.