Comment utiliser plusieurs versions de PHP (PHP-FPM et FastCGI) avec ISPConfig 3 ( Debian Wheezy)
Depuis ISPConfig 3.0.5, il est possible d'utiliser plusieurs versions de PHP sur un serveur et de sélectionner la version PHP optimale pour un site Web. Cette fonctionnalité fonctionne avec PHP-FPM (à partir de PHP 5.3) et FastCGI (toutes les versions de PHP 5.x). Ce tutoriel montre comment construire PHP 5.3 et PHP 5.4 en tant que PHP-FPM et une version FastCGI sur un serveur Debian Wheezy. Ces versions de PHP peuvent être utilisées avec le PHP par défaut (installé via apt) dans ISPConfig.
Je n'émets aucune garantie que cela fonctionnera pour vous !
1 Remarque préliminaire
J'installerai PHP 5.3.22 et PHP 5.4.12, les dernières versions de PHP 5.3 et 5.4 au moment d'écrire ces lignes. Je montrerai également comment créer des extensions PHP supplémentaires telles que APC, memcache, memcached et ioncube.
Veuillez noter que PHP-FPM peut être utilisé sur les serveurs Apache et nginx, tandis que FastCGI n'est disponible que pour les serveurs Apache.
PHP-FPM et FastCGI sont mutuellement exclusifs en PHP 5.3 et 5.4, c'est pourquoi je montre deux façons de construire PHP, une pour PHP-FPM, une pour FastCGI, mais vous pouvez compiler PHP deux fois pour obtenir les deux, une fois avec --enable -fpm et une fois avec --enable-cgi (assurez-vous d'utiliser des répertoires de base différents, tels que /opt/php-5.3.22 pour PHP-FPM et /opt/phpfcgi-5.3.22 pour FastCGI).
2 Compiler PHP 5.3.22 (PHP-FPM)
Téléchargez et extrayez PHP 5.3.22 :
mkdir /opt/php-5.3.22
mkdir /usr/local/src/php5-build
cd /usr/local/src/php5-build
wget http://de. php.net/get/php-5.3.22.tar.bz2/from/this/mirror -O php-5.3.22.tar.bz2
tar jxf php-5.3.22.tar.bz2
cd php-5.3.22/
Installez les prérequis pour compiler PHP5 :
apt-get install build-essential
apt-get build-dep php5
apt-get install libfcgi-dev libfcgi0ldbl libjpeg62-dbg libmcrypt-dev libssl-dev libc-client2007e libc-client2007e-dev
ln -s /usr/lib/libc-client.a /usr/lib/x86_64-linux-gnu/libc-client.a
(La dernière commande est nécessaire si vous construisez PHP avec --with-imap, car sinon ./configure s'arrêtera avec l'erreur suivante :
vérification de crypt dans -lcrypt... oui
configure :erreur :impossible de trouver la bibliothèque imap (libc-client.a). Veuillez vérifier votre installation c-client.
example@unixlinux.online:/usr/local/src/php5-build/php-5.3.22#
)
Configurez et compilez PHP 5.3.22 comme suit (vous pouvez ajuster la commande ./configure à vos besoins, jetez un œil à
./configure --help
pour voir toutes les options disponibles ; si vous utilisez une commande ./configure différente, il est possible que des bibliothèques supplémentaires soient requises ou que le processus de construction échoue) :
./configure \
--prefix=/opt/php-5.3.22 \
--with-pdo-pgsql \
--with-zlib-dir \
- -with-freetype-dir \
--enable-mbstring \
--with-libxml-dir=/usr \
--enable-soap \
--enable- calendrier \
--avec-curl \
--avec-mcrypt \
--avec-zlib \
--avec-gd \
--avec- pgsql \
--disable-rpath \
--enable-inline-optimization \
--with-bz2 \
--with-zlib \
-- enable-sockets \
--enable-sysvsem \
--enable-sysvshm \
--enable-pcntl \
--enable-mbregex \
-- enable-exif \
--enable-bcmath \
--with-mhash \
--enable-zip \
--with-pcre-regex \
--with-mysql \
--with-pdo-mysql \
--with-mysqli \
--with-jpeg-dir=/usr \
--with -png-dir=/usr \
--enable-gd-native-ttf \
--with-openssl \
--with-fpm-user=www-data \
--with-fpm-group=www-data \
--with-libdir=/lib/x86_64-linux-gnu \
--enable-ftp \
--with -imap \
--with-imap-ssl \
--with-kerber os \
--with-gettext \
--with-xmlrpc \
--with-xsl \
--enable-fpm
Le dernier commutateur (--enable-fpm) garantit que cette version de PHP fonctionnera avec PHP-FPM.
faire
faire installer
Copiez php.ini et php-fpm.conf aux bons emplacements :
cp /usr/local/src/php5-build/php-5.3.22/php.ini-production /opt/php-5.3.22/lib/php.ini
cp /opt/php-5.3.22/etc/php-fpm.conf.default /opt/php-5.3.22/etc/php-fpm.conf
Ouvrez /opt/php-5.3.22/etc/php-fpm.conf et ajustez les paramètres suivants - dans la ligne d'écoute, vous devez utiliser un port inutilisé (par exemple, 8999 ; le port 9000 peut déjà être utilisé par le PHP-FPM par défaut de Debian ), et vous devez ajouter la ligne include=/opt/php-5.3.22/etc/pool.d/*.conf à la fin :
vi /opt/php-5.3.22/etc/php-fpm.conf
[...] pid = run/php-fpm.pid [...] user = www-data group = www-data [...] listen = 127.0.0.1:8999 [...] include=/opt/php-5.3.22/etc/pool.d/*.conf |
Créez le répertoire du pool pour PHP-FPM :
mkdir /opt/php-5.3.22/etc/pool.d
Créez ensuite un script d'initialisation pour PHP-FPM :
vi /etc/init.d/php-5.3.22-fpm
#! /bin/sh
### BEGIN INIT INFO
# Provides:          php-5.3.22-fpm
# Required-Start:    $all
# Required-Stop:     $all
# Default-Start:     2 3 4 5
# Default-Stop:      0 1 6
# Short-Description: starts php-5.3.22-fpm
# Description:       starts the PHP FastCGI Process Manager daemon
### END INIT INFO
php_fpm_BIN=/opt/php-5.3.22/sbin/php-fpm
php_fpm_CONF=/opt/php-5.3.22/etc/php-fpm.conf
php_fpm_PID=/opt/php-5.3.22/var/run/php-fpm.pid
php_opts="--fpm-config $php_fpm_CONF"
wait_for_pid () {
        try=0
        while test $try -lt 35 ; do
                case "$1" in
                        'created')
                        if [ -f "$2" ] ; then
                                try=''
                                break
                        fi
                        ;;
                        'removed')
                        if [ ! -f "$2" ] ; then
                                try=''
                                break
                        fi
                        ;;
                esac
                echo -n .
                try=`expr $try + 1`
                sleep 1
        done
}
case "$1" in
        start)
                echo -n "Starting php-fpm "
                $php_fpm_BIN $php_opts
                if [ "$?" != 0 ] ; then
                        echo " failed"
                        exit 1
                fi
                wait_for_pid created $php_fpm_PID
                if [ -n "$try" ] ; then
                        echo " failed"
                        exit 1
                else
                        echo " done"
                fi
        ;;
        stop)
                echo -n "Gracefully shutting down php-fpm "
                if [ ! -r $php_fpm_PID ] ; then
                        echo "warning, no pid file found - php-fpm is not running ?"
                        exit 1
                fi
                kill -QUIT `cat $php_fpm_PID`
                wait_for_pid removed $php_fpm_PID
                if [ -n "$try" ] ; then
                        echo " failed. Use force-exit"
                        exit 1
                else
                        echo " done"
                       echo " done"
                fi
        ;;
        force-quit)
                echo -n "Terminating php-fpm "
                if [ ! -r $php_fpm_PID ] ; then
                        echo "warning, no pid file found - php-fpm is not running ?"
                        exit 1
                fi
                kill -TERM `cat $php_fpm_PID`
                wait_for_pid removed $php_fpm_PID
                if [ -n "$try" ] ; then
                        echo " failed"
                        exit 1
                else
                        echo " done"
                fi
        ;;
        restart)
                $0 stop
                $0 start
        ;;
        reload)
                echo -n "Reload service php-fpm "
                if [ ! -r $php_fpm_PID ] ; then
                        echo "warning, no pid file found - php-fpm is not running ?"
                        exit 1
                fi
                kill -USR2 `cat $php_fpm_PID`
                echo " done"
        ;;
        *)
                echo "Usage: $0 {start|stop|force-quit|restart|reload}"
                exit 1
        ;;
esac |
Rendez le script d'initialisation exécutable et créez les liens de démarrage du système :
chmod 755 /etc/init.d/php-5.3.22-fpm
insserv php-5.3.22-fpm
Démarrez enfin PHP-FPM :
/etc/init.d/php-5.3.22-fpm start
Tant qu'il n'y a pas de pools dans /opt/php-5.3.22/etc/pool.d, vous obtiendrez cet avertissement que vous pouvez ignorer :
example@unixlinux.online:/usr/local/src/php5-build/php-5.3.22# /etc/init.d/php-5.3.22-fpm start
Démarrage de php-fpm [04-Mar -2013 14:58:41] AVERTISSEMENT :Rien ne correspond au modèle d'inclusion '/opt/php-5.3.22/etc/pool.d/*.conf' de /opt/php-5.3.22/etc/php-fpm .conf à la ligne 512.
done
example@unixlinux.online:/usr/local/src/php5-build/php-5.3.22#
C'est tout - si vous le souhaitez, vous pouvez maintenant installer des modules supplémentaires comme APC, memcache, memcached et ioncube.
Les modules APC, memcache et memcached peuvent être installés via PEAR que nous devons d'abord installer et initialiser :
apt-get -y install php-pear
cd /opt/php-5.3.22/etc
pecl -C ./pear.conf update-channels
APC peut maintenant être installé comme suit :
pecl -C ./pear.conf install apc
Acceptez toutes les valeurs par défaut. Ensuite, ouvrez /opt/php-5.3.22/lib/php.ini...
vi /opt/php-5.3.22/lib/php.ini
... et ajoutez la ligne extension=apc.so à la fin du fichier (vous pouvez également configurer des paramètres APC supplémentaires) :
[...] extension=apc.so apc.enabled=1 apc.shm_size=128M apc.ttl=0 apc.user_ttl=600 apc.gc_ttl=600 apc.enable_cli=1 apc.mmap_file_mask=/tmp/apc.XXXXXX ;apc.mmap_file_mask=/dev/zero ;apc.shm_segments = 5 |
L'extension Memcache peut être installée comme suit :
pecl -C ./pear.conf install memcache
Ouvrez /opt/php-5.3.22/lib/php.ini...
vi /opt/php-5.3.22/lib/php.ini
... et ajoutez la ligne extension=memcache.so à la fin du fichier :
[...] extension=memcache.so |
L'extension memcached peut être installée comme suit :
apt-get install libmemcached-dev
pecl -C ./pear.conf install memcached
Ouvrez /opt/php-5.3.22/lib/php.ini...
vi /opt/php-5.3.22/lib/php.ini
... et ajoutez la ligne extension=memcached.so à la fin du fichier :
[...] extension=memcached.so |
L'ionCube Loader peut être installé comme suit :
cd /tmp
Ensuite, téléchargez et décompressez le package ionCube Loader adapté à votre architecture (x86_64 ou x86).
Pour x86_64 :
wget http://downloads2.ioncube.com/loader_downloads/ioncube_loaders_lin_x86-64.tar.gz
tar xfvz ioncube_loaders_lin_x86-64.tar.gz
Pour x86 :
wget http://downloads2.ioncube.com/loader_downloads/ioncube_loaders_lin_x86.tar.gz
tar xfvz ioncube_loaders_lin_x86.tar.gz
Procédez comme suit :
cp ioncube/ioncube_loader_lin_5.3.so /opt/php-5.3.22/lib/php/extensions/no-debug-non-zts-20090626/ioncube.so
vi /opt/php-5.3.22/ lib/php.ini
Ajoutez la ligne zend_extension =/opt/php-5.3.22/lib/php/extensions/no-debug-non-zts-20090626/ioncube.so juste au début du fichier (avant la ligne [PHP]) :
zend_extension = /opt/php-5.3.22/lib/php/extensions/no-debug-non-zts-20090626/ioncube.so [PHP] [...] |
Rechargez ensuite PHP-FPM :
/etc/init.d/php-5.3.22-fpm reload
Dans ISPConfig 3.0.5, vous pouvez configurer la nouvelle version PHP sous Système> Versions PHP supplémentaires. Dans l'onglet Nom, il vous suffit de saisir un nom pour la version de PHP (par exemple, PHP 5.3.22) - cette version de PHP sera répertoriée sous ce nom dans les paramètres du site Web dans ISPConfig :
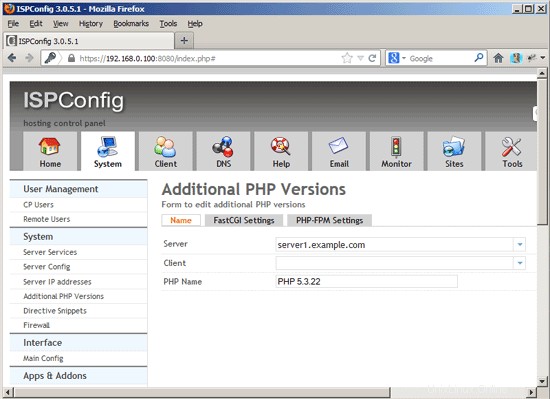
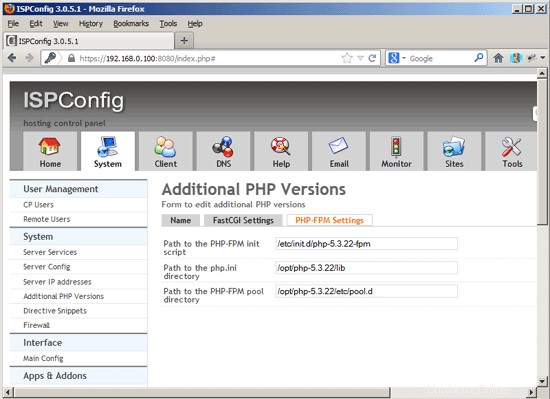
Allez dans l'onglet PHP-FPM Settings (l'onglet FastCGI Settings peut être laissé vide) et remplissez les champs comme suit :
Comment utiliser plusieurs versions de PHP (PHP-FPM et FastCGI) avec ISPConfig 3 (Debian Wheezy) - Page 2
3 Compiler PHP 5.3.22 (FastCGI)
Téléchargez et extrayez PHP 5.3.22 :
mkdir /opt/phpfcgi-5.3.22
mkdir /usr/local/src/php5-build
cd /usr/local/src/php5-build
wget http://de. php.net/get/php-5.3.22.tar.bz2/from/this/mirror -O php-5.3.22.tar.bz2
tar jxf php-5.3.22.tar.bz2
cd php-5.3.22/
Installez les prérequis pour compiler PHP5 :
apt-get install build-essential
apt-get build-dep php5
apt-get install libfcgi-dev libfcgi0ldbl libjpeg62-dbg libmcrypt-dev libssl-dev libc-client2007e libc-client2007e-dev
ln -s /usr/lib/libc-client.a /usr/lib/x86_64-linux-gnu/libc-client.a
(La dernière commande est nécessaire si vous construisez PHP avec --with-imap, car sinon ./configure s'arrêtera avec l'erreur suivante :
vérification de crypt dans -lcrypt... oui
configure :erreur :impossible de trouver la bibliothèque imap (libc-client.a). Veuillez vérifier votre installation c-client.
example@unixlinux.online:/usr/local/src/php5-build/php-5.3.22#
)
Configurez et compilez PHP 5.3.22 comme suit (vous pouvez ajuster la commande ./configure à vos besoins, jetez un œil à
./configure --help
pour voir toutes les options disponibles ; si vous utilisez une commande ./configure différente, il est possible que des bibliothèques supplémentaires soient requises ou que le processus de construction échoue) :
./configure \
--prefix=/opt/phpfcgi-5.3.22 \
--with-pdo-pgsql \
--with-zlib-dir \
- -with-freetype-dir \
--enable-mbstring \
--with-libxml-dir=/usr \
--enable-soap \
--enable- calendrier \
--avec-curl \
--avec-mcrypt \
--avec-zlib \
--avec-gd \
--avec- pgsql \
--disable-rpath \
--enable-inline-optimization \
--with-bz2 \
--with-zlib \
-- enable-sockets \
--enable-sysvsem \
--enable-sysvshm \
--enable-pcntl \
--enable-mbregex \
-- enable-exif \
--enable-bcmath \
--with-mhash \
--enable-zip \
--with-pcre-regex \
--with-mysql \
--with-pdo-mysql \
--with-mysqli \
--with-jpeg-dir=/usr \
--with -png-dir=/usr \
--enable-gd-native-ttf \
--with-openssl \
--with-fpm-user=www-data \
--with-fpm-group=www-data \
--with-libdir=/lib/x86_64-linux-gnu \
--enable-ftp \
--with -imap \
--with-imap-ssl \
--with-ke rberos \
--with-gettext \
--with-xmlrpc \
--with-xsl \
--enable-cgi
Le dernier commutateur (--enable-cgi) garantit que cette version de PHP fonctionnera avec FastCGI.
faire
faire installer
Copiez php.ini au bon emplacement :
cp /usr/local/src/php5-build/php-5.3.22/php.ini-production /opt/phpfcgi-5.3.22/lib/php.ini
C'est tout - si vous le souhaitez, vous pouvez maintenant installer des modules supplémentaires comme APC, memcache, memcached et ioncube.
Les modules APC, memcache et memcached peuvent être installés via PEAR que nous devons d'abord installer et initialiser :
apt-get -y install php-pear
cd /opt/phpfcgi-5.3.22/etc
pecl -C ./pear.conf update-channels
APC peut maintenant être installé comme suit :
pecl -C ./pear.conf install apc
Acceptez toutes les valeurs par défaut. Ensuite, ouvrez /opt/phpfcgi-5.3.22/lib/php.ini...
vi /opt/phpfcgi-5.3.22/lib/php.ini
... et ajoutez la ligne extension=apc.so à la fin du fichier (vous pouvez également configurer des paramètres APC supplémentaires) :
[...] extension=apc.so apc.enabled=1 apc.shm_size=128M apc.ttl=0 apc.user_ttl=600 apc.gc_ttl=600 apc.enable_cli=1 apc.mmap_file_mask=/tmp/apc.XXXXXX ;apc.mmap_file_mask=/dev/zero ;apc.shm_segments = 5 |
L'extension Memcache peut être installée comme suit :
pecl -C ./pear.conf install memcache
Ouvrez /opt/phpfcgi-5.3.22/lib/php.ini...
vi /opt/phpfcgi-5.3.22/lib/php.ini
... et ajoutez la ligne extension=memcache.so à la fin du fichier :
[...] extension=memcache.so |
L'extension memcached peut être installée comme suit :
apt-get install libmemcached-dev
pecl -C ./pear.conf install memcached
Ouvrez /opt/phpfcgi-5.3.22/lib/php.ini...
vi /opt/phpfcgi-5.3.22/lib/php.ini
... et ajoutez la ligne extension=memcached.so à la fin du fichier :
[...] extension=memcached.so |
L'ionCube Loader peut être installé comme suit :
cd /tmp
Ensuite, téléchargez et décompressez le package ionCube Loader adapté à votre architecture (x86_64 ou x86).
Pour x86_64 :
wget http://downloads2.ioncube.com/loader_downloads/ioncube_loaders_lin_x86-64.tar.gz
tar xfvz ioncube_loaders_lin_x86-64.tar.gz
Pour x86 :
wget http://downloads2.ioncube.com/loader_downloads/ioncube_loaders_lin_x86.tar.gz
tar xfvz ioncube_loaders_lin_x86.tar.gz
Procédez comme suit :
cp ioncube/ioncube_loader_lin_5.3.so /opt/phpfcgi-5.3.22/lib/php/extensions/no-debug-non-zts-20090626/ioncube.so
vi /opt/phpfcgi-5.3.22/ lib/php.ini
Ajoutez la ligne zend_extension =/opt/phpfcgi-5.3.22/lib/php/extensions/no-debug-non-zts-20090626/ioncube.so juste au début du fichier (avant la ligne [PHP]) :
zend_extension = /opt/phpfcgi-5.3.22/lib/php/extensions/no-debug-non-zts-20090626/ioncube.so [PHP] [...] |
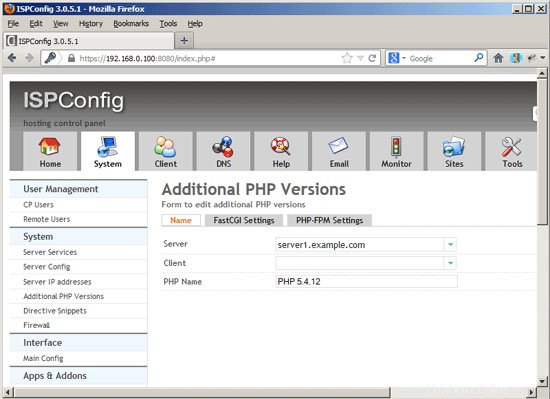
Dans ISPConfig 3.0.5, vous pouvez configurer la nouvelle version PHP sous Système> Versions PHP supplémentaires. Dans l'onglet Nom, il vous suffit de saisir un nom pour la version de PHP (par exemple, PHP 5.3.22) - cette version de PHP sera répertoriée sous ce nom dans les paramètres du site Web dans ISPConfig :
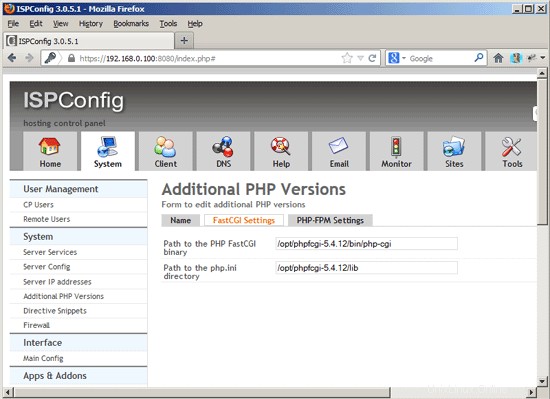
Allez dans l'onglet Paramètres FastCGI (l'onglet Paramètres PHP-FPM peut être laissé vide) et remplissez les champs comme suit :

Comment utiliser plusieurs versions de PHP (PHP-FPM et FastCGI) avec ISPConfig 3 (Debian Wheezy) - Page 3
4 Compiler PHP 5.4.12 (PHP-FPM)
Téléchargez et extrayez PHP 5.4.12 :
mkdir /opt/php-5.4.12
mkdir /usr/local/src/php5-build
cd /usr/local/src/php5-build
wget http://de. php.net/get/php-5.4.12.tar.bz2/from/this/mirror -O php-5.4.12.tar.bz2
tar jxf php-5.4.12.tar.bz2
cd php-5.4.12/
Installez les prérequis pour compiler PHP5 :
apt-get install build-essential
apt-get build-dep php5
apt-get install libfcgi-dev libfcgi0ldbl libjpeg62-dbg libmcrypt-dev libssl-dev libc-client2007e libc-client2007e-dev
ln -s /usr/lib/libc-client.a /usr/lib/x86_64-linux-gnu/libc-client.a
(La dernière commande est nécessaire si vous construisez PHP avec --with-imap, car sinon ./configure s'arrêtera avec l'erreur suivante :
vérification de crypt dans -lcrypt... oui
configure :erreur :impossible de trouver la bibliothèque imap (libc-client.a). Veuillez vérifier votre installation c-client.
example@unixlinux.online:/usr/local/src/php5-build/php-5.4.12#
)
Configurez et compilez PHP 5.4.12 comme suit (vous pouvez ajuster la commande ./configure à vos besoins, jetez un œil à
./configure --help
pour voir toutes les options disponibles ; si vous utilisez une commande ./configure différente, il est possible que des bibliothèques supplémentaires soient requises ou que le processus de construction échoue) :
./configure \
--prefix=/opt/php-5.4.12 \
--with-pdo-pgsql \
--with-zlib-dir \
- -with-freetype-dir \
--enable-mbstring \
--with-libxml-dir=/usr \
--enable-soap \
--enable- calendrier \
--avec-curl \
--avec-mcrypt \
--avec-zlib \
--avec-gd \
--avec- pgsql \
--disable-rpath \
--enable-inline-optimization \
--with-bz2 \
--with-zlib \
-- enable-sockets \
--enable-sysvsem \
--enable-sysvshm \
--enable-pcntl \
--enable-mbregex \
-- enable-exif \
--enable-bcmath \
--with-mhash \
--enable-zip \
--with-pcre-regex \
--with-mysql \
--with-pdo-mysql \
--with-mysqli \
--with-jpeg-dir=/usr \
--with -png-dir=/usr \
--enable-gd-native-ttf \
--with-openssl \
--with-fpm-user=www-data \
--with-fpm-group=www-data \
--with-libdir=/lib/x86_64-linux-gnu \
--enable-ftp \
--with -imap \
--with-imap-ssl \
--with-kerber os \
--with-gettext \
--with-xmlrpc \
--with-xsl \
--enable-fpm
Le dernier commutateur (--enable-fpm) garantit que cette version de PHP fonctionnera avec PHP-FPM.
faire
faire installer
Copiez php.ini et php-fpm.conf aux bons emplacements :
cp /usr/local/src/php5-build/php-5.4.12/php.ini-production /opt/php-5.4.12/lib/php.ini
cp /opt/php-5.4.12/etc/php-fpm.conf.default /opt/php-5.4.12/etc/php-fpm.conf
Ouvrez /opt/php-5.4.12/etc/php-fpm.conf et ajustez les paramètres suivants - dans la ligne d'écoute, vous devez utiliser un port inutilisé (par exemple, 8998 ; le port 9000 peut déjà être utilisé par le PHP-FPM par défaut de Debian ), et vous devez ajouter la ligne include=/opt/php-5.4.12/etc/pool.d/*.conf à la fin :
vi /opt/php-5.4.12/etc/php-fpm.conf
[...] pid = run/php-fpm.pid [...] user = www-data group = www-data [...] listen = 127.0.0.1:8998 [...] include=/opt/php-5.4.12/etc/pool.d/*.conf |
Créez le répertoire du pool pour PHP-FPM :
mkdir /opt/php-5.4.12/etc/pool.d
Créez ensuite un script d'initialisation pour PHP-FPM :
vi /etc/init.d/php-5.4.12-fpm
#! /bin/sh
### BEGIN INIT INFO
# Provides:          php-5.4.12-fpm
# Required-Start:    $all
# Required-Stop:     $all
# Default-Start:     2 3 4 5
# Default-Stop:      0 1 6
# Short-Description: starts php-5.4.12-fpm
# Description:       starts the PHP FastCGI Process Manager daemon
### END INIT INFO
php_fpm_BIN=/opt/php-5.4.12/sbin/php-fpm
php_fpm_CONF=/opt/php-5.4.12/etc/php-fpm.conf
php_fpm_PID=/opt/php-5.4.12/var/run/php-fpm.pid
php_opts="--fpm-config $php_fpm_CONF"
wait_for_pid () {
        try=0
        while test $try -lt 35 ; do
                case "$1" in
                        'created')
                        if [ -f "$2" ] ; then
                                try=''
                                break
                        fi
                        ;;
                        'removed')
                        if [ ! -f "$2" ] ; then
                                try=''
                                break
                        fi
                        ;;
                esac
                echo -n .
                try=`expr $try + 1`
                sleep 1
        done
}
case "$1" in
        start)
                echo -n "Starting php-fpm "
                $php_fpm_BIN $php_opts
                if [ "$?" != 0 ] ; then
                        echo " failed"
                        exit 1
                fi
                wait_for_pid created $php_fpm_PID
                if [ -n "$try" ] ; then
                        echo " failed"
                        exit 1
                else
                        echo " done"
                fi
        ;;
        stop)
                echo -n "Gracefully shutting down php-fpm "
                if [ ! -r $php_fpm_PID ] ; then
                        echo "warning, no pid file found - php-fpm is not running ?"
                        exit 1
                fi
                kill -QUIT `cat $php_fpm_PID`
                wait_for_pid removed $php_fpm_PID
                if [ -n "$try" ] ; then
                        echo " failed. Use force-exit"
                        exit 1
                else
                        echo " done"
                       echo " done"
                fi
        ;;
        force-quit)
                echo -n "Terminating php-fpm "
                if [ ! -r $php_fpm_PID ] ; then
                        echo "warning, no pid file found - php-fpm is not running ?"
                        exit 1
                fi
                kill -TERM `cat $php_fpm_PID`
                wait_for_pid removed $php_fpm_PID
                if [ -n "$try" ] ; then
                        echo " failed"
                        exit 1
                else
                        echo " done"
                fi
        ;;
        restart)
                $0 stop
                $0 start
        ;;
        reload)
                echo -n "Reload service php-fpm "
                if [ ! -r $php_fpm_PID ] ; then
                        echo "warning, no pid file found - php-fpm is not running ?"
                        exit 1
                fi
                kill -USR2 `cat $php_fpm_PID`
                echo " done"
        ;;
        *)
                echo "Usage: $0 {start|stop|force-quit|restart|reload}"
                exit 1
        ;;
esac |
Rendez le script d'initialisation exécutable et créez les liens de démarrage du système :
chmod 755 /etc/init.d/php-5.4.12-fpm
insserv php-5.4.12-fpm
Démarrez enfin PHP-FPM :
/etc/init.d/php-5.4.12-fpm start
Tant qu'il n'y a pas de pools dans /opt/php-5.4.12/etc/pool.d, vous obtiendrez cet avertissement que vous pouvez ignorer :
example@unixlinux.online:/usr/local/src/php5-build/php-5.4.12# /etc/init.d/php-5.4.12-fpm start
Démarrage de php-fpm [04-Mar -2013 16:03:35] AVERTISSEMENT :Rien ne correspond au modèle d'inclusion '/opt/php-5.4.12/etc/pool.d/*.conf' de /opt/php-5.4.12/etc/php-fpm .conf à la ligne 512.
done
example@unixlinux.online:/usr/local/src/php5-build/php-5.4.12#
C'est tout - si vous le souhaitez, vous pouvez maintenant installer des modules supplémentaires comme APC, memcache, memcached et ioncube.
Les modules APC, memcache et memcached peuvent être installés via PEAR que nous devons d'abord installer et initialiser :
apt-get -y install php-pear
cd /opt/php-5.4.12/etc
pecl -C ./pear.conf update-channels
APC peut maintenant être installé comme suit :
pecl -C ./pear.conf install apc
Acceptez toutes les valeurs par défaut. Ensuite, ouvrez /opt/php-5.4.12/lib/php.ini...
vi /opt/php-5.4.12/lib/php.ini
... et ajoutez la ligne extension=apc.so à la fin du fichier (vous pouvez également configurer des paramètres APC supplémentaires) :
[...] extension=apc.so apc.enabled=1 apc.shm_size=128M apc.ttl=0 apc.user_ttl=600 apc.gc_ttl=600 apc.enable_cli=1 apc.mmap_file_mask=/tmp/apc.XXXXXX ;apc.mmap_file_mask=/dev/zero ;apc.shm_segments = 5 |
L'extension Memcache peut être installée comme suit :
pecl -C ./pear.conf install memcache
Ouvrez /opt/php-5.4.12/lib/php.ini...
vi /opt/php-5.4.12/lib/php.ini
... et ajoutez la ligne extension=memcache.so à la fin du fichier :
[...] extension=memcache.so |
L'extension memcached peut être installée comme suit :
apt-get install libmemcached-dev
pecl -C ./pear.conf install memcached
Ouvrez /opt/php-5.4.12/lib/php.ini...
vi /opt/php-5.4.12/lib/php.ini
... et ajoutez la ligne extension=memcached.so à la fin du fichier :
[...] extension=memcached.so |
L'ionCube Loader peut être installé comme suit :
cd /tmp
Ensuite, téléchargez et décompressez le package ionCube Loader adapté à votre architecture (x86_64 ou x86).
Pour x86_64 :
wget http://downloads2.ioncube.com/loader_downloads/ioncube_loaders_lin_x86-64.tar.gz
tar xfvz ioncube_loaders_lin_x86-64.tar.gz
Pour x86 :
wget http://downloads2.ioncube.com/loader_downloads/ioncube_loaders_lin_x86.tar.gz
tar xfvz ioncube_loaders_lin_x86.tar.gz
Procédez comme suit :
cp ioncube/ioncube_loader_lin_5.4.so /opt/php-5.4.12/lib/php/extensions/no-debug-non-zts-20100525/ioncube.so
vi /opt/php-5.4.12/ lib/php.ini
Ajoutez la ligne zend_extension =/opt/php-5.4.12/lib/php/extensions/no-debug-non-zts-20100525/ioncube.so juste au début du fichier (avant la ligne [PHP]) :
zend_extension = /opt/php-5.4.12/lib/php/extensions/no-debug-non-zts-20100525/ioncube.so [PHP] [...] |
Rechargez ensuite PHP-FPM :
/etc/init.d/php-5.4.12-fpm reload
Dans ISPConfig 3.0.5, vous pouvez configurer la nouvelle version PHP sous Système> Versions PHP supplémentaires. Dans l'onglet Nom, il vous suffit de saisir un nom pour la version de PHP (par exemple, PHP 5.4.12) - cette version de PHP sera répertoriée sous ce nom dans les paramètres du site Web dans ISPConfig :
Allez dans l'onglet PHP-FPM Settings (l'onglet FastCGI Settings peut être laissé vide) et remplissez les champs comme suit :
Comment utiliser plusieurs versions de PHP (PHP-FPM et FastCGI) avec ISPConfig 3 (Debian Wheezy) - Page 4
5 Compiler PHP 5.4.12 (FastCGI)
Téléchargez et extrayez PHP 5.4.12 :
mkdir /opt/phpfcgi-5.4.12
mkdir /usr/local/src/php5-build
cd /usr/local/src/php5-build
wget http://de. php.net/get/php-5.4.12.tar.bz2/from/this/mirror -O php-5.4.12.tar.bz2
tar jxf php-5.4.12.tar.bz2
cd php-5.4.12/
Installez les prérequis pour compiler PHP5 :
apt-get install build-essential
apt-get build-dep php5
apt-get install libfcgi-dev libfcgi0ldbl libjpeg62-dbg libmcrypt-dev libssl-dev libc-client2007e libc-client2007e-dev
ln -s /usr/lib/libc-client.a /usr/lib/x86_64-linux-gnu/libc-client.a
(La dernière commande est nécessaire si vous construisez PHP avec --with-imap, car sinon ./configure s'arrêtera avec l'erreur suivante :
vérification de crypt dans -lcrypt... oui
configure :erreur :impossible de trouver la bibliothèque imap (libc-client.a). Veuillez vérifier votre installation c-client.
example@unixlinux.online:/usr/local/src/php5-build/php-5.4.12#
)
Configurez et compilez PHP 5.4.12 comme suit (vous pouvez ajuster la commande ./configure à vos besoins, jetez un œil à
./configure --help
pour voir toutes les options disponibles ; si vous utilisez une commande ./configure différente, il est possible que des bibliothèques supplémentaires soient requises ou que le processus de construction échoue) :
./configure \
--prefix=/opt/phpfcgi-5.4.12 \
--with-pdo-pgsql \
--with-zlib-dir \
- -with-freetype-dir \
--enable-mbstring \
--with-libxml-dir=/usr \
--enable-soap \
--enable- calendrier \
--avec-curl \
--avec-mcrypt \
--avec-zlib \
--avec-gd \
--avec- pgsql \
--disable-rpath \
--enable-inline-optimization \
--with-bz2 \
--with-zlib \
-- enable-sockets \
--enable-sysvsem \
--enable-sysvshm \
--enable-pcntl \
--enable-mbregex \
-- enable-exif \
--enable-bcmath \
--with-mhash \
--enable-zip \
--with-pcre-regex \
--with-mysql \
--with-pdo-mysql \
--with-mysqli \
--with-jpeg-dir=/usr \
--with -png-dir=/usr \
--enable-gd-native-ttf \
--with-openssl \
--with-fpm-user=www-data \
--with-fpm-group=www-data \
--with-libdir=/lib/x86_64-linux-gnu \
--enable-ftp \
--with -imap \
--with-imap-ssl \
--with-ke rberos \
--with-gettext \
--with-xmlrpc \
--with-xsl \
--enable-cgi
The last switch (--enable-cgi) makes sure this PHP version will work with FastCGI.
make
make install
Copy php.ini to the correct location:
cp /usr/local/src/php5-build/php-5.4.12/php.ini-production /opt/phpfcgi-5.4.12/lib/php.ini
That's it - if you like, you can now install some additional modules like APC, memcache, memcached, and ioncube.
The APC, memcache, and memcached modules can be installed through PEAR which we must install and initialize first:
apt-get -y install php-pear
cd /opt/phpfcgi-5.4.12/etc
pecl -C ./pear.conf update-channels
APC can now be installed as follows:
pecl -C ./pear.conf install apc
Accept all default values. Afterwards, open /opt/phpfcgi-5.4.12/lib/php.ini...
vi /opt/phpfcgi-5.4.12/lib/php.ini
... and add the line extension=apc.so at the end of the file (you can also configure some additional APC settings):
[...] extension=apc.so apc.enabled=1 apc.shm_size=128M apc.ttl=0 apc.user_ttl=600 apc.gc_ttl=600 apc.enable_cli=1 apc.mmap_file_mask=/tmp/apc.XXXXXX ;apc.mmap_file_mask=/dev/zero ;apc.shm_segments = 5 |
The memcache extension can be installed as follows:
pecl -C ./pear.conf install memcache
Open /opt/phpfcgi-5.4.12/lib/php.ini...
vi /opt/phpfcgi-5.4.12/lib/php.ini
... and add the line extension=memcache.so at the end of the file:
[...] extension=memcache.so |
The memcached extension can be installed as follows:
apt-get install libmemcached-dev
pecl -C ./pear.conf install memcached
Open /opt/phpfcgi-5.4.12/lib/php.ini...
vi /opt/phpfcgi-5.4.12/lib/php.ini
... and add the line extension=memcached.so at the end of the file:
[...] extension=memcached.so |
The ionCube Loader can be installed as follows:
cd /tmp
Next download and unpack the correct ionCube Loader package for your architecture (x86_64 or x86).
For x86_64:
wget http://downloads2.ioncube.com/loader_downloads/ioncube_loaders_lin_x86-64.tar.gz
tar xfvz ioncube_loaders_lin_x86-64.tar.gz
For x86:
wget http://downloads2.ioncube.com/loader_downloads/ioncube_loaders_lin_x86.tar.gz
tar xfvz ioncube_loaders_lin_x86.tar.gz
Proceed as follows:
cp ioncube/ioncube_loader_lin_5.4.so /opt/phpfcgi-5.4.12/lib/php/extensions/no-debug-non-zts-20100525/ioncube.so
vi /opt/phpfcgi-5.4.12/lib/php.ini
Add the line zend_extension =/opt/phpfcgi-5.4.12/lib/php/extensions/no-debug-non-zts-20100525/ioncube.so right at the beginning of the file (before the [PHP] line):
zend_extension = /opt/phpfcgi-5.4.12/lib/php/extensions/no-debug-non-zts-20100525/ioncube.so [PHP] [...] |
In ISPConfig 3.0.5, you can configure the new PHP version under System> Additional PHP Versions. On the Name tab, you just fill in a name for the PHP version (e.g. PHP 5.4.12) - this PHP version will be listed under this name in the website settings in ISPConfig:
Go to the FastCGI Settings tab (the PHP-FPM Settings tab can be left empty) and fill out the fields as follows:
6 Links
- PHP:http://www.php.net/
- ISPConfig:http://www.ispconfig.org/
- Debian:http://www.debian.org/
About The Author

Falko Timme is the owner of  Timme Hosting (ultra-fast nginx web hosting). He is the lead maintainer of HowtoForge (since 2005) and one of the core developers of ISPConfig (since 2000). He has also contributed to the O'Reilly book "Linux System Administration".