Environnement multiserveur virtuel avec Web dédié et MySQL, Serveurs de messagerie et DNS sur Debian Squeeze avec ISPConfig 3
Version 1.0
Auteur :Michel Käser
Ce didacticiel décrit comment vous pouvez configurer un serveur dédié unique en tant qu'environnement multiserveur virtuel à l'aide d'OpenVZ avec des serveurs Web et MySQL, de messagerie et DNS dédiés sur Debian Squeeze. De plus, vous apprendrez à entretenir tous ces serveurs. De plus, vous apprendrez comment installer des packages très utiles sur chacun d'eux, comment les protéger et comment les surveiller.
À la fin, vous disposerez d'un environnement multiserveur virtuel entièrement fonctionnel, prêt pour l'hébergement partagé.
Je n'émets aucune garantie que cela fonctionnera pour vous !
1 Exigences
Pour suivre ce tutoriel, vous aurez besoin des éléments suivants :
- un serveur dédié
- au moins 5 adresses IP
- beaucoup de temps
2 Remarque préliminaire
Dans ce tutoriel, j'utilise ce serveur dédié :http://www.hetzner.de/hosting/produkte_rootserver/ex4 avec le Flexi-Pack et un sous-réseau /28 supplémentaire (14 IP).
Le but est d'avoir ces serveurs :
- Type :nœud
- Matériel :dédié
- Nom d'hôte :root.example.tld
- 192.168.1.1
- Type :Conteneur
- Matériel :virtuel
- Nom d'hôte :web.example.tld
- 192.168.1.2
- Type :Conteneur
- Matériel :virtuel
- Nom d'hôte :mail.example.tld
- 192.168.1.3
- Type :Conteneur
- Matériel :virtuel
- Nom d'hôte :ns1.example.tld
- 192.168.1.4
- Type :Conteneur
- Matériel :virtuel
- Nom d'hôte :ns2.example.tld
- 192.168.1.5
3 Le système de base
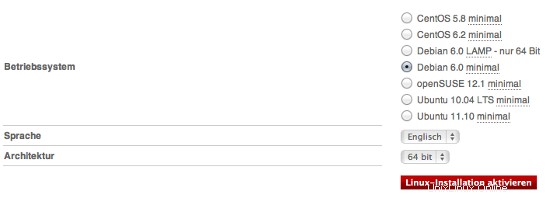
Je suppose que vous avez pris le même serveur dédié que moi. L'interface Web Hetzner vous permet d'installer une gamme de distributions. Prenez la version minimale de Debian 6.0 64 bits.
Cela installera le système de base pour vous et vous n'aurez pas à le configurer vous-même. Vous obtiendrez également le mot de passe root.
4 Installation du panneau Web OpenVZ + OVZ
Dès que votre serveur est prêt, connectez-vous en utilisant les informations d'identification reçues. Nous allons d'abord faire une mise à jour/mise à niveau :
apt-get update &&apt-get -y upgrade &&apt-get -y dist-upgrade
qui mettra à niveau notre serveur vers la dernière version.
Nous installons des packages supplémentaires pour :
apt-get -y install nano wget ntp ntpdate
4.1 Installer OpenVZ
Nous voulons maintenant installer OpenVZ, la base de notre environnement multiserveur virtuel.
Un noyau OpenVZ et les packages vzctl, vzquota et vzdump sont disponibles dans les référentiels Debian Squeeze, nous pouvons donc les installer comme suit :
apt-get install linux-image-openvz-amd64 vzctl vzquota vzdump
Créez un lien symbolique de /var/lib/vz vers /vz pour assurer la rétrocompatibilité :
ln -s /var/lib/vz /vz
Ouvrez /etc/sysctl.conf et assurez-vous que vous disposez des paramètres suivants :
nano /etc/sysctl.conf
[...]
net.ipv4.conf.all.rp_filter=1
net.ipv4.icmp_echo_ignore_broadcasts=1
net.ipv4.conf.default.forwarding=1
net.ipv4.conf.default.proxy_arp = 0
net.ipv4.ip_forward=1
kernel.sysrq = 1
net.ipv4.conf.default.send_redirects = 1
net.ipv4.conf.all.send_redirects = 0
net.ipv4.conf.eth0.proxy_arp=1
[...]
Si vous avez besoin de modifier /etc/sysctl.conf, exécutez
sysctl-p
après.
L'étape suivante est importante si les adresses IP de vos machines virtuelles proviennent d'un sous-réseau différent de l'adresse IP du système hôte. Si vous ne le faites pas, la mise en réseau ne fonctionnera pas dans les machines virtuelles !
Ouvrez /etc/vz/vz.conf et définissez NEIGHBOUR_DEVS sur all :
nano /etc/vz/vz.conf
[...]
# Controls which interfaces to send ARP requests and modify APR tables on.
NEIGHBOUR_DEVS=all
[...]
Enfin, redémarrez le système :
redémarrer
Si votre système redémarre sans problème, alors tout va bien !
Exécuter
uname -r
et votre nouveau noyau OpenVZ devrait apparaître :
exemple@unixlinux.online :~# uname -r
2.6.32-5-openvz-amd64
Puisque Hetzner monte /home sur un disque dur séparé, nous pouvons l'utiliser comme emplacement de sauvegarde OpenVZ. Pour ce faire, exécutez :
rm -rf /var/lib/vz/dump
ln -s /home/backup/vz /var/lib/vz/dump
Comme nous allons utiliser fail2ban dans nos conteneurs virtuels, nous devons activer certains supports IPTables pour eux. Pour ce faire, nous éditons le fichier /etc/vz/vz.conf :
nano /etc/vz/vz.conf
Recherchez la ligne commençant par IPTABLES et commentez-la (#). Collez ensuite ce qui suit :
[...]
IPTABLES="ipt_REJECT ipt_tos ipt_limit ipt_multiport iptable_filter iptable_mangle ipt_TCPMSS ipt_tcpmss ipt_ttl ipt_length ipt_state"
Ensuite, activez le module d'état dans le noyau :
modprobe xt_state
4.2 Installation du panneau Web OVZ
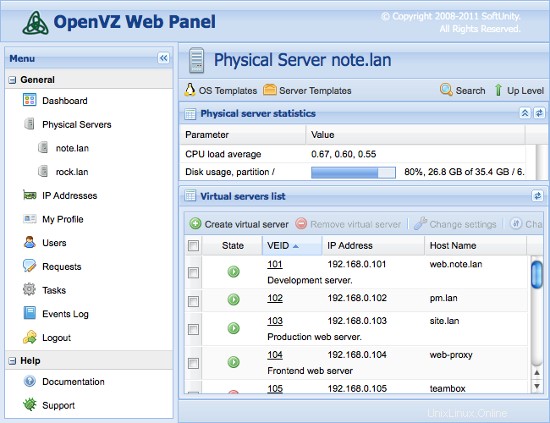
Le panneau Web OpenVZ est une interface graphique basée sur le Web pour le contrôle du matériel et des serveurs virtuels avec la technologie de virtualisation OpenVZ.
La manière la plus simple d'installer OpenVZ Web Panel consiste à exécuter la commande suivante :
wget -O - http://ovz-web-panel.googlecode.com/svn/installer/ai.sh | merde
Après l'installation, le Panel devrait être disponible à l'URL suivante :
http://<192.168.1.1>:3000
Les informations d'identification par défaut de l'administrateur sont :admin/admin. N'oubliez pas de changer le mot de passe par défaut.
Environnement multiserveur virtuel avec serveurs dédiés Web et MySQL, de messagerie et DNS sur Debian Squeeze avec ISPConfig 3 - Page 2
5 Création des serveurs virtuels
Nous allons maintenant utiliser le panneau Web OVZ pour créer nos serveurs virtuels. Connectez-vous au panneau et ajoutez vos adresses IP sous Adresses IP. Ensuite, cliquez sur localhost et modèles de système d'exploitation.
Nous devons maintenant télécharger un modèle pour nos serveurs virtuels. Pour ce faire, cliquez sur Install New OS Template -> Contributed et sélectionnez debian-6.0-amd64-minimal.
Revenez maintenant à localhost et cliquez sur Créer un serveur virtuel. Remplissez les champs comme ci-dessous :
- ID de serveur (VEID) :un nombre (je choisirais la dernière partie de votre IP, donc 2 pour la première)
- Modèle de système d'exploitation :déjà sélectionné le bon
- Modèle de serveur :illimité
- Adresse IP :192.168.1.2
- Nom d'hôte :web.example.tld
- Serveur DNS :8.8.4.4 8.8.8.8 (qui sont le DNS de Google)
- laissez le reste tel quel et affectez l'espace disque, la RAM et le processeur comme vous le souhaitez...
Répétez cette étape pour tous vos serveurs virtuels (enfin 4 fois :Web, Mail, 2x DNS).
5.1 Préparation des serveurs virtuels
Vous devez maintenant vous connecter à chaque serveur virtuel et exécuter ces commandes :
apt-get update &&apt-get -y upgrade &&apt-get -y dist-upgrade
apt-get -y install nano wget ntp ntpdate
qui les mettra à niveau vers la dernière version et installera certains packages manquants.
6 Installation des serveurs dédiés
6.1 Installation du serveur Web/DB
Modifiez le fichier hosts et ajoutez les adresses IP et les noms d'hôte pour tous les serveurs. Les noms d'hôte et les adresses IP doivent être ajustés pour correspondre à votre configuration.
nano /etc/hosts
127.0.0.1 localhost
192.168.1.2 web.example.tld
192.168.1.3 mail.example.tld
192.168.1.4 ns1.example.tld
192.168.1.5 ns2.example.tld

# The following lines are desirable for IPv6 capable hosts
::1     localhost ip6-localhost ip6-loopback
fe00::0 ip6-localnet
ff00::0 ip6-mcastprefix
ff02::1 ip6-allnodes
ff02::2 ip6-allrouters
ff02::3 ip6-allhosts
Définissez le nom d'hôte du serveur :
echo web.example.tld> /etc/hostname
/etc/init.d/hostname.sh start
Installez le serveur MySQL. Une instance de serveur MySQL est nécessaire sur chaque serveur car ISPConfig l'utilise pour synchroniser la configuration entre les serveurs.
apt-get -y install mysql-client mysql-server
Entrez le nouveau mot de passe pour MySQL à la demande du programme d'installation.
Nous voulons que MySQL écoute sur toutes les interfaces du serveur maître, pas seulement sur localhost, donc nous éditons /etc/mysql/my.cnf et commentons la ligne bind-address =127.0.0.1 :
nano /etc/mysql/mon.cnf
[...]

# Instead of skip-networking the default is now to listen only on
# localhost which is more compatible and is not less secure.
#bind-address           = 127.0.0.1

[...]
Puis redémarrez MySQL :
/etc/init.d/redémarrage mysql
Installez maintenant Apache2, PHP5, phpMyAdmin, FCGI, suExec, Pear et mcrypt comme suit :
apt-get -y install apache2 apache2.2-common apache2-doc apache2-mpm-prefork apache2-utils libexpat1 ssl-cert libapache2-mod-php5 php5 php5-common php5-gd php5-mysql php5-imap phpmyadmin php5-cli php5 -cgi libapache2-mod-fcgid apache2-suexec php-pear php-auth php5-mcrypt mcrypt php5-imagick imagemagick libapache2-mod-suphp libopenssl-ruby libapache2-mod-ruby sudo zip wget
Vous verrez la question suivante :
Serveur Web à reconfigurer automatiquement :<-- apache2
Exécutez ensuite la commande suivante pour activer les modules Apache suexec, rewrite, ssl, actions, headers, expires et include :
a2enmod suexec les actions de réécriture ssl incluent ruby dav_fs dav auth_digest les en-têtes expirent
PureFTPd peut être installé avec la commande suivante :
apt-get -y install pure-ftpd-common pure-ftpd-mysql
Editez le fichier /etc/default/pure-ftpd-common...
vi /etc/default/pure-ftpd-common
... et assurez-vous que virtualchroot est défini VIRTUALCHROOT=true :
[...]
VIRTUALCHROOT=true
[...]
Nous configurons maintenant PureFTPd pour autoriser les sessions FTP et TLS. FTP est un protocole très peu sûr car tous les mots de passe et toutes les données sont transférés en texte clair. En utilisant TLS, toute la communication peut être cryptée, ce qui rend le FTP beaucoup plus sécurisé.
Si vous souhaitez autoriser les sessions FTP et TLS, exécutez
echo 1> /etc/pure-ftpd/conf/TLS
Pour utiliser TLS, nous devons créer un certificat SSL. Je le crée dans /etc/ssl/private/, donc je crée d'abord ce répertoire :
mkdir -p /etc/ssl/private/
Ensuite, nous pouvons générer le certificat SSL comme suit :
openssl req -x509 -nodes -days 7300 -newkey rsa:2048 -keyout /etc/ssl/private/pure-ftpd.pem -out /etc/ssl/private/pure-ftpd.pem
Nom du pays (code à 2 lettres) [AU] :<-- Saisissez le nom de votre pays (par exemple, "DE").
Nom de l'État ou de la province (nom complet) [Some-State] :<-- Saisissez votre état ou Nom de la province.
Nom de la localité (par exemple, ville) [] :<-- Entrez votre ville.
Nom de l'organisation (par exemple, société) [Internet Widgits Pty Ltd] :<-- Entrez le nom de votre organisation (par exemple, le nom de votre entreprise).
Nom de l'unité organisationnelle (par exemple, section) [] :<-- Saisissez le nom de votre unité organisationnelle (par exemple, "Service informatique").
Nom commun (par exemple, VOTRE nom) [] :<-- Saisissez le nom de domaine complet du système (par exemple, "web.example.tld").
Adresse e-mail [] :<-- Saisissez votre adresse e-mail.
Modifiez les autorisations du certificat SSL :
chmod 600 /etc/ssl/private/pure-ftpd.pem
Installez vlogger, webalizer et awstats :
apt-get -y installer vlogger webalizer awstats
Ouvrez ensuite /etc/cron.d/awstats...
vi /etc/cron.d/awstats
... et commentez les deux tâches cron dans ce fichier :
#*/10 * * * * www-data [ -x /usr/share/awstats/tools/update.sh ] && /usr/share/awstats/tools/update.sh

# Generate static reports:
#10 03 * * * www-data [ -x /usr/share/awstats/tools/buildstatic.sh ] && /usr/share/awstats/tools/buildstatic.sh
Installez Jailkit :Jailkit n'est nécessaire que si vous souhaitez chrooter les utilisateurs SSH. Il peut être installé comme suit (important :Jailkit doit être installé avant ISPConfig - il ne peut pas être installé après !) :
apt-get -y install build-essential autoconf automake1.9 libtool flex bison debhelper
cd /tmp
wget http://olivier.sessink.nl/jailkit/jailkit-2.14.tar.gz
tar xvfz jailkit-2.14.tar.gz
cd jailkit-2.14
./debian/rules binaire
cd ..
dpkg -i jailkit_2.14-1_*.deb
rm -rf jailkit-2.14*
Installer fail2ban :ceci est facultatif mais recommandé, car le moniteur ISPConfig essaie d'afficher le journal :
apt-get install fail2ban
Pour que fail2ban surveille PureFTPd, créez le fichier /etc/fail2ban/jail.local :
vi /etc/fail2ban/jail.local
[pureftpd]

enabled  = true
port     = ftp
filter   = pureftpd
logpath  = /var/log/syslog
maxretry = 3
Créez ensuite le fichier de filtre suivant :
vi /etc/fail2ban/filter.d/pureftpd.conf
[Definition]
failregex = .*pure-ftpd: \(.*@<HOST>\) \[WARNING\] Authentication failed for user.*
ignoreregex =
Redémarrez ensuite fail2ban :
/etc/init.d/fail2ban redémarrage
Ensuite, nous allons installer ISPConfig 3. Pour obtenir l'URL de téléchargement de la dernière version stable d'ISPConfig 3, veuillez visiter le site Web d'ISPConfig :http://www.ispconfig.org/ispconfig-3/download/
Ce serveur est le serveur maître de notre configuration qui exécute l'interface du panneau de configuration ISPConfig. Pour permettre aux autres instances MySQL de se connecter à la base de données MySQL sur ce nœud lors de l'installation, nous devons ajouter des enregistrements d'utilisateur racine MySQL dans la base de données principale pour chaque nom d'hôte et adresse IP du serveur esclave. Pour ce faire, le moyen le plus simple consiste à utiliser l'outil d'administration Web phpmyadmin que nous avons déjà installé. Ouvrez l'URL http://192.168.1.2/phpmyadmin dans un navigateur Web, connectez-vous en tant qu'utilisateur racine MySQL et exécutez ces requêtes MySQL :
CRÉER UN UTILISATEUR 'root'@'192.168.1.3' IDENTIFIÉ PAR 'myrootpassword';
ACCORDER TOUS LES PRIVILÈGES SUR * . * À 'root'@'192.168.1.3' IDENTIFIÉ PAR 'myrootpassword' AVEC GRANT OPTION MAX_QUERIES_PER_HOUR 0 MAX_CONNECTIONS_PER_HOUR 0 MAX_UPDATES_PER_HOUR 0 MAX_USER_CONNECTIONS 0;
CRÉER UN UTILISATEUR 'root'@'192.168.1.4' IDENTIFIÉ PAR 'myrootpassword';
ACCORDER TOUS LES PRIVILÈGES SUR * . * À 'root'@'192.168.1.4' IDENTIFIÉ PAR 'myrootpassword' AVEC GRANT OPTION MAX_QUERIES_PER_HOUR 0 MAX_CONNECTIONS_PER_HOUR 0 MAX_UPDATES_PER_HOUR 0 MAX_USER_CONNECTIONS 0;
CRÉER UN UTILISATEUR 'root'@'192.168.1.5' IDENTIFIÉ PAR 'myrootpassword';
ACCORDER TOUS LES PRIVILÈGES SUR * . * TO 'root'@'192.168.1.5' IDENTIFIÉ PAR 'myrootpassword' AVEC GRANT OPTION MAX_QUERIES_PER_HOUR 0 MAX_CONNECTIONS_PER_HOUR 0 MAX_UPDATES_PER_HOUR 0 MAX_USER_CONNECTIONS 0;
CRÉER UN UTILISATEUR 'root'@'mail.example.tld' IDENTIFIÉ PAR 'myrootpassword';
ACCORDER TOUS LES PRIVILÈGES SUR * . * À 'root'@'mail.example.tld' IDENTIFIÉ PAR 'myrootpassword' AVEC GRANT OPTION MAX_QUERIES_PER_HOUR 0 MAX_CONNECTIONS_PER_HOUR 0 MAX_UPDATES_PER_HOUR 0 MAX_USER_CONNECTIONS 0;
CRÉER UN UTILISATEUR 'root'@'ns1.example.tld' IDENTIFIÉ PAR 'myrootpassword';
ACCORDER TOUS LES PRIVILÈGES SUR * . * À 'root'@'ns1.example.tld' IDENTIFIÉ PAR 'myrootpassword' AVEC GRANT OPTION MAX_QUERIES_PER_HOUR 0 MAX_CONNECTIONS_PER_HOUR 0 MAX_UPDATES_PER_HOUR 0 MAX_USER_CONNECTIONS 0;
CRÉER UN UTILISATEUR 'root'@'ns2.example.tld' IDENTIFIÉ PAR 'myrootpassword';
ACCORDER TOUS LES PRIVILÈGES SUR * . * À 'root'@'ns2.example.tld' IDENTIFIÉ PAR 'myrootpassword' AVEC GRANT OPTION MAX_QUERIES_PER_HOUR 0 MAX_CONNECTIONS_PER_HOUR 0 MAX_UPDATES_PER_HOUR 0 MAX_USER_CONNECTIONS 0;
Dans les commandes sql ci-dessus, remplacez les adresses IP (192.168.1.3 - 192.168.1.5) par les adresses IP de vos serveurs et remplacez mail.example.tld, ns1.example.tld et ns2.example.tld par les noms d'hôtes de votre servers et myrootpassword avec le mot de passe root souhaité.
Cliquez sur le bouton recharger les autorisations ou redémarrez MySQL. Fermez ensuite phpmyadmin.
Revenez au shell de web.example.tld et téléchargez la dernière version stable d'ISPConfig 3 :
cd /tmp
wgethttp://www.ispconfig.org/downloads/ISPConfig-3-stable.tar.gz
tar xfz ISPConfig-3-stable.tar.gz
cd ispconfig3_install/ installer/
Lancez ensuite le script d'installation :
php -q install.php
Sélectionner la langue (en,de) [en] :<-- en
Mode d'installation (standard,expert) [standard] :<-- expert
Nom d'hôte complet (FQDN) du serveur, par exemple serveur2 .domain.tld [web.example.tld] :<-- web.example.tld
Nom d'hôte du serveur MySQL [localhost] :<-- localhost
Nom d'utilisateur root MySQL [root] :<-- root
Mot de passe racine MySQL [] :<-- Saisissez ici votre mot de passe racine MySQL
Base de données MySQL pour créer [dbispconfig] :<-- dbispconfig
Jeu de caractères MySQL [utf8] :<-- utf8
Ce serveur doit-il rejoindre une configuration multiserveur ISPConfig existante (y,n) [n] :<-- n
Configurer Mail (y,n) [y] :<-- n
Configurer Jailkit (y,n) [y] :<-- y
Configurer le serveur FTP (y,n) [y] :<-- y
Configurer le serveur DNS (y,n) [y] :<-- n
Configurer le serveur Apache (y,n) [y] :<-- y
Configurer le serveur pare-feu (y,n) [y] :<--n
Installer ISPConfig Web -Interface (y,n) [y] :<--y
Port ISPConfig [8080] :<-- 8080
Activer SSL pour l'interface Web ISPConfig (y,n) [y] :<-- y
Nom du pays (code à 2 lettres) [AU] :<-- ENT ER
Nom de l'État ou de la province (nom complet) [Some-State] :<-- ENTER
Nom de la localité (par exemple, ville) [] :<-- ENTER
Nom de l'organisation (par exemple, société) [Internet Widgits Pty Ltd] :<-- ENTER
Nom de l'unité organisationnelle (par exemple, section) [] :<-- ENTER
Nom commun (par exemple, VOTRE nom) [] :<-- ENTER
Adresse e-mail [] :<-- ENTER
Un mot de passe de test [] :<-- ENTER
Un nom de société facultatif [] :<-- ENTER
Nettoyez les répertoires d'installation :
cd /tmp
rm -rf /tmp/ispconfig3_install/install
rm -f /tmp/ISPConfig-3-stable.tar.gz
6.2 Installation du serveur de messagerie
Modifiez le fichier hosts et ajoutez les adresses IP et les noms d'hôte pour tous les serveurs. Les noms d'hôte et les adresses IP doivent être ajustés pour correspondre à votre configuration.
nano /etc/hosts
127.0.0.1 localhost
192.168.1.2 web.example.tld
192.168.1.3 mail.example.tld
192.168.1.4 ns1.example.tld
192.168.1.5 ns2.example.tld

# The following lines are desirable for IPv6 capable hosts
::1     localhost ip6-localhost ip6-loopback
fe00::0 ip6-localnet
ff00::0 ip6-mcastprefix
ff02::1 ip6-allnodes
ff02::2 ip6-allrouters
ff02::3 ip6-allhosts
Définissez le nom d'hôte du serveur :
echo mail.example.tld> /etc/hostname
echo mail.example.tld> /etc/mailname
/etc/init.d/hostname.sh start
Installez postfix, dovecot et MySQL avec une seule commande :
apt-get -y install postfix postfix-mysql postfix-doc mysql-client mysql-server openssl getmail4 rkhunter binutils dovecot-imapd dovecot-pop3d
Entrez le nouveau mot de passe pour mysql à la demande de l'installateur et répondez aux questions suivantes comme décrit ci-dessous :
Type de configuration général ? <-- Site Internet
Nom de messagerie ? <-- mail.exemple.tld
Pour installer amavisd-new, SpamAssassin et ClamAV, nous exécutons :
apt-get -y install amavisd-new spamassassin clamav clamav-daemon zoo décompressez bzip2 arj noarch lzop cabextract apt-listchanges libnet-ldap-perl libauthen-sasl-perl clamav-docs daemon libio-string-perl libio-socket-ssl-perl libnet-ident-perl zip libnet-dns-perl
Si vous souhaitez utiliser des listes de diffusion sur votre serveur, installez mailman. Cette étape est facultative. mailman nécessite un serveur Web apache, donc si vous ne voulez pas exécuter une instance apache sur votre serveur de messagerie, n'installez pas mailman.
apt-get -y install mailman
Le programme d'installation d'apt pour mailman vous demandera alors de sélectionner les langues pour la liste de diffusion. Activez toutes les langues que vous souhaitez utiliser pour mailman. Créez ensuite la liste de diffusion "mailman".
facteur de nouvelle liste
et saisissez l'adresse e-mail et le nouveau mot de passe de l'administrateur de la liste de diffusion. C'est la dernière étape de l'installation du facteur. La prochaine commande pour installer php doit être exécutée sur chaque serveur, indépendamment du fait que vous ayez installé ou non mailman.
Installez ensuite la version en ligne de commande de PHP pour pouvoir exécuter des scripts shell basés sur PHP pour ISPConfig :
apt-get -y install php5-cli php5-mysql php5-mcrypt mcrypt
Installer fail2ban :ceci est facultatif mais recommandé, car le moniteur ISPConfig essaie d'afficher le journal :
apt-get install fail2ban
Pour que fail2ban surveille PureFTPd et Dovecot, créez le fichier /etc/fail2ban/jail.local :
vi /etc/fail2ban/jail.local
[dovecot-pop3imap]

enabled = true
filter = dovecot-pop3imap
action = iptables-multiport[name=dovecot-pop3imap, port="pop3,pop3s,imap,imaps", protocol=tcp]
logpath = /var/log/mail.log
maxretry = 5
Créez ensuite le fichier de filtre suivant :
vi /etc/fail2ban/filter.d/dovecot-pop3imap.conf
[Definition]
failregex = (?: pop3-login|imap-login): .*(?:Authentication failure|Aborted login \(auth failed|Aborted login \(tried to use disabled|Disconnected \(auth failed|Aborted login \(\d+ authentication attempts).*rip=(?P<host>\S*),.*
ignoreregex =
Redémarrez ensuite fail2ban :
/etc/init.d/fail2ban redémarrage
Maintenant, je vais installer ISPConfig 3 sur ce serveur. Pour obtenir l'URL de téléchargement de la dernière version stable d'ISPConfig 3, veuillez visiter le site Web d'ISPConfig :http://www.ispconfig.org/ispconfig-3/download/
Téléchargez la dernière version stable d'ISPConfig 3 :
cd /tmp
wgethttp://www.ispconfig.org/downloads/ISPConfig-3-stable.tar.gz
tar xfz ISPConfig-3-stable.tar.gz
cd ispconfig3_install/ installer/
Lancez ensuite le script d'installation :
php -q install.php
Sélectionner la langue (en,de) [en] :<-- en
Mode d'installation (standard,expert) [standard] :<-- expert
Nom d'hôte complet (FQDN) du serveur, par exemple serveur1 .domain.tld [mail.example.tld] :<-- mail.example.tld
Nom d'hôte du serveur MySQL [localhost] :<-- localhost
Nom d'utilisateur root MySQL [root] :<-- root
Mot de passe racine MySQL [] :<-- Saisissez ici votre mot de passe racine MySQL
Base de données MySQL pour créer [dbispconfig] :<-- dbispconfig
Jeu de caractères MySQL [utf8] :<-- utf8
Ce serveur doit-il rejoindre une configuration multiserveur ISPConfig existante (y,n) [n] :<-- y
Nom d'hôte du serveur maître MySQL [] :<-- web.example.tld
Maître MySQL Nom d'utilisateur root du serveur [root] :<-- root
Mot de passe root du serveur maître MySQL [] :<-- Saisissez ici le mot de passe root du serveur maître
Nom de la base de données du serveur maître MySQL [dbispconfig] :<- - dbispconfig
Configurer Mail (y,n) [y] :<-- y
Nom du pays (code à 2 lettres) [AU] :<-- DE (Entrez le code ISO du pays où vous vivez ici)
Nom de l'État ou de la province (nom complet) [Some-State] :<-- Niedersachsen (Entrez l'état où vous vivez ici)
Nom de la localité (par exemple, ville) [] :<-- Lueneburg (Entrez la ville ici)
Nom de l'organisation (par exemple, société) [Internet Widgits Pty Ltd] :<-- ENTER
Nom de l'unité organisationnelle (par exemple, section) [] :<-- ENTER
Nom commun (par exemple, VOTRE nom) [] :<-- ENTER
Adresse e-mail [] :<-- ENTRER
Configurer Jailkit (y,n) [y] :<-- n
Configurer le serveur FTP (y,n) [y] :<-- n
Configurer le serveur DNS (y,n) [y] :<-- n
Configurer le serveur Apache (y,n) [y] :<-- n
Configurer le serveur pare-feu (y,n) [y] :<--n
Installer Interface Web ISPConfig (y,n) [y] :<--n
Exécuter...
rm -f /var/www/ispconfig
... pour supprimer le lien de l'interface ISPConfig dans le répertoire /var/www.
Nettoyez les répertoires d'installation :
rm -rf /tmp/ispconfig3_install/install
rm -f /tmp/ISPConfig-3-stable.tar.gz
Environnement multiserveur virtuel avec serveurs dédiés Web et MySQL, de messagerie et DNS sur Debian Squeeze avec ISPConfig 3 - Page 3
6.3 Installation du serveur DNS principal
Modifiez le fichier hosts et ajoutez les adresses IP et les noms d'hôte pour tous les serveurs. Les noms d'hôte et les adresses IP doivent être ajustés pour correspondre à votre configuration.
nano /etc/hosts
127.0.0.1 localhost
192.168.1.2 web.example.tld
192.168.1.3 mail.example.tld
192.168.1.4 ns1.example.tld
192.168.1.5 ns2.example.tld

# The following lines are desirable for IPv6 capable hosts
::1     localhost ip6-localhost ip6-loopback
fe00::0 ip6-localnet
ff00::0 ip6-mcastprefix
ff02::1 ip6-allnodes
ff02::2 ip6-allrouters
ff02::3 ip6-allhosts
Définissez le nom d'hôte du serveur :
echo ns1.example.tld> /etc/hostname
/etc/init.d/hostname.sh start
Installez le client et le serveur MySQL :
apt-get -y install mysql-client mysql-server
Entrez le nouveau mot de passe pour MySQL à la demande du programme d'installation.
Installez ensuite la version en ligne de commande de PHP pour pouvoir exécuter des scripts shell basés sur PHP pour ISPConfig :
apt-get -y install php5-cli php5-mysql php5-mcrypt mcrypt
Installer fail2ban :ceci est facultatif mais recommandé, car le moniteur ISPConfig essaie d'afficher le journal :
apt-get install fail2ban
Installez le serveur DNS BIND :
apt-get -y install bind9 dnsutils
Installez ensuite ISPConfig 3 sur le serveur DNS. Pour obtenir l'URL de téléchargement de la dernière version stable d'ISPConfig 3, veuillez visiter le site Web d'ISPConfig :http://www.ispconfig.org/ispconfig-3/download/
Téléchargez la dernière version stable d'ISPConfig 3 :
cd /tmp
wgethttp://www.ispconfig.org/downloads/ISPConfig-3-stable.tar.gz
tar xfz ISPConfig-3-stable.tar.gz
cd ispconfig3_install/ installer/
Lancez ensuite le script d'installation :
php -q install.php
Sélectionner la langue (en,de) [en] :<-- en
Mode d'installation (standard,expert) [standard] :<-- expert
Nom d'hôte complet (FQDN) du serveur, par exemple serveur2 .domain.tld [ns1.example.tld] :<-- ns1.example.tld
Nom d'hôte du serveur MySQL [localhost] :<-- localhost
Nom d'utilisateur root MySQL [root] :<-- root
Mot de passe racine MySQL [] :<-- Saisissez ici votre mot de passe racine MySQL
Base de données MySQL pour créer [dbispconfig] :<-- dbispconfig
Jeu de caractères MySQL [utf8] :<-- utf8
Ce serveur doit-il rejoindre une configuration multiserveur ISPConfig existante (y,n) [n] :<-- y
Nom d'hôte du serveur maître MySQL [] :<-- web.example.tld
Maître MySQL Nom d'utilisateur root du serveur [root] :<-- root
Mot de passe root du serveur maître MySQL [] :<-- Saisissez ici le mot de passe root du serveur maître
Nom de la base de données du serveur maître MySQL [dbispconfig] :<- - dbispconfig
Configurer Mail (y,n) [y] :<-- n
Configurer Jailkit (y,n) [y] :<-- n
Configurer le serveur FTP (y, n) [y] :<-- n
Configurer le serveur DNS (y,n) [y] :<-- y
Configurer e Serveur Apache (y,n) [y] :<-- n
Configurer le serveur pare-feu (y,n) [y] :<--n
Installer l'interface Web ISPConfig (y,n) [y] :<--n
Exécuter...
rm -f /var/www/ispconfig
... pour supprimer le lien de l'interface ISPConfig dans le répertoire /var/www.
Nettoyez les répertoires d'installation :
rm -rf /tmp/ispconfig3_install/install
rm -f /tmp/ISPConfig-3-stable.tar.gz
6.4 Installation du serveur DNS secondaire
Modifiez le fichier hosts et ajoutez les adresses IP et les noms d'hôte pour tous les serveurs. Les noms d'hôte et les adresses IP doivent être ajustés pour correspondre à votre configuration.
nano /etc/hosts
127.0.0.1 localhost
192.168.1.2 web.example.tld
192.168.1.3 mail.example.tld
192.168.1.4 ns1.example.tld
192.168.1.5 ns2.example.tld

# The following lines are desirable for IPv6 capable hosts
::1     localhost ip6-localhost ip6-loopback
fe00::0 ip6-localnet
ff00::0 ip6-mcastprefix
ff02::1 ip6-allnodes
ff02::2 ip6-allrouters
ff02::3 ip6-allhosts
Définissez le nom d'hôte du serveur :
echo ns2.example.tld> /etc/hostname
/etc/init.d/hostname.sh start
Installez le client et le serveur MySQL :
apt-get -y install mysql-client mysql-server
Entrez le nouveau mot de passe pour MySQL à la demande du programme d'installation.
Installez ensuite la version en ligne de commande de PHP pour pouvoir exécuter des scripts shell basés sur PHP pour ISPConfig :
apt-get -y install php5-cli php5-mysql php5-mcrypt mcrypt
Installer fail2ban :ceci est facultatif mais recommandé, car le moniteur ISPConfig essaie d'afficher le journal :
apt-get install fail2ban
Installez le serveur DNS BIND :
apt-get -y install bind9 dnsutils
Installez ensuite ISPConfig 3 sur le serveur DNS. Pour obtenir l'URL de téléchargement de la dernière version stable d'ISPConfig 3, veuillez visiter le site Web d'ISPConfig :http://www.ispconfig.org/ispconfig-3/download/
Téléchargez la dernière version stable d'ISPConfig 3 :
cd /tmp
wgethttp://www.ispconfig.org/downloads/ISPConfig-3-stable.tar.gz
tar xfz ISPConfig-3-stable.tar.gz
cd ispconfig3_install/ installer/
Lancez ensuite le script d'installation :
php -q install.php
Sélectionner la langue (en,de) [en] :<-- en
Mode d'installation (standard,expert) [standard] :<-- expert
Nom d'hôte complet (FQDN) du serveur, par exemple serveur2 .domain.tld [ns2.example.tld] :<-- ns2.example.tld
Nom d'hôte du serveur MySQL [localhost] :<-- localhost
Nom d'utilisateur root MySQL [root] :<-- root
Mot de passe racine MySQL [] :<-- Saisissez ici votre mot de passe racine MySQL
Base de données MySQL pour créer [dbispconfig] :<-- dbispconfig
Jeu de caractères MySQL [utf8] :<-- utf8
Ce serveur doit-il rejoindre une configuration multiserveur ISPConfig existante (y,n) [n] :<-- y
Nom d'hôte du serveur maître MySQL [] :<-- web.example.tld
Maître MySQL Nom d'utilisateur root du serveur [root] :<-- root
Mot de passe root du serveur maître MySQL [] :<-- Saisissez ici le mot de passe root du serveur maître
Nom de la base de données du serveur maître MySQL [dbispconfig] :<- - dbispconfig
Configurer Mail (y,n) [y] :<-- n
Configurer Jailkit (y,n) [y] :<-- n
Configurer le serveur FTP (y, n) [y] :<-- n
Configurer le serveur DNS (y,n) [y] :<-- y
Configurer e Serveur Apache (y,n) [y] :<-- n
Configurer le serveur pare-feu (y,n) [y] :<--n
Installer l'interface Web ISPConfig (y,n) [y] :<--n
Exécuter...
rm -f /var/www/ispconfig
... pour supprimer le lien de l'interface ISPConfig dans le répertoire /var/www.
Nettoyez les répertoires d'installation :
rm -rf /tmp/ispconfig3_install/install
rm -f /tmp/ISPConfig-3-stable.tar.gz
6.5 Ajuster les paramètres du serveur dans ISPConfig
Connectez-vous à ISPConfig sur le serveur maître avec un navigateur Web :
http://192.168.1.2:8080
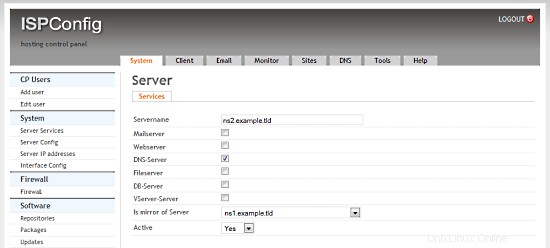
Cliquez sur System> Server services> web.example.tld et décochez toutes les cases à l'exception de la case Webserver, Fileserver et DB-Server et cliquez sur Save.

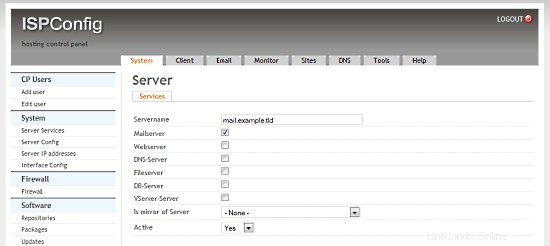
Cliquez sur System> Server services> mail.example.tld et décochez toutes les cases à l'exception de la case Mailserver et cliquez sur Save.
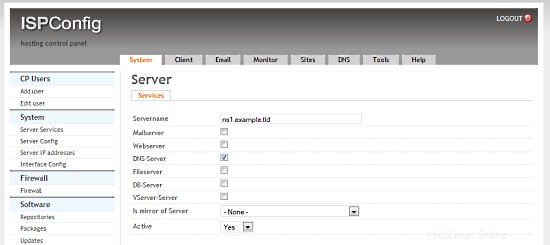
Cliquez sur System> Server services> ns1.example.tld et décochez toutes les cases sauf la case DNS-Server et cliquez sur Save.
Cliquez sur System> Server services> ns2.example.tld et décochez toutes les cases sauf la case DNS-Server et sélectionnez ns1.example.tld dans la case Is mirror of Server et cliquez sur Save.
6.6 Configuration du DNS inversé
Étant donné que la plupart des serveurs de messagerie recherchent une entrée DNS inverse valide, nous devons en configurer une pour notre serveur de messagerie. Hetzner nous permet de le faire dans leur interface Web :
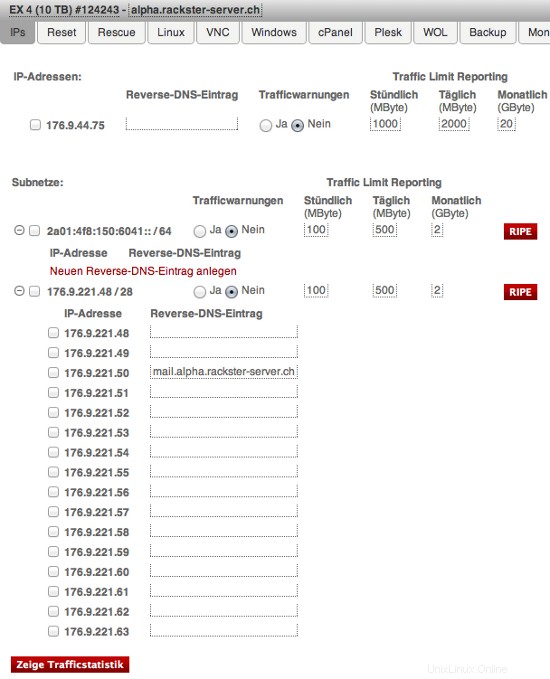
Notez l'entrée pour IP 176.9.221.50. Pour vous, sous IP 192.168.1.3 vous devez renseigner :mail.example.tld
Environnement multiserveur virtuel avec serveurs dédiés Web et MySQL, de messagerie et DNS sur Debian Squeeze avec ISPConfig 3 - Page 4
7 Extension de nos serveurs
Nous avons maintenant un environnement de travail parfait d'un serveur dédié exécutant nos serveurs virtuels. Cependant, il y a beaucoup de réglages que nous pouvons et devons leur appliquer. Nous allons le faire maintenant. Non pas que tous ces éléments soient facultatifs, mais fortement recommandés.
Les premières étapes peuvent être répétées sur tous les serveurs.
7.0.1 SSH avec clé d'authentification au lieu du mot de passe
L'authentification par clé SSH est beaucoup plus sécurisée que le mot de passe, car vous devez posséder la clé privée pour accéder au serveur. Si vous n'en avez pas déjà une, créez une paire de clés RSA (sur votre ordinateur local) :
ssh-keygen
Génération de la paire de clés rsa publique/privée.
Entrez le fichier dans lequel enregistrer la clé (/home/username/.ssh/id_rsa) :Entrez la phrase secrète (vide s'il n'y a pas de phrase secrète) :
Entrez à nouveau la même phrase secrète :
Votre identification a été enregistrée dans /home/username/.ssh/id_rsa.
Votre clé publique a été enregistrée dans /home/username/.ssh/id_rsa.pub.
Une fois la clé publique installée sur le serveur, l'accès sera accordé sans question de mot de passe. SSH usually comes with an utility called ssh-copy-id that simply adds the contents of client's ~/.ssh/id_rsa.pub to the server's ~/.ssh/authorized_keys:
ssh-copy-id -i .ssh/id_rsa.pub example@unixlinux.online
At this point, root account on the server can be locked for password authentication:
Please first try accessing the server using the key before running this command!
passwd -l root
7.0.2 Installing Logwatch
Logwatch is a little package that will send you detailed reports on what happend/is running on your server. It's absolutely useful for monitoring.
apt-get -y install logwatch
Then adjust its configuration:
nano /usr/share/logwatch/default.conf/logwatch.conf
and set these values:
Output = mail
Format = text
MailTo = example@unixlinux.online
Detail = High
Service = All
You now will receive an email from Logwatch every day. You'll see, this is awesome!
7.0.3 Enabling additional fail2ban rules
Fail2ban is a great way to block unwanted users from accessing our servers. Since we already have it installed on our Web &MySQL Server as well on our Mail Server, you can skip the first step on them. Run this on your node and both DNS servers:
apt-get -y install fail2ban
We now will tell fail2ban what services it should monitor and how to handle bad requests:
These have to be run on all servers (including the Web &MySQL server and the Mail server):
nano /etc/fail2ban/jail.local
and add the following to the file (do not replace already existing content!):
[ssh]
enables = true
port    = ssh
filter  = sshd
logpath  = /var/log/auth.log
maxretry = 3

[ssh-ddos]

enabled = true
port    = ssh
filter  = sshd-ddos
logpath  = /var/log/auth.log
maxretry = 5
Fail2ban will now detect SSH break-in attemps and block them. Finally, restart fail2ban:
/etc/init.d/fail2ban restart
7.1 Extending the Node Server
7.1.1 Installing Ajenti
Ajenti is a nice server control panel. I primary use it for managing the firewall and because of the built in filemanager, console and terminal.
First we have to add it's repository to our sources.list:
nano /etc/apt/sources.list
and add:
deb http://repo.ajenti.org/debian main main
Afterwards you have to import it's Key:
wget http://repo.ajenti.org/debian/key -O- | sudo apt-key add -
You should now be able to access the CP via:http://192.168.1.1:8000. The default username/password is:admin
If you plan to use the built in terminal you have to install the Python PIL module:
apt-get -y install python-imaging
7.1.2 Installing Archey
This is very optional, however I like it. Archey will show you some nice information on login.

To install it, simply run:
apt-get install lsb-release scrot
cd /tmp
wget https://github.com/downloads/djmelik/archey/archey-0.2.8.deb
dpkg -i archey-0.2.8.deb
rm archey-0.2.8.deb
nano /etc/bash.bashrc
At the very end, add:archey.
7.2 Extending The Web/DB Server
These steps are only run on our Web/DB server.
7.2.1 Installing cURL
apt-get -y install curl php5-curl libcurl3-dev
7.2.2 Installing ionCube Loader
You should now be able to do this by yourself. Just download the correct version over at http://www.ioncube.com/loaders.php and follow its introductions.
7.2.3 Installing APC and other useful apps
In this section we will install apc (php accelarator), which is developed by the guys who develop php and some apps (htop, iptraf, logwatch, tiger).
apt-get -y install php-apc htop iptraf tiger
Edit /etc/php5/conf.d/apc.ini, so as to increase the memory cache:
nano /etc/php5/conf.d/apc.ini
And append the following line:
apc.shm_size=128
Finally restart Apache:
/etc/init.d/apache2 restart
With htop you can see system info in a better way than top, with iptraf you can see real time statistics for your connection and with tiger you can have yourself mailed with a periodically report of your system's security vulnerabilities (if any exists).
As a lot of scripts/apps send a lot of mails to user root, you can alias root's mail, to a more 'real' email address. So, after you set up a 'real' mail for your example.tld domain, you can edit the aliases and add an alias to root user:
nano /etc/aliases
and change the line
root:root
to something like
root:example@unixlinux.online
After this execute:
newaliases
If you want to install Drupal (or other cms) you will propably need uploadprogress and json. To accomplish their installation, do:
apt-get -y install php5-dev php-services-json
pecl install uploadprogress
touch /etc/php5/apache2/conf.d/uploadprogress.ini
nano /etc/php5/apache2/conf.d/uploadprogress.ini
And append the following line:
extension=uploadprogress.so
Finally restart Apache:
/etc/init.d/apache2 restart
7.2.4 Installing mod_security
Install the apache mod-security 2 module with apt from the Debian repositories:
apt-get -y install libapache-mod-security
Create the folder for the mod-security configuration files:
mkdir /etc/apache2/mod-security
chmod 600 /etc/apache2/mod-security
Download and unpack the mod-security rules:
cd /tmp
wget http://www.modsecurity.org/download/modsecurity-core-rules_2.5-1.6.1.tar.gz
tar fvx modsecurity-core-rules_2.5-1.6.1.tar.gz
mv *.conf /etc/apache2/mod-security/
ln -s /var/log/apache2 /etc/apache2/logs
Configure apache to load the activated mod-security rules:
nano /etc/apache2/conf.d/mod-security.conf
Include /etc/apache2/mod-security/*.conf
To enable mod-security, edit the file
nano /etc/apache2/mod-security/modsecurity_crs_10_config.conf
and remove the # in front of the line:
SecDefaultAction
"phase:2,log,deny,status:403,t:lowercase,t:replaceNulls,t:compressWhitespace"
Then reload Apache.
/etc/init.d/apache2 force-reload
Mod security will now start to block hack attempts to your websites and log the actions in the file /var/log/apache2/modsec_audit.log.
tail /var/log/apache2/modsec_audit.log
You will see very likely some falsely blocked URL's. To whitelist them, you can add the ID's of the rules that should not be used in the whitelist file.
Example:
nano /etc/apache2/mod-security/modsecurity_crs_99_whitelist.conf
SecRuleRemoveById 960015
SecRuleRemoveById 960016
7.2.5 MySQL Tuning
Download tuning-primer.sh and mysqltuner.pl. These will help you to improve mysql's configuration file.
cd /root/scripts
wget http://www.day32.com/MySQL/tuning-primer.sh
wget http://mysqltuner.com/mysqltuner.pl
chmod 700 tuning-primer.sh mysqltuner.pl
To execute them:
perl /root/scripts/mysqltuner.pl
/root/scripts/tuning-primer.sh
The scripts will ask some simple questions (user/pass) and will display in red colour, their suggestions for critical settings. You can use their suggestions to boost the performance of mysql-server.
7.2.6 Installing RoundCube
Following the above instructions you can install roundcube via apt-get. However following another logic (if you have the time and the courage) you can install roundcube in it's own subdomain, manually.
In "Perfect Server ...." you usually install Squirrelmai. However if you don't want it you can remove it:
apt-get remove squirrelmail
rm /etc/apache2/conf.d/squirrelmail.conf
Install roundcube. (You MUST have the mysql administrator's password before you proceed -- Let dbconfig-common configure the database. You will be asked some questions about the password of the db administrator and the password of the new user that will be created for roundcube. Answer those questions and continue:
apt-get -y install roundcube roundcube-mysql
Examle answers:
"Configure database for roundcube with dbconfig-common?" .... Answer Yes
"Database type to be used by roundcube:...Answer mysql
"Password of the database's administrativeuser:" ... Answer your-admin-DB-password
"MySQL application password for roundcube:" ... Answer the-password-you-want-to-give-to-the-roundcube-user
"Password confirmation:"... Answer the-password-you-want-to-give-to-the-roundcube-user
If something goes wrong you can always run:
dpkg-reconfigure roundcube-core
For more information, please see this post.
For everyone to be able to access his webmail (under his domain name) you have to create or edit the file /etc/apache2/conf.d/roundcube so as to set the alias to 'webmail'. If you want SSL you should include the last two directives (IfModule mod_rewrite.c) to have apache ALWAYS redirect to your SSL installation of ISPConfig.
nano /etc/apache2/conf.d/roundcube
# Those aliases do not work properly with several hosts on your apache server
# Uncomment them to use it or adapt them to your configuration
#    Alias /roundcube/program/js/tiny_mce/ /usr/share/tinymce/www/
    Alias /roundcube /var/lib/roundcube
    Alias /webmail /var/lib/roundcube

# Access to tinymce files
<Directory "/usr/share/tinymce/www/">
      Options Indexes MultiViews FollowSymLinks
      AllowOverride None
      Order allow,deny
      allow from all
</Directory>

<Directory /var/lib/roundcube/>
  Options +FollowSymLinks
  # This is needed to parse /var/lib/roundcube/.htaccess. See its
  # content before setting AllowOverride to None.
  AllowOverride All
  order allow,deny
  allow from all
</Directory>

# Protecting basic directories:
<Directory /var/lib/roundcube/config>
        Options -FollowSymLinks
        AllowOverride None
</Directory>

<Directory /var/lib/roundcube/temp>
        Options -FollowSymLinks
        AllowOverride None
        Order allow,deny
        Deny from all
</Directory>

<Directory /var/lib/roundcube/logs>
        Options -FollowSymLinks
        AllowOverride None
        Order allow,deny
        Deny from all
</Directory>

<IfModule mod_rewrite.c>
  <IfModule mod_ssl.c>
    <Location /webmail>
      RewriteEngine on
      RewriteCond %{HTTPS} !^on$ [NC]
      RewriteRule . https://%{HTTP_HOST}:50443%{REQUEST_URI}  [L]
    </Location>
  </IfModule>
</IfModule>

<IfModule mod_rewrite.c>
  <IfModule mod_ssl.c>
    <Location /roundcube>
      RewriteEngine on
      RewriteCond %{HTTPS} !^on$ [NC]
      RewriteRule . https://%{HTTP_HOST}:50443%{REQUEST_URI}  [L]
    </Location>
  </IfModule>
</IfModule>
Edit /var/lib/roundcube/config/main.inc.php:
nano /var/lib/roundcube/config/main.inc.php
and SET some variables in the file (if this is the first time you edit the file the lines are 60 and 66):
auto_create_user = TRUE;
$rcmail_config['default_host'] = 'mail.example.tld';
If you will install the following plugin (the logger that helps fail2ban) you have to extend the list of plugins in the same file. Ifthe only plugin is the one that will be istalled right afterward you have to edit the line (42) as below:
$rcmail_config['plugins'] = array('fail2ban'); Install the roundcube logger plugin from http://mattrude.com/projects/roundcube-fail2ban-plugin/.
Basically you have to download the file (fail2ban.php) and paste it in the fail2ban folder in the plugins folder of roundcube. Finally you must have this file: /usr/share/roundcube/plugins/fail2ban/fail2ban.php. Execute:
cd /usr/share/roundcube/plugins/
wget --no-check-certificate http://cloud.github.com/downloads/mattrude/rc-plugin-fail2ban/roundcube-fail2ban-plugin.1.1.tgz
tar -xvzf roundcube-fail2ban-plugin.1.1.tgz
touch /var/log/roundcube/userlogins
rm roundcube-fail2ban-plugin.1.1.tgz
chown www-data:www-data /var/log/roundcube/userlogins
This plugin will update the log file with each failed login attempt:/var/log/roundcube/userlogins
Don't forget to edit the link for the webmail in ISPConfig (System -> Interface Config -> (tab) Mail) and set it to /webmail. Lastly, restart apache.
/etc/init.d/apache2 restart
You can now access webmail at http://web.example.tld/webmail
Virtual Multiserver Environment With Dedicated Web &MySQL, Email &DNS Servers On Debian Squeeze With ISPConfig 3 - Page 5
Sur cette page
- 7.2.7 Installing fail2ban
- 7.2.8 Installing mod_evasive With fail2ban Support
- 7.3 Extending the Mail Server
- 7.3.1 Enhanced e-mail SPAM protection
- 7.3.2 Installing Postgrey
- 7.4 Securing The Servers Using SSL
7.2.7 Installing fail2ban
Extend the jail.local file that falko suggests in ThePerfect Server - Debian Squeeze (Debian 6.0) With BIND &Courier [ISPConfig 3]:/etc/fail2ban/jail.local
nano /etc/fail2ban/jail.local
You have to append or edit the following:
[roundcube]
enabled  = true
port     = http
filter   = roundcube
logpath  = /var/log/roundcube/userlogins
maxretry = 5
Last (and very important) don't forget to create the roundcube.conf file /etc/fail2ban/filter.d/roundcube.conf.
nano /etc/fail2ban/filter.d/roundcube.conf
with the following contents:
[Definition]
failregex = FAILED login for .*. from <HOST>
ignoreregex =
Restart fail2ban:
/etc/init.d/fail2ban restart
You can check that all jails are active with the command:
iptables -L -n
7.2.8 Installing mod_evasive With fail2ban Support
mod_evasive is an Apache module for handling DDoS attacks. We will install it and configure fail2ban to auto ban/unban reported attacks.
apt-get install libapache2-mod-evasive
mkdir /var/lock/mod-evasive
chown www-data /var/lock/mod-evasive
ln -s /etc/alternatives/mail /bin/mail
nano /etc/apache2/mods-available/mod-evasive.conf
and paste:
<IfModule  mod_evasive20.c>
   DOSHashTableSize 3097
   DOSPageCount 3
   DOSSiteCount 60
   DOSPageInterval 1
   DOSSiteInterval 2
   DOSBlockingPeriod 15
   DOSEmailNotify example@unixlinux.online
   DOSLogDir "/var/lock/mod_evasive"
</IfModule>
Afterwards we activate the module and restart apache
a2enmod mod-evasive
/etc/init.d/apache2 restart
mod_evasive will not detect DDoS attacks. To ban them by IPTables, we have to create the file:/etc/fail2ban/filter.d/apache-dosevasive.conf:
# Fail2Ban configuration file
#
# Author: Xela
#
# $Revision: 728 $
#

[Definition]

# Option:  failregex
# Notes.:  regex to match the Forbidden log entrys in apache error.log
#          maybe (but not only) provided by mod_evasive
#
# Values:  TEXT
#
failregex = ^\[[^\]]*\]\s+\[error\]\s+\[client <HOST>\] client denied by server configuration:\s

# Option:  ignoreregex
# Notes.:  regex to ignore. If this regex matches, the line is ignored.
# Values:  TEXT
#
ignoreregex =
and to /etc/fail2ban/jail.local we add:
[apache-dosevasive]

enabled = true
filter  = apache-dosevasive
action = iptables-allports[name=dos]
logpath = /var/log/apache*/*error.log
bantime = 600
maxretry = 10
7.3 Extending the Mail Server
7.3.1 Enhanced e-mail SPAM protection
The command below enables a stricter SPAM handling for postfix on ISPConfig 3 servers.
postconf -e 'smtpd_recipient_restrictions = permit_mynetworks, permit_sasl_authenticated, reject_invalid_hostname, reject_non_fqdn_hostname, reject_unknown_recipient_domain, reject_non_fqdn_recipient, reject_unauth_destination, reject_non_fqdn_sender, reject_unknown_sender_domain, reject_unknown_recipient_domain, reject_rbl_client cbl.abuseat.org,reject_rbl_client dul.dnsbl.sorbs.net,reject_rbl_client ix.dnsbl.manitu.net, check_recipient_access mysql:/etc/postfix/mysql-virtual_recipient.cf, reject_unauth_destination'
Then restart postfix:
/etc/init.d/postfix restart
7.3.2 Installing Postgrey
Postgrey will eliminate 99% of all spam emails you receive. To install it, run these commands:
apt-get install postgrey
/etc/init.d/postgrey start
The Postfix configuration files are located in /etc/postfix. Edit /etc/postfix/main.cf and add check_policy_service inet:127.0.0.1:60000 to the smtpd_recipient_restrictions.
Then reload postfix's configuration:
postfix reload
7.4 Securing The Servers Using SSL
Last but not least you should follow this tutorial:https://www.howtoforge.com/securing-your-ispconfig-3-installation-with-a-free-class1-ssl-certificate-from-startssl. Don't forget to execute the commands on the right server!
8 Maintaining Our Servers
You should regulary run this to keep your servers up-to-date:
apt-get update && apt-get -y upgrade && apt-get -y dist-upgrade
9 Links/Credits/Sources
Since most is not from me, here are all the links used for this tutorial:
- http://www.faqforge.com/linux/enhanced-e-mail-spam-protection-in-ispconfig-3/
- https://www.howtoforge.com/greylisting_postfix_postgrey
- https://www.howtoforge.com/extending-perfect-server-debian-squeeze-ispconfig-3-p4
- http://spielwiese.la-evento.com/xelasblog/archives/56-Apache-DOS-Attacken-erschweren-mit-mod_evasive.html
- http://www.faqforge.com/linux/apache-mod-security-installation-on-debian-6-0-squeeze/
- http://forum.whmcs.com/showpost.php?s=f876c3e3a7d56bd2f325685a80d746cf&p=16768&postcount=4
- https://www.howtoforge.com/extending-perfect-server-debian-squeeze-ispconfig-3-p3
- http://debian.nimmervoll.eu/tag/debian-logwatch-einrichten/
- http://www.debian-administration.org/articles/530
- https://www.howtoforge.com/securing-your-ispconfig-3-installation-with-a-free-class1-ssl-certificate-from-startssl
- https://www.howtoforge.com/multiserver-setup-with-dedicated-web-email-dns-and-mysql-database-servers-on-debian-squeeze-with-ispconfig-3
- http://debian.nimmervoll.eu/archey-debian-installation/
- http://ajenti.org/
- http://code.google.com/p/ovz-web-panel/wiki/Installation
- https://www.howtoforge.com/installing-and-using-openvz-on-debian-squeeze-amd64